A few dozen people have discovered this old picture of our former dining room (now third bedroom) in our archives and just had to know what was on the walls. Well, we’re here to clear up the mystery. Did the title of this post give it away?
Yup, it’s chalk. Let’s have a closer look, shall we?
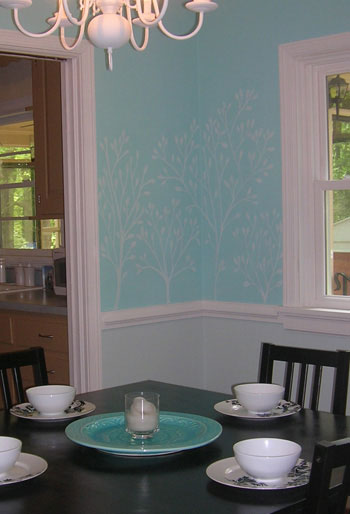
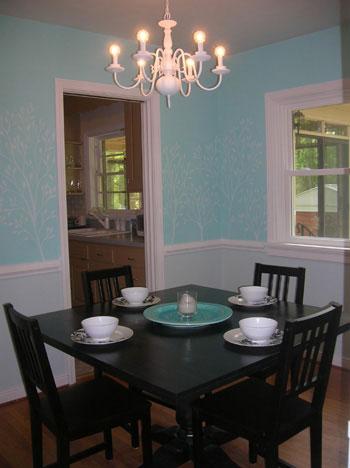
After we painstakingly removed all the wallpaper and painted the walls a bright and happy tone it still felt a bit bare in there, so I grabbed some chalk from the junk drawer and freehanded some leafy branches around the room right over the flat latex paint (which is Sea Spray by Glidden by the way). I fully intended to use a small brush to paint over them with white paint but I actually got lazy and found some spray-on chalk fixative (an old art-school trick of the trade) at a nearby craft store instead. With a few thin sprays it was “sealed” right on the wall. And the fixative didn’t leave any drips or wet spots when we applied it. Whew.
It was still a bit less secure than if I had painted over my chalk branches (if you applied some serious pressure like you were sanding the wall a bit of chalk could be found on your hand) so I would recommend using a small paint brush to trace some paint over your chalk art if you’ll be doing this project in a child’s room and need maximum durability. But for a casually trafficked area like a dining room, chalk + fixative = perfection.
Oh and because everyone loves a good before & after (and this room no longer exists in our house since we turned it into a third bedroom) we thought we’d remind you guys what it looked like when we purchased our house:
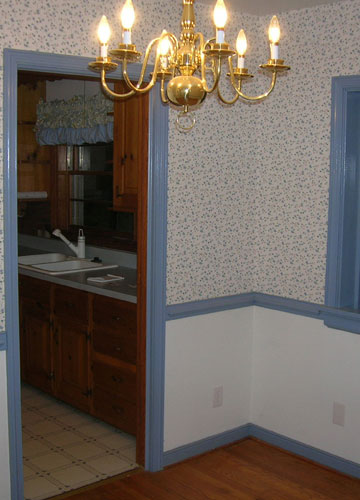
She’s a beauty, eh? And you might notice that the brass chandelier looks a bit sleeker in the photos above. Another quick and easy dining room project of yore was painting the ol’ brass chandy. And it’s really a super simple process. Just remove yours and bring it outside or into a garage and spray it with Kilz or some other spray primer and follow that with two thin coats of regular latex spray paint (in any color that you’d like- it would be just as fab in soft green or sultry red). Of course we removed the bulbs and taped off the bulb holders so they didn’t get coated with paint. And afterwards we even replaced the flame shaped bulbs with clear round Domino-esque ones when we rehung it). Simple, cheap and oh so effective. Happy chalking and spray painting everyone!

Jenny @ Words On Wendhurst says
I’m always amazed at what a little spray paint can do. My husband makes fun of me for all my spray painting…until he sees the final result!
I love that little mural you guys had going on. Wish I had known about chalk fixative when I was working on the stenciling in the guest room!
Kristin @ Domestic Ease says
How absolutely precious!! This would be so cute in a playroom, too….but elegant enough for the adult areas, too!
Blessings!
Kristin
Sarah says
I have that exact same chandelier in my living room and have been meaning to paint it for a while now. I just got more motivated. I am thinking eggplant…
Becky says
Wow, I totally thought that was a stencil project or wall vinyl. So cool that you thought to use chalk.
Abby says
That is so clever! I just recently became a reader and am now OBSESSED! You two do a great job and serve as an amazing inspiration :)
Jen Z. says
What a great idea for a wall. Too bad I don’t know how to draw as well as you do. What a great job you did free hand. Thanks for sharing.
Holly says
This is so cool! I can’t believe I’ve never seen it on your blog before!
Jill Stigs says
You are so talented. I tried to do something like this with a silver marker on black paper and the results were totally laughable!!
And I cannot live w/o spray paint!
It actually looked good as YOUR dining room!!
Sandra says
I love what you did with the chadelier! What did you use to paint it?
Thanks!
Sandra
YoungHouseLove says
Hey Sandra,
We just used spray primer (Kilz) followed by white glossy spray paint from Lowe’s for a few bucks. It did the trick in an afternoon!
xo,
s
Sally says
You are so stinking creative! Thank your for your wonderful inspiration. I think I am going to use this idea in our extra bedroom! Yippee!
Devin says
Is that your same dining room table?? I love that!!!
YoungHouseLove says
Hey Devin,
That’s actually the same pedestal base that we used to make the white table that now lives in the corner of our sunroom (we snagged it at a thrift store and at first topped it with a large wooden square piece of wood from Lowe’s and painted everything black – later we purchased a rectangular wood table that fit into the new dining area better and topped the pedestal base with a round piece of wood from Lowe’s and painted it white for a totally new look). Hope it helps!
xo,
s
Lauren R. says
I agree with Kristin @ Domestic Ease that this idea would be so incredibly cute in a playroom or nursery! What better oppurtunity to take advantage of cool design ideas with chalk then with a kids room.
Megan says
What a cute idea. It looks amazing in the room. And thanks for the chandelier paint tip. I might have to use this in the near future.
heather s. says
I agree that it would look cute in a nursery but it’s too whimsical and cutsey for a dining room.
Blayne says
I had been wondering about that! I noticed this pic because the look I am going for in my kitchen is black and white damask with pops of teal. I even have that platter that you have in the middle of the table! I love the chalk idea, but I don’t think I could free-hand anything that fabulous.
Megan says
How clever! I love seeing the “in between” stages of your home makeover and see how it evolved. Gives hope to us decorating newbies!
Amanda says
I finished spray painting my same exact light fixture last week. My friend’s mom reads my blog and thought the “new” chandelier was actually new. It’s amazing what some paint and the new round bulbs did. We actually kind of like the light now and don’t plan on buying the expensive one I had originally wanted. Thanks for all the tips on how to paint it and which bulbs you used, they were a huge help!
Antonette says
I love the idea of painting the old chandelier. It looks brand new! I have a question though- did you paint the chain too, or just buy a white one? Also, do you think the same technique would work on ceiling fans?
Thanks for sharing!
YoungHouseLove says
Hey Antonette,
Yup, we sprayed the chain as well for a super easy makeover (and we actually did update an old brass and brown ceiling fan with the same technique so we know it can be done!). Hope it helps…
xo,
s
cjm says
Okay, I’m a few months late, but I just saw this post now and am amazed! But I have several really dumb questions: how did you know that you could remove the top of your pedestal table (or did you buy it “topless” {ha ha})? And how did you get the new tops to stay on? Also, did you sand the table before you painted it each time?
I never would have thought of painting a chandelier–it looks spectacular in white. You guys come up with such simple yet amazing solutions to things, it just blows my mind! :) Thank you!
YoungHouseLove says
Hey CJM,
We just peeked under the top of the pedestal table and saw that it had bolts that held the top of the table to the base (which could easily be removed). Then we got a larger piece of wood to create the top and just screwed it onto the base, using the same bolts that had secured the other top to hold the new one in place. Hope it helps! As for how we painted the table, we didn’t sand it and actually just used oil-based primer followed by a few thin and even coats of latex paint and a few more super thin coats of poly. Here’s that tutorial for ya: https://www.younghouselove.com/2009/02/how-to-paint-furniture/
xo,
s
Elle S. says
OMG, how did I miss this?! I love, love love it! However, I am a little confused about the process of doing the chalk over paint – you paint first, then do the chalk design, then paint over it? Sorry, I’m just getting over the flu, so I’m a little…slow today. Great job!
YoungHouseLove says
Hey Elle,
The dining room wall was already painted that color for a while, so the first step is definitely to paint your room the desired background color and let it dry for at least a few days. Then use chalk to draw your pattern on the wall and either paint over your chalk lines (with a thin paint brush in a contrasting color) to “lock in” the pattern with paint (or spray seal the chalk with fixative instead). Hope it helps!
xo,
s
Elle says
Thanks for the quick response, Sherry! I’ll be sure to check back in with pics of the look of shock/sheer terror/excitement? on my hubby’s face when I re-do our master bedroom while he’s at work!
Amy says
Did you do all four walls? Did you have a light switch to work around? Did you treat it like it wasn’t there? I’m trying this in our breakfast nook, but we have a dimmer switch and a phone jack. I’m just ignoring them but I wonder if it’s going to end up looking weird with a big white rectangle in the middle of one of the trees.
YoungHouseLove says
Yup, we did all four walls and actually the vines didn’t reach up to the light switch so it didn’t matter. Oh and if it was in the way we would have just ignored it just like you’re doing. Hope it helps!
xo,
s
Sarah says
Hi Sherry! I am new to the site and am addicted! We recently bought a house and I’m loving all the inspiration that we get from you and John!
What was the “tealish” color of your dining room. I’ve been thinking about a similar color for our spare bedroom…
YoungHouseLove says
It was Freshwater by Glidden, although they may have since discontinued the color. Be sure to ask the paint guys to look up the formula on the computer if you can’t find the swatch (so they can still whip you up a batch). Hope it helps!
xo,
s
Judith says
It is nice to see someone else has ideas like me! Last night I painted my dining room almost the same exact color, but I painted the bottom half of the wall a dark beige. Also sprayed painted my light fixture with a bronze multi-textured paint. I like your idea of the different shape for the bulb. I was just going to change to a frosted, but will try the round bulb now. I had the idea of trying to bring the outdoors in to the wall, but thought more on the line of the beach look. That is why I painted my walls “Sea Glass”. I went online to see if anyone else thought that color was good for a dining room and found your site. I am thinking of palm frones I will let you know how it works! Thanks
Aimee says
Hey guys…I had painted my chandelier before I saw this post. I was using a copper spray paint on a brass chandelier so I hadn’t used primer. The problem I ran into was when the pieces would rub against each other and scratch off the finish. For example: the chain pieces scratched when I was rehanging. I would assume you’d run into the same problem and reveal the white primer no? Is there something you used to seal the spray paint with? Do you have a suggestion on how I can avoid this when spray painting metal?
YoungHouseLove says
Hey Aimee,
Kilz spray primer (or something like it) actually helps spray paint stick better and prevents some scraping and peeling since the paint has a better grip. We definitely recommend it in the future. And you could also add more durability with a spray poly which will seal things (but the primer is really the most important step). Hope it helps!
xo,
s
Amy says
Just wondering about your painting process after removing the wallpaper. Before painting did you use a specific primer on the walls? I have been researching and some say to use Zinsser Gardz and then paint. Some say to use BIN and then paint. And some say to use Gardz then an oil based primer and then paint. Any thoughts? Thanks.
YoungHouseLove says
We scrubbed our walls with hot water until we removed all traces if glue and went straight to water based paint after things dried, but to be safe you could probably use a number of primers with success. The key is really to remove the glue since primer won’t get rid of those sticky patches and they’ll show through and ruin your finish. Hope it helps!
xo,
s