We started 2008 with a home improvement bang like no other.
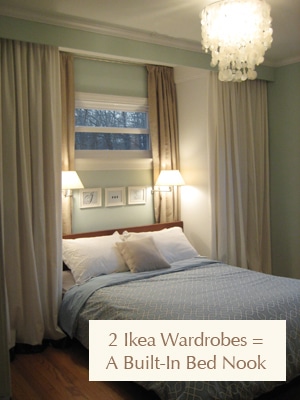
We were up at 8:20 am and on the road to Ikea by 9. What would motivate two sleep-deprived twenty-somethings to get up that early on our last day off? How about the thought of gaining not one, but two more bedroom closets?! That’s right, we finally decided that one tiny closet in the master bedroom (which forced John to keep all his clothes in the guest bedroom) was not enough. So on New Years Day we (fittingly) resolved to do something about it.
Here’s the New Years Day play by play:
8:20 am- Up and at em’.
9:00 am- Hit the road for Ikea.
11:00 am- Arrive. Hightail it to the closet department.
12:30 pm- Leave $460 poorer with two giant wardrobes to flank the bed (plus tons of interior fittings).
2:00 pm- Arrive home. Rest.
2:05 pm- Enough sitting around. The wardrobes aren’t going to put themselves together.
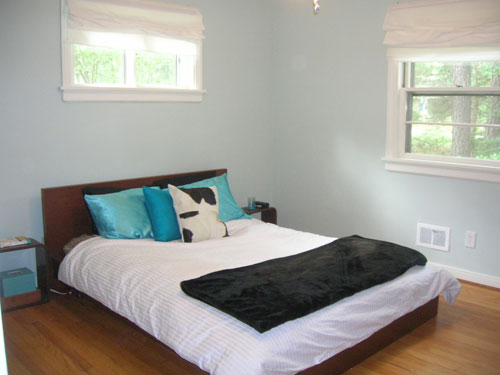
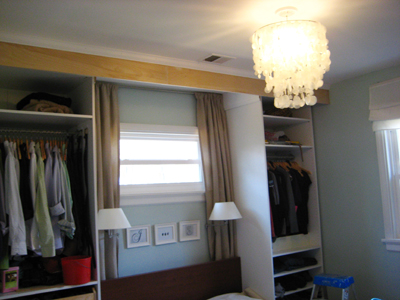
2:06 pm- Forget to shoot a “before” photo, but here’s an old pic for reference:
2:15 pm- Move out the side tables and get out the dreaded allen wrench.
3:50 pm- One wardrobe frame done, one to go.
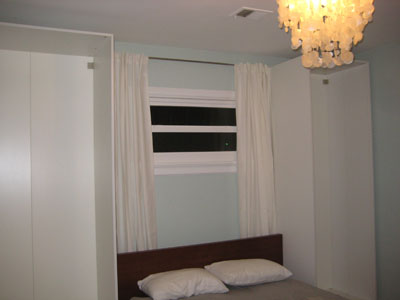
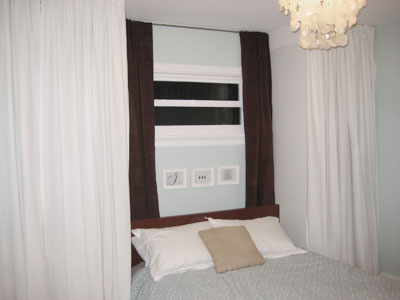
4:30 pm- Build second wardrobe frame. Re-hang curtains on back wall in an attempt to enlarge that tiny window
4:35 pm- Enjoy a victory bowl of cereal after shooting this “during” photo.
\
5:25 pm- Quick trip to Lowe’s to get long screws to anchor the behemoths to the wall, which annoyingly Ikea didn’t provide.
6:15 pm- Install six glorious shelves and a hanging bar in Sherry’s wardrobe.
7:30 pm- Install three drawers and a hanging bar in John’s wardrobe (two shelves were also meant to be added, but we realized we bought the wrong size- d’oh)
8:30 pm- Burger King run. We can’t survive on cereal and home improvement endorphins alone.
9:30 pm- Finally get all of our clothes, shoes, bags, and belts into our two fantastic wonderful beautiful new closets (the guest bedroom closet is now empty- amazing).
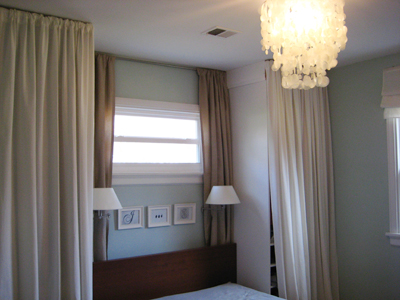
10:00 pm- Hang matching white curtains on both wardrobes. Step back and HATE them (we thought it would look soft and elegant- it wound up looking like a cheap Trading Spaces project).
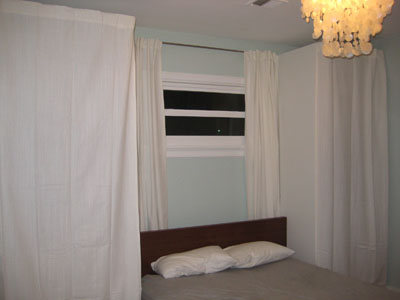
10:05 pm- Realize we both like it infinitely more with the curtains pushed to the side (they look more like fancy built ins, and not like a cheapo bookcase swathed in fabric).

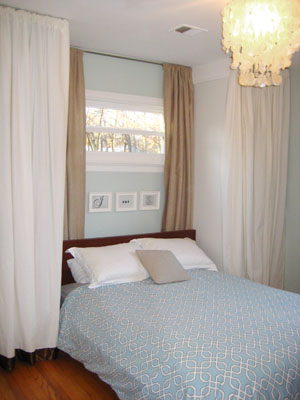
The next few days were full of progress. We ran to Home Depot and grabbed 7 inch molding to add to the tops of the wardrobes so that they appear more flush to the ceiling (bridging that 4″ gap that used to be painfully obvious on top of each wardrobe). Our next stop was Linens N’ Things where we picked up a few heavy curtain panels in rich chocolate brown. Back home we extended the wardrobes to the ceiling with the molding, hung the new brown panels around the window, and rehung the curtains in front of each wardrobe flush with the ceiling. Here’s what it all looks like now that we’ve bridged the gap. The wardrobes were definitely looking better with the gap bridged, but we weren’t so crazy about the dark chocolate curtains.
So we returned ’em and went on a curtain shopping spree. In fact you wouldn’t believe us if we told you how much money we spent. But we’re going to tell you anyway- close to $500. Yeesh. That’s a lotta loot. But we realized we needed lots of different curtain choices to make a final decision, so we got oodles of options (from Bed Bath & Beyond, Linens N’ Things, and Target) and then took them home for a little curtain fashion show (don’t worry, we returned every pair except for our favorites).
Here’s Burger sniffing out the competition:

Although we had many (many) curtain panels to choose from, there was immediately a clear winner. The gorgeous khaki chenille-esque curtains with the subtle crosshatched pattern for a little added texture from Bed Bath & Beyond. Bellisimo.
As our curtain crisis came to a close, then came the exciting hunt for plug-in swing-arm lamps for above the bed. Ok, maybe “exciting” isn’t the right word, but I tend to get a little thrill when I can check any project off my list.
After striking out at several places including Lowe’s (no swing-arms), Restoration Hardware (too pricey) we had just about given up on Richmond’s lighting stock. Luckily, we ended up visiting my parents in Northern Virginia and stumbled upon a Lamp Factory Outlet.
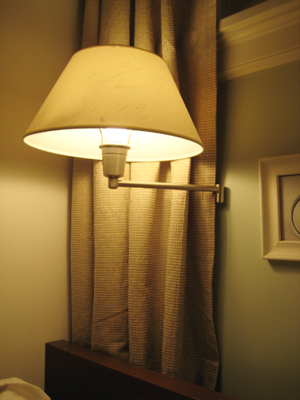
There, amongst endless rows of table lamps and chandeliers, we found the perfect option: two brushed nickel, plug-in, swing-arm lamps for only $40 a piece. About $200 dollars cheaper than most of the other options we saw. We snagged ‘em (the last two in stock!) and as of last night they’re officially swinging from our bedroom wall. We couldn’t be happier with the dramatic result:
The room definitely looks more finished and hotel-ish, so we can’t wait to curl up with a good book and order some room service. Ok, wishful thinking.
Here’s a close-up. You can see how we tucked the base behind the curtain and angled the lamp arm around the edge for a more polished look.
But alas, this project wasn’t quite finished. Instead of having two refrigerator sized boxes on either side of the bed, we wanted them to look more finished. So we decided to mount a wide piece of wood to the ceiling that would hang in front of both wardrobes and serve as a header (to make the bed feel like it’s tucked into a built-in nook). I know that sounds confusing, so I’ll just let a few pictures do the talking.
Here’s a photo of the wardrobes before the header:
And here’s a during shot:
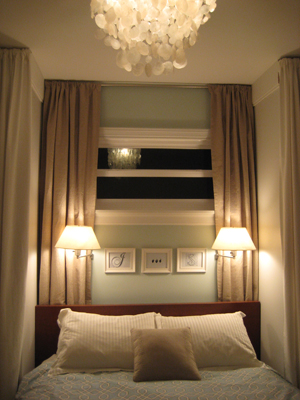
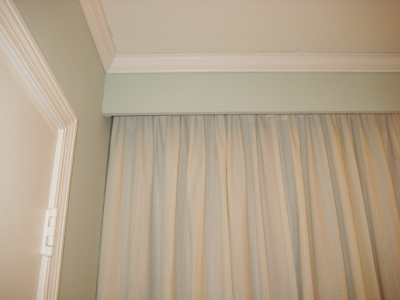
Now I’ll ask for a drum roll. After painting the header and re-hanging the curtains, the eight inch plank of wood makes a major difference. And the crown molding is the icing on the cake. Here’s a detail shot so you can get up close and personal with our new master bedroom built-in:
And here’s a shot of the full monty:
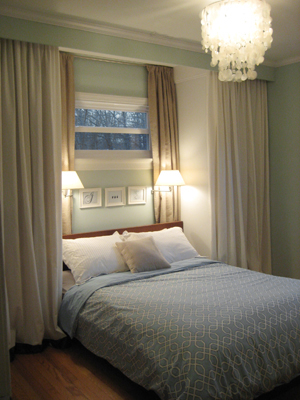
Now laying in bed truly feels like you’re tucked into a cozy little nook instead of squeezed between two large, unrelated pieces of furniture. The whole layout looks a lot more deliberate, which is exactly what we were going for.
So that’s the story of two people trying to turn a 12 by 13 foot room into something special. Fifty year old houses don’t have giant master suites with monster closets and attached bathrooms, so you gotta do what you can to make a tiny room (that looks just like the other bedrooms) appear special. So what do you think? Mission accomplished?
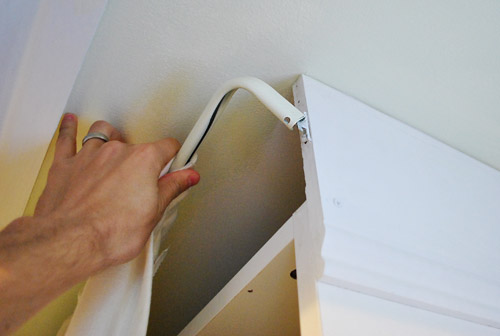
***UPDATE: Since a lot of people have requested them, we snapped some photos of how the curtain rod is attached behind the header on the ceiling. You can see below how it’s a cheap-o curtain rod that sits on a bracket we attached to the piece of molding bridging the gap between the wardrobe and ceiling. We had to hang it down a couple of inches from the ceiling so there was enough room to lift the rod off (you can see the two holes above the bracket proving we learned this the hard way!).

roxy says
Hey Guys~
It looks great!! What a great idea!! One question, I couldn’t help noticing that cool capiz light fixture you have over your bed. May I ask where it’s from?
Take care!
Roxy
Chelsea says
Love the crown molding! Looks great!! Question- do you mind sharing which curtains you ended up going with and where they were from? I LOVE them and think they might work for us… the khaki colored, chenille-like ones with the pattern?? I would really appreciate it.
By the way- your house is just fantastic and a real inspiration to me!!
YoungHouseLove says
Hey Roxy,
The capiz chandelier is from West Elm. There are so many duplicates out there but only one for the price- $99!
Chelsea,
The curtains were from Bed Bath & Beyond. They were a pretty good price (maybe 25 bucks each?).
Good luck girls, and happy shopping!
xo,
Sherry
Carla says
Just found your blog and I must say that this looks awesome. Very cozy and master-y. Which IKEA wardrobes did you use to pull off the look?
Thanks!
YoungHouseLove says
Hey Carla,
We used two Pax wardrobes outfitted with a number of drawers, shelves, and hanging bars for lots of storage. We purchased each unit without doors to save money and just attached a curtain rod at the top of each one for the curtains. Here’s a link to a bunch of different Pax units in a variety of sizes and finishes. Hope it helps!
http://www.ikea.com/us/en/catalog/categories/rooms/bedroom/10997?pageNumber=2
xo,
Sherry
Lauren says
Hi-
Couldn’t make out from the photo how the header was attached. Can you explain? By the way, love your site!
Thanks,
Lauren
YoungHouseLove says
The header is screwed right into a stud that we found in the ceiling (from behind so the screw heads don’t show). Although a handyman helped us with this step, in the future we think we could totally take it on since the only “hard” part was making sure that a stud actually existed (which was quite simple thanks to some knocking and a few nail hole checks). Hope that helps!
xoxo,
Sherry
Regina says
Love the look and your blog. However, I must ask where do you put the alarm clock and/or bedside phone? Do you miss not having a bedside table.
YoungHouseLove says
Hey Regina,
We actually keep our bedside stuff (cell phone, alarm clock, jewelry, contact case) inside each of our wardrobes on a shelf that’s around the height of a side table- which is still easily reached from bed. We just slip our hands behind the curtain and grab whatever we need… and it’s easy and clean-looking since it’s all out of sight. Hope it helps!
xoxo,
Sherry
Sam & Jacci says
John & Sherry –
You know I’ve been reading your blog for a few months now, and here and there I’ve been reading some archived posts. I have to tell you that this is my *favorite* YHL post!!! :) I’ve loved your master bedroom since I first saw it, but this post gives a whole new perspective on how it gradually came about. I especially love the way you shared your trial and error approach to the curtain selection and how you just kept fudging with things until you got the look you were after. Never be ashamed to return what doesn’t work, right? :)
I’ve been reading a lot about interior lighting lately, and I really think your chandelier and wall lights *make* this room. They add that special touch, like a great pair of earrings and a bracelet :) Beautiful!!! And I know y’all are pleased as punch with how it turned out. You should be :)
It’s gorgeous.
Jacci
Sam & Jacci says
And the extra pillows you eventually put on the bed were great choices – little details :)
Amanda says
I was introduced to your blog recently by a coworker of mine. We are both commercial interior designers. We could design all day for others but when it comes to our own homes, we seem to get design brain freeze! Thank you for all your inspring posts. I’m officially addicted!
I have to say this is ultimately my favorite. Partially because my husband and I live in a 60 year old house that has only (2) “closets” (and I use the word closet very loosely). I have finally convinced my husband that we should create this same look in our “master” bedroom. I have just a few questions. What did you attach the curtains to? Are they attached to the wardrobe or ceiling? Also – what white curtains did you purchase for this installation? I know you mention Vivan as your favorite whites at IKEA. Are these the same?
Love the blog! Keep it comin’!
-Amanda
YoungHouseLove says
Hey Amanda,
We actually used cheap thin metal Walmart curtain rods attached to the top of the wardrobes (not the ceiling) so the curtains can be easily removed for cleaning. Thanks to the wooden header (mounted to the ceiling across the whole wall in front of the built-ins) the rods aren’t seen and the whole thing look a lot more seamless.
And although we love Vivan panels they’re too sheer for this job so we went with the more expensive, heavier weight panels (don’t remember the name but they were nice and heavy and cost about $30 for 2 (we went with four so we have two on each side that can part in the middle for easy closet access). Hope it helps! Happy hanging…
xoxo,
Sherry
Anita says
Hey Sherry, I know this doesn’t help you now that you’re finished with your curtain project, but I actually started sewing my own. It’s incredibly easy, saves you money, and best of all you can choose curtain styles and fabric patterns of your choice, and come up with crafty ways to use the remnants.
tara doherty says
I heart this master suite…I was wondering are both of the PAX wardrobes the same size??? And can I ask what size they are???
Thanks..
td
YoungHouseLove says
Hey Tara,
They’re actually slightly different sizes since the window isn’t centered but by hanging curtains to cheat the window a bit towards the middle of the room and using two slightly different sized wardrobes it makes the whole wall seem a lot more symmetrical. We think John’s is 39″ wide and mine is 29″. Hope it helps!
xoxo,
Sherry
John says
Hi, my wife and I are having a disagreement about the lamps – I think your lamps are on vertical stands that extend all the way to the floor hidden behind the curtains and the bed and she thinks they are lamps with a short arm screwed into the wall behind the curtains. Which is it? We’re dying to know.
YoungHouseLove says
Hey John,
She’s right! They’re wall-mounted swing arm lamps that peek out (thanks to their long bent arm) from behind the curtains. They’re actually plug-in versions since we had an outlet conveniently located nearby so we didn’t even have to hardwire ’em. Hope it helps!
xoxo,
Sherry
Jessica says
I just wanted to let you know that the Domino Magazine link at the bottom of this post no longer works – I’d love to see this example if you are able to find a link that works!
This bedroom is amazing! I am going to close on a house in July and the bedrooms don’t have very big closets – I might try to get my husband to agree to take on this project with me!
YoungHouseLove says
Hey Jessica,
Sorry that link at the bottom over to Domino magazine wasn’t working for ya (they’ve since folded and closed down their site). Very sad. It was basically a similar solution to our built-in storage project except they created an arch of cabinetry that stretched over the head of the bed as well (since there was no window there). Hope it helps!
xoxo,
Sherry
Jaedyn says
Oh wow! I love this transformation so much! We also have an old home (built in the 40’s), and have been scratching our heads trying to figure out a good layout for our master room. A closet had been built as an afterthought, and it cuts into our space, making it impossible to have a nice “flow” in the room. But this is completely PERFECT for our room!! I’m definately doing this to our space! Thanks for the inspiration!!
Julie says
Hi! My husband and I just bought a tiny, mostly remodeled home and I came across your site while exploring paint colors. I love what you have done and you’ve given me great ideas.
We too are considering the Ikea wardrobes because the master doesn’t have a closet (at all). Have you been happy with them? Did you consider the actual sliding doors that they sell vs. the drapes? I need to go look at them at the store to fully grasp what they look like and all the “inner components.”
YoungHouseLove says
Hey Julie,
We actually considered doors but since we knew we’d be sleeping between them (and because John gets up a bit earlier than me) we liked the fact that curtains don’t slam like doors (they’re very quiet to slide open and shut). We also actually got two differently sized wardrobes (the window above the bed is off center, so John’s wardrobe is a bit wider than mine) and in using two differently sized wardrobes, only one of them could be fitted with doors (mine was a less regular size so it didn’t come with a door option). Needless to say, this made curtains seem like the way to go! And over a year later we’re still loving everything about them. They’re easy, convenient and they really add ambiance and softness to our master bedroom. Hope it helps!
xo,
Sherry
Kara says
Oh my gosh, I stumbled on your site today and LOVE it!!! We bought an old 50’s home for our first house and have been redoing everything. We also are huge IKEA and West Elm fans (I have the same capiz shell lamp!) I really love what you did with the bedroom and think that would work great for our master bedroom since my husband currently has NO closet space. We would be covering up a window with one of the wardrobes and in the center would just be our wall and headboard. My question is, should I still put up curtains in between the wardrobe to complete the look or should I just go with some artwork?
YoungHouseLove says
Hey Kara,
So glad you found us! If you don’t have an exposed window that’s visible between the wardrobes I would definitely hang some art work in lieu of curtains (or even a curvy round mirror to bounce around some light). Hope it helps! Happy decorating…
xo,
Sherry
tiggyT says
hi Sherry,
what you’ve done with the bedroom is fantastic, getting such a sleek finish is especially impressive considering the dimensions are unsymmetrical. i was just wondering what you do to block out the light from the window when you want to sleep – do the curtains close over the lamps or is there a blind somewhere that i can’t see?
i’ve only recently found this site –
*LOVE* your home, it is the perfect blend of cosy and stylish!
tig
YoungHouseLove says
Thanks Tig! We actually have a roll down shade to block out the sunlight that hides under the white roman shade on the bigger window, and we leave the smaller window above the bed uncovered since the sun doesn’t rise from that side of the house so the room remains pretty dark even without it covered. Hope it helps!
xo,
s
Joelle says
John and Sherry,
I love you site and all the things you have done to your house! Question – our bedroom has a vaulted ceiling but I am in love with the way the molding looks against your wall color. Can you put molding up in a vaulted ceiling or would that look weird?
Thanks!
Joelle
YoungHouseLove says
Hey Joelle,
It really depends how things work out, but implementing our built-ins with a vaulted ceiling could still frame the bed out nicely and look great. You’d definitely have to be sure that they look wall to wall like ours (since freestanding boxes will look out of place if they’re not visually attached to the room in some way) and hopefully you can still add that decorative molding for a polished and grand look even though they won’t meet the ceilings at the top. Hope it helps!
xo,
s
Jessica says
Where did you get the ceiling light from?! I love it! :)
YoungHouseLove says
West Elm- we love it too! It’s not available there in the round shape anymore (although there’s a similar capiz chandelier that’s rectangular) but perhaps google or ebay will help you find one that’s a closer match (or even identical). I’d search for “capiz chandelier” and see what comes up. Hope it helps!
xo,
s
Wendy says
I come via ikea hacker. I love your added closet space. It looks fabulous! I am also part of a young family with an older house (1958), but we have a walk-in master closet(!) that is original(!!).
YoungHouseLove says
Hey Wendy,
So glad you found us! I can’t believe you’re the lucky owner of an older home with a walk-in closet in the master bedroom. Talk about hitting the jackpot!
xo,
Sherry
Jill says
Well, this is crazy…. I just stumbled upon your site last night doing a search for toilet paper storage and then this morning, you’re featured on IKEA hacker! And to top it off, it looks like at least one of you lived in the new dorms at UVA (as did I!) Small world. Awesome job on your site and your home!!!!
Amy says
I don’t remember how I found your blog, but I love it and I LOVE the work you did on this bedroom. Question: where did you get your pretty blue bed cover (comforter or duvet)? I love white print on it!
P.S. For your readers, I think you can still find a round capiz chandelier at Cost Plus World Market for only $65.
YoungHouseLove says
Hey Amy,
Good to know about the chandy at World Market- thanks! As for the duvet, it’s from West Elm but is no longer available. Maybe ebay? Happy hunting…
xo,
s
Laurie says
I just got hooked on the Ikea Hacker web site. You’ve done a beautiful job with your home!
When I first looked at the picture of your bed I thought the dog was a toy. I had to look again and read the comment! LOL
Ashley says
i love your site! we just bought a new home and i am feeling a little overwhelmed with all the emptiness to fill. i was wondering what color paint you used in your master bedroom?
YoungHouseLove says
Hey Ashely,
Our master bedroom is Glidden’s “Gentle Tide.” You can check out a full room-by-room breakdown of all of our paint colors here: https://www.younghouselove.com/watching-paint-dry/
Have fun with your new home. We know it’s overwhelming at first, but just take your time and enjoy the process!
-John
Melissa Stinson says
I found your blog via IkeaHacker, and I just wanted to say that I LOVE what you did with the room!! The wardrobes tryuly do look like they were built-in now.
My husband and I also have a 50-something year old little house with small rooms and not much closet space, so I’m definitely bookmarking this idea away as a possible project for our own space. :)
Annalea says
Awesome. Beautiful. I’m so gonna steal this when DH builds us our 30′ x 30′ log cabin. ;o)
Great job!
Jen @ blissfully caffeinated says
So, so gorgeous! And smart! I wish my husband and I were that crafty.
I cracked up at “the dreaded Allen wrench.” It’s so true. I cry a little every time we have to build something from Ikea.
Off to dig into your archives!
Heather says
Hey there,
I just stumbled across your blog and let me tell you, i am SO inspired!! My husband and I will be closing on our home within weeks and I have been looking for storage ideas as the house does not have many closets and the rooms are on the small side. I LOVE LOVE how you used the ikea wardrobes in your bedroom. Your whole house is beautiful. One sidenote however, the pictures of the process you went through in putting up the wardrobes do not seem to be showing on my computer. Nor do the pictures of your floorplan. Any idea on what i can do to be able to view them? Any input would be appreciated. Also, another question…out of curiosity, what are the dimensions of your bedroom? I will be in touch as i start working on my own home within the months to come. Thank you for your ideas and for helping me to become EXCITED rather than overwhelmed about the upcoming process!
*Heather*
YoungHouseLove says
Hey Heather,
We’re so excited you found our site and we’re sorry about the pictures not loading! We’re actually switching everything to our new site: younghouselove.com so in the transition things might be a little choppy but they should be up and running asap (in fact some of them are even up now). Oh and our bedroom is 12×13. Good luck with your own home makeovers!
xo,
s
Robert says
Great site… We just purchased our first flat here in London. If you’re ever planning on being in the area then we have a job/major challenge for you. One bed flats here are exactly overflowing with storage space and I’m running short on ideas.
Would you have any suggestions for storage over the door frames without making it look like you just chucked a couple of cabinets over them? That’s the best I’m coming up with at the moment.
Also, Thanks for the idea on the wardrobes. We were dreading the thought of Ikea but you made them look great, these will save us a minimum of $2000 from the other options we had considered. The main difference we will have will be the lack of a window above the bed so I’m wondering how I can dress it up without having that feature or highlighting it like you have. Any thoughts?
Thanks again,
Robert
YoungHouseLove says
Hey Robert,
Instead of a window above the bed you can hang a big mirror (which will create the same effect and bounce around lots of light) or even hang a nice piece or art or an unframed canvas up there for a nice little focal point between the built-ins. Either way it’ll look just as lovely as a window! As for the shelf above the door question, I have no ideas other than to select something crisp and clean like a nice white floating shelf and maybe carrying it across the whole wall of the room (or even around the entire room) to create a sleek ledge for storage that doesn’t look very temporary or tossed up (and resembles the look of a custom built-in more). Hope it helps!
xo,
Sherry
KT says
I am getting very addicted to your site. We live in NoVA and are in the process of searching for a home to buy (put an offer on one this week). I love how you updated your bedroom, would you mind sharing the name ofthe lighting store you used? I have a feeling we will be needing to update a lot for whichever home we end up with. Please feel free to email if you prefer.
YoungHouseLove says
Hey KT!
So glad to hear you’re enjoying our site. We got the swing arm lamps at the Lamp Factory Outlet store located in the Fair Lakes Shopping Center. Here’s their website: http://www.thelampfactoryoutlet.com/. Hope that helps!
-John
Debbie says
I love your master bedroom makeover. I husband and I moved into a 15 year old split level and have NO CLOSET SPACE. I have one question about your room… did you have a closet to begin with? If yes, did you keep that space as well?
Thanks so much, and your directions for painting cabinets were very helpful!
YoungHouseLove says
Hey Debbie,
Yes, we did keep our tiny existing closet for hanging full length things like suits and dresses (since the wardrobes only have shelves on the bottom half). Hope it helps!
xo,
s
Elizabeth H. says
We just bought a ranch built in 1957 in Denver, Colorado last friday! Needless to say, your blog came around at just the right time (I think your wedding was featured on Snippet & Ink?) We are facing a similar issue in our bedroom…gotta love the “closets” in a house from the 50’s! I know that your blog is going to be a great resource as we begin to renovate…after our wedding in September! Thank you for sharing!
aiisa says
OMG! Reading your story of the master bdrm makeover had me laughing my head off (& my kitties looking at me like I am _crazy_). You guys totally pulled this off! I tried something similar in an old apt, but it did not work out, and I ended up reselling the PAX and reconfiguring my closet instead. Once again, great job!
ShopKim says
That is a truly amazing transformation. I wish I had a portion of that kind of talent.
Linda says
LOVE IT! You are both very creative and full of great design sense.
Thanks for sharing and inspiring us! Linda
Kristy says
That is amazing. Love your ideas. Can you tell me the brand of closets from ikea or the web address? I can’t seem to find the ones you used. Thank you~
YoungHouseLove says
Hey Kristy,
The wardrobes are from Ikea’s “Pax” series (in white without doors). Hope it helps!
xo,
s
Erica says
Hi,
I have embarked on this project too! I NEED HELP! First I found two identical wardrobes on craigslist that were the right size $20. I brought them home last night and put casters/wheels on them (I have a dog so everything has to be on wheels so I can vacuum) NOW, I am trying to put up the header and I have an old 50’s house with plaster ceilings. I got the wood and some brackets. I also got these plastic screws that are supposed to be really strong in plaster. I don’t think they are going to be secure enough. I know I will have nightmares of this header falling on me in the middle of my sleep. So I started drilling and looking for studs. I can’t find any in these plaster ceilings? HOW DO YOU FIND A STUD IN A PLASTER CEILING? HOW DID YOU ATTACH YOUR HEADER TO THE CEILING?
I hope you get back to me soon! I am in the middle of this project. . . and need advice.
THANKS
XO,
e
YoungHouseLove says
Hey Erica,
We actually had a handyman friend come over and help us with our header because we had a hard time finding studs in our plaster ceiling as well. He was able to go up into the attic and look at the way the beams ran and knock on the ceiling until he found one. Then of course to make sure we were right on it we drilled a screw in and it held like crazy. If you hit a stud you won’t need plastic screws or crazy anchors since good old long metal screws will hold your wooden header into the wooden beam overhead like a charm. Hope it helps! And don’t be afraid to ask for help from a handy friend or even hire a handyman for the day to get that header up and keep yourself safe from falling lumber in the middle of the night. Trust me, it’s totally worth it!
xo,
s
erica says
so,
I went up in the attic and did just that. It’s the only way to find them that worked. Love this project. . . curtains tomorrow.
Thanks for the ideas and help!
Jennifer says
Looks beautiful. Very inspiring. Windows over the bed are tricky. One question – how do you cover the window at night? The lamps look like they prevent the curtains from closing.
YoungHouseLove says
That window is on the opposite side of the rising sun so it stays uncovered all night. We do wake up with a bit of light in the room but nothing too bright (which actually helps us get up). Hope it helps!
xo,
s
kate says
Where did you find you duvet cover/ comforter?
YoungHouseLove says
Our bedding is from West Elm but they no longer sell it so you’ll probably have your best luck on ebay. Good luck!
xo,
s
JillyB says
I’m working on a similar project in our closet-less, 109-year-old mill house. How did you hang the curtains in the closets? I can’t decide if I should hang a rod inside or outside the top of the closet frame. Thanks!
YoungHouseLove says
Hey JillyB,
We used cheap metal curtain rods (sort of shaped like a long “U” and attached them to the sides of the baseboard that we used to extend the top of the wardrobes to ceiling height). In essence, they protrude outside the top of the wardrobes and the curtains drape down to the floor in front of both of them. They really didn’t look finished until we hung the wooden header from the ceiling to obscure the bunched curtains over the tops of the rods. Once that was up everything looked built-in and seamless. Hope it helps!
xo,
s
Jenny says
That project turned out awesome. We are currently renovating our house, which was built in 1890. The closets are small and had 3 hooks each. That was all!!!! Too bad I don’t just have a work dress, a sunday dress, and my everyday dress. haha!
prettythings says
I have to say, I’m totally loving your site, and this bedroom make over is Over The Top! I can’t get over how you transformed this room with Ikea wardrobes, fabric, paint and a header (okay, maybe I’m over simplifying here)for a gorgeous custom look!
We’re getting ready to put our house on the market (a 50’s craftsman cottage) and looking at wonderful old homes in CT… your work is making me impatient to move ASAP and get started on dream renovation projects! Love it!
YoungHouseLove says
Aw thanks PrettyThings! It’s still one of our favorite makeovers to date because it felt like such an impossible situation (boring small and boxy room with no closet space) that we somehow transformed with some pretty affordable materials and a lot of hard work.
xo,
s
Steph says
Your blog, your life, your marriage, your house…. it’s all amazing!
I have a quick question about the light in your bedroom – I’m looking at something similar for my bedroom but I’m concerned it will not be bright enough for me to see the interior of my wardrobe (a somewhat similar set up to yours). Do you find that light bright enough for day to day stuff?
YoungHouseLove says
Good question! The good news is that it’s plenty bright. In fact it might be brighter than something with a fabric or paper shade since it’s more breezy and open so light just radiates from it. We LOVE ours. Hope it helps!
xo,
s
Rachel says
Working on this project- on a smaller scale. Our room is a few feet smaller- so we can only fit the 20″ wardrobe on either side. But we have a very similar floor plan with only small closets in each of our 3 rooms. To me- every little bit of extra storage helps! I am wondering- where did you find your bed? We love the simple clean lines and it is harder then I assumed it would be to find a bed without all of the frills. We currently have a homemade headboard, circa 2004, which I am a bit bored with. And can you suggest where to get the floor to ceiling white curtains used as doors.
Oh and before I forget, is there a gap between the wardrobe and the walls? I thought I saw a picture with a gap that the curtains cover nicely. Just wondering if we need to take the trim off at the floor level. Thanks for your help!!!
Rachel
YoungHouseLove says
Hey Rachel,
Our bed is the Malm bed from Ikea. Cheap and simple (plus you save money on a boxspring since you don’t need one with a platform bed).
When it comes to the small gap you see on the left side, we intentionally fitted the wardrobes perfectly on either side of the bed for a seamless look when the curtains are drawn but there was still a bit of space between the left wardrobe and the wall, which we actually use to store our ironing board. Gotta love turning a negative into a positive! The best part is that once the curtains are drawn nobody knows the built-ins aren’t perfectly fitted.
As for taking off the baseboards, just see how things look. We didn’t need to remove ours for a seamless look since the curtains obscured any gaps (because we were sure to hang them totally flush to the wall). Hope it helps!
xo,
s
jessica says
i just found out about your site from my aunt..& i can’t tell you how happy i am that she sent it to me!!!! We have exactly the same problem in our bedroom(although our house was built in the 80’s so we don’t have any of the charm of a small, older home :D ) as soon as my husband came home, i showed him what you guys did & he was excited too!! I can’t wait to do our project!! Besides that it seems like your site is a WEALTH of information for all the issues we’re currently facing in finding space in our 800 sq ft home..In fact as I write this, I’m sitting in my new “office” my hubby made from our front closet..! 3 shelves & a table top & filing cabinet. Anyways, thanks for this site and I’m looking forward to finding more gems that I can translate into my house!! GREAT JOB!
Heidi Harder says
I like your website! Do you think this set up could work with a dining/office room, with the desk being sandwiched in the middle of the two closets? It is the first room you see out in front of you when you first walk in the house. Also, where did you get your ceiling to floor curtains? Thanks-Heidi
YoungHouseLove says
I would definitely go for it. Nice workable layout it sounds like. Hope it helps!
xo,
s