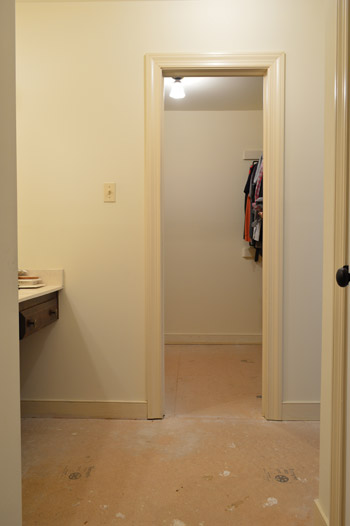
I realize four months isn’t an eternity, but it was about 3.9 months longer than we wanted to spend with the last vestiges of the old carpet upstairs. Especially since it was in our bathroom. Ah, carpeted bathrooms.
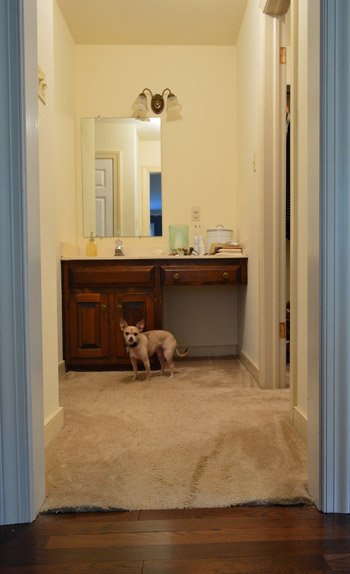
We didn’t remove it – or the portion that extended into our closet – back when we removed the rest of the upstairs carpet because we knew we didn’t want hardwood floors in the bathroom. So, in the absence of a new flooring decision, we just left the old stuff. The old, wrinkly, creamy stuff that blended right in with the creamy walls and creamy trim.

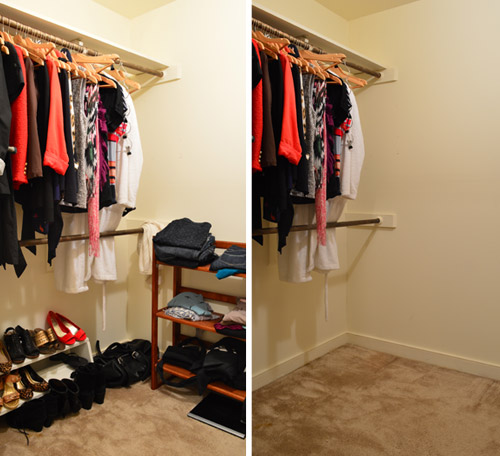
But yesterday morning (yup, about 24 hours ago!) we decided to oust the carpet for good. So we cleared out the floor of our messy closet for full flooring access.
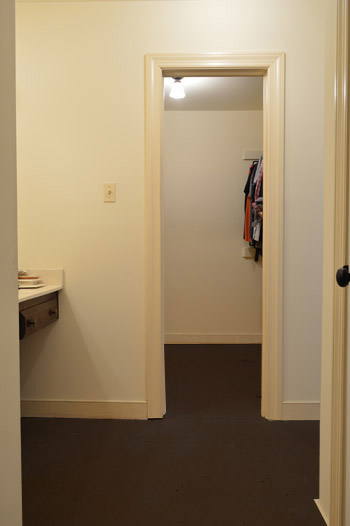
We covered the steps for removing our carpet in this video, but here’s a quick recap of how it went down came up. First we yanked the carpet loose from the tack strips that held it in place along each wall, then rolled it up and removed it. Next went the blue foam padding, which easily tore up from the staples that kept it down. These were the fast and easy parts.
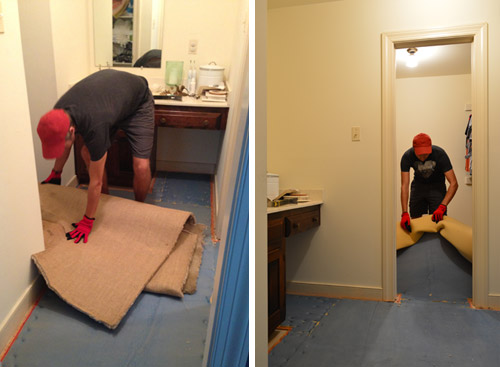
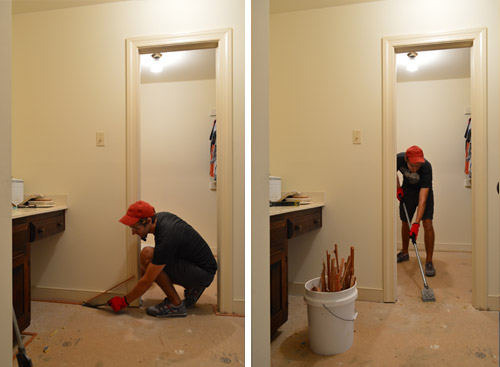
Next was the get-sweaty phase: prying up all of the tack strips with a crowbar and then using a floor scraper to pop all of the staples out. This, plus sweeping and shopvac-ing the whole space clean took me a solid hour.
Meanwhile Sherry was in the garage getting something else done (weekend naptime = a mad dash at as many projects as we can squeeze in) but we’ll get to that in a second.
Now’s the part where you probably expect us to tell you about our plan for new flooring… buuuuut we don’t really have one yet. Well, I mean, long term we want to tile the bathroom area, but that first involves lots of demo so that we can combine the sink area with the shower/toilet area for a nice big open space (we don’t need two single sinks separated by a wall, and much prefer one larger bathroom instead of two smaller choppy rooms). We may eventually end up putting hardwood in the closet, or maybe a wall-to-wall low-pile jute rug or something. We have enough leftover wood flooring to make that call later, but big bathroom & closet reconfigurations are things we like to do after we live in a house for a nice long time before rushing into stuff, so they’re not now plans, they’re later plans.
We’re pretty sure our “for now” plan is to paint the particle board with a floor paint so it at least looks a bit more finished and doesn’t feel as, I dunno, dusty? Then we can toss down a few sheepskins or area rugs/runners to cozy things up in the meantime before making any much-harder-to-redo decisions like knocking down walls and tiling floors.
We also debated peel and stick floor tiles or buying a large seagrass rug and cutting it to lay it wall-to-wall in both spaces, but we both thinking paint + area rugs will serve us well in the short term without being a whole lot of money/effort that we’ll later end up undoing. Since our future tiling plans would require us to rip this stuff up and put backer board in place anyway (you can’t tile over particle board since it’s not a secure base – even if you screw backer board on top of it) there’s no harm in slapping some paint on it in the interim.
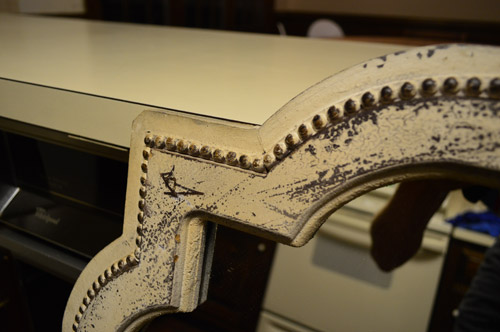
But this post isn’t just to tell you about our somewhat short-sighted “must get this carpet out of here!” adventure yesterday. It’s also to tell you about this mirror that we spotted at HomeGoods last week. As soon as we saw it, it gave us flashbacks of the quatrefoil mirror that we hung above the sink in our last bathroom. I should clarify: these are the good kind of flashbacks.

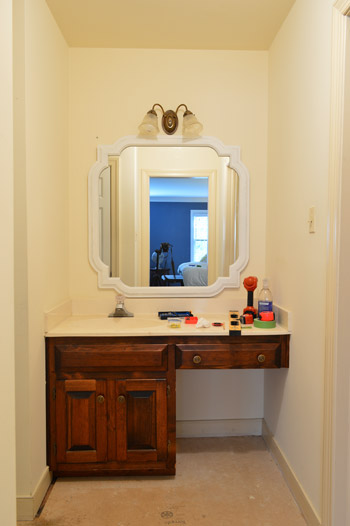
So since we were in desperate need of a bigger mirror over the vanity (see the first photo in this post for proof) and we knew it would bounce a whole lot of light around our closed off little sink nook (while sort of mimicking the look of a nice big window) we were sold. It was huge (over 40 inches wide!) so we thought $89 (down from $299) for such a large mirror with an interesting shape was a good deal, too.
We also liked the little beaded detail around the border, but the rustic paint job wasn’t doing it for us.
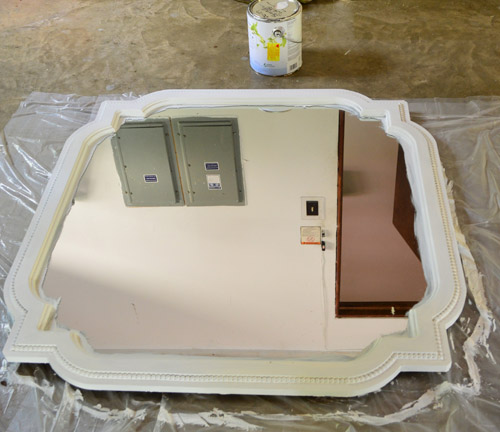
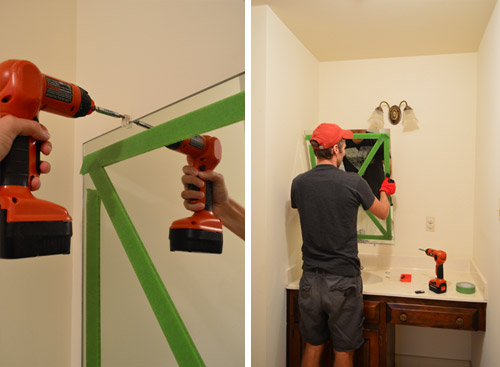
That’s actually what Sherry was doing in the garage while I yanked up the old carpet. She laid out our new mirror on a dropcloth and primed and painted it. It ended up needing one coat of primer + two coats of white paint (she used eggshell Simply White paint leftover from Clara’s bedroom walls because we thought a less glossy finish would be nice with the textured detailing). We debated going with a color instead (and even considered the dark blue tone from our nearby bedroom walls) but decided we’d rather do something on the walls or the vanity before going bold with the mirror. That way it would still look window-ish with a big ol’ pane of glass + a white almost-rectangular frame around it.
Removing the frameless half mirror upstairs was nice and easy, thanks to no adhesive behind it (thank goodness). We just had to loosen the clips that were screwed in on the top and bottom and out it came. No shattering. No seven years of bad luck.
Then we hung the new mirror… and it looked ridiculously cramped. Harumph. Our measurements told us it’d be tight, but we didn’t expect it to look this “cozy.”
After throwing a brief and solemn pity party, we figured out a pretty simple solution. Nix the light fixture – just for now. There are two lights in this little nook (a ceiling light and the one that was mysteriously not-at-all-centered over the old mirror, so we decided we could safely cap the wires and install a fixture box cover – that way we could hang the mirror higher. Then once we find a fixture that we love for above the mirror it’ll be easy to move the fixture box about a foot higher to sit nicely above the new mirror without cramping it and install a new light fixture (since the wires to the fixture box come down from the attic, moving it up should be a really simple process). We just want to wait to see what light fixture we find before moving the fixture box prematurely, since the measurements of the light will inform where we place the new fixture box.
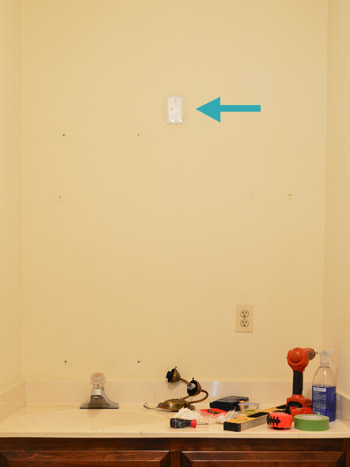
With the fixture box safely sealed off, we could raise the mirror to exactly where we wanted it – about 6″ above the top of the counter (rather than nearly resting on it like it was doing before). It actually completely conceals the covered fixture (we also temporarily capped and covered an outlet, which is also on our to-be-moved list). But future electrical-to-do-lists aside, we’re very pleased with the progress that our bathroom made yesterday. The floors may not be prettier yet, but the mirror makes the space feel much bigger already, and even though the vanity is a lot heavier on one side, the nook is already feeling more balanced.

And because impatience (to get rid of the carpet) and serendipity (finding that mirror) kind of got the mental wheels spinning about this room, we’re starting to formulate a vision for some other quick and easy updates to tide us over until we work up enough steam and funds for a full gut job down the line. Sherry even Photoshopped a bit of what’s swirling around in our brains right now. Warning: we’re still in the “changing our minds every second” phase of this project since we just started it 24 hours ago, so who knows where we’ll really end up.
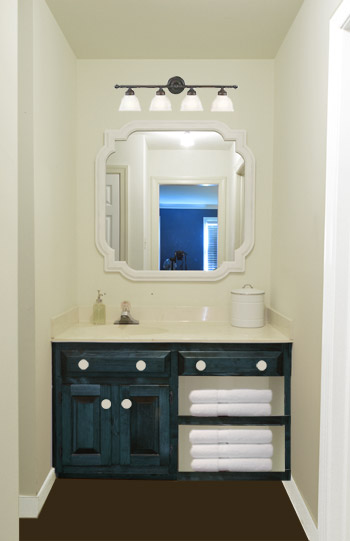
Obviously there’ll be wall and trim painting (so don’t mind the unchanged wall color above – we just have no idea where we’ll end up yet, so we’ll have to get swatches and see what we think). We’re also planning some sort of paint or stain on the vanity (maybe a muted grayed out navy?) plus some new knobs for contrast. The floor will likely get the aforementioned paint treatment, and I thought we could make use of the dead space on the right side by building some open shelves for towel storage (although we have also debated just closing that in and trying to locate matching doors for a completely-concealed front. And of course we want to move up the capped fixture box and add a vanity light after we find one that we like.
But for now, we’re just excited to be rid of the old carpet and to be diving into a new corner of the house. What did you guys do this weekend?

Isabel says
Like everything, carpet is a personal choice (I personally don’t like them) but I will never understand carpets in places like bathroom and dining areas where dirt and water are at a premium. I really like your idea of making the right side of the vanity open storage; you could even have baskets that you cover inside with a fun a fabric so it sticks out for a bit of color or have a pouf in the bottom “shelf” like in your previous house, I thought that looked so cute. We (FINALLY!!) finished the outdoor shutter/window frame/door paint updates and also re-painted the living room walls a delicious creamy tan (BM Shaker Beige). We did not get the paint right the first time so this time we tested with a few different paints before finding the right one, so worth it!
YoungHouseLove says
Wahoo! Exterior painting is no joke. Congrats on getting that done Isabel!
xo
s
Lisa says
I just recently finished painting my laundry room floor as a short term fix for the 25+ year old ugly linoleum. Two coats of primer, two coats of floor/porch paint, lots of frog tape to create fun stripes and two more coats of floor paint in a different color followed by two coats of water based polyurethane and the floor looks so good it may not just be a short term fix.
YoungHouseLove says
Sounds so pretty!
xo
s
Teresa says
My first thought when you said you were taking down the too-low vanity light was “hey, they could put in side lights now instead of above the mirror lights.” Overhead lighting in a bathroom mirror tends to be very unflattering (aging). The reason I know this for sure is that one hotel I stayed in had side lighting and I couldn’t believe how much better I looked in that mirror! I realize you don’t have much space on either side but you might consider it if you found something appropriately sized.
YoungHouseLove says
That’s another fun idea! Thanks Teresa!
xo
s
Maggie says
Seconding this suggestion! As a decorator, I’m always trying to spread the word that mounting lights to the side, not above, is IMMENSELY more flattering. The light is more even on your face and you don’t get shadows on your face (think of the Hollywood dressing rooms – you want even light surrounding you for putting on makeup, etc!). Plus, they are unexpected and look awesome.
Susanna says
That is awesome! I’m so glad i’m not the only one who suddenly thinks: this has to go! This has to be changed! Like right now! Lucky you that both of you guys are the same :D my bf always stops me because he is a lil self-doubter (does that word exist? I’m not a native speaker …?). He always needs to plan ahead before he does stuff and calls me crazy, so I’m really happy the two of you just go for it as well sometimes ;)
Sending you all the best from germany,
Susanna
Donna says
For Future Reference:
I like my closets carpeted as well, and since they are usually not too large, I think it would be so fun to have a printed carpet in mine. A graphic, fun animal print, etc, really makes the space seem fun. Hang a crystal chandy and wha-la! instant fun space!
YoungHouseLove says
Ooh la la, sounds like fun.
xo
s
Niki says
God bless you! We do not have a nook; but, we do have a similar vanity situation (that little area w/nothing there). I LOVE the idea of putting shelves there (for now). Thanks for putting the dead zone to use!
YoungHouseLove says
Aw, thanks Niki! Good luck!
xo
s
Ashley says
I live in a two bedroom house that shares a bathroom and the additional vanity sink is tucked away in the master. I love your idea of additional storage where the open space is for the vanity stool. I will definitely need your step by step directions to achieve a smiliar look. :)
Jamie Maier says
Love your photoshop redo especially the blue cabinet! I like the open towel shelving.
Jill says
What are the dimensions of this countertop? How wide and how deep?
YoungHouseLove says
It’s 49″ wide by 22″ deep.
xo
s
Naomi says
such an improvement all ready! I worked on a huge playground restoration in our little town this weekend. I helped build the original when i was 9 so it was so neat to see the community coming together again 20 years later :)
Brenda says
So I really love that photoshopped picture of the blue vanity. I especially love how it’s not solid color like with regular paint. There’s something about the stained blue look that’s kind of awesome. And that mirror is gorgeous!
YoungHouseLove says
Thanks Brenda!
xo
s
Jess says
Ahhh! That photoshopped picture looks amazing! I know that even if it doesn’t end up there, it will be beautiful. But seriously, that’s super pretty. My bathroom just told me it wants to look the same. :D
Lindsey says
You guys are awesome!!! I just had a total “light bulb” moment when I saw your Photoshopped vanity picture. We have that awkward vanity opening in our bathroom and I have tried to figure out what on earth we could do with that space. The shelves are a fantastic idea! Thanks for the inspiration!
YoungHouseLove says
Of course! Good luck Lindsey!
xo
s
Alyssa says
I bought the same mirror two weeks ago! I was on the hunt for something to go over the huge fireplace in my bedroom (sounds fancier than it is) – thought about painting the frame, but it actually goes with the bedroom as is! Homegoods man. Love it.
YoungHouseLove says
No way! That’s awesome! Yay HomeGoods.
xo
s
Laura says
Oh wow! What a big change already. I completely agree, carpet in a bathroom just ain’t my thang! I love the mirror choice and think that already the space looks more modern and fresh. We just did our bathroom’s as well! Kinda keeping that cheap and cheerful motto!
http://www.oomphlove.blogspot.ca/search/label/Renovations
YoungHouseLove says
You totally captured the chic-ness of the inspiration image! I love it!
xo
s
Tania says
YAY for getting rid of the carpet!!! We kind of had one of those impatient demo moments this week…we had these DISGUSTING giant cabinets in our laundry room and we finally ripped them out only to discover there was no floor tile underneath. My husband wanted to stop and put it back but I persevered and now we have a 2×4 patch of subfloor that I have no idea how to fix…yet. At least the cabinets are gone!!!!
Lauren says
I primed the heck out of our stairway!!! which has been on our to do list forever. I am wondering if it worked out, which I assume it did, for you not to remove the mirror. I have a large mirror that I have been tolerating the gold on just to avoid removing the mirror before painting. This post gives me hope.
Stefanie says
LOVE that mirror. I would have taken one look at it in Homegoods with that original paint job and passed it over..but it’s amazing how much different it appears with a fresh coat of clean white paint.
Also, all the talk of flooring made me remember something I saw on Reddit yesterday and thought that Sherry might enjoy. http://imgur.com/a/qN0nm How freakin’ beautiful did that turn out? I thought it would be a great idea for a small bathroom or even a way to add some fun to a closet floor..etc.
YoungHouseLove says
So beautiful! I love it!
xo
s
catherine says
Love that you guys are doing mini transformations before demo. This helps us non pro bloggers out as we pinch our pennies for big projects!
YoungHouseLove says
Aw thanks Catherine! We pretty much have done that since the beginning (even before we started blogging we did a first-phase kitchen makeover, painted most of our rooms twice to get it right, etc). There really is nothing like taking things one day and one project at a time- it adds up to quite the result over the years (and you can save your pennies as you go!).
xo
s
Sammi says
Sometimes it really makes me wonder who the heck makes the final carpeting decisions in homes… When I was about eight my parents finally decided the carpet in our dining room had to go. That was nasty, between three kids and two dogs, that floor could talk!
I’m truly surprised you guys didn’t end up finding mold in that carpeting or anything!
YoungHouseLove says
Oh thank goodness!
xo
s
LeeDR says
So happy to see someone else’s bathroom that has the sink offset from the mirror! The bathroom remodel we did called for such a small sink and very little counter space if I centered the sink it would leave me no place to even put a toothbrush holder. Design wise, the sink to the side just didn’t seem like such a good decision to me, however we centered our lighting and mirror over the entire space like yours now does…and we’re very happy with the look.
YoungHouseLove says
That’s so interesting! Definitely seems really functional and I bet it looks great!
xo
s
Pat S says
I like the idea of towel storage. The photoshopped update looks great.
Jennifer says
Looks great! When you demo the wall between the two bath spaces, do you think you’ll put in a larger vanity at that point (that spans the spaces of both old ones)? Or will you just keep the one in the hall area, and have an empty space across the toilet? Wasn’t sure if the photo-shopped version was a “just for now” fix, or part of the final plan. Either way, I can’t wait to see the final version!!
YoungHouseLove says
Yes, we’ll put in a double vanity eventually, so these are just quick and affordable interim changes (paint/stain/and some accessories for the most part).
xo
s
Kirstin says
Oh my god! I did the same thing this weekend, but much, much more carpet. I closed on my first house on Friday — 1920s English cottage style house with shingle siding and many cute built-ins. But also carpet everywhere — kitchen, powder room, living room/den, stairs, and upstairs full bath. On Saturday morning friends came over at 8:30 am to rip all of it out. Disgusting, ancient carpet with vintage horse hair padding that was one of the most foul things ever. But it protected some beautiful hardwood floors that I can live with for a while before refinishing. I spent two afternoons removing all the tack strips and staples. It was very zen.
YoungHouseLove says
Oh my gosh, that’s amazing Kirstin! Totally sounds like you have awesome friends to get into old carpeting with you.
xo
s
Emily says
I love the vanity on the vision board. I have a similar style of vanity and NEVER thought to put a shelf in the open space. Genius! Stealing that idea.
Tara says
Nice! I’m helping my parents redecorate a few rooms, so this weekend we shopped around for a comforter set and then grabbed our paint samples and wallpaper removal stuff (they have tons of professionally-applied wallpaper around the house that we’ll be taking care of this week…fun fun!)
Emily says
Also – is there a guideline for the size of the light fixture over a mirror? Thanks!
YoungHouseLove says
There might be a design rule but I don’t know it! Haha! I just like to eye things and even tape things off on the wall (if we haven’t bought it) or hold things up (if we have) to see what we think.
xo
s
Theresa says
When you are thinking about the major rehab down the road, please think about a barn type door for the closet door change. I would love to see you guys rocks one of those. My doorways don’t permit it but for a closet I think it would be a fun element that you could do something great with as an accent piece for the bedroom. Happy Fall.
YoungHouseLove says
That would be fun!
xo
s
Kyle says
Wow, you’ve been busy!
I love love LURVE the idea of the open shelves for towels (and I think you may have had towels out in the open in the first house’s bathroom?) but just in case you hadn’t thought of this, we recently closed in some open shelves that we made at that height and in that location because they got gross (and no one wants a gross towel). It may not happen to everyone and I can’t comment on the amount of shedding that goes on in your house, but when my husband would shave or I would brush my hair (or my cat would sneak into the bathroom uninvited), those towels because of the height and under/near sink location got stray hairs, dust, etc. on them. It.was.yucky. Just a thought :).
YoungHouseLove says
Thanks Kyle! We have a linen closet in this chopped up layout too, so maybe we should use decorative baskets there with bathroom stuff in them and put the towels in the linen closet. We’ll have to see how it goes!
xo
s
Laurel m. says
Yay! I love tearing out awful old carpet! Subfloors are floors, too, but can be swept and wiped. I like your mirror, too. I’ve been looking for one with a little ball trim like that because I fancy the gold rub n buff that Jen from iheartorganizing did on her bathroom mirror. You guys can make anything look good!
YoungHouseLove says
I love Jen and her blog! That came out so good!
xo
s
Mia says
Now that you’ve demonstrated the folly of “love handles” in a previous post (powder room), I really hate seeing them. So even if you won’t remove them until ready to paint the walls, at least do so in photoshop. Pleeeeease?
YoungHouseLove says
Haha, those babies have got to go! Although one of them is even worse than two (the one downstairs was so unbalanced looking).
xo
s
Tiffanie says
…I painted the floor of my girls room, last year, a VERY dark brown, just like you have shown in the above pictures…(I believe it was BM Ferret brown, if I remember correctly.)…painted it as an “inbetween” stage, but so far that stage has lasted almost a year :)…..needless to say, I LOVE it and am getting antsy to “inbetween” paint a few other floors in our home…love watching your projects come together!!!! Thanks so much for sharing them!!!!!
YoungHouseLove says
Yay! So glad it worked out. Thanks for the color name too!
xo
s
Laura says
Do you have access to an electrical outlet in there in the meantime?
YoungHouseLove says
Yup, there’s one in the toilet/tub part of the bathroom (where there’s a second sink & mirror).
xo
s
Tricia says
I totally recommend painting the subfloor. We tore up the nasty carpet in our upstairs hallway and were not ready to choose hardwood flooring yet, so we painted it a dark blue with a light yellow stripe around the perimeter. We only used 2 coats of semi-gloss latex paint. It cleans easily and has held up for over a year! We actually love the look so it will stay until we get tired of it!
YoungHouseLove says
Wahoo! I love hearing that Tricia!
xo
s
erin says
ah I went and bought paper, and mat board and created background for the shelving unit we have in the living room. They were white shelves with black brackets (WHY?????) we did call west elm to ask if they had white ones, No. just a dumb design decision. but now those black brackets are hidden! yay!
YoungHouseLove says
Sounds awesome Erin! So smart!
xo
s
Haley says
… and I thought I was productive when I cut fabric strips for quilt binding.
I like the open shelving idea. If you needed more storage space, you could always use baskets too.
YoungHouseLove says
I love the basket idea too! And anything having to do with a quilt = major in my mind. You go, girl.
xo
s
Amanda K. @ Living on Grace says
I don’t understand why carpeted bathrooms was ever a trend. Ew. Our house had purple plush carpet covering beautiful tile. Someone please explain.
Mia B says
We have also been tearing out carpet, tack strips and baseboards in preparation for our new hardwoods (currently on back order, ugh!) We’re doing four beds, a hall and a huge bonus room over the garage, plus the staircase so it’s practically like doing an entire house – in fact, it’s bigger than our first house. So far, the only island of sanity is our bedroom (except for a dozen paint samples on the walls.) Got three bedroom ceilings painted this weekend, two bedrooms de-carpeted and cleaned up, and are working our way to painting the walls, doors and trim. Hopefully the floors will be here and acclimated by the time we are ready for them!
Gabby O says
That blue vanity in the last picture…gorgeous!! And what a way to make a statement in a small space.
Kerri says
It must be so satisfying to rip old carpet up! Love the new mirror too.
Until I looked closer it definitely weirded me out that there were no bodies being reflected in all the mirror photos… Upon closer inspection it looks like a tripod may have been used?
Can’t wait to see this space develop – I have always enjoyed your bathroom remodels.
YoungHouseLove says
Yup, tripod for the win! It’s so dark in that nook we need a tripod to take a non-blurry pic anyway.
xo
s
Farrell says
Bathroom already looks more cheery!If you go with grayed out navy, I used a beautiful color just like that on my half bath vanity and am pretty much dying to use it on every cabinet in the house if I could convince the hubs that we need to actually repaint every one! :) My bath too was cream and natural wood galore. Its Arabian Nights by Clark & Kensington. And I love it! I first saw it on the blog Manhatten Nest, and its as beautiful in person as it is in their quick kitchen remodel pics!
YoungHouseLove says
Sounds so pretty! And I love Manhattan Nest!
xo
s
Julie. says
ugh, carpet in a bathroom. I did the same thing when we bought our place 5 years ago…ripped it up right away without a firm long term plan. Just had to get it out!! I put an indoor/outdoor rug over the plywood subfloor and just lived with it until we re-did the master bath.
Laurie says
Well, I’m moving the grandparents this weekend but I’m watching your bathroom makeovers closely because I have to do the same with my dated bathrooms.
I cant wait to see your post on the light fixture because I’m right about at that point for both my kitchen and bathroom!
Amy says
This will probably sound crazy, but I feel like we’re on the same wavelength on house stuff. We randomly keep focusing on the same rooms at the same time…painting the living room, fixing up the guest bath… and just yesterday I was working on our master bathroom. I’m actually working some navy into our bath as well. Great minds think alike, I guess. :)
YoungHouseLove says
I love it!
xo
s
Mary | Lemon Grove Blog says
Wasn’t buying the whole transformation until I saw the photoshop’ed version. ;) Way to use those mad computer skillz to show the final vision. What an awesome space to have in your house. We live in a 1940’s bungalow, so storage space is always at a premium.
Shari says
Wow, that last picture was like deja vu for me! I have a bathroom with that same setup. I call it the “Motel 6″ bathroom! lol. Eventually, I want to take down the wall between the vanity and tub/toilet room too but wasn’t physically, mentally or financially up for tackling the whole demo-and-replace renovation now so 3 weeks ago I had my husband build shelves in the vanity dead space just like you pictured! (To achieve hidden storage, I used a large sea grass basket on each shelf.) I also painted the vanity navy blue…”Naval” by Sherwin Williams, because all over the internet it says Naval is the “perfect” navy blue. I love the way it turned out. It’s amazing how just a few changes can make such a huge difference!
YoungHouseLove says
Sounds so pretty!
xo
s
GreenInOC says
I would love to see you guys do a painted floor – I think your instructions and advice will be the best on the net!
Love the mirror and the solution to raise it.
You guys always end up in a much better place than I do with impulsive projects – mine generally end up in tears and calling a professional!!
Megan says
Great mini-makeover! I love that impatience got the best of you…small changes can make a BIG difference! Wondering about painting over the mirror… did you do a de-glosser or did the existing material have enough profile to go directly over with primer? I always question that stuff when you do trim, hardware, doors, frames, etc. What is your go-to prep routine? Also, the point about tile and backerboard is PERFECT for our current project – removing laminate flooring from our powder room. Found a small matte black hex tile (with charcoal grout) that I’m midly obsessed with. Wondering how much work it’s going to be to secure this baby down? We too, have particle board… everywhere. Thanks in advance for any advice! :-)
YoungHouseLove says
It was a really rough/matte texture so I just went straight to primer, but if it had been in a kitchen (grease gets on stuff there!) or had a shiny finish (like a gloss paint) I would have wiped it down with a deglosser first! As for your floor, if you have plywood you can drill backerboard into it, but if you have particleboard you have to rip it up and there should be plywood under it that you can put your backerboard into. Hope it helps!
xo
s
Mary Beth says
I really love it, you guys – it looks beautiful!!
I have a question… I have a mirror that I’d like to paint as well and I am not sure how to protect the mirror while I redo the wooden frame!
I can’t tell what Sherry did from the photo – in fact it looks like there’s paint on the mirror?
Thanks for helping if you can!!!
http://www.hystericallyeverafter.com
Mary Beth
YoungHouseLove says
Oh yes, I just get paint on the mirror and use a straight razor to scrape it off! An exacto knife works in a pinch too!
xo
s
Trudy says
Hi guys,
First time poster. LOVE your blog. I’m out of your typical demographic, since I’m a 44 year old with a teenager and pre-teen. Our entire house is floored with hardwoods, other than one guest bath and our boys’ bath. Our master bath has been hardwood for its entire 15 years of life and there is NO damage from water in there at all. They look beautiful flowing straight from our master bedroom into it. Rich and pretty under our clawfoot tub and up to the shower door. Hardwoods are fine in bathrooms. We’re not even that careful. May want to consider continuing your gorgeous floor in there.
YoungHouseLove says
That’s awesome!!
xo
s