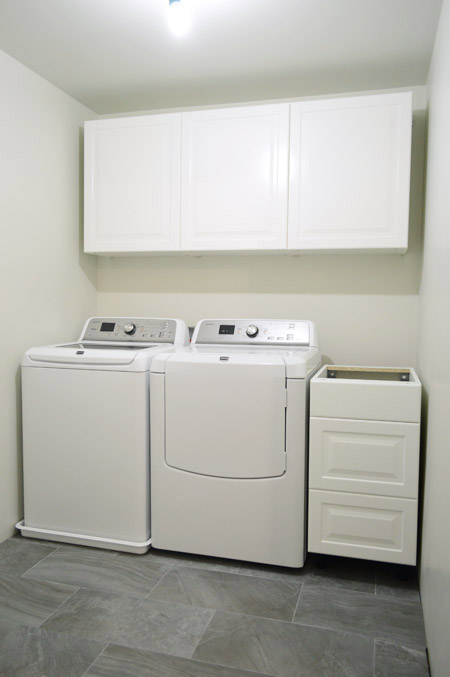
This post was shaping up to be a weird one (well, weirder than our baseline weird). We were simultaneously trying to hang Ikea cabinets in our laundry room and re-hook up the washer & dryer, but as of yesterday morning we were sort of stuck half-way through both projects and this was the best progress shot we thought we’d have for you today:
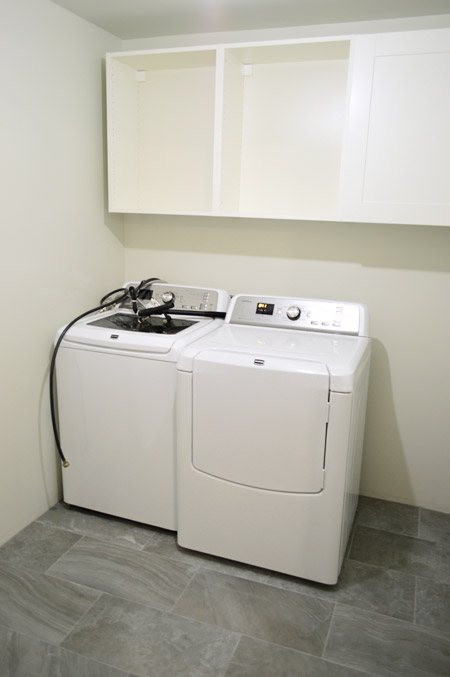
But thanks to some last minute pieces falling into place over the last 24 hours, we have working appliances that have been completely re-installed (picture Sherry dancing for no less than twenty minutes with an elated baby in her arms laughing at her) and doors on our all of our cabinets (more dancing – also singing). I’ll get into appliance installation details next week (getting the overflow drain and washer pan connected took some effort) but today is all about cabinets.
We’ve been wanting to take Ikea cabinets for a spin since we’re heavily considering them for our eventual kitchen remodel. We hear great things about them and pretty consistently see them popping up in high end homes thanks to magazines like Dwell, Domino, and House Beautiful, yet we’ve gone a bunch of other routes in the past. We’ve done the custom cabinet thing in our first house, and the second-hand / work-with-what-you’ve-got thing in our second house (we refinished our existing cabinets and added used ones from the Habitat ReStore). It’s funny that despite all of the Ikea in our life, we’ve never actually dabbled in their cabinetry. So the laundry room felt like a perfect lower-risk test space to learn the process and to help us determine if we want to go this route in the kitchen down the line.
We started by using their online Kitchen Planner to map out the space. We actually used it before to help envision our last kitchen, even though we weren’t purchasing their cabinets. In general it’s a pretty easy (and free!) online tool to play around with – although I did have to insert a dishwasher into my plan, since they don’t have a dryer option. Before long we had a plan and a shopping list that we could print out and bring to the store.

The above shot is the plan after the kitchen expert at Ikea helped us fine-tune things. I’m glad we arrived with an idea of what we wanted (it saved a ton of time!) but I’m also glad we consulted with one of their employees before our purchase (it saved some unnecessary purchases when she went through the list and explained that some things weren’t necessary for this type of installation). She also helped to point out some trim that we might want to add to hide our under cabinet lighting (last minute decision = under cabinet lighting, just to help us see & treat stains more easily).
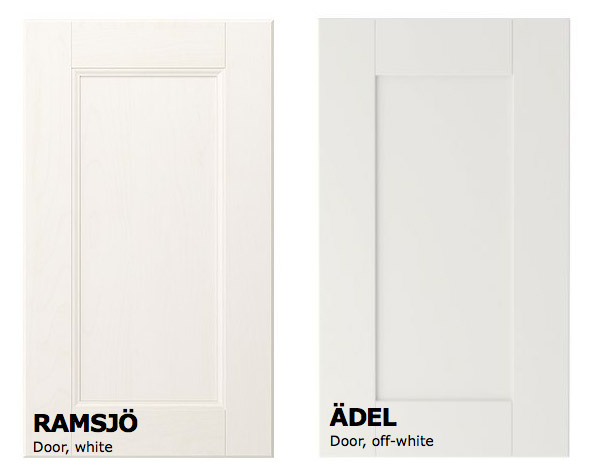
While we were there, we also made a change in our cabinet door decision. Online the Ramsjo looked closest to what we wanted, but in person it had more of a whitewashed wood look (with some pink undertones). The Adel, even though it was labeled “off-white” appeared to be a lot closer to the solid white look we wanted. It wasn’t perfectly white, but we’re used to Ikea stuff being ever so slightly creamy.
Everything was in stock, so about an hour (and 800-some-dollars) later we were packed up and back on the road. Which was a good thing since we were doing this on a Friday afternoon, which is pretty much the last time you should attempt traveling I-95 South near Ikea (we were doing a few other things in the area, so it definitely wouldn’t have been the time we’d pick if we were just hitting Ikea and returning home).
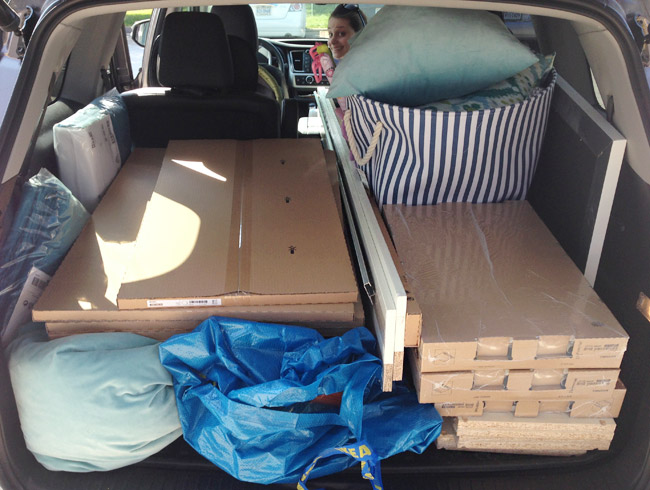
We gritted our teeth through the normal rush hour / summer Friday traffic. And just as we got through it… they closed the highway entirely because a truck spilled acid all over the road. Sooooo yeah. I trip that’s normally two hours took about three times that long.

Once we had them home, it was time to put them together, which we hear is the most dreaded part of an Ikea kitchen. It wasn’t so bad for us since we were only assembling three upper cabinets and one lower one. Plus, we did the three uppers assembly-line-style (not to be confused with Gangnam Style) so it went faster.

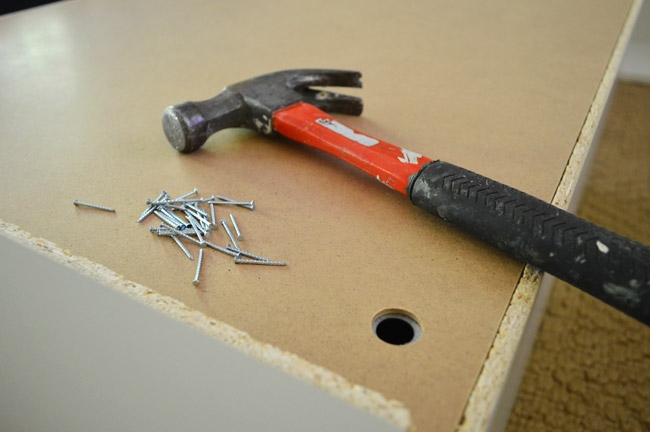
Actually, the most annoying part was nailing the panels on the back of each one, and that wasn’t even that bad (it just took a while since there were around 24 nails for each cabinet).
I have to say, we were both pretty impressed with the hanging system Ikea uses. In all of the Ikea kitchens we’ve seen online and in magazines, we never realized that the uppers aren’t screwed to the wall like traditional cabinets. Instead, they all hang from a metal rail that you install directly into the wall studs, which made hanging them ourselves (and keeping them aligned) a lot easier than other methods we’ve tried in the past.
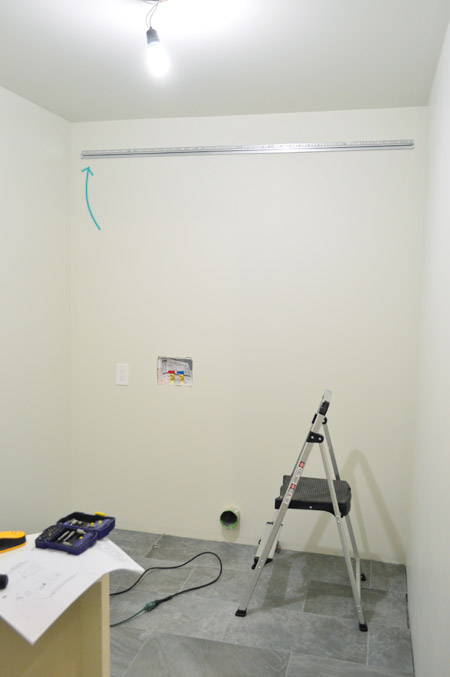
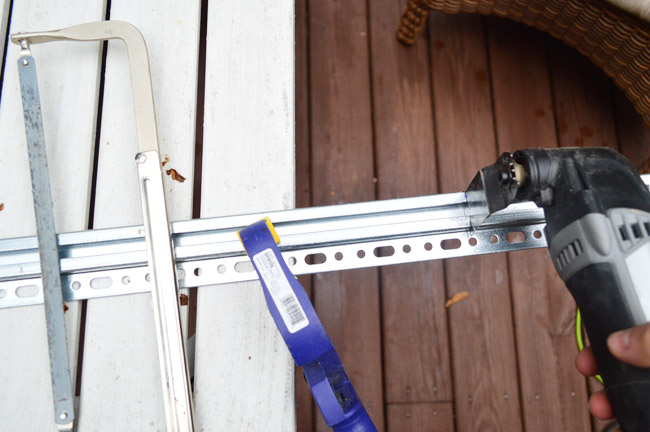
The metal hanging rail comes as one 80″ long piece, but we only needed ours wide enough for the three 24″ cabinets. The instructions suggested a hacksaw, but our Dremel made the job much faster.
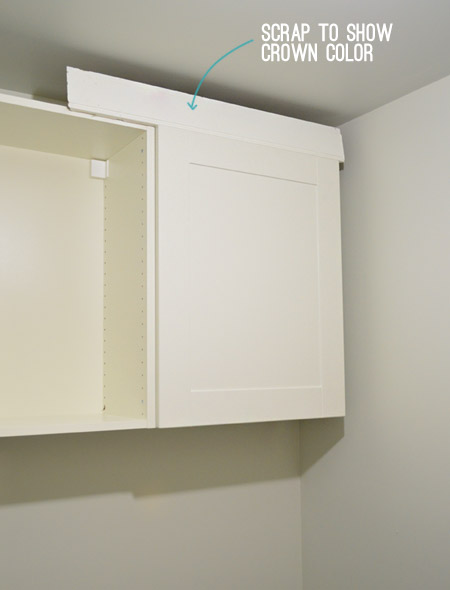
Determining how high to hang the rail took some planning. We’re going to finish off our cabinets with the same crown molding that matches the rest of the house, so we had to account for the height that would add, as well as the fact that the cabinets attach to the rail a few inches down from the top of the cabinet.
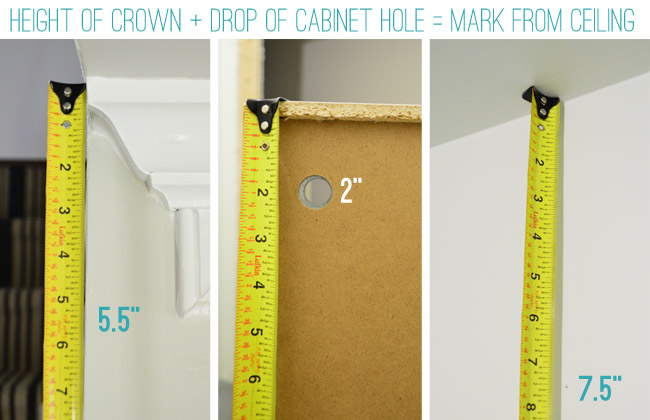
Once I had my mark (which I made in the center of that back wall) I drew a line across the rest of the wall with my level.
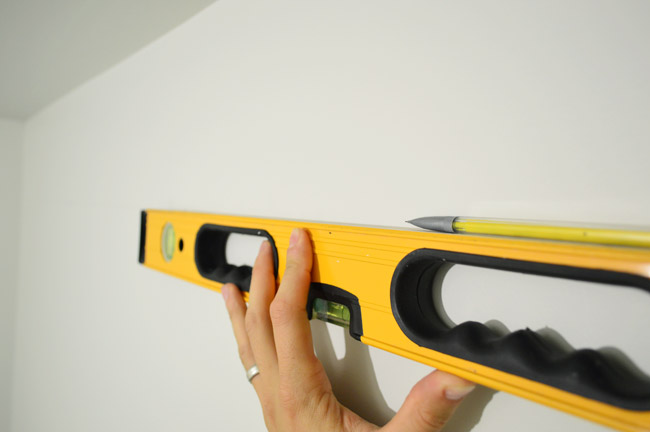
But I soon realized that the line I marked wasn’t very helpful since it would be impossible to see behind the solid metal strip that the cabinets hang from. So I noted how much higher I needed to mark the wall to give myself a more visible reference point.
And so went the second line on my wall.

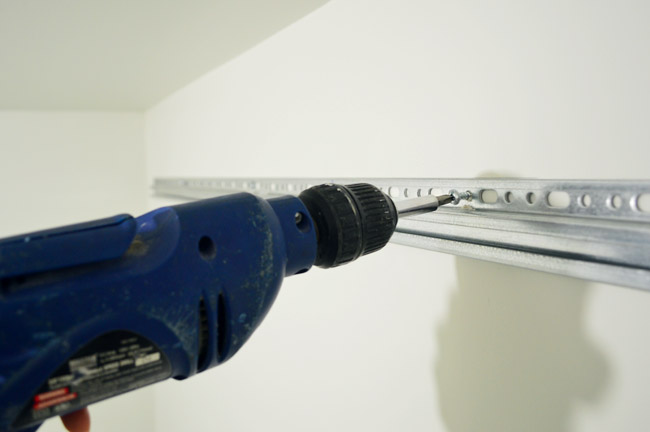
We also marked the studs so we were sure our screws would be going into something solid.

The wall is pretty flat (i.e. it doesn’t bow or dip anywhere) so we could just directly screw the metal rail into each of the studs. But according to the instructions, you might have to shim it if your wall is a little wavy.
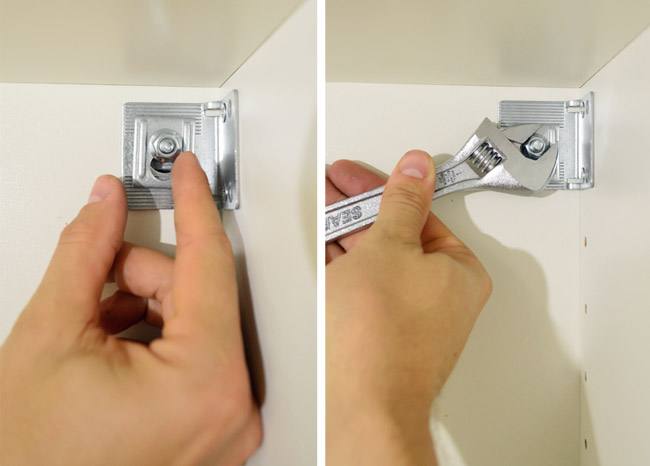
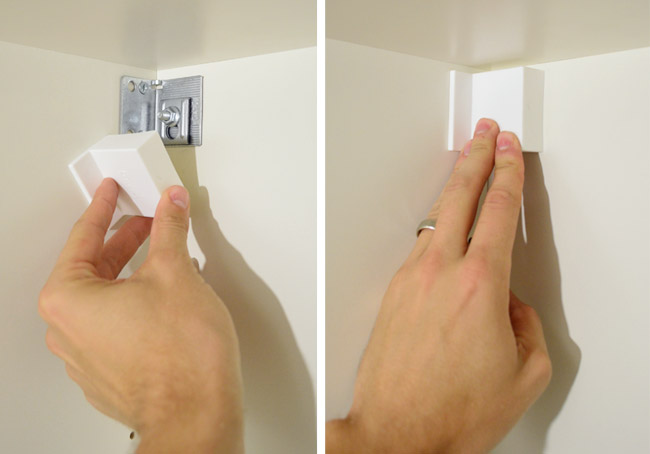
With the rail securely hung on the wall, we slid in the bolts that each cabinet frame would hang from.
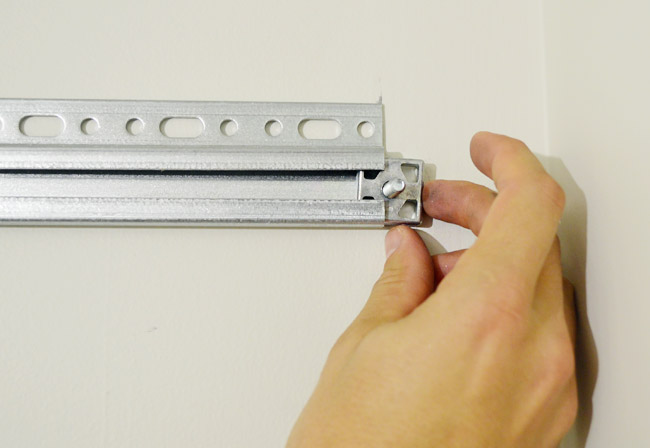
The cabinet frames aren’t very heavy (at least without shelves or doors yet) so it was easy enough for one person to hoist them up and place them on the bolts (Sherry did one herself without any sweating or cursing). We secured them one at a time, so the first one to go up was that middle one, then I did the right one and Sherry did the left one.
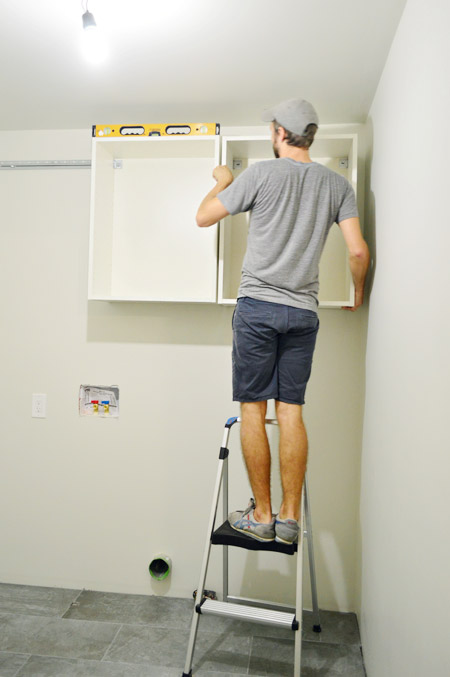
Once they’re resting on those two bolts, you add a metal clip and a nut – then tighten everything with a wrench. The clip allows you to adjust the placement slightly in case you need to level things a little. As you can see above, we rested a level on top to make sure each cabinet was straight as we went.
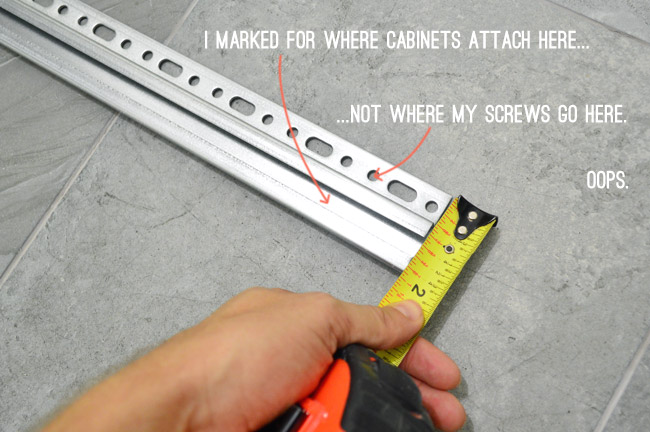
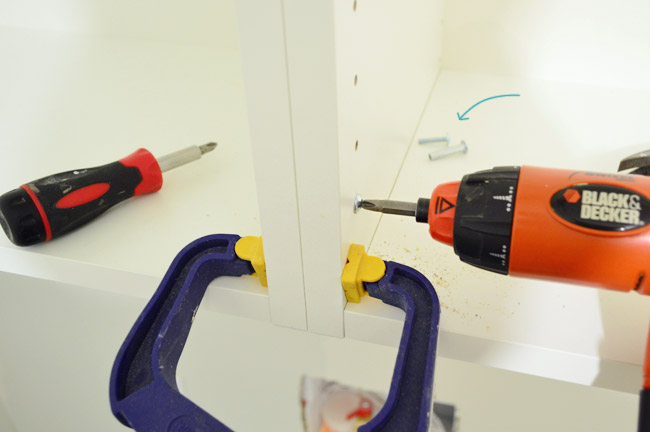
Once all three were up, we clamped them together at the edges so we could bolt all of them together to make one solid unit (this also eliminated any gaps between them). Once clamped, I drilled through one of the peg holes using a 3/16″ bit. NOTE: I realized afterwards that you should do the very bottom and very top hole, not the second one in – since those are used for the door hardware, but it was easy to correct – it just meant doing it twice.
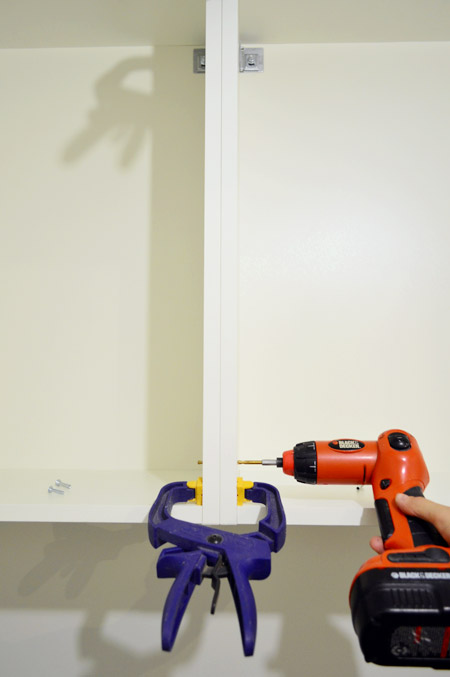
With a hole drilled through both cabinets, I used the supplied screws to make the connection tight.
The final step was snapping on the white plastic caps to cover the hanging hardware on the back of the cabinet.
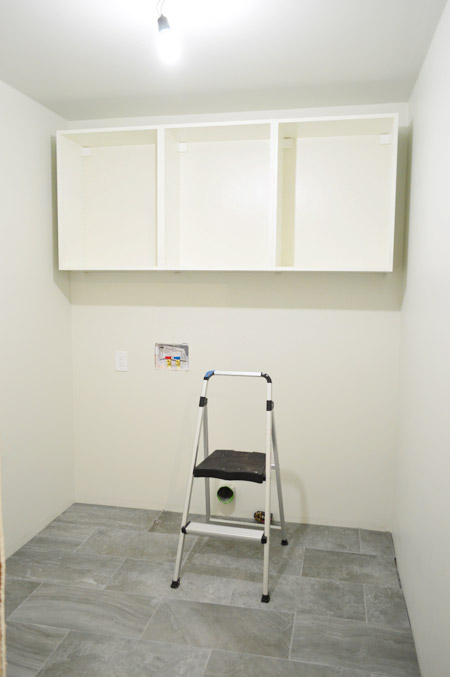
So here are our three uppers sitting pretty on the wall. Definitely an improvement when it comes to storage & function, but not super impressive looking since they still need some wood filler pieces on the sides and some crown on the top. Oh yeah and shelves and doors.
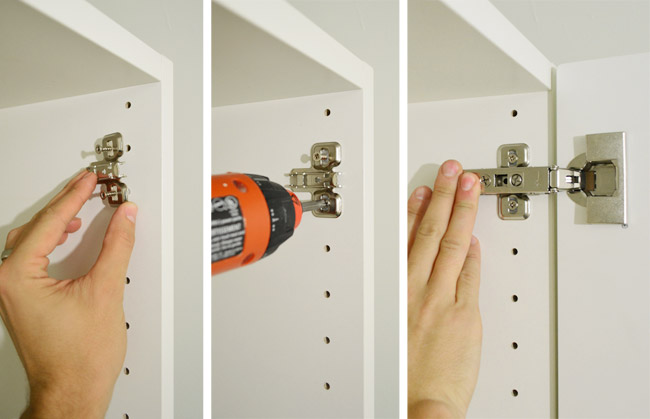
The doors were pretty easy to add, since the hardware that Ikea sells uses pressure to attach everything (there’s no drilling holes or anything). The various screws can help you adjust the placement, but our first one seemed to sit nicely against the frame without touching them at all.
What wasn’t so nice? The color. It’s harder to detect in photos than real life, but the Adel door front was looking a lot more cream than we hoped it would look (it’s a few shades darker than the other slightly cream Ikea furniture we have). It looked especially yellow next to a Simply White scrap piece of baseboard – which is what all of our home’s trim/baseboards/doors are painted.
We didn’t expect it to match perfectly, but after some Googling (which we wish we’d done before our Ikea trip) we realized that Ikea sells a door style that people say matches Simply White almost perfectly (what are the odds, they actually shouted out our house’s exact trim/door color?!). Meanwhile the style we bought is said to match Benjamin Moore’s Paper Mache (which is notably less white). Oops. We sadly overlooked the Lidingo door style since the picture on Ikea’s website makes it look a lot darker/yellower, but here’s an example of how the matching paint swatches look SO DIFFERENT than the photos of the doors online:

And while the Lidingo door style isn’t as clean-lined as the shaker style that we’re usually most attracted to, it definitely fits the style of our house and looks pretty great in other Ikea kitchens we’ve scoped online (we’ve always liked Dana’s over at HouseTweaking, so learning that she used them was definitely a selling point). But most selling of all was the fact that there was actually a door style that is said to match all of our house’s doors and trim. I know I’ve said what are the odds already, but really, what are the odds?!
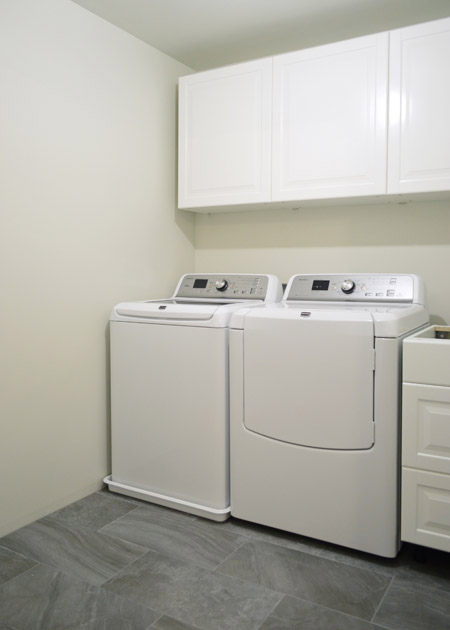
So… we halted door installation and started planning a return trip to Ikea. Cue the eye twitch and flashbacks to highway closure traffic. But by some MIRACLE, it turns out my parents were visiting my sister and cousins in Northern Virginia on Tuesday and could swing by Ikea on their way home and get the new Lidingo doors for us. They are such an improvement over the Adels that we couldn’t wait to hang them last night after we got the kids to bed. We even tucked the base cabinet in there for kicks, although it still needs to be secured to the wall to be officially installed (along with needing trim pieces on the sides, hardware, a counter, and a toe kick).
Actually, our to-do list is still pretty long in the cabinet department. But those little details are what makes it all come together, so we’re psyched to dive into them.
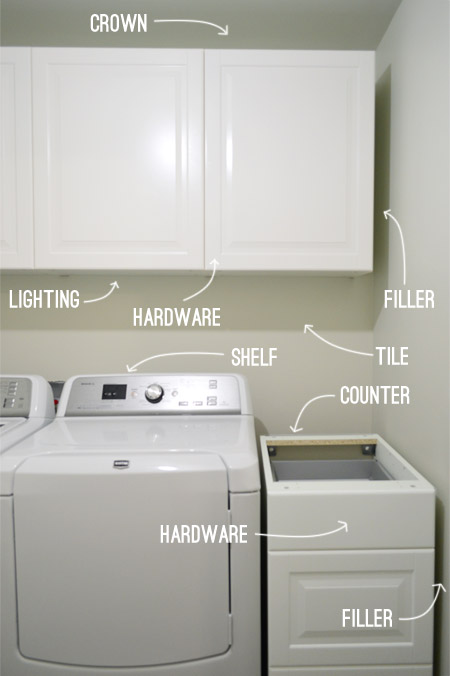
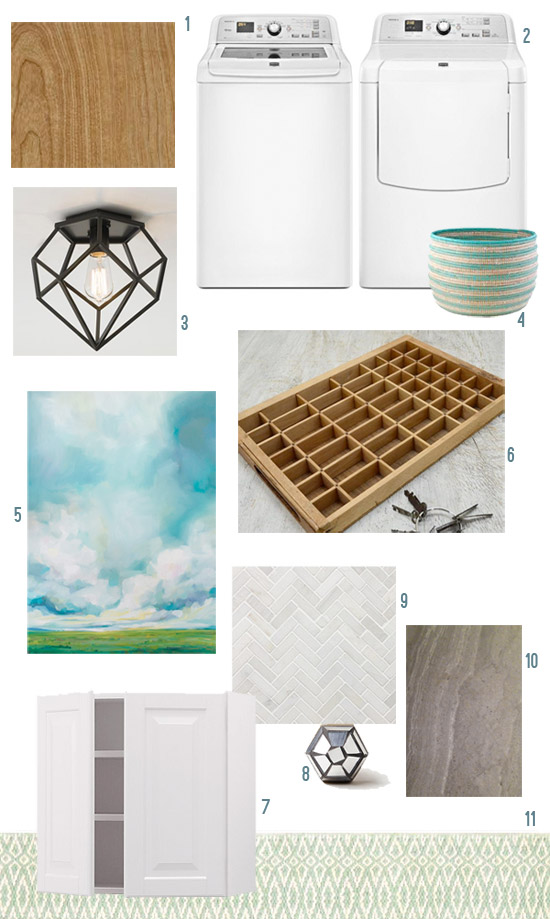
It’s definitely still more of a blank slate in here, so we’re especially excited to bring in some wood tones to break up all the white – in the form of a butcher block counter among a few other items (you can read about those plans here).
We still need to return the doors and drawer fronts in that first color (we only unboxed one), but we’ll be driving through that area again in a few weeks so it’s not too much of a pain to stop in and drop those off (he says while crossing all appendages that no unforeseen traffic issues arise). Also, here’s how I feel about being able to do laundry at home again:


Lauren says
Guess you guys should’ve “adjusted your monitors” before going out and buying the cabinets!! HHAHAHAHAHAH.
YoungHouseLove says
Ha!
xo
s
Randi says
This is such an amazing tutorial! Can’t wait to see the tile backsplash installed. Hope you guys have a great weekend!
Becky says
We just finished a kitchen remodel. I tried to convince my husband to do Ikea cabinets. He refused. I looked and looked for something ready to assemble and comparably priced. We ended up using Barker Caninets. They are so well made and so easy to assemble. The biggest advantage over Ikea in my view is that they can be custom sized in 1/4 inch increments. Soft close Blum hardware is standard, and I figure I spent about 10 percent more than Ikea. Before you decide on Ikea for your kitchen, peruse the Barker Cabinet website. It takes about 6 to 8 weeks for them to build your cabinets, but that is the trade-off to get custom sizing.
YoungHouseLove says
They sound great!
xo
s
Carrie says
Thanks for posting! I’ve been debating what to use in my laundry room. I didn’t know if I needed to build some and buy the doors in order to get the correct depth for all the oversized Costco products in my life. How deep are your cabinets? Are they comfortable to reach into over the machines?
YoungHouseLove says
The upper cabs are about 13″. It’s nice because I can easily reach (and I’m short). Any deeper and the lid from our top loader would have hit them!
xo
s
Lady ID says
Cool. I’m glad you found doors that match. It would have bothered me too.
As far as the cupboards being on a rail – I never would have guessed!! Is that secure?? I’m sure it is because they sell well but it just looks like you filled the cupboards with heavy glass, etc the whole structure would just plop off the wall…
YoungHouseLove says
Yup, the rail is screwed into studs and the cabinets are attached to the rail, so it’s just an easier way to align them while still securing them to studs!
xo
s
Alison G says
The house we moved into has a complete IKEA kitchen (even appliances!) and we LOVE it. Super durable, the soft close drawers are great for helping to avoid finger pinches, easy to wipe off and keep clean and tons of super smart storage! I can’t say enough good things about it.
Christi says
It’s totally a German thing! We had to build in our kitchen in 2 different apartments – reconfigured it and bought additional units for the second. When we got the apartment it had only a tile strip on the wall with outlets and water/drain hookups. Often the bathrooms will only have a toilet, tub, and separate shower without any kind of shower door, no sink, and absolutely no light fixtures in the entire place! They normally cover the walls with a textured wall paper (has wood chips in varying sizes in it) which I called wall vomit. The wall beneath is plaster and is never painted directly on, only over the wall vomit, er, paper. In order to move into our second apartment we had to take up some nasty carpet and lay new carpet and laminate, strip and re-paper and paint ALL of the walls, and install the entire kitchen (which was unusually large for Germany), and install light fixtures in all rooms. It’s become more common to have the kitchens already installed, we sold ours to the next renter when we moved stateside.
As far as Ikea kitchens: You’ll love it. Love it. The quality/price/options are fantastic. It’s also wonderful that you can go and buy a new door if, let’s say, your son rams a truck a little too hard into the corner of the drawer. Pro tip: install ONLY drawers for base cabinet storage. You’ll thank me. There are a ton of drawer dividers that can accommodate plates, pans, etc. Also, don’t install a trash bin with a swing out door, get the drawer style. (You have to open the door completely to pull out the bin – the drawer enables you to open slightly and toss!)
Love the progress you’re making – keep up the inspiration!
YoungHouseLove says
Amazing! Love the tips!
xo
s
Crystal says
I’m almost done with our families kitchen remodel (still have filler pieces/crown moulding to cut and install) as a 115lb woman I was able to complete the whole remodel (taking down walls and building new ones including hanging drywall, electrical, plumbing, building and installing 16 ikea cabinets including 39″ tall uppers) 99.9% myself because of the Ikea rail system. I did have to have my husband help me lift the 125lb Domsjo sink into place. I am by no means muscular and I give all the credit to Ikeas ease of installation. I chose the Adele doors and love them as well as all the features you get with Ikea. Crossing my fingers you love them as much as we do and choose them for your future kitchen remodel. LOVE LOVE LOVE your laundry room thus far!
YoungHouseLove says
Love hearing that!!
xo
s
MJ says
Thank you for this tutorial! We JUST bought 2 ikea cabinets to install in our laundry room as well and I had been on the search for a good installation guide. It look’s so great hung up in your laundry room that I can’t wait to try it out on ours!
SG says
Hoping I can bother you with a DIY question (related to needing filler). I have an old wood dresser that I’m refinishing. I reclaimed it and before I did, someone took off all the hardware, so now each drawer has a significant hole in front (between 2″ and 2.5″ in diameter, maybe an inch deep). I had been hoping to find hardware that would just cover the hole, but I haven’t seen any and am thinking I’ll need to fill it instead. So my question is this: For any area of that size, how do you recommend filling it? My husband wants to use standard wood filler, but I’m worried it’s too big an area. But filling with real wood seems awfully tricky, so I don’t know what our other options would be.
YoungHouseLove says
We had an issue with wood filler not perfectly matching (even when it’s stained) but someone said that if you sand something wood and sprinkle sawdust on top of the putty it can act more like wood and blend in more when stained. Never tried it but it sounds good!
xo
s
SG says
We also have had trouble with that. We’re planning on painting the drawers so we’re hoping that will solve some of the matching problems? But you think filling an area that size with wood filler will work fine? Thanks so much for the help!
YoungHouseLove says
Oh yes if you’re painting it then wood putty should do the trick (then sand that, do another pass of putty, sand that, and then prime and paint). Good luck!
xo
s
Michele says
Your blog made me cry! I am so touched! Seriously, you might not understand it, but it it so frustrating to be a DIY enthusiast (and an Architect, btw) when you live in a 3rd world country and you work 12 hours a day for next-no-zero money building very *unattractive* industrial buildings (ugh!)! I can only dream to go to some place as cool as IKEA one day (yes, I did say that. It might sound simple to you, but it´s NOT! ). Your blog sure is a scape from this place. So, thank you for that! Keep up the great work.
YoungHouseLove says
Oh Michele you are so sweet. I hope you get to check out Ikea someday, and that you get the opportunity to design things you love. I’m so inspired by you and I’m sending you all the love in the world.
xo
s
Cris Kiss My Tulle says
We have the exact same cabinets (the white are the uppers and the gray are the lowers) for our kitchen. My biggest tip is to use a heavy duty stapler instead of the nails to attach the backers. Works great!
YoungHouseLove says
Really smart!
xo
s
Evelyn says
YAAAAAAAY for adorable mamas with pretty working laundry rooms!
Erin J. says
If you guys end up going with IKEA cabinets in the future for your kitchen, a little trick the hubs and I learned for attaching the backs of the cabinets is to use a nail gun loaded with short tacks (http://diysquirrel.blogspot.com/2012/07/lidingo-ate-your-baby.html – please excuse the apparent formatting wonkiness with my photos). That step goes by so much faster when you’re working with lots of cabinets!
Side question: Is it too late to send in house photos for consideration in Book 2?? I would love to share our mostly-completed house with you guys!
Erin J. says
I forgot to mention that we have since built a 6-7′ wide by floor-ceiling high wall of Lidingo cabinets to serve as our pantry – if I can still submit pics, I’ll be sure to include pictures of all of our IKEA cabinet swag!
YoungHouseLove says
Oh man we’re all done with submissions. Sad!! But maybe next book ;)
xo
s
katalina says
This is probably a very obvious statement…but that beautiful floor would look great in your entry someday!
Mo says
Just wanted to inform you, that ikea has a new kitchen system in Europe called METOD. The old one was called Faktum which must be yours because of Ädel and other door names. There is a possibilty to buy things online for the old one. Haven’t tried that although we have the old system and are really happy with it, no problems after 8 years and a move – Germany. ;)
Metod came 6 months after a 20% sale… It is called to be more flexible…
Love your site!
YoungHouseLove says
Great tip! Thanks Mo!
xo
s
Liz says
Must be such a relief to have a working washer/dryer again! With two toddlers, we can’t go two days without doing at least one load!
The room is probably very hard to photograph but do you have enough space on the wall next to the door to add storage? I’d think it would be a good to have some more open counter space for folding/organizing laundry – something that’s tricky to find when you have top-loaders! And, assuming there’s enough room for a counter on that side, maybe a pull down drying rack on the wall? You guys could easily contruct a narrow console table to go along that wall opposite the machines – Ana White style! That could also carry the wood tones to the other side of the room.
YoungHouseLove says
We’re excited to dive into the other walls now that the washer & dryer are in place. It’s somewhat tight but we’ll definitely add something!
xo
s
Kaija says
Where do you iron? Do you iron?
Looking for ideas to dress up the ironing board and store it :)
YoungHouseLove says
We do sporadically iron, and debated a wall mounted ironing board but realized we like it to be mobile (I have ironed the bottom of curtains while they’re hanging in a room for example) so hooks on the wall to hang the board up, but a free-moving board that could be set up in there or another room sounds like the best of both worlds.
xo
s
Kitty says
I-95 S on a Friday – I feel your pain! All Virginians have done that, thinking, “Maybe it won’t be so bad,” but it always is horrible. And it’s not as if there’s a good alternate route. My sympathies! Oh and nice laundry room, btw.
Kara says
We always take Route 301 through Southern Maryland. If you assume zero traffic, it’s a slower route, but I’ve never taken I-95 and hit zero traffic, so in the end, I think 301 always ends up faster. More stop lights and small towns, but hey, there are like 5 Chick-fil-As on the route. Winner!
YoungHouseLove says
Smart!
xo
s
Julie says
It just occurred to me how patient you are. Not only are you working hard to follow Ikea directions, but you stop to take well staged photographs of the process as you go. Just want to say WELL DONE.
YoungHouseLove says
Thanks so much Julie!
xo
s
Kayla says
Seeing the pictures of hanging the wall cabinets gave me a flashback moment to just a month and a half ago when we (finally) replaced our very worn out, very cheap, very 70’s kitchen with IKEA cabinets (Adel off-white) – we didn’t have anything else white to work with so the Adel were fine. I had the exact same reaction to the Ramsjo – I so wanted them (solid wood!) until I saw the whitewashed finish. Then it was, nope, MDF is fine :) And cheaper! I’m really impressed with the thick layer of finish on the doors, I just dinged my first door the other day, and it took a monster canner lid to do it, and didn’t even go all the way through the finish.
We were totally geeking out about IKEA cabinets through the whole renovation – they really are awesome and easy to install! I’m loving all the big drawers and the slow close dampers on doors and drawers. We also did some of the solid wood countertop for our penninsula workspace. And a farmhouse sink – loving it!
YoungHouseLove says
Sounds gorgeous!
xo
s
P says
Hi Guys,
So exciting to have a new laundry room to work with; maybe you can answer a few questions in your thought process. Where do you put your ironing board? Did you consider a drying rod for hanging wet shirts instead of the 3rd cabinet? What about a drying rack for non-hanger items? Utility sink? I guess I’m not seeing anything different than when the laundry was in the “old” space, so it’s not clear what your goal is for this room. Other than “light in the hallway”.
YoungHouseLove says
We’ll get there, I promise! For the back wall we wanted cabinetry but have plans to use the side and entry wall for other functions like a hanging ironing board, drying rack, etc (the room is 8′ deep!). As for a utility sink it would have been so small we opted to skip it.
xo
s
Amy Ehmann says
Just ordered my Ikea kitchen this morning!! It was madness since the sale ends this weekend. The floor tile is looking amazing. I might have to use it in our future mudroom. I find myself looking forward to your update posts everyday. I love how you’re not afraid to tackle any project yourselves – esp. drywall. Looks like you’re in the home stretch. Can’t wait to see it done. =)
YoungHouseLove says
Thanks Amy! Best of luck with your cabinets!
xo
s
Kay says
Great laundry! Did you think about only 2 upper cabinets and a clothes rod? My laundry is set up like that and I love it. Makes it easy to hang up clothes as they come out of the dryer.
YoungHouseLove says
We debated that but thought we’d rather have concealed storage on that wall (we hope to use some of the other walls for systems like that).
xo
s
-alex says
I’m sure someone has said this already, but I haven’t read all the comments… If you decide to do a whole kitchen, your compressor and finish nails are your friend when doing the back of the cabinets. Just be careful to adjust the pressure and to aim carefully or it will go through the laminate on the inside of the cabinet.
Other helpful Ikea hint is that the Applad white is also simply white. I bought my kitchen first, and chose Simply White for the walls to match. My uppers are white, my base cabs are Gnosjo black.
YoungHouseLove says
Thanks so much Alex!
xo
s
Karen from Cord Controller says
Glad to see things are still coming along! It honestly amazes me the amount of “stick-to-itiveness” you guys have haha
If I started even half of these projects I couldn’t guarantee that they’d even get done in the same year!
YoungHouseLove says
Having no washer and dryer at home can motivate ya!
xo
s
Kaija says
I have the white Adel cabinets. They are so easy to keep clean! There are some color variations, for example a side panel I have does not exactly match the doors.
I learned:
-to use a builder’s square to make sure my cabinets are square before installing the back panel
-to apply Gorilla Glue to all joints to make then indestructable. This of course is a problem if you have any plans to take them apart later.
Dreaming of a day when I can buy more Adel to build a banquette in my dining area!
Kaija says
Oh, forgot to add that I found matching sliding doors from HD online for my laundry closed which is in the kitchen.
YoungHouseLove says
Great tips!
xo
s
shannon says
hey guys! shannon/googiemomma of the 4 girls’ bunk room infamy here ;) lol…anyway, we did ikea in our kitchen, err…7, 8 years ago? like any good DIYing family, it’s still a work in progress. but even over 7+ years and five kiddos they look spectacular. there’s just so much personalization you can do with ikea. the biggest thing is organization–which i know shouldn’t be a prob for you guys. when they delivered our cabinets, the stack of boxes was taller than me and took up half our dining room/temporary construction zone. i was Official Cabinet Putter-Togetherer, mr. was general contractor. and i went at it like i was preparing to go into battle. i never actually did a post about our kitchen, that was well before i was blogging…maybe one day i’ll get around to that. lollllzzz. we mixed two different door styles–i wanted glass doors in the one area. we took them all the way to the counter for a built in hutch type of look. hmmm. talking about this is making me want to get out there and clean it up nice and shiny and take some pics. oh well, that’s my 2 cents worth!
YoungHouseLove says
You have no idea how awesome that is to hear!
xo
s
shannon says
ok, just reread your post, and wanted to mention that we have adel fronts on all our drawers, and used the lidingo glass doors. mix and match, baby. to us, the color looks virtually identical. although i think they may have tweaked their whites a touch since we did our kitchen? i liked the cleaner lines on the solid adel fronts, but the more charming traditional style of the lidingo glass vs. the more contemporary glass doors adel sports.
wow, who knew i was so passionate about ikea kitchens?
YoungHouseLove says
I love that!
xo
s
Jill says
I have read that ikea cabs are actually made by a high end Italian co Snaidero, or vice versa. But maybe that’s an urban legend.
I also found a lot of people online (when I was researching our kitchen) who did ikea boxes w another-company’s doors. There are MANY more choices for door styles. We used Conestoga and I also read good things about Barker, Scherrs, and several others.
Gillian says
I put the back on the billy book case using my staple gun…once I saw the copious amounts of nails I just decided to McGyver it…so far, so good :)
Ashley says
We are doing a built in banquette in my dining room and using ikea refrigerator cabinets for the seat and Billy’s for the bookshelves. In your research did you find which white kitchen cabinet matches the billy white best?
YoungHouseLove says
We didn’t come across anything that I remember, but I wonder if someone out there knows! Anyone have advice for Ashley?
xo
s
Amy says
This is probably somewhere in your string of comments… But how do you plan to attach the crown to the cabinets? Should you have attached some sort of board to the top of them first (to use to hold the crown in place)? I put Ikea cabinets in for my SIL’s kitchen and the crown was tricky since I didn’t do that first… Maybe you know a better way?
YoungHouseLove says
We’ll be sure to share those details as we go! Since the crown will bridge a lot of the gap we can add a back piece to the top of the cabinets but it doesn’t have to fill that whole space so we can attach it while they’re hanging. It’s hard to explain, so we’ll share pics when we do it!
xo
s
Connie says
You will be so glad to have the under-cabinet lighting, although you may not fully appreciate it until your eyes age a bit. Elderly eyeballs need more light, and we use our under-cabinet lights in the kitchen daily. Strangely, I never considered the laundry room as a good place for more. That could be a future upgrade.
YoungHouseLove says
Thanks Connie! Someone pointed out how much easier it is to spot stains before tossing in laundry so I thought it would be a nice little bonus :)
xo
s
Susan says
We just finished our second Ikea kitchen in less than a year. In our previous house, we had the Adel cabinets and loved them. This time we went with the Lindigo in Gray. Love them more. You can’t go wrong with and Ikea kitchen…there are so many options and so many ways to configure them (not to mention all of the storage abilities they have). I hope you decide to do an Ikea kitchen…you’ll love it.
YoungHouseLove says
Love hearing that!
xo
s
Laura says
Sorry if this has been asked to death…ya’ll get so many comments its hard to keep track :)
But I was wondering if you guys discussed putting a utility sink in this laundry room?
YoungHouseLove says
We did but since it would be so small we opted to skip it.
xo
s
Annie says
I don’t get whyit would be small. I went and read a previous post where you said the room is 8×7. Assuming your machines are 30 inches, that leaves 36 inches which is well big enough for a 24 inch base and a 12 inch pullout or for a 36 inch base. The one you have looks to be no more than 18 inches. Where did the extra space go?
YoungHouseLove says
The room is 8′ deep (not wide), so that back wall is just shy of 7′. The appliances are 60″ together, but the washer’s drain pan eats up about an additional inch on either side of it, and we need to leave clearance beside the dryer and that cabinet so nothing grinds/bangs. We might have been able to sneak a 21″ cabinet in there, but it would have been tight, and we didn’t want to risk scraping/grinding.
-John
Annie says
Wait, what? You can’t have a basic laundry appliance (sink) because there’s not room, but the reason there’s not room is because you put the appliances on the short wall? That is insane. The next owners are going to hate you! Why on earth would you shift plumbing to a place which creates a massive unused/unusable space in the room?
Annie says
Went and got my trusty calculator out, and in addition to a 36 inch base cabinet with pullout trash and laundry sink next to the machines you could have had (assuming your door is 30 inches) two 24 and one 18 inch shallow (12 inch) drawer units along the back wall. Pop a fold out drying rack on the wall above the drawers and hang your ironing board on hooks at the very end and you’ve got the best damn laundry in the world. It’s sad that you didn’t really think through your layout before jumping into the project.
Annie says
I found a pic for you. These are IKEA shallow bases in a laundry. Glorious, no?
(sorry for multiple comments, you can merge them into one in moderation if you like).
Annie says
ROFLOL The link, perhaps?
http://media-cache-ak0.pinimg.com/736x/85/9b/6a/859b6a2c846a2d26600b288155bf11e1.jpg
YoungHouseLove says
Thanks Annie! We considered putting the appliances on the long wall, but only would have had 4 feet in front of them (they stick out 3 feet from the wall after installation) which felt like it would be more cramped, like a galley kitchen (especially with a pull out system jutting into that space). By sinking them into the back wall (embracing that 8 foot depth!) we freed up 5 feet in front of them, which feels a lot more generous and less like a galley – plus you walk into the room and face everything instead of walking in and turning immediately while being in somewhat of an alley. I’m sure others might have opted for a sink & a galley layout (sounds like you definitely would have, and I completely respect that :)
xo
s
Bethany says
We just finished our ikea kitchen remodel and we used three base filler panels from rev a shelf ; (2) 3in pull outs for spice racks and (1) 6in pull out for cleaning supplies. I highly reformed them! If you can shift your cabinets to install one instead of filler panels with wasted space, you totally should.
http://www.rev-a-shelf.com/p-252-filler-pullout-organizer-with-wood-adjustable-shelves-wall-accessories.aspx
YoungHouseLove says
Ooh that’s smart! Not sure if there’s enough space for that but it’s awesome!
xo
s
Bethany says
Ugh. ***Recommend. Haha! It’s been a longggg day. We finally finished our kitchen Reno and we’re getting ready to put our house on the market. Throw in a 3 year old and a 14 month old; I’m delirious.
YoungHouseLove says
I’m delirious just thinking about that! Good luck Bethany!
xo
s
Alycia says
Not sure if you already know this or not but Ikea will take back the one you opened too. We just installed our FOURTH!! Ikea kitchen (rental properties) and ordered some extras by accident. They got built and everything before we realized they wouldn’t fit. I took them back and got a full refund, no problem. It looks great and I’m excited to see the rest: )
YoungHouseLove says
That’s amazing!
xo
s
kim says
Where are you going to fold and sort clothes? On that little section of counter? Or will there be a longer shelf/table? And what about a cool fold down ironing board? I’m just feeling like those shouldn’t be finishing touches; they are the part of the primary function of the room (sort, wash, dry, iron, fold, involving soap, bleach, fabric softener, irons etc) and should be incorporated as functional pieces, not decoration. What do I have wrong? I’m almost sold but its still not quite there for me…
YoungHouseLove says
We wanted to get the washer & dryer into the room to get a feel for how we could use that remaining space on the side and back wall best (guessing if something that folds down/attaches might feel cramped seemed premature – and waiting meant we can better determine what width/depth might work best). In other words, we have functional needs, but whether we go more vertical or wider with them seemed like a better call to make after the appliances and cabinetry were in. We’re currently considering a few hanging ironing board systems & fold-down drying racks, so we’ll keep you posted!
xo
s
Amanda says
Was the $800+ spent at ikea just for the cabinets or does that include other stuff as well? That seems really expensive for such a small amount of cabinetry.
YoungHouseLove says
That was everything including filler pieces, toe kicks, soft close upgrades, drawers, cabinets, frames, and under cabinet lighting :)
xo
s
Nicole B. says
Sorry to hear about your traffic troubles. What a pain! I always forget about Ikea cabinets. I’m excited to hear about how yours hold up over time. Looks great so far!
Rachel says
Omg! We we’re stuck in that traffic from hell too. Did you happen to see a frantic twin mama with the hatchback open racing two preschoolers to the car travel potty? I highly recommend the Potette plus (from amazon). Saved us from disaster with the kids.
We live in NOVA and I swear an ikea trip is a car adventure every single time. Be careful on 95!
YoungHouseLove says
Oh my gosh, I missed that but I’m sweaty just thinking about it!
xo
s
stacy says
we used ikea cabinets for out kitchen and installed them ourselves -we’re very happy with them! they look great and are holding up well!
Laura says
The room looks great! We installed an Ikea kitchen earlier this summer, and we love it. You are right, though, the Ramsjo white doors do have a pinkish tinge to them. I didn’t really notice it until we installed our backsplash, but it isn’t too distracting.
Nicole says
I just installed Ikea cabinets in my kitchen. I am happy with them and the install was relatively easy. I really recommend sticking with white. We went with the dark rockhammar. And I am slightly annoyed that you can see the birch boxes through the seams of the doors and drawers.
Also, Ikea took back cabinets that I built that turned out to be the wrong size! I had already nailed the backing on. And it wad totally my fault for getting the wrong size. They resell them in their half of sidewalk sale.
YoungHouseLove says
So glad!
xo
s
Monique says
I’m dying to know how people live without a sink in their laundry? Where do you soak things and scrub stains? I also use mine to rince out paint brushes and rollers which certainty isn’t everyone’s cup of tea. But I couldn’t live without mine!
YoungHouseLove says
We debated adding one but it would have been so small that in the end we opted to go without. What we really want is a utility sink in the garage since we use that as a workshop a lot (that would be an awesome spot to wash brushes and rollers!). We have a hall bath off this hallway so that’s where we have been spot cleaning things so far, and it seems to work. We also love that our top loading washer can be filled with water and then the lid can still be opened to add/soak things (we couldn’t do that when we had front loaders since they always drained before you could open them).
xo
s
Leah says
Hi, I love what you do! Especially loving watching you make a tiny laundry into a proper room, but I can’t work out why you haven’t put a sink and taps in that little space? I know you mentioned earlier the planning of the room but what about soaking and handwashing?? Maybe there is a sink going in there now, but I can’t see the taps!!! Exclamation marks cause I couldn’t live without a sink in my laundry. P.s. I am in Australia, so maybe its just me/us!
YoungHouseLove says
It sounds like laundry sinks are standard in Australia, but here it’s not as common (we know a lot more people without sinks than people who have one). In our case, the sink would have been really small if we added one, so we opted not to. We have a hall bath so that’s where we have been spot cleaning things so far, and it seems to work. We also love that our top loading washer can be filled with water and then the lid can still be opened to add/soak things (we couldn’t do that when we had front loaders since they always drained before you could open them).
xo
s
Leah says
Hi again, you’ve answered the sink question a million times already, just skim read the comments. I’ve never commented before, but this is upsetting me!! you need a sink! It’s too late now tho I guess. I’ll get over it. You do such beautiful quality things, thanks for providing one of my daily reads.
YoungHouseLove says
This has been a common Aussie question (just got a few other comments about the same thing right before yours)! It sounds like laundry sinks are standard there, but here it’s not as common (we know a lot more people without sinks than people who have one). In our case, the sink would have been really small if we added one, so we opted not to. We have a hall bath so that’s where we have been spot cleaning things so far, and it seems to work. We also love that our top loading washer can be filled with water and then the lid can still be opened to add/soak things (we couldn’t do that when we had front loaders since they always drained before you could open them).
xo
s
Jamie B says
Yay for Ikea cabinets!!! We gutted our kitchen 4 years ago and did everything in Adel white. We absolutely love it! The cabinets are so easy to clean. Even all the black marks left on the cabinet shelves from years of pans scraping it came off effortlessly with a little Magic Eraser action. We went to Lowe’s and had them color match to custom make a color that matched the Adel white perfectly, so we could paint the rest of the window trim and our back door to match.
Sadly, we are selling that house TODAY and I’m going to miss that kitchen like whoa. But, I’m pretty sure we’ll be updating the next house with an Ikea kitchen in the future!
YoungHouseLove says
Oh man, good luck on the house sale!
xo
s
Selena Blake says
Just curious, why did you move the appliances back in before putting in your baseboards?
YoungHouseLove says
The cabinet on the right needs to be fully built-in before any baseboard goes in (we didn’t want it sitting away from the wall due to baseboard, we want it flush with a filler piece and then baseboard goes in – and we couldn’t finalize the placement of that cabinet without properly installing the washer & dryer since the overflow drain and washer pan had to be in the exact right spot since it was attached to the floor). Long story short, adding baseboard around the washer and the cabinet made more sense than putting them in first since they would bump into our room and crowd the washer and cabinet and then we’d have to work around them with things bumping into the room more from the sides.
xo
s
Gilly says
I am so glad someone asked this, and I am so glad you answered! This EXACT THING is what we need to know, because while this type of thinking is so common for you J&S, this is EXACTLY what most of us would have to rip out and re-do because we didn’t think it through. :) Happy Friday to all!
(I still come here like the trained monkey that I am, every Friday at 10 AM, and hit my F5 key haha, before I remember it’s Friday.)