Ready for the next chapter of our sandbox project? If you’re not, I can tell you one person who definitely was. Her name rhymes with Blara.
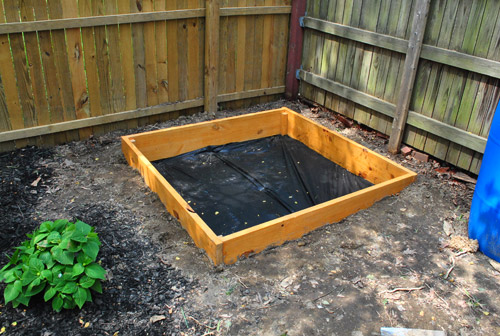
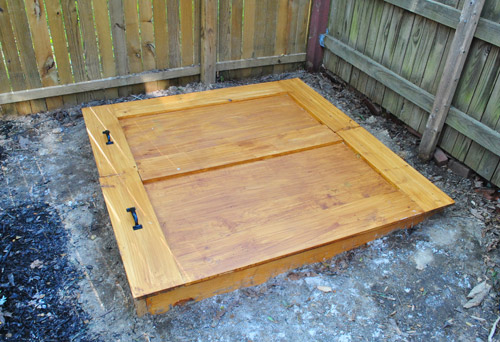
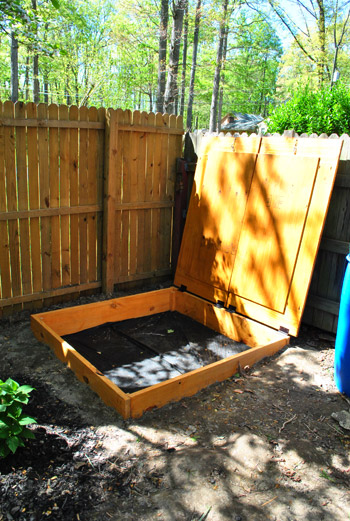
Here’s where we left off. Box built (more on that here) and awaiting sand. But in need of a cover first.
Having looked at a bunch of other DIY sandbox covers (like the awesome ones from Dana Made It, Small & Friendly, Modern Parents Messy Kids, and Dover Projects) and based on our own experiences, we compiled a mental list of what we wanted (and didn’t want) out of our cover. Our checklist was something like this:
- Should primarily keep out natural debris (leaves, acorns, etc) and animal “debris” (from neighborhood cats, birds flying by, etc).
- Should help keep water out, but we weren’t going to be crazy about making it completely airtight.
- Should be sturdy – so no tarps that could fly off or other plastic that might warp. Wood felt like our best bet.
- Shouldn’t be too heavy. If lifting it were a burden, we might be less inclined to use it.
So this is what we came up with. It doesn’t make much sense in it’s pre-constructed phase, but I promise it’ll all come together a bit later.
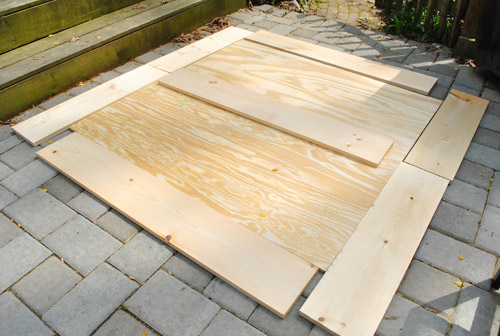
The concept for it was born from the fact that plywood was the cheapest way to cover such a big area (a 5 x 5 ft square, essentially) but my experience with plywood outdoors is that it can warp. So we decided to buy two 2 x 4″ plywood sheets with a frame of 1 x 8″ boards around it – both to add stability and to make it large enough to do the job. Plus since it’s right off of our patio we wanted it to look clean and finished and not like a plank of wood tossed haphazardly over a box.
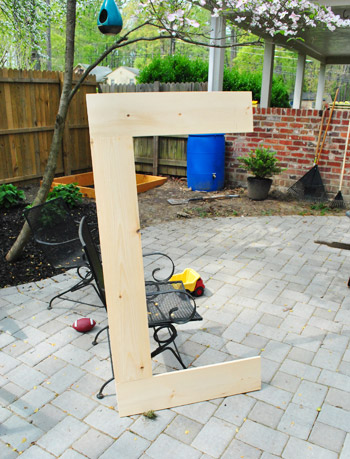
Oh, and since one big 25 square foot cover threatened to be quite heavy – we decided to build it in two interlocking pieces. So here’s the frame for one side (I attached the frame boards using my Kreg jig). Hey look – it’s a C for Clara.
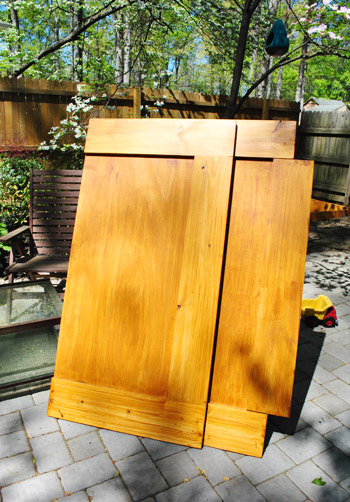
After building both frames and screwing the plywood to it from the underside, I stained both pieces with the same Behr waterproof Deck Stain in a “Natural” color that I used for the sandbox itself. It came out a bit streakier than I would’ve liked, but in my continued efforts to not stress about a sandbox I let it be (will Clara care about a less-than-perfect stain job? I certain hope not). Oh, and you’ll notice that one side has the board kinda dangling off the side. That’s a middle piece that I added to cover up some of the seam between the two sides. It’ll make more sense when you see it all in place in a few pics.
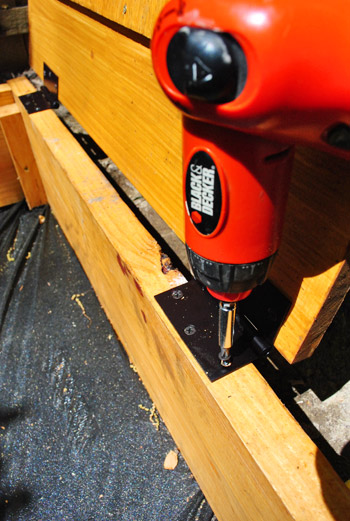
We could’ve just let the cover sit freely on the top of the box, but I opted to attach it with some hinges so that we wouldn’t have to carry the whole thing every time Clara wanted to play.
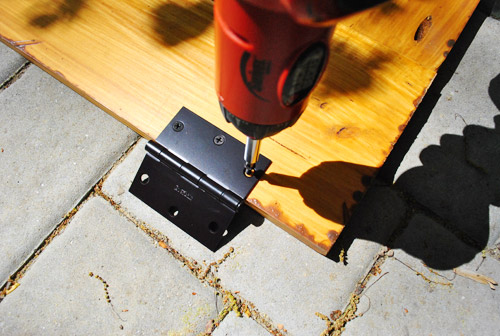
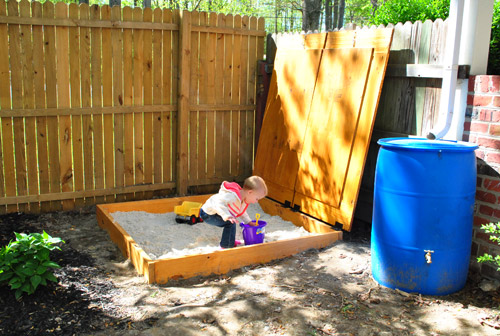
Plus, this meant the cover could rest against the fence rather than having to be stored somewhere else on the patio while the sandbox is in use. So I attached the other half of the hinge right to the top of the box itself.
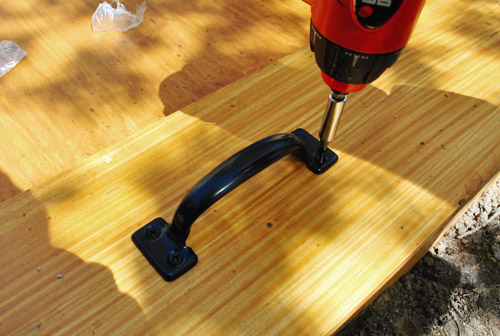
While we’re on the subject of hardware, we also attached a matching handle on each side of the cover for easy grabbing. They actually polished things off a lot. Note to self: add hardware to stuff, it makes it look legit.
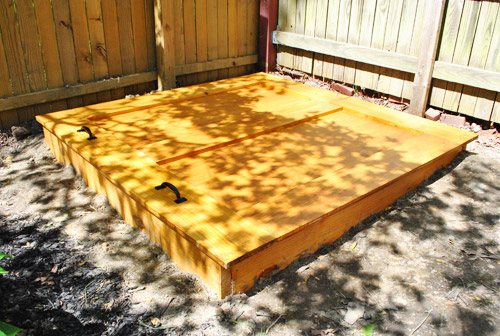
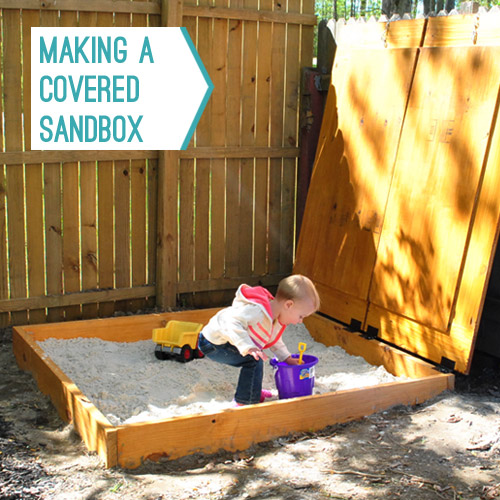
Here it is with the cover finished and attached, but I realize it’s a bit hard to see given the tree shadows…
…so let’s momentarily skip ahead to some pictures I took later in the day when the sun was starting to set. It’s not as pretty looking, but there aren’t those blotchy shadows going on. As for rain collecting on those panels, we’re going to see how it goes, but there are a couple of seams and cracks that should let it drain out well. So far (with very small rains) it has been fine. But if we have a gully washer and it’s an issue we’ll alter it with some drainage holes and report back!
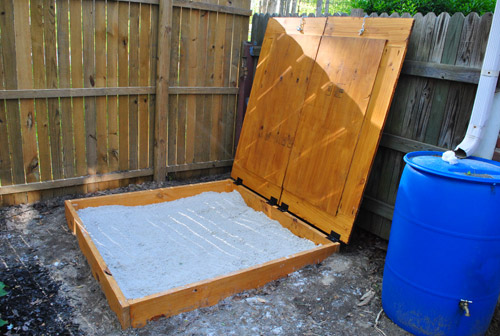
And now you can see how each side can swing open to reveal the sandbox beneath.
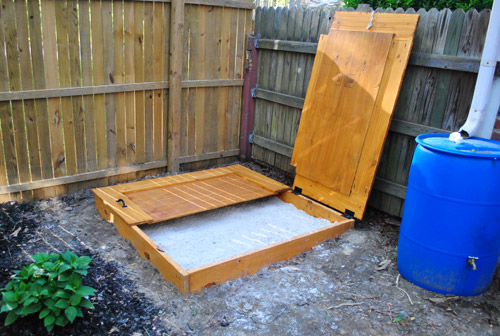
Ta-dah! Oh and you’ll notice that the rain barrel has a fully fused plastic top on it (so there’s no danger of Clara somehow climbing on top of it and falling into water). Sometimes from pics of the side, folks assume that a rain barrel is topless, but it’s closed and has very small mesh circles where the water filters through (to keep mosquitoes out).
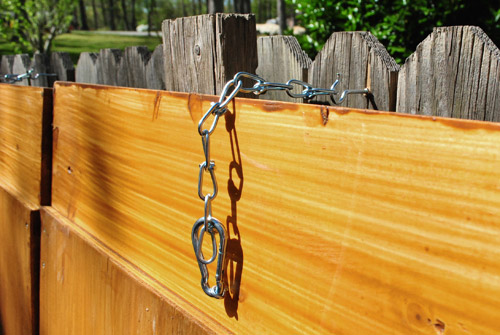
And on the subject of child safety, you may be thinking the same thing we thought – “Ack! What if Clara pulls the cover down on herself?!” So we installed a little safety latch to keep that from happening. It’s a bit of a contraption (again, me over-complicating things) but it’s basically an eye-hook screwed into the underside of the cover with a piece of chain attached via carabiner. When the cover is closed it sits hidden under the box, but when resting against the fence we can hang the chain over a hook we screwed into the fence post.
These may look dainty, but they’re actually nice and heavy duty. We tugged on them more than a few times just to be sure they’re really in there. So when the sandbox cover is open and locked in this position, it’s not going anywhere. It’s especially nice that the hinges rotate more than 90 degrees since the cover can lean back on the fence for more security (if it were frozen in the air at a 90 degree angle we’d worry it might be more apt to fall closed, but when leaning back against the fence and hooked into place, it’s nice and secure). So now that we’ve covered how the cover works, I’m going to rewind to a time when there wasn’t sand yet in the box. A much sunnier, distractingly shadow-y time.
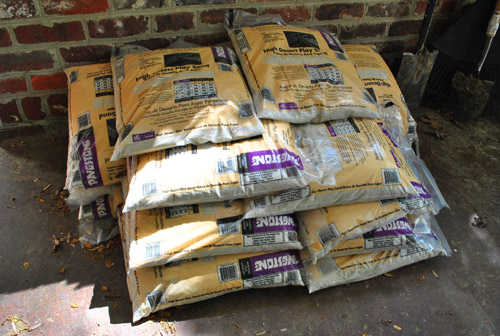
Even though I showed you a few extra bags of play sand that we had sitting around from last year, I still bought about 15 more because I knew it would take a lot to fill it up and give a decent amount depth for Clara to really get her dig on.
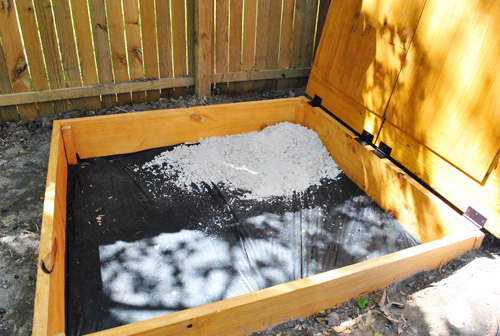
I call this picture “the inaugural sand” – my sand box equivalent to a ceremonial cornerstone or symbolic spike that connected the railroads. But it’s really just the first bag I dumped in there.
As I dumped bag after bag of sand, Clara stood patiently waiting for her cue to play. Patience isn’t always her strongest virtue, but I have to give her props for being a very calm lady in waiting this day. Look at her all poised and ready with her bucket and her shovel.
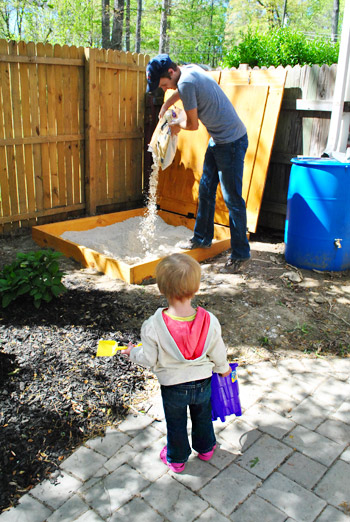
20 bags of sand later – we gave Clara the go ahead.

And the rest is history.
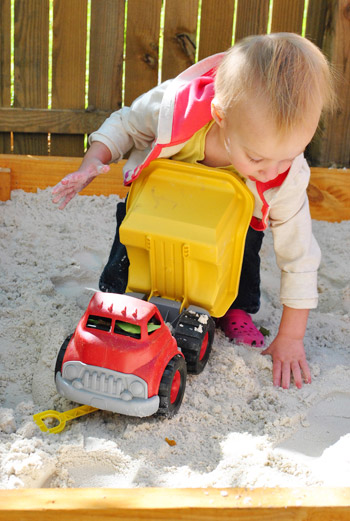
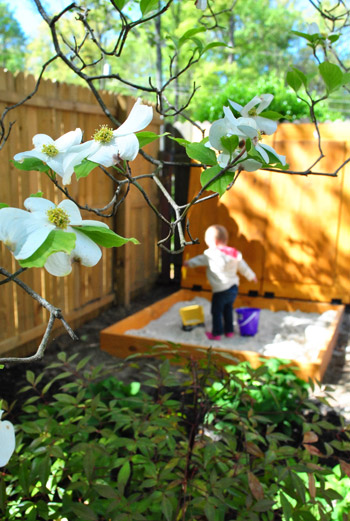
Think she likes it?
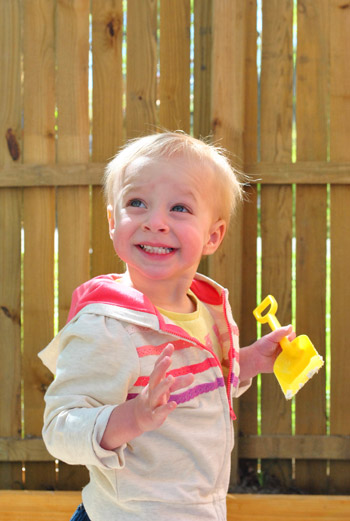
We’re just as happy about it. The location is perfect for letting her play in a contained area (the patio is fully fenced in) while allowing us to sit outside and try to get some work done in a nearby chair. Plus, it’s pretty shaded most of the day too.
I must admit, in addition to be a bit more complex than I had set out to make it – it also was a bit more expensive than I had prepared myself for. Both wood and sand really add up quickly, but after looking up other wood sandboxes (many which didn’t even come with a cover and were $180 or more, like this one from Target) I felt a lot better. Plus sandboxes don’t come with sand, so that’s always an added expense. Here’s our budget breakdown:
- Wood for 5 x 5′ box: $17
- Wood for 5 x 5′ cover: $38
- Stain: $22
- Weed block: $0 (leftover from last year)
- Hinges, handles & safety hardware: $21
- Sand: $48 (thanks to some leftover bags from last year)
- TOTAL: $146
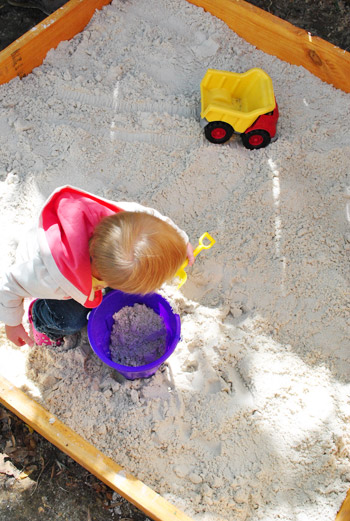
Clara happily digging around for hours on end: priceless. And so ends the two-part saga that was…
OR DOES IT? Just when we thought our sandbox adventures had come to a close, something else happened. And it resulted in a little sandbox remix. More details tomorrow (we just have to edit the pics and write the post up). Then it’s really over. Whew. Who knew a simple sandbox would turn into a trilogy? In the meantime, have you added hardware to anything that suddenly felt more legit? I’m telling you, it’s a thing.
Pssst- To read The Sandbox Chronicles in their entirety, here’s Part 1 (about building the base of the box) and Part 3 (about swapping what we found out was unsafe sand for pea gravel).

K (Barking Babymama) says
I LOVE the picture of Clara waiting with her shovel and pail – SO SWEET!
Sylvie says
Hmm, sounds like part 3 deals with the safety issues with play sand. We just added a sandbox to our deck for our 15 month old, courtesy of the in-laws. They got designated “play sand”. But after reading about the dangers of “play sand”, I’m trying not to hyperventilate and ask them to spend literally a hundred dollars more to switch the sand. Don’t want to seem ungrateful, but I still worry. Being a parent sure means endless worries!!
Emma says
OK. The picture of Clara waiting for the sandbox is a classic. Kind of like me walking in to Home Goods. Great sandbox!
Amanda says
Nice job! She needs some little triangular seats in nailed into the corners something like the below photo, maybe! I had a sandbox home made when I was a kid and liked my little seats instead of always sitting in the sand, I can remember. :)
http://www.akidplace.com/v/vspfiles/photos/00130-2.jpg
YoungHouseLove says
We considered doing something like that, but I was having flashbacks to my childhood sandbox with those where they house lots of spiders and other creepies… so we opted against ’em for now.
-John
Lisa says
Just grab a couple of dollar bin plastic step stools as part of your sand box toys (seriously check the Target dollar bin section and grab them in various colors) and there is an easy fix to the sitting in the sand part…you can just put one or two in the box when she and her pals are playing and they can sit on them (or use them as part of their adventure). Then when you are cleaning up the toys, take them out so that they don’t attract any of the creepies!
Actually, they would be good on your patio too…a little seat just for kids…mine love it! :)
YoungHouseLove says
That’s a great idea!
xo,
s
Jaz says
Wow! What a great feature to the patio area – no doubt Clara’s favorite!
I saw another comment on the concerns with certain types of sand & your response, so it sounds like you’re on it (of course, you guys rock!). And, I thought I’d share this great link from WebMD Healthe Home on this topic complete with a quick video:
http://www.webmd.com/health-ehome-9/default.htm#nav
These posts make ME want to spend some time playing in the sand box! :-)
YoungHouseLove says
Thanks Jaz! That’s a great link!
xo,
s
LARY @ Inspiration Nook says
How awesome! I hope one day I get to build one for our kids. :)
Virginie says
This comment isn’t as much a reaction to this post than to your blog as a hole.
YHL is my daily dose of fresh air and positive thinking, as I see you guys moving from one project to the other with so much energy !
Life brought me to a place far away from my family, and I cannot wait to finally go on home-improvement adventures with (for) them, like you do everyday. I am specially intrigued by carpentry, and your own wood experiments inspire me so much !
Keep up the great work, you have no idea how much good you do!
I hope this comment didn’t come out too creepy (I’m sure it did :), and pardon any mistakes, as English is not my native language.
It is just my own simple, flawed way to tell you how much energy you let sip through those pages.
Keep being awesome, and enjoy each and every second of it !
YoungHouseLove says
Aw thanks Virginie! You’re so sweet! And your English is perfect!
xoxo,
Sherry (& John)
Meg says
YEAH! I have been trying to convince my husband to let me craigslist our plastic sand box and make a bigger one that wouldn’t mildew if rain collects in it.
You will be so glad when baby #2 is ready to play in the sandbox that you made yours so big. Small sand box and multiple kids equals lots of fights and sand throwing!
I sent him the link to this post and my husband is now on board.
THANK YOU!
Sara says
Awesome sandbox!!! She is PUMPED!
Robin @ Our Semi Organic Life says
Oh the suspense! What will it be??EEE….
Jamie B. says
This brought back nice memories. :) My dad built an amazing playground (we had 2.5 acres) for me when I was little, all with his own two hands and ingenuity. There was a swing set, teeter-totter, the most BAMF playhouse you can imagine (although that came later) and a sandbox. Sorry, John, but I have distinct memories of digging down to the weed barrier, which was plastic, at which point I ripped through it and just kept right on digging into the dirt … lol.
That playground got a lot of use but gradually as I got older and the wood inevitably rotted it was all taken down until only the sandbox was left, which my mom turned into a flower garden. She got a kick out of emptying the sand out and finding old marbles and Happy Meal toys still buried in it.
Jenna at Homeslice says
Hardware or not, your sandbox is completely legit! It looks awesome, you guys think of everything! Clara’s a lucky girl!
Amy says
Love the sandbox. I am curious if you considered putting the hinge in the middle of the doors (underneath the flap cover board, and then had it lift and fold? If so, what made you decide against? I am just thinking that over time it may put less stress on the upper part of the fence and have less of a chance of coming loose since it will be lower to the ground and have a lower center of gravity. That and it would be lower in the case of monkey children trying to scale the lid. I have one of those at home too. :)
YoungHouseLove says
Hmmm, it just didn’t cross my mind I guess! Maybe it’s something we’ll look at doing if this solution wears out more quickly than we expected.
-John
Rachael says
After 4 children, I am really a bit, errrmmmm, lax on safety, but even I breathed a sigh of relief when I saw you latched those lids up!!
And love Lilly up there^^^’s idea for chalkboard paint on the lid. On the outside OR inside!
Kate @ zMOMbie says
How awesome! Ellie wants to come over and play. :)
Katelyn says
Looks wonderful! we had a very similar sandbox growing up, it was a blast! We also used the lid for a stage =)
John@ Our Home From Scratch says
Dude. That sandbox is awesome. Nice!
Kristi says
http://www.youtube.com/watch?v=lxg9axJS
$herdog…Whaaaa?!?!?!?!
YoungHouseLove says
Haha, that’s not $herdog! $herdog doesn’t know what you’re talking about. Haha.
xo,
$
Kristi says
Well whoever she is, She is soooo cute!!! Haha
kristin j says
I really need to add hardware to my built-in entertainment center, but I just dont know how to go about picking something that will look good…but it really needs it
Sammy says
http://www.youtube.com/watch?v=lxg9axJ
OMG Sherry!
YoungHouseLove says
Haha, I don’t know what you’re talking about. Haha.
xo,
s
Debbie C says
Wow, this is so great! Clara must be so happy! John, you and your Kreg jig are unstoppable.
Bethany says
Pic of her, with shovel and pail in hand just ready to dive in, is awesome!!
Christina says
Great job guys!
On another note, is it weird that as an adult I want Clara’s jacket/hoodie?
YoungHouseLove says
Haha- I want all of her clothes to be my size (and I want her long legs too- haha).
xo,
s
John Manross says
I think that’s one cool sandbox right there. Thanks for posting the financial details of the project, too. This is one cool way to convince people who want to do DIY projects that they won’t be spending a fortune in the procesa.
Alison says
So neat! My favorite is her waiting with her shovel. So sweet. I think we need a video of her in the sand box talking. :)
Thais Bessa says
OMG there is a third part, can’t wait!
I was wondering what do you guys think about painting some cool art in the inside part of the cover, so when it is open and she is playing inside, she can see cool pictures that remind her of the sea and sun. That should be no problem for artist Sherry!
Since we are talking about building stuff for kiddos and we have a little one almost same age as Clara, I wanted to ask you guys something. We are in the process of moving her from a cot to a toddler bed. Are you planning to move Clara soon? If so, are you going to build her a little bed? That would be brilliant!
YoungHouseLove says
It would be fun to decorate the inside cover with art or chalkboard paint or something! As for moving Clara to a bed, she has three older cousins (7-12 months older) and they’re all still in cribs so we’re just sticking with the family. Haha. Our doc said something about doing the crib as long as she’s comfortable and we can since she’s sleeping so well! We’re actually planning to use a daybed as her big girl bed once she’s ready for that though! SO excited! And we would love to build a trundle bed under it to pull out for sleepovers a lot later on!
xo,
s
Lisa says
My daughter was 3.5 years old when she moved out of the crib and into the toddler bed. We kept her in there as long as we could! Now, at 4, she sleeps in a twin bed that my dad made for her from an Ana White plan. It is a daybed look…we just had him make two headboards, instead of a headboard/footboard. It is AWESOME! It is pretty high up, but will grow with her so nicely and it is so sturdy! It has plenty of space for a trundle or storage underneath. While he was at it, he made the same bed for our son, just used the two footboards instead of headboards because his room is smaller and will be more regular bed, than daybed. I will have to post some pics soon on your FB page and on the Ana White page!
YoungHouseLove says
That’s so much fun! Would love to see pics!
xo,
s
Tasmin says
You should totally paint the inside of the lid with chalkboard paint, double fun and it would visually look great!
YoungHouseLove says
A bunch of people have suggested that actually! Such a fun idea!
xo,
s
Lara V says
WOW!!!! That cover is amazing!!! Great work guys!!! I’m sure Clara will enjoy that sandbox for years!!! Makes me wistful……seems like mine were just playing in our sandbox and now they’re 11.
Sarah says
That looks so legit! I love the pic of Clara waiting for Dad to pour the sand in…classic!! Does it remind her of the beach in Hawaii?
YoungHouseLove says
I think so! She still talks about Hawaii! It’s so funny how we thought it wouldn’t be something she remembers, but she chats about whales and the airplane and the beach and the pool. And the wild chickens we saw! So cute!
xo,
s
Michelle @ Lifewithacrazypup says
I love Clara’s adorable little face when she was showing you how excited she was about the sandbox! She’s so precious. I love her name too! Whenever kids come into our life, my husband and I have considered the name Claire (which is kinda close, haha!)
YoungHouseLove says
Aw, so cute!
xo,
s
Sid says
Please tell me post 3 isn’t going to be about you replacing all the sand for different sand. We all grew up with play sand. We’re all fine.
YoungHouseLove says
Things have changed since we were kids when it comes to how they make things! And anything that says “can cause cancer” on a container that’s labeled for kids is terribly wrong in our mind!
xo,
s
Katie says
This comment really has little to do with the sandbox. I didn’t want to backtrack to other posts, but I’m wondering if you have any good tips/ideas on combining brown with gray as far as decorating goes. I’ve never seen it addressed on my *professional* decorating blogs, so I was wondering if you had an opinion.
I will add though that the sandbox turned out wonderful. We’ve never made it to making a sandbox. When my 4th was 1, I was at Target and found one of the turtle sandboxes on clearance for $6. We’ve been using it ever since, but it’s on the tiny side and the sand is EVERYWHERE.
YoungHouseLove says
They’re both neutrals, so in our book they look great together! Many many rooms with gray have brown in them since if the walls or upholstered furnishings are gray there are usually a few wood items in each room that are brown in tone. It layers in nicely together- so our tip would just be to have a few gray things and a few brown things so it looks intentional and one brown or gray thing isn’t the odd man out.
xo,
s
Debra says
Sand boxes have such found memories. Our kids practically lived out in theirs – then my husband built a fort over their sand box. They still played in the sand box more than the fort! Your door to cover it up is ingenious idea!!
JZB says
You two crack me up! Once again, amazing job. I’m so inspired, but know I will never have the time to do that myself.
Deborah says
I adore the sandbox, and Clara, and don’t be surprised if Burger takes a notion to dig in it, too. If you put talcum powder or corn starch on Clara’s skin—if she’s wearing shorts, sun-suit, et cetera—then the sand will brush/wipe off much easier. You can also buy a cheapie dust pan brush to stash nearby for brushing off the sand. Works a lot better than trying to dust her off by hand alone.
Re: adding hardware. I definitely agree that a bit of hardware is a nice touch, and practical. I added a simple but shiny shiny shiny handle to the inside of a screen door so we would “see” the handle and not push the door open by pushing on the screen. Worked great. I also bought some tiny little handles for my surprisingly heavy wooden recipe file box, but haven’t attached them yet.
YoungHouseLove says
Love the powder tip! And the hardware on your recipe book and screen sound so cute!
xo,
s
Jeff says
Please make sure you use “Silica Free” sand. Silica or Silicon Dioxide can lead to lung disease or even cancer if inhaled over time.
YoungHouseLove says
Oh yes, we have learned all about that! Stay tuned for this morning’s post!
xo,
s
Nikki S says
Hi! Love the sandbox. Great job as always.
As a mom of 2 older boys, I can tell you from experience that it is nice to have somewhere to sit when playing the sandbox with the kiddos. You may want to consider adding some pieces to the four corners per one of your inspiration sandboxes.
YoungHouseLove says
Thanks Nikki! We mentioned in the last post that John didn’t like those corners on his original sandbox growing up in VA since they got overrun by spiders/webs/creepy stuff- haha. So we just sit in chairs on the patio overlooking the sandbox while Clara is happy to sit right in the middle and dig in!
xo,
s
Katie G says
I am in my mid-20s and have no children, yet I’m sitting here thinking “ooh, I can’t wait to see what happens with the sandbox in part 3!” I realize this probably means I’ve lost it…haha.
YoungHouseLove says
Haha, what will we all do now that The Sandbox Trilogy has ended?
xo,
s
Eleanor@SavingOurWay says
Oh my gosh – the picture with Clara standing there with her bucket & shovel in hand, patiently waiting for her sandbox to be filled so she could play – is truly the sweetest!
Heidi G says
The sandbox looks great! We just added hardware to our kitchen cabinets (we didn’t have any before), and they look so much nicer now!
Michelle says
Good to know about the sand. Thanks for sharing. We’ve been planning to build a sandbox for awhile now too. Hopefully we get ‘er done this summer! ;-)
Claire says
You guys may already know this but apparently you can quickly remove sand from skin by applying baby powder.
YoungHouseLove says
Oh yes, love that tip!
xo,
s
brooke says
Thanks so much for posting about that sand!Had no idea! Rocks are cooler anyway :)
sara @ it's good to be queen says
the picture of clara standing there with her bucket and shovel, waiting on her daddy to pour her sand in…is PRECIOUS. what a blessing that little girl has in you two!!
Kate says
So I know you’re going to monitor the drainage situation for a while because you guys seem to be extra thorough. But once you figure out if that cover drains fine through the cracks…the underside of that cover is begging for some chalkboard paint. It is basically a chalk easel waiting to happen.
YoungHouseLove says
That’s definitely a fun idea!
xo,
s
Lynn @ SafeBeauty says
Whew! Thanks for clearing that up Sherry. I don’t know why but I was so Google lazy today. I’ll try harder next time I try and sound like I know something! ;o)
My best, Lynn
YoungHouseLove says
No worries at all! Haha. I wasn’t sure either until I Wikipedia’d it! Haha.
xo,
s
Megan - Newly Wife says
I love the picture of her waiting. Adorbs!
Stacey says
Did yall take note of or do you happen to remember what you cut your 1×8 boards down to, to frame the sides?!