Ready for the next chapter of our sandbox project? If you’re not, I can tell you one person who definitely was. Her name rhymes with Blara.
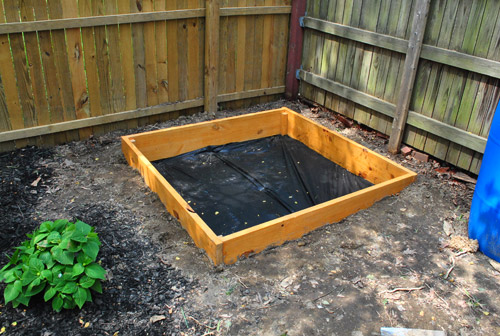
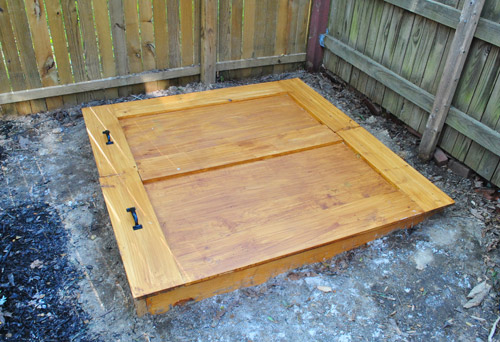
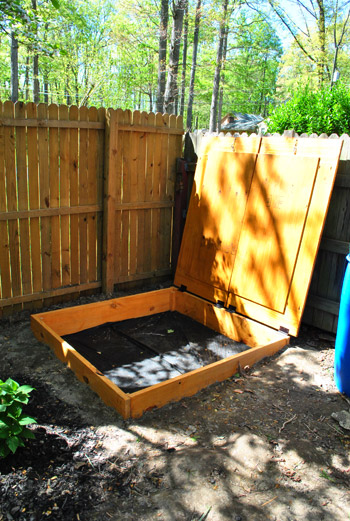
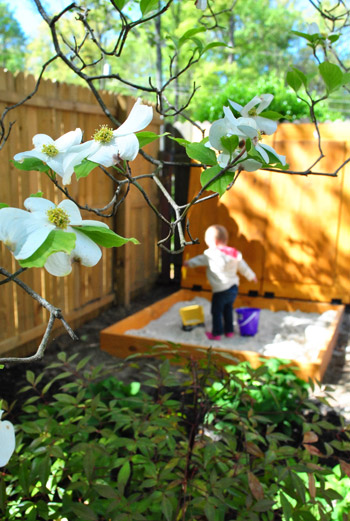
Here’s where we left off. Box built (more on that here) and awaiting sand. But in need of a cover first.
Having looked at a bunch of other DIY sandbox covers (like the awesome ones from Dana Made It, Small & Friendly, Modern Parents Messy Kids, and Dover Projects) and based on our own experiences, we compiled a mental list of what we wanted (and didn’t want) out of our cover. Our checklist was something like this:
- Should primarily keep out natural debris (leaves, acorns, etc) and animal “debris” (from neighborhood cats, birds flying by, etc).
- Should help keep water out, but we weren’t going to be crazy about making it completely airtight.
- Should be sturdy – so no tarps that could fly off or other plastic that might warp. Wood felt like our best bet.
- Shouldn’t be too heavy. If lifting it were a burden, we might be less inclined to use it.
So this is what we came up with. It doesn’t make much sense in it’s pre-constructed phase, but I promise it’ll all come together a bit later.
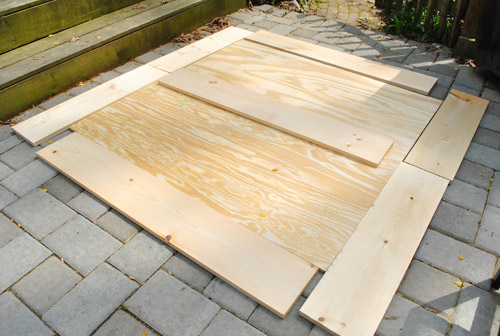
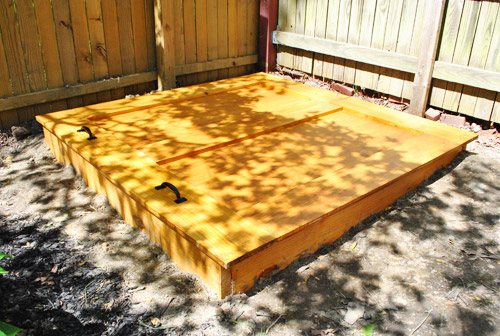
The concept for it was born from the fact that plywood was the cheapest way to cover such a big area (a 5 x 5 ft square, essentially) but my experience with plywood outdoors is that it can warp. So we decided to buy two 2 x 4″ plywood sheets with a frame of 1 x 8″ boards around it – both to add stability and to make it large enough to do the job. Plus since it’s right off of our patio we wanted it to look clean and finished and not like a plank of wood tossed haphazardly over a box.
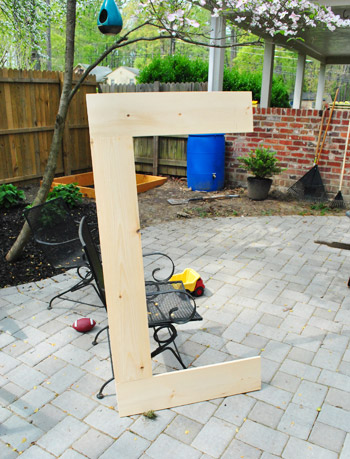
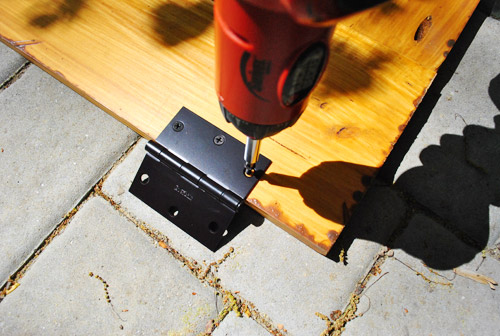
Oh, and since one big 25 square foot cover threatened to be quite heavy – we decided to build it in two interlocking pieces. So here’s the frame for one side (I attached the frame boards using my Kreg jig). Hey look – it’s a C for Clara.
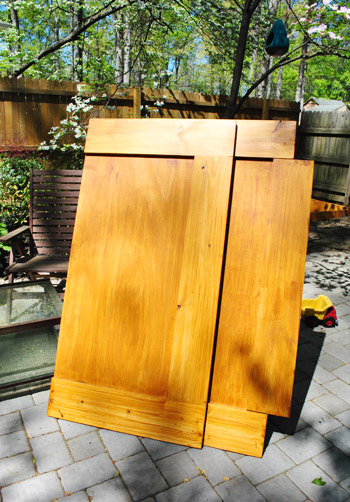
After building both frames and screwing the plywood to it from the underside, I stained both pieces with the same Behr waterproof Deck Stain in a “Natural” color that I used for the sandbox itself. It came out a bit streakier than I would’ve liked, but in my continued efforts to not stress about a sandbox I let it be (will Clara care about a less-than-perfect stain job? I certain hope not). Oh, and you’ll notice that one side has the board kinda dangling off the side. That’s a middle piece that I added to cover up some of the seam between the two sides. It’ll make more sense when you see it all in place in a few pics.
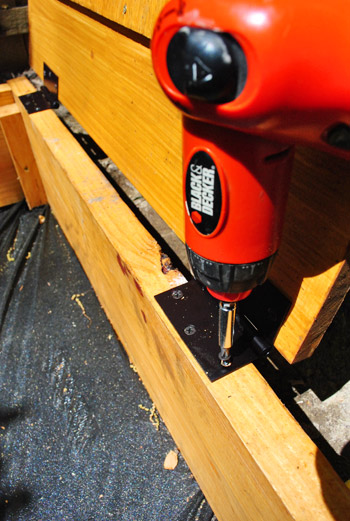
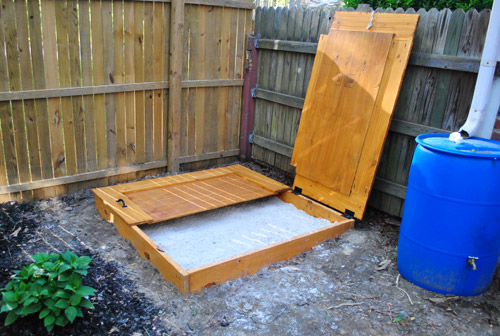
We could’ve just let the cover sit freely on the top of the box, but I opted to attach it with some hinges so that we wouldn’t have to carry the whole thing every time Clara wanted to play.
Plus, this meant the cover could rest against the fence rather than having to be stored somewhere else on the patio while the sandbox is in use. So I attached the other half of the hinge right to the top of the box itself.
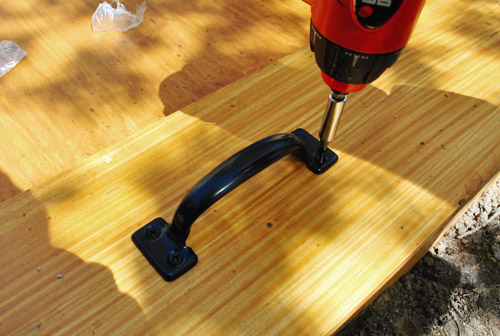
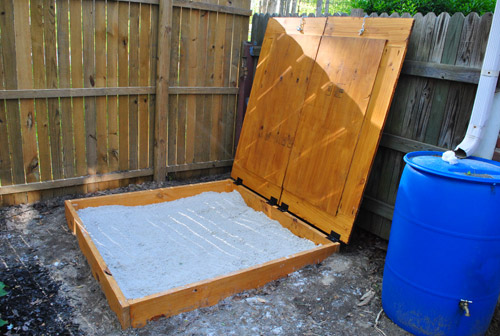
While we’re on the subject of hardware, we also attached a matching handle on each side of the cover for easy grabbing. They actually polished things off a lot. Note to self: add hardware to stuff, it makes it look legit.
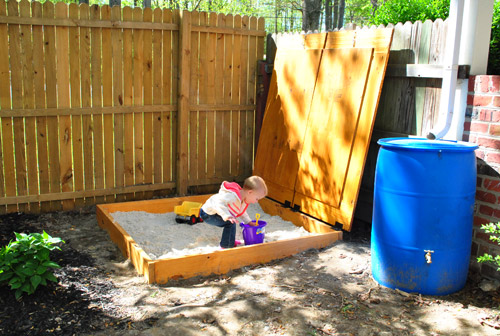
Here it is with the cover finished and attached, but I realize it’s a bit hard to see given the tree shadows…
…so let’s momentarily skip ahead to some pictures I took later in the day when the sun was starting to set. It’s not as pretty looking, but there aren’t those blotchy shadows going on. As for rain collecting on those panels, we’re going to see how it goes, but there are a couple of seams and cracks that should let it drain out well. So far (with very small rains) it has been fine. But if we have a gully washer and it’s an issue we’ll alter it with some drainage holes and report back!
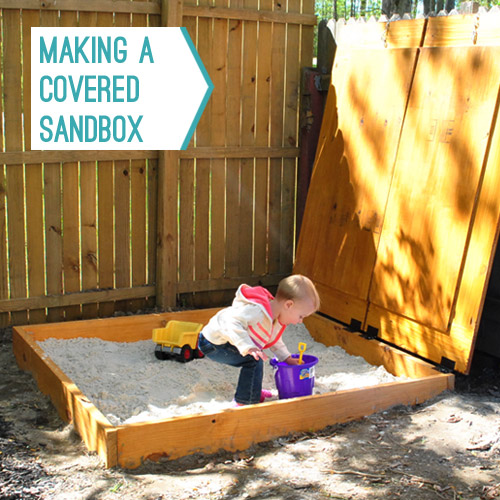
And now you can see how each side can swing open to reveal the sandbox beneath.
Ta-dah! Oh and you’ll notice that the rain barrel has a fully fused plastic top on it (so there’s no danger of Clara somehow climbing on top of it and falling into water). Sometimes from pics of the side, folks assume that a rain barrel is topless, but it’s closed and has very small mesh circles where the water filters through (to keep mosquitoes out).
And on the subject of child safety, you may be thinking the same thing we thought – “Ack! What if Clara pulls the cover down on herself?!” So we installed a little safety latch to keep that from happening. It’s a bit of a contraption (again, me over-complicating things) but it’s basically an eye-hook screwed into the underside of the cover with a piece of chain attached via carabiner. When the cover is closed it sits hidden under the box, but when resting against the fence we can hang the chain over a hook we screwed into the fence post.
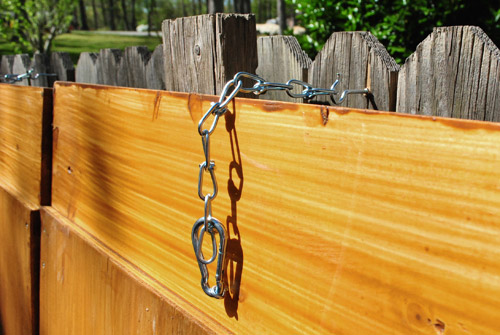
These may look dainty, but they’re actually nice and heavy duty. We tugged on them more than a few times just to be sure they’re really in there. So when the sandbox cover is open and locked in this position, it’s not going anywhere. It’s especially nice that the hinges rotate more than 90 degrees since the cover can lean back on the fence for more security (if it were frozen in the air at a 90 degree angle we’d worry it might be more apt to fall closed, but when leaning back against the fence and hooked into place, it’s nice and secure). So now that we’ve covered how the cover works, I’m going to rewind to a time when there wasn’t sand yet in the box. A much sunnier, distractingly shadow-y time.
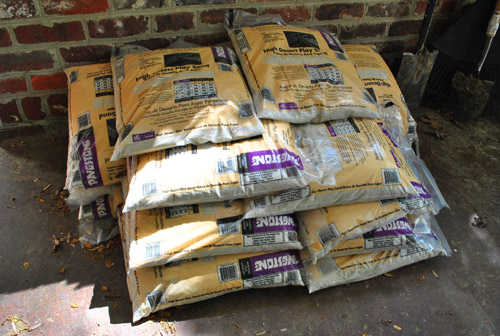
Even though I showed you a few extra bags of play sand that we had sitting around from last year, I still bought about 15 more because I knew it would take a lot to fill it up and give a decent amount depth for Clara to really get her dig on.
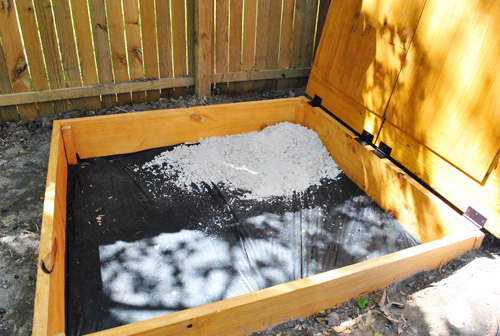
I call this picture “the inaugural sand” – my sand box equivalent to a ceremonial cornerstone or symbolic spike that connected the railroads. But it’s really just the first bag I dumped in there.
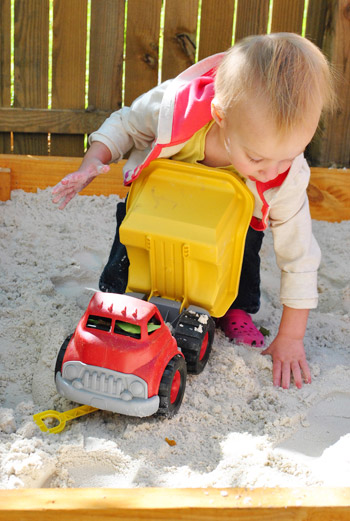
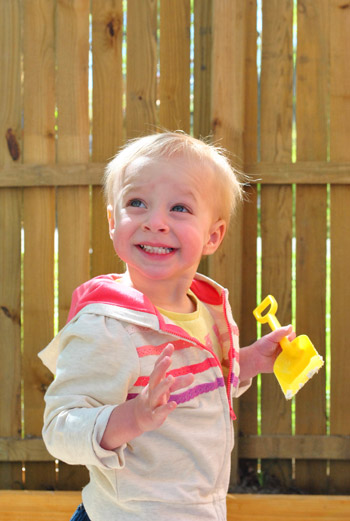
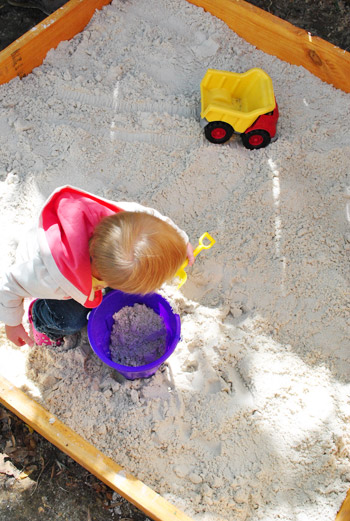
As I dumped bag after bag of sand, Clara stood patiently waiting for her cue to play. Patience isn’t always her strongest virtue, but I have to give her props for being a very calm lady in waiting this day. Look at her all poised and ready with her bucket and her shovel.
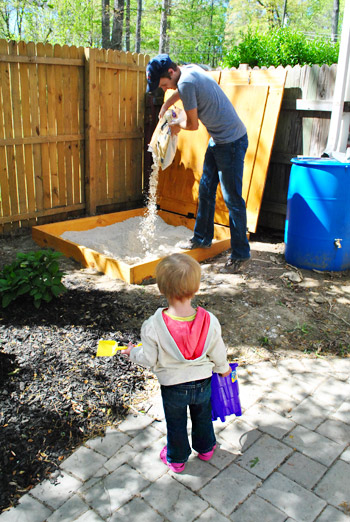
20 bags of sand later – we gave Clara the go ahead.

And the rest is history.
Think she likes it?
We’re just as happy about it. The location is perfect for letting her play in a contained area (the patio is fully fenced in) while allowing us to sit outside and try to get some work done in a nearby chair. Plus, it’s pretty shaded most of the day too.
I must admit, in addition to be a bit more complex than I had set out to make it – it also was a bit more expensive than I had prepared myself for. Both wood and sand really add up quickly, but after looking up other wood sandboxes (many which didn’t even come with a cover and were $180 or more, like this one from Target) I felt a lot better. Plus sandboxes don’t come with sand, so that’s always an added expense. Here’s our budget breakdown:
- Wood for 5 x 5′ box: $17
- Wood for 5 x 5′ cover: $38
- Stain: $22
- Weed block: $0 (leftover from last year)
- Hinges, handles & safety hardware: $21
- Sand: $48 (thanks to some leftover bags from last year)
- TOTAL: $146
Clara happily digging around for hours on end: priceless. And so ends the two-part saga that was…
OR DOES IT? Just when we thought our sandbox adventures had come to a close, something else happened. And it resulted in a little sandbox remix. More details tomorrow (we just have to edit the pics and write the post up). Then it’s really over. Whew. Who knew a simple sandbox would turn into a trilogy? In the meantime, have you added hardware to anything that suddenly felt more legit? I’m telling you, it’s a thing.
Pssst- To read The Sandbox Chronicles in their entirety, here’s Part 1 (about building the base of the box) and Part 3 (about swapping what we found out was unsafe sand for pea gravel).

Kim says
Thank god you covered it. That is a giant litter box for stray cats and raccoons! (Raccoons have similar habits to cats of all things.) When is the last time you saw a park with a sand box these days? They are non-existent around here. Nice job!
Kim says
Awesome job, I love it! Seriously, I’m so jealous of Clara. First the custom play kitchen, now this! (Amongst a million other things the two of you have done for her!)
Sara says
You should use chalk board paint for the underside. That way when it’s up she can draw too!
YoungHouseLove says
A bunch of folks have been suggesting that! So much fun!
xo,
s
Robin says
Do y’all love your job as much as I love your job? beautiful work…again! i’m so glad you saved Clara from a great big head bonk, safety latch is awesome.
YoungHouseLove says
Aw thanks Robin! We do love it- although there definitely are some redos along the way! Stay tuned for tomorrow’s post. Haha.
xo,
s
Meg says
What an awesome project! Clara is one lucky girl. I can see it now… “Put some hardware on it!” will be all the rage.
Birds had their day in the sun, now it’s hardware’s time to shine!
YoungHouseLove says
Haha, it’s true.
xo,
s
Bethany says
Not sure if other towns do this, but here in Ankeny, Iowa, the local chapter of the Jaycees does a free sandbox fill (donations accepted) every spring. We found this out after we purchased some sand for our dinky sand box, but maybe someone else can find something like this!
YoungHouseLove says
Wow- that’s amazing! Great tip for other areas who might do that!
xo,
s
Elaine says
On the safety concern front, I would also be somewhat concerned about an older child lifting up the lid enough to either crawl in and get trapped under the lid or get their head or neck trapped between the lid and side of sand box (Clara is probably too young and not strong enough). This has long been a concern with toy boxes and cedar chests and is why they are required to have special hinges (see http://www.CPSC.gov). One way to address this to provide a way to lock the lid in place when the sandbox is not in use.
Otherwise it is a beautiful sandbox. I truly enjoy and am inspired by your blog.
YoungHouseLove says
Great idea! That might be an issue with an older child, so we could always add a locking system to keep it shut when we don’t want it being opened.
xo,
s
Stacey says
I thought of this when I read the part about using the chain to secure it in the open position. You could probably use the chain to lock it in the closed position, too.
YoungHouseLove says
Oh yes, so smart!
xo,
s
Erin says
I love Clara’s new Sandbox and as an adult, I whole heartedly approve of the lid.
I had a sand box when I was a kid and at night the bears would come from the woods and play in our apple tree and it use my sandbox as a litter-box.
I was about 6 months older that Clara shaking my fist in the air yelling dirty Bears.
I must ask my parents why it never occurred to them to make a lid for it :p
YoungHouseLove says
Haha, that’s so funny! Dirty bears!
xo,
s
Jimmy says
Very nicely done John. More complicated than it needs to be? Sure. But it also looks really good. Well done.
Stephanie says
Love this – we need to get a cover on our sandbox, but we hadn’t really figured out how to do it in a way that would be easy to lift plus be secured so it wouldn’t fall back down. Way to go!
Angie says
The first thing that popped into my head when I saw the C of wood for the lid was, “Hey! A C for Clara!” Then I read your words and sure enough, Great minds think alike! And you literally made me giggle when I read “who knew a simple sandbox would turn into a trilogy?” I’m a major bookworm and reading references get me right in my giggler (the thing that makes me giggle). Can’t wait for tomorrow! Love the suspense!
Sue says
Let’s face it … we all know this blog thing is just a front for sharing gratuitous pictures of the Bean and the Burgs. And, frankly, I’m okay with that. Nice work, as usual!
YoungHouseLove says
Haha, amen! We know who the stars of this show are.
xo,
s
heyruthie says
please tell me that the “thing that happened” is that you and John realized how fun it is to play in there with Clara, and you built yourselves a little seat :-) My kids LOVE it when I play in the sandbox with them!
YoungHouseLove says
Haha, I wish! I have been playing with Clara but I sit right in it with her.
xo,
s
Casey says
I LOVE that picture of her patiently waiting. it is too cute!
Perhaps another plan one day is a matching box to corral her sand toys?
And hey, when Clara and and future Petersiks are all grown up- you will have a lovely zen garden :)
YoungHouseLove says
I’d love a matching box for her outdoor toys! We were just talking about needing one!
xo,
s
Wrenaria says
Super cute. Nice work, John!
YoungHouseLove says
Thanks!
-John
CohoesMom5 says
Our old day care center had their entire play area full of sand for one giant sandbox. It was fully fenced in with the same type ot stockade fencing and they never had any issues with cats or other animals using it as a litterbox.
I don’t see chalkboard paint on the cover but I do see ramps for cars to zoom down. (small pieces of wood screwed into the cover at random angles).
YoungHouseLove says
Ooh that would be fun!
xo,
s
Lisa says
So adorable!! Way to go John. Can my kids come play? :)
YoungHouseLove says
Sure! Come on over Lisa!
xo,
s
Heidi P. says
Wow. So impressed.
Darlene Marquez says
Random advice for keepin it real- I learned a trick a couple years ago that I tap all the time with my kids and sand: When they have the semi wet, hard to just dust-off-of-them-in-time-for-dinner sand all over them (or when they’re itty with that sensitive skin, or it sticks to pool water/sunscreen) use baby powder sprinkled on your hands and on them to slide it right off! Our powder sits right in our porch caddy with the sunscreen, and bugspray!
YoungHouseLove says
Love that tip!
xo,
s
Louise says
Water/rain is actually an important component of sandbox play. It’s cleaner and neater to have that pristine dry white sand, but for play, sand is best when damp and mold-able. We have a mesh cover that snaps onto our sandbox. Keeps cats and leaves out, but lets just the right amount of moisture in. Bonus is that the kids can remove and replace the cover on their own. Downside is that it doesn’t look as cool as your cover.
YoungHouseLove says
So smart!
xo,
s
decoratica says
Oooh! Waht a cute girl! I LOOOOVE the picture where she’s waiting daddy to finish her sandbox, sooooo sweet!!!
XO
Cydney says
LOVE LOVE LOVE IT!!!! You guys are so crafty! Now if you could come to Oklahoma and make one for my Everett & Spencer that would be awesome!
YoungHouseLove says
Sure! Be right over!
xo,
s
ashley says
a trilogy AND a cliff hanger?!? how very Hunger Games of you :)
YoungHouseLove says
Haha, just call John Peeta.
xo,
s
KP says
What was Burger up to during the sandbox build? Bring back the Burger Blog!!!
YoungHouseLove says
Haha, Burger’s over on younghouselife.com today! He pops up there a lot!
xo,
s
Linda from Norway says
Hey
Love your post on how to build a sandbox, we need to build one as well.
I was wondering though, as a regular reader of your blog, I know that you try to keep to eco friendly and organic products. what’s your best tip for roll ons/deoderants? I’ve tried SO many organic ones that haven’t really worked well enough.. THanks so much for replying!!? (I’m a teacher and not stinking is a priority, as is keeping it organic and safe..)
Thanks for a great blog, btw, I hardly ever comment…
YoungHouseLove says
We both use Tom’s Of Maine. Seems to work well for us! Hope it helps.
xo,
s
K (Barking Babymama) says
Piggybacking on that – Sherry what do you like to use for facewash? I have used Clean and Clear (cheap and effective) for 12 years, but I just ran out and am wanting to look into more natural options. Just wondering what you use!
YoungHouseLove says
I use Dr. Bronner’s soap as face wash and body wash and hand wash. It’s organic and mild and lovely! Plus you can get a giant bottle for $10 at Target and it’s meant to be watered down (it’s concentrated) so I fill a soap pump with half water and half that and then just use a squirt to wash my hands or face.
xo,
s
Kathy says
Has Burger been in the sandbox to play with Clara?
YoungHouseLove says
Haha, we have a strict rule about no Burger- just so he doesn’t get to sniffing around. Don’t want him to think it’s a place to “go” – haha.
xo,
s
Kathleen says
That’s great! Nice touch with the tops. Gully washer…ha!
Amanda says
Love Clara’s pink crocs. So cute!
Carla says
Nice job. And when she outgrows it, it would make an awesome coldframe too, just replace the plywood in the cover with plexi. Or maybe you guys don’t need coldframes that far south.
YoungHouseLove says
Ooh that’s a fun idea! I was thinking it could be a raised bed someday!
xo,
s
Reenie says
Very kewel…..great job. Love the pic of Clara waiting patiently :)
Crystal @ 29 Rue House says
Clara is such a lucky gal and you did such a nice job on the sandbox John. I’ve been wanting to get our little girl one of those trucks ever since I saw Clara pushing it in the kitchen. It looks like fun!
Lisa says
I love the photo of Clara standing with her pail and shovel waiting for the sand. So adorable.
We had a small beach in our yard (a Minnesota lake beach). :-) We would play in the sand for hours at a time making cities for the matchbox cars to drive around. We would spend the morning making our city and then after lunch “visit” each other’s cities. Fun memories. But definitely not the pretty smooth sand that Clara has!
Teri says
Clara is a lucky little girl, hope she enjoys playing in her new sandbox. Her hair looks just like my granddaughter Ellie’s(16 mo),it’s cute and one day she’ll have so much you will wish it was short again when you have to comb it and wash it, put it in pony tails, etc etc.
What is the floor of the sandbox made of? Is there a layer of wood under the weed matting?
YoungHouseLove says
It’s just a very packed “floor” of dirt with weed fabric on top. Since it’s not fluffy dirt and is really packed it’s sort of like a wood floor. It’s hard! Haha.
xo,
s
Lynn @ SafeBeauty says
Awesome job John, now umm…correct me if I’m wrong, but umm…isn’t a lady in waiting a bad thing? For some reason it brought back a vague recollection of every bar wench in every old cowboy film I’ve ever seen. I’m preeeeeetty sure they were called “ladies in waiting”. And that I am positive Little Bean is NOT! Haha!
My best, Lynn
YoungHouseLove says
Haha- I had to look it up! It says a high-ranking noblewoman: http://en.wikipedia.org/wiki/Lady-in-waiting
xo,
s
Lindsay L. says
Great job on the sandbox! But what is part three?? I CAAAAAAAAAN’T WAAAAAAAIT! :) Looks like Clara and I have something in common with our patience issues. The picture above of her showing self-control is inspiring.
Gina says
The sandbox looks great. Cute pic of Clara waiting patiently to get in and start digging! I am sure that the chain/hook thing is secure but just looking at that freaks me out!!! But I have this thing with the hood of my car, too…I swear that even when it’s resting securely on the the stick thingy that it is still gonna come crashing down on my head! (:
Sarah says
Looks great! My dad built us a sandbox when we were little too, and we got endless fun out of it. And I’m glad you found a good way to secure the lid when it’s up. I remember playing in a friend’s sandbox as a kid when a big wind kicked up. It blew the heavy wood lid back over the sandbox and slammed a small kid. Your chain and hook system should protect Clara from both herself and the weather – good plan.
Daniel says
Nice, but the fence-to-lid connection looks like it could be a little more secure–I’d probably want to go with something like a locking gate hook rather than just an open eye hook.
YoungHouseLove says
Someone would have to physically lift the chain to get it off of the eye hook (you can’t push the lid in any way to get it to “jump” off the hook). Hope that makes sense!
xo,
s
Amiz says
Holy sandy paradise, Batman!! I want to geet in there and play myself!! I love that you stained it, it makes it look a lot better than the natural look. Great work John!!
Natalie says
Not sure if anyone has mentioned this, but baby powder is GREAT at getting sand off of sweaty little hands, feet and whatnot. I originally ready about someone using a sock filled with baby powder to clean up their kids at the beach. I have used it at the beach with great success. It won’t clean her clothes, but if you strip the clothes off and wipe her down with a powder filled sock it might minimize the migration of sand into the house:)
YoungHouseLove says
Love that tip!
xo
s
Kristin Sirico says
You should paint the underside with Chalkboard paint for some added fun
YoungHouseLove says
Love that idea! It has come up a lot actually!
xo
s
NBI Suncontrol says
This is awesome. Thank you!
Keely says
You did such a great job mom & dad! She is going to have so much fun this summer! My kiddos play in their sand box all the time (and I’ll admit, I sometimes jump in and play too!)
Hey I wanted to make a suggestion for cutting down on the cost of sand (for when you need a ‘refill’ ;-) If you go to your nearest stone/paver/topsoil store, they also sell sandbox sand (atleast out here in Cali they do!). Our sandbox is about the same size, and it cost about $20 to fill it to the brim with sand. You do need a truck, and it requires some shoveling, but it’s a cost effective option.
YoungHouseLove says
Such a great tip!
xo,
s
jenny says
that picture of her waiting patiently, bucket and shovel in hand, is the most adorable picture i have ever seen. what a great moment to catch on “film” :)
Kate says
I looked at the picture with the cover leaning against the fence and had the following internal monologue: “Oh no. That is going to fall on Clara! *pause* I’m sure they’ve already thought of that. They’re so good. *pause* But what if they haven’t!? Oh that would be awful! But they have to have thought of that–they wouldn’t have forgot that.”
Sorry to have ever doubted you! It looks great just great and Clara is one lucky girl!
YoungHouseLove says
Haha, thanks Kate!
xo,
s
Rachel says
Sorry if I missed it…where did you get your sand? It looks finer and less dusty than most of the “play sand” I’ve been able to find. Clara is a lucky girl. That’s a great sandbox. Sort of inspires me to turn a raised flower bed in our yard into a sandbox for my little guy!
YoungHouseLove says
We got it at Home Depot. Although if we were going to do it again we wouldn’t have done that. More on that tomorrow!
xo,
s
Shanna says
Love the sandbox! I’m glad your fence is sturdy – if we leaned that lid against my fence -the weight of the heavy lid would crash my fence.
House Candy says
Oh wow! It came out great! I like the added safety of the doors leaning against the fence and secured with the hooks. Clara is one lucky little girl :)
Becky@OrganizingMadeFun says
You guys are so original in all your stuff! Great job! I love it – and my kids {ages 8 and 12} STILL play in the sand box! If you are able to, think about putting some place for you or her to sit on the edge. Ours had that and it’s great when I can {well, I used to} sit and play a little bit with the kids in the sandbox. Glad you have a tree close by to keep her shaded…that makes her want to be in there even more.
Becky B.
http://www.organizingmadefun.com
Organizing Made Fun
Koliti says
I love, love, love the way you both honor your daughter with thoughtful projects that bring squeals of delight! (can you tell that I didn’t have a cool kitchen or a fun sandbox when I was growing up?)
Also love your child-safety measures – because even a freaky gust of wind can blow things around.
Thanks for sharing! I enjoy seeing the look of total happiness on Clara’s face!