When Rhoda sent her amazing DIY staircase makeover we had to share the goods. Here’s her letter:
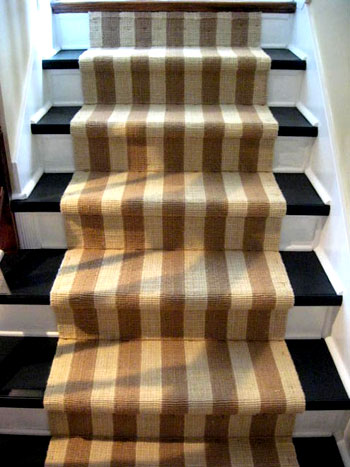
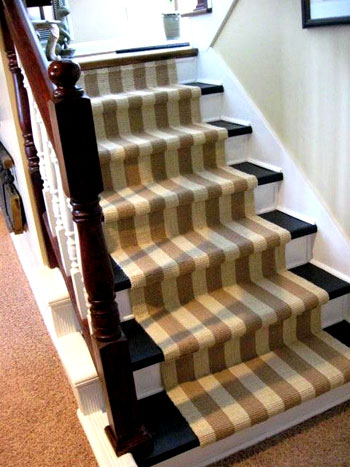
I wanted to pass along photos of my latest project, since y’all are such DIY loving people. I hated the carpet on our downstairs set of steps, so I ripped all the carpet up. Oooops, you can see from the pics what I had to work with… and these stairs were never meant to be shown to the public. But, I slowly transformed them by adding TONS of molding (I just used my hand miter box and lots of paint- including porch and floor paint for the stair treads). Then I added a natural jute runner down the middle (from Overstock). After stapling it on our stairs look absolutely fabulous, if I do say so myself. This is by far my most favorite DIY project that I’ve completed to date! Oh and you can find more info on my blog. I hope you enjoy! -Rhoda
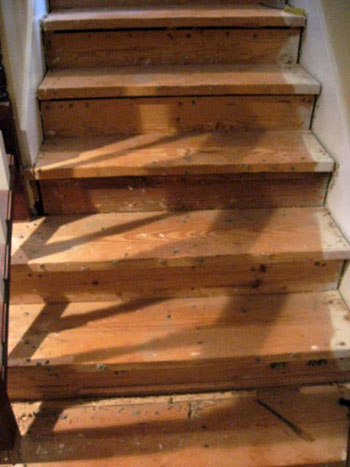
Here are the terrifying before photos to show you what Rhoda was really working with:

And here are the amazingly polished and pristine after photos after Rhoda worked her magic:
Is your mouth totally hanging open like ours is? We’re amazed and inspired by Rhoda’s hard work and unyielding DIY confidence. And we can totally see why it’s her favorite home makeover project to date! Everything from the chic black and white paint to the affordable and perfect-for-stairs striped runner has us drooling over here. What do you guys think? Did Rhoda show those stairs who’s boss or what? Anyone else inspired to attack their less than stellar stairs now that they’ve seen her work her magic? If only ranch houses had stairs…

Shana says
Oh my word. I want to do that right now!
B&S says
Oh man that is awesome! We’ve got a ranch – but with stairs (to the basement of course). Our stairs are awful – steep, ugly carpet..etc etc – and I’ve always felt pretty hopeless about them – but this is inspiring to at least give some thought to how we could fix them up!
Melissa says
It is AMAZING what molding and paint can do for pretty much anything – even an ugly stairwell! Great job, Rhoda, and I love your blog too!
Melissa
http://www.houseography.net
Ange says
Ooh! So nice. Totally inspired. I have a different dislike with my stairs. They are a beautiful polished timber but they are open strung, so you can see right through them, which I have always hated. I am saving Rhoda’s pics to show hubby. We have always discussed the best way to enclose our stairs so that we could keep the polished treds, I think Rhoda’s moulding technique might just be the ticket. Thanks to her & YHL!
Kathryn says
Love this!!! We plan to redo our basement stairs (ranch w/ partially finished basement) in the near future, and this is exactly the look I want! I just looked on Overstock for the runner, but couldn’t find it. Could you find out what it’s called for me? Thanks so much and congrats on the baby! She’s adorable!!
YoungHouseLove says
Hey Kathryn,
Here’s hoping Rhoda stops in with that info for you soon. Stay tuned…
xo,
s
Jenn says
We bought a three level town he this year. The place has ivory wall to wall carpets, including on the stairs. I want to rip up the carpet on the steps, but this was my fear. They did an amazing job! I’m inspired! Now
I just have to wait for the three week old to give me the ok for diy projects again!
Rebekah says
The browns with black just has me all confused…
Sarah says
WOW! That’s incredible. I never would have thought to use black, brown stain and white – but it looks amazing!
kc race says
This is so weird, we JUST hired hardwood refinishers to do our steps in June…after seeing this, I am so tempted to cancel and just do it myself! Question: how does the paint hold up over time?
Rhoda @ Southern Hospitality says
Thanks again for all the great comments! I appreciate your enthusiasm.
Kathryn, the link to the jute runner is in the post, but here is it again for all of you:
http://www.overstock.com/Home-Garden/Hand-woven-Tan-White-Jute-Rug-26-x-76/4215919/product.html
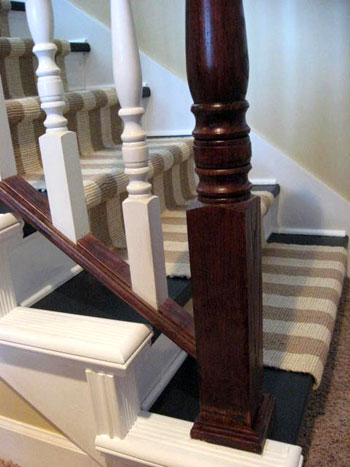
Some of you didn’t care for the stained railing, but it all ties in with my upstairs where I have a LOT of railings & white spindles, which has the darker stain all around the room, so I needed to keep it all consistent to flow. I personally love the mix.
Rhoda @ Southern Hospitality says
Heather, attaching the jute runner was just a matter of using the staple gun. I would suggest using at least 1/2″ long staples & an electric gun would be ideal. Start at the top and begin adding your staples, pull taut and wrap around each stair tread, and keep on stapling until you get to the bottom. You need to staple UNDER each stair tread to keep it tight & I added staples on top of the stair treads on each side too for extra security. My runner has stayed in place very well & looks like it did when I put it down.
claire says
wow! what a job well done!!! looks great! love the carpet!
Rhoda @ Southern Hospitality says
KCrace, As far as the paint holding up, I have no idea, as I just did this a few weeks ago and the runner will take all the abuse. But, I used Porch & Floor paint & from what I’ve heard, it’s very durable, so it should be fine on a set of stairs. Hope that helps!
Christine says
I removed old carpet from the stairs in my house – I would have cried if they looked like these before photos when I was done! Rhonda – you did an amazing job!
Fifth Street Mama says
This is so inspirational! I am in the midst of gutting and redoing a farm house and I LOVE this guest room! Thanks!
Tracy says
Amazing and beautiful! Just wondering what Rhoda did on the landing between the two flights of stairs-I couldn’t really tell from the pics. Very inspiring!
Penny says
Wow, that’s an incredible makeover. Fabulous job.
Rhoda @ southern Hospitality says
Tracy, if you come back to read this, I did add some pics of the landing earlier this a.m., so I’m surprised you didn’t see them. Please go back & look again at the end of the post!
CommaHappy says
That is AWESOME… It has a cool farmhouse feel. And I love the stripy runner!
Erin says
This is so funny because I just tore up the carpeting on our basement steps on Friday night and thought about doing the step in black and the riser in white…then thought about all white…yaddy yaddy…those pictures have inspired me! Awesome job!!
Natalie says
We just stained our treads a natural color and ever since I’ve been wanting to paint them black. I just e-mailed my husband this blog post to try to convince him too. Just beautiful!
LizzieBeth says
I can’t help but wonder if Dave above is the same Dave who owns the business he is promoting. I prefer what Rhoda did much more than stair recaps. It has lots more personality and looks better IMO. It’s timely for me. We recently ripped off the carpet on our stairs and decided to add quarter round moulding to cover the cracks. We also planned to paint the treads black with porch paint and the risers white. That said…we never considered a runner and I”m so glad the youngsters posted Rhoda’s redo. It validates the track we were on and now my hubby is enthusiastic about taking it from the “talking” stage to the “doing” stage! YEA. ha.
Elle S. says
Love those stairs! We did the same thing with the ugly carpeted stairs that we inherited when we purchased this house in September. Here is what we did: http://sternerstyle.blogspot.com/p/diy-projects_21.html
Great job!
Dave says
Lizziebeth….nope i do not own the company I mentioned nor do i promote them. I’m an architect living in Ontario, Canada that just love reading the innovative solutions people come up with. Never know maybe someone will have an idea i never thought of.
The Company posted…They were just one example of what can be done with stairs (an one of the few to my knowledge locally here that have photos of the work at the halfway point. I just wanted people to see take what they could get from the images on the website that might inspire people as to how they could do themselves, to give a little more finished of a look.
As far as cracks or joints in between the risers, trends and walls….I would recommend if you are using a paint rather than a stain to use wood filler (use paintable caulking to fill the deeper cracks first then apply wood filler on top for a clean sandable finish) to fill in the cracks. Once you sand and paint it will look more clean and seamless then just putting trim everywhere. Remember stairs do enough of a good job looking heavy. Less is more sometimes and this may be one of those times. Unless you like lots and lots of trim then have fun and go crazy. Most of all imperfections don’t always equal character…lol just ask my wife.
Take care!