Even though spring is a ways off, Sara’s before and after pictures had us feeling all sunny and cheerful. Here’s her letter:
I’m a longtime reader of your blog, and I have a big Reader Redesign for you. My fiancé and I bought our house last summer and have slowly been fixing it up. I’m so excited to share our biggest project to date: a DIY paver patio. We got a quote from a contractor that wanted around $8200 for the job! We decided to do the work ourselves, and also add a wall for extra seating. With no experience. And only two weeks to get it done before our big summer party. Yikes! We spent all of our nights and weekends (and a couple of vacation days) digging, compacting, leveling, shoveling, and moving (literally) tons of gravel, pavers and sand. It was backbreaking, but we are so pleased with the end result! With some clearance patio furniture and pillows from Home Depot, clearance seat cushions from TJ Maxx and a new fire pit from Menards, we ended up with a 300 square foot outdoor room that was nothing but weeds before! We still have some things to do out there, but for this season we are done. Oh and you can see more details and photos over on our blog. Here’s our budget breakdown for you:
- Belgard Dublin Cobble pavers, Weston Universal wall stones, edgers, stakes, 11 tons of crushed limestone, two tons of sand, three bags of polymeric sand, concrete adhesive for wall – $2054
- Compactor rental – $200
- Patio table – $140
- Six patio chairs – $300
- End table – $40
- Six throw pillows – $40
- Six seat cushions – $60
- Umbrella – FREE gift from neighbor (thanks, Margo!)
- 50 pound umbrella stand – $85 and worth every penny
- Fire pit – $100
- Total: $3019 – over 5k less than the contractor wanted for just the patio (not including the seat wall!)
Thanks so much for your great blog and for taking the time to check out our big patio project! -Sara
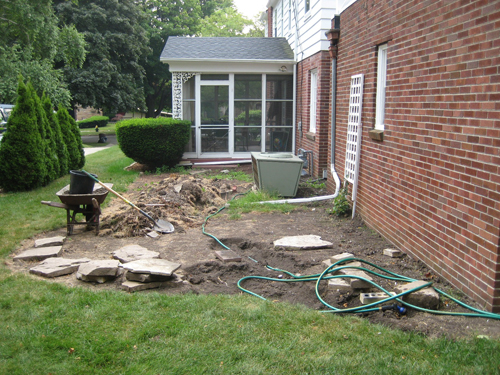
Here’s the bare before photo:
And here’s the amazing after:
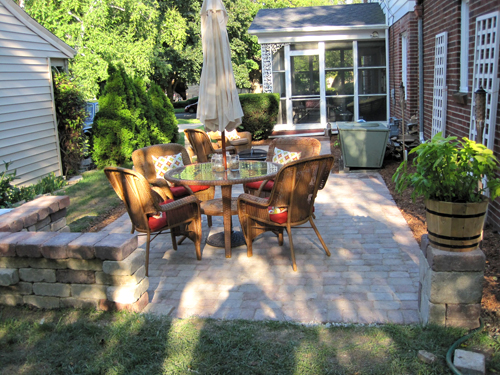
Didn’t Sara’s DIY determination pay off big-time? What a fantastic place to entertain and enjoy three seasons out of the year! Plus we can only imagine the added resale value that it brings to their home. Don’t forget to head over to her blog to see more. Amazing job Sara! Now if only spring would hurry up and get here so you can enjoy all that hard work…

Chelsea says
Wow! Great job to Sara! Who needs a contractor anyways?!?!
Begoña says
I’m still amazed by what people can do with their own hands!gotta love DIY projects!
caitlin says
ah! this is so awesome! i was just writing an email to someone about patio building plans in my sideyard and this is exactly the type of information and inspiration i need :)
micah says
wow… I can’t imagine how much work that was. It looks awesome!
Danielle@ Newlyweds Paradise says
Holy Cow! What a fab job!
Sara says
Youngsters, thank you so much for the post! We can’t wait for summer to get out there and enjoy our (hard-earned) space again. If anyone has specific questions, feel free to use the ’email me’ link on my blog!
Amanda says
That project timeframe is intense. But at least you get semi-instant (okay 2 weeks is still a long time) gratification!
Dennis Bullock says
Wow…what a redux! Looks great!
Jill says
Jaw-dropping. Bravo, Sara!
julia says
love it! The wall for extra seating is brilliant!
Jean says
That’s amazing. And it’s definitely inspiring patio envy over here!
Mary says
I think the thing that’s coolest about this isn’t even the price tag….it’s the fact that these two literally did it all themselves. How amazing to have such a fantastic new space that just begs to be used….and every time Sara and her fiance sit out there, they will have the memories and the sense of accomplishment in their work. Fantastic.
Also I really love the extra wall that was built for seating…it also seriously adds to the ambiance and feel of the patio.
All that said, it is sad to see that gorgeous grass go (I moved from a very grassy East Coast to a yardless home in CA, and it’s still hard for me every time I see someone choose stone over grass). But, tastes are different, and I bet they have plenty of grass in the best of the yard, so – kudos!
Sharon says
Love Sara’s site … I’ve been following her posts for quite a while. She has an irreverant, wicked sense of humor and a great sense of style.
Paula Grace says
They did a great job! I’ll go over to their blog to check it out. $5000 is nothing to sneeze at!
Melissa says
That’s amazing! I can’t decide if these pictures make me want to sit and relax in your yard or get to work in my own.
P.S. At first I thought it was the Petersik’s house because of the brick work and the sun room.
Heidi says
The makeover looks fabulous! Tons of hard work must have gone into that and it really shows. I love this blog by the way I check it everyday and I’ve just started up my own! I’m going to link you guys into mine and if you were cool with doing the same for me I’d really appreciate it! I hope you like ;) http://recklessbliss.blogspot.com/
Laura says
Looks beautiful!! Thanks for sharing! We’re considering a similar project, but I’m intimidated by how much the sand and crushed stone weigh. How did you move all those tons of materials? Do you have a pickup truck, or did you have them delivered? Our yard is uphill (and up steps) from street level, so I’m not sure how we’d do it.
YoungHouseLove says
Hey Laura,
We’d suggest heading over to Sara’s blog to ask her those questions. Here’s that link for you (also included in the post): http://www.russetstreetreno.com/2009/09/getting-down-and-dirty.html
Hope it helps!
xo,
s
Dana says
OOOOOhhhhh, Aaaaaaahhhhh. Very similar to what we had in mind for our backyard. Nice to see it’s doable and purrrty!
Sara says
For Laura and anyone that would be interested, I posted a patio how-to on my blog today. And yes, we had all the materials delivered on pallets. The driver had a skid steer that he used to bring them from the street to the yard. Unfortunately, we had to use a wheelbarrow to haul the stuff from out front yard to the back. Ah, the joys of DIY!
Greg Stallworth says
Cost of 300 sq.ft. patio…$3019
Being proud of your own DIY handywork and knowing it cost you $5000 less….priceless!
P.S. Didn’t know burger has a blog.
caitlin says
if you haven’t visited Sara’s blog yet, do it! It is hilarious and helpful.. I cannot believe how much they have gotten done in that house in what, a year?? Crazy.