The last four days have been nutzo in Patio Land for us (not to be confused with Temptation Island- remember that show?). The good news is that it’s nearly done. Like 90% done. But since I’m a bit low on energy at the moment (and we have to wait for better light to take more pictures), I’m gonna cover as much of our four-day patio-extravaganza as I can muster. The rest will come a bit later when we’re 100% finished (and have a chance to take about a million after shots from every angle).
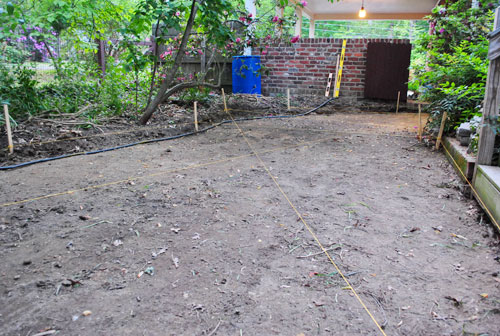
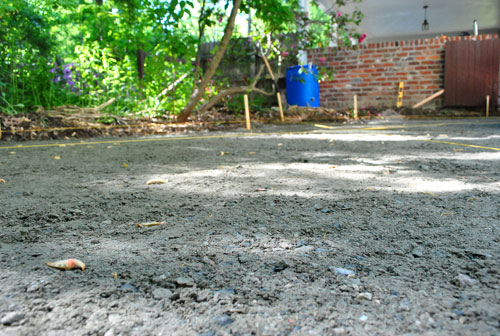
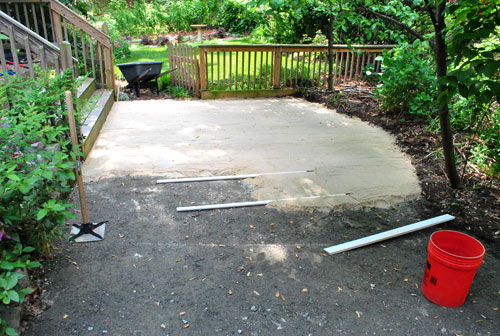
To recap: as of last Monday the area was all marked, leveled, and dug up.
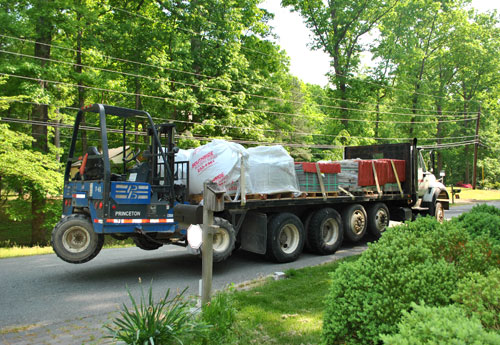
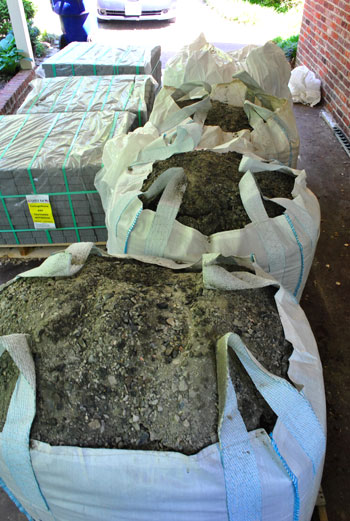
Then on Tuesday our nearly 10-ton delivery arrived via flatbed (300 square foot patios apparently weigh more than two elephants). As far as deliveries go, it wasn’t that eventful – except that the forklift (seen hooked to the back of the truck below) got a flat tire halfway through, so it delayed things a bit while the guy left to repair it.
But eventually everything made it into our carport in one piece. If you’re keeping track, that’s three giant bags of fill gravel, one giant bag of sand, and three pallets full of cobblestone pavers (two of the rectangular variety and one of the square kind).
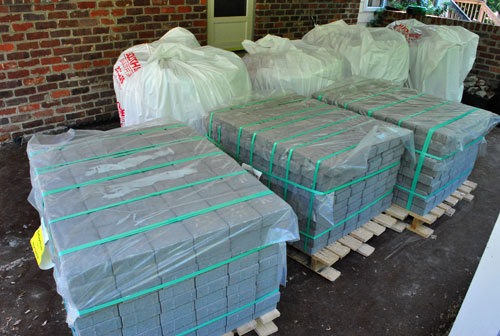
We picked a paver called CottageStone by a local company named Eagle Bay. Yup, it’s manufactured right here in Richmond and we discovered it just by asking for the most affordable paver cobblestones at a local stoneyard called Southside Builders Supply (it came out to be around $2 a square foot, which beat both Lowe’s and Home Depot prices by around 75 cents, which really adds up over 300 square feet). The color is a gray-ish tone that they call “Jefferson” (amongst other Virginia-tastic color names like “Blue Ridge,” “Chesapeake,” and even “Richmond”). It was pretty easy to make our color choice because we decided to do our best to roughly match the gray cobblestone pavers that are already in our driveway. So that’s how we picked our poison- er, pavers (read more about the cost of the whole project here). But enough about design decisions and money – let’s get back to the physical labor.
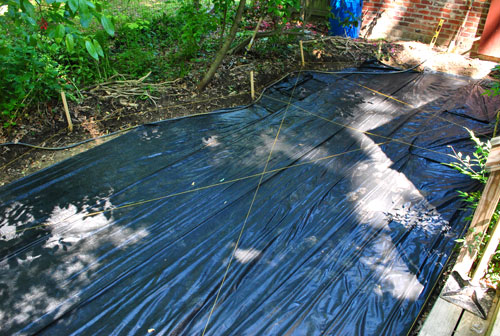
We took Wednesday off Project Patio because it rained, so Thursday was my next work day (while Sherry tended the blog, the baby, and brought me granola bars and water by the hour). As my trusty Lowe’s video and the saleswoman at the stone yard had directed me, the next step was to put down my weed blocker. I picked up this 300 square foot roll of Weed Block and ground staples to hold it down (weirdly called “Crampons”) from Home Depot.
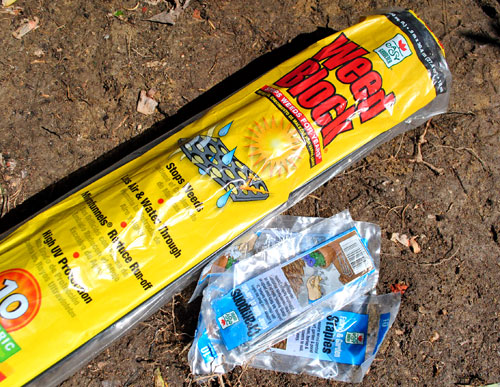
Since we know from experience that weeds and grass love to sprout up between paver stones, we wanted to at least discourage their appearance (although we’re huge rebels… just kidding… we like to follow directions or we start to hyperventilate). Here’s the area all covered in the Weed Block sheets just as recommended. It was pretty easy to cut it to size with scissors and then just stab each row into place with my crampons, so this step only took me about forty five minutes.
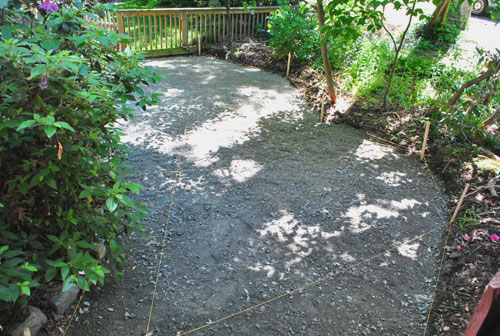
Next up: gravel. And not just any gravel – THREE EFFING TONS of it.
Laying this gravel basically consumed my entire Thursday. My wheelbarrow wouldn’t fit through the gate separating the carport and the patio area, so I resorted to carrying the gravel bucket by bucket (thanks to a spare 5-gallon paint bucket that we had on hand) back and forth all day. It was exhausting and disappointing (only because I fully expected to look like Hercules when I was done, but still found myself staring at my usual spaghetti arms). But in the end I was glad that I went the bucket route instead of using the ol’ wheelbarrow, because it allowed me to keep my nylon strings in place, which were invaluable when it came to ensuring that everything was nice and level with a slight slope away from the house (which is really important for drainage reasons).
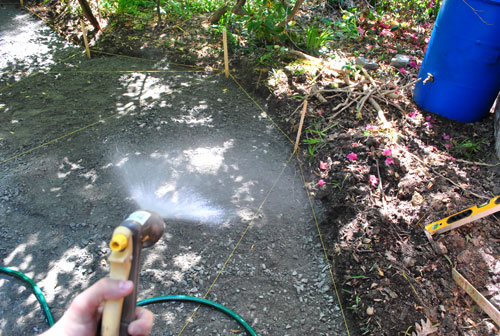
But my workout for the day wasn’t complete, because the gravel had to be tamped down. First I lightly misted the whole area, which started to turn the loose gravel into more of a cement-like consistency. I paid close attention to the Lowe’s video at this point in the process, which instructed me to make it moist enough to clump, but not to go overboard and get it too wet. So my advice would be not to go spray crazy and just look for that cement-like clumping action and then step. away. from. the. hose.
The tamping was a manual task again (sigh) because we opted to purchase a $30 hand tamper instead of going through the trouble / expense of renting a plate compactor (our car is small, we’re cheap, and I may have already mentioned that I wouldn’t mind bigger biceps). It wasn’t a particularly enjoyable task, but honestly at that point my arms were sorta operating on autopilot. And it was actually really gratifying. You can see how it turned my gravel pit into a flat, semi-solid, and ready-for-sand surface below. It almost looked like asphalt in the end. But sand would have to wait for Friday. Over seven hours of Project Patio was enough for me (and the sun was starting to set anyway).
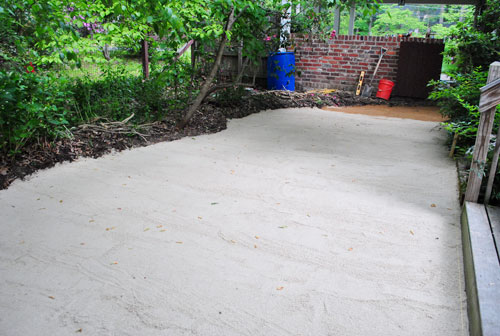
After taking Clara’s 51-week photo on Friday morning, I threw my patio pants back on and got to laying down a 1″ layer of sand. I couldn’t have done this part without the brilliant tip from the Lowe’s video involving two pieces of 1″ PVC pipe. Praise google.
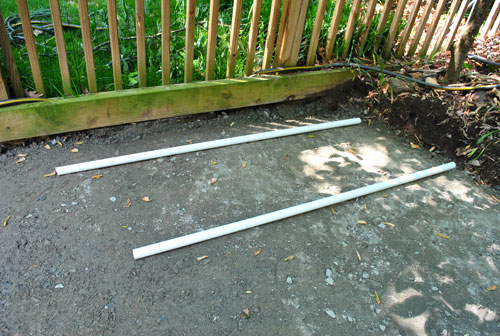
You basically lay them down side-by-side and then dump your sand over them.
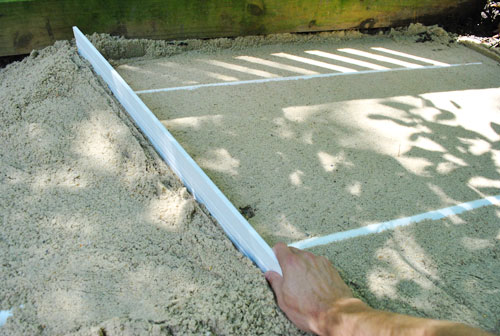
Then using a spare piece of 2 x 4 (or in my case, some extra trim molding) you scrape off the excess sand which leaves you with a flat, paver-ready surface of sand (which is exactly an inch deep thanks to the pipe “spacers”).
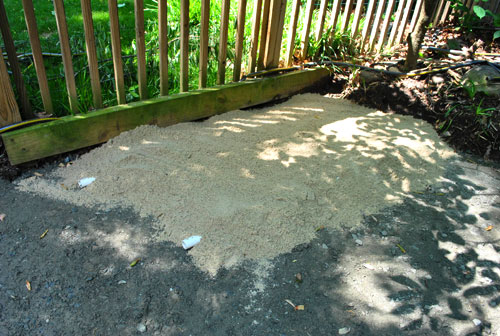
Then you carefully pull out the pipes and fill the empty “pipe lines” with a little bit of excess sand (by hand) for a totally flush look. Let’s just say it was a much faster process than the gravel was (since it only had to be an inch deep instead of three, which made it a lot faster to haul). Here it was half-complete:
I would’ve finished faster had I not run out of sand at the very end. But fortunately a quick trip to Lowe’s for a few extra bags did the trick (notice the color change at the far end of the area?).
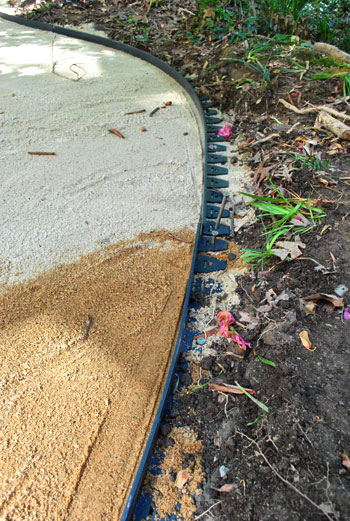
The last step before we could fiiiiiinally get to putting down stone was to install the plastic edging to hold all of our pavers in place (which will end up being virtually invisible once we backfill it with dirt/mulch on one side and pavers on the other). We had heard different theories about whether you should do this before or after you put your stone down (apparently it can work either way) but we thought it’d be easier to plan our curves with the flexible edging than with the heavy stones themselves. And we can tell you from experience that it was the right way to go for us – definitely consider adding the edging first if you’re doing any sort of curve and would appreciate a nice set guide to follow.
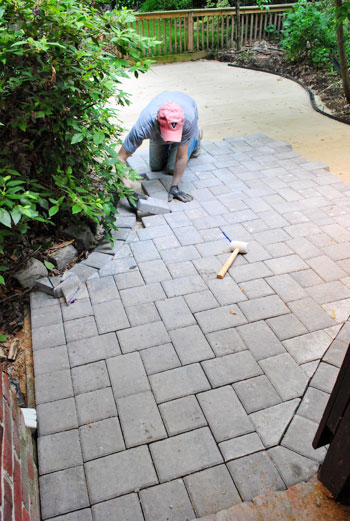
By this point it was about 4pm on Friday. I really wanted to call it a day, but Sherry and I were determined to get some of the pavers down so that we could at least start to see the patio come to life. So I charged forward and promised myself that I’d just put down the entrance area. A couple of hours later (yes, it was slow going at first), I had this:
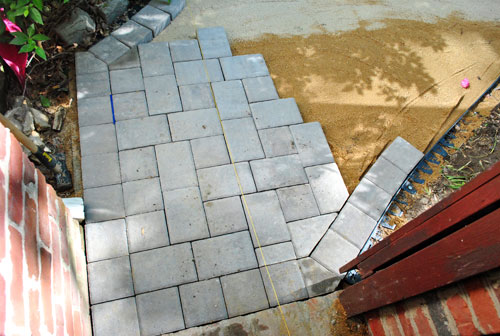
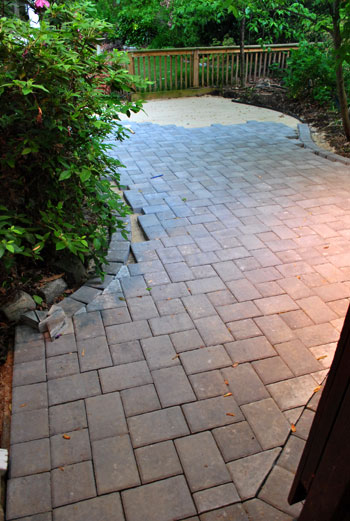
I’ll get into the ins and outs of cutting and laying the pattern in the next post, but below you can see things progressing slowly but surely. Sherry snapped this pic right after she put Clara down to sleep for the night (hooray for a 7:15 beanette bedtime, which gave us some daylight to work together on it- enabling us to move twice as fast during that narrow evening window). And thankfully we didn’t hear a peep from Clara (you know Sherry had the baby monitor outside on high, just in case). But Clara must have known we were busy making a patio for her birthday bash. Smart kid.
We both decided to put all the cuts on hold for the night so that we could focus on just filling the central patio area with as many whole pavers as our arms could carry (and avoid operating a wet saw in partial darkness as the sun began to set).
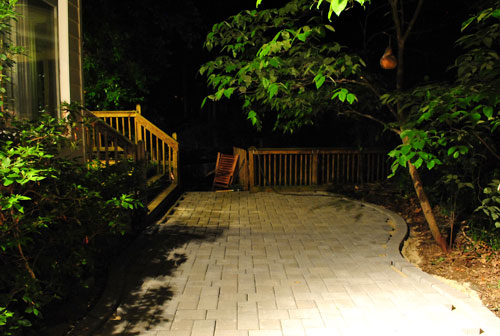
By some miracle, our energy held out ’til about 9:30, when we finally laid the last full paver at the far end of the patio. So you can sort of start to see how things are coming together, despite the darkness and all those missing stones around the borders that we still have to cut.
Our camera batteries only lasted long enough to attempt to snap a few totally normal pics of us “conquering” this task. So we just got a few blurry shots like this winner before the camera shut itself down:
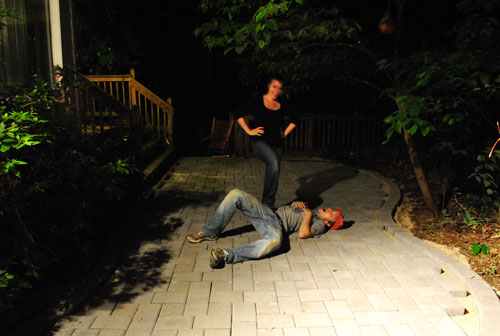
Notice how I chose the role of laying down and looking exhausted? I plead that so-tired-you-feel-drunk phenomenon that occurs after a loooong day (when everything makes you die laughing and you kind of lose your mind for a minute).
So now you know how the Petersiks spend a Friday night. Actually, we did cap it off with a Netflix movie (after a much-needed shower, of course). We saw Love & Other Drugs if you’re wondering. And we thought it was just as naked as the critics said, but not bad. Just don’t rent it with the extended family over the holidays or anything (awkward).

JourneyBeyondSurvival says
John.
THOR!
I haven’t seen it, but I think you deserve a god or demi god title now. We shall all address you thusly.
Ruth says
I totally agree. Does demi god title trump man-card, or are they equivalent?
YoungHouseLove says
Haha, either way John’s chest is swollen with pride.
xo,
s
Smarcus says
Holy crap. You guys are amazing. I’m trying to figure out how many decades it would take my husband and I to do this, and whether both of us would survive each other in the process. ;-)
Amanda H says
amen to that.
Kristen says
That looks awesome!! Seriously, unbelievable that you were able to get all those pavers down after already working out there all day! I can’t wait to see the final product and some daylight pictures. Well done!
Julie says
It looks so great! You may have already mentioned this and if so I’m sorry for the repeat question but could you give me an idea of how much you had to spend on materials? I’d love to do this in our back yard. Thanks!
YoungHouseLove says
Here’s a general post about the snowballing cost of the patio, but we’ll be sure to share a full budget breakdown with our post full of all the after pics when we’re totally done!
xo,
s
Wom-mom Ethne says
This looks great. Hopefully you had it finished by Sunday for a lovely Mother’s Day!
Lisa G. says
Rock star. Seriously. Rock. Star. It looks amazing!
Amanda says
The patio looks incredible!
I’m dying to know how you came up with your design, the first of it looks kind of scattered, though I can vaguely see a pattern forming the more in you went. I assume you went with a similar pattern your driveway is. I wouldn’t have the patience + I’m pretty “needs to be perfect, ahh!” type.
YoungHouseLove says
Yup, it’s called a K-pattern (same as the one in our driveway). We’ll detail more about laying the pattern and cutting the pavers in our next post for sure!
xo,
s
James says
Seriously great job on that paving, it looks amazing by night – a real professional job. No doubt you saved yourself a huge sum of money by doing it all yourself as well!
DONNA says
The two of you are TRULY AMAZING!!! I live my life vicariously through yours!
Enjoy the fruits of your hard labor…and HAPPY FIRST BIRTHDAY to dear CLARA!
Best regards,
Donna
heather says
Wicked Nice!
kelly says
WOW! Looks amazing!
Monica says
Wow! It looks great! Props to you guys for tackling it and making it look amazing!
Kayla says
Hi John and Sherry! Your patio looks amazing – My husband and I are so glad you guys did this particular project so we could learn from your experience! By the way I just have to mention that we had quite the YHL-inspired weekend at our place. We painted our baby’s nursery (due 10/4/11)and used your “How to Paint a Room YHL Style” tutorial which worked awesomely for us and the room looks like it was professionally done! Then we hung a frame arrangement over our sofa using your idea about cutting out the paper shapes of the frames and putting the nails through those first – it worked like a charm! Keep up the great work – your blog continues to be an invaluable resource for me and my husband :)
lauren says
hahaha…you guys are hysterical.
Dan says
Very nice. My wife and I are looking at pulling up our warped and chipping deck in the near future, and we’re gathering ideas on what we want to do instead. Thanks for the post.
Lori @ Richmond, BABY! says
Love it! It’s coming together so nicely! Great work!
Aubrey says
The patio (despite not being quite done yet) looks AMAZING!! This makes me optimistic when I will eventually get a house with a less-than-great/non-existant patio!! Amazing Job!!!
jody says
this is such a fantastic project!
p.s. i believe it’s biceps, not bicepts.
YoungHouseLove says
Thanks Jody! Got it fixed. Now that I’ve learned to spell “biceps” correctly, I can get to work on building some. :)
-John
Erin says
I’m in awe – congratulations on a job well done!
Do you plan to put a BBQ or table and chairs in this area? Or just leave it open for dancing and tramping :)
YoungHouseLove says
Oh yeah, we need all sorts of furniture and the bbq and we even envision a sandbox/baby pool for the bean. Slowly but surely!
xo,
s
Rebecca @ the lil house that could says
You guys are seriously INSANE! Not that I would ever doubt you, but this looks way more awesome and professional than I envisioned it in the previous posts. The border, the pattern, the curves… totally impressed! :)
jbhat says
You guys just slay me, honestly. Wow. It looks really good.
jbhat
The Nester, Meagan says
Omg! What a feat! Hats off… That is some hard old work, there is just no way B & I could do that sort of thing without the Dad’s help or something!
All the best,
Meagan
Mary says
HA!! Love and Other Drugs! UM… didn’t get the critics memo about the naked, so… super duper lucky we didn’t watch it with the inlaws. HOWever. The following day, husband suggests that we may want to just tell Netflix we lost it… hehehe…
Meredith says
Looks awesome!
Just a nitpick: bicepts=biceps. Not that you should be subject to any criticism AT ALL after days of manual labor, eesh. :)
YoungHouseLove says
Thanks Meredith. Got it fixed! Isn’t it telling that muscles are so unfamiliar to me that I have trouble spelling them too?
-John
Amanda Wells says
Oh wow. That IS nutso. I had no idea how much work went into laying a patio. Geez. It looks amazing, though!!
http://www.amandadovewells.com/?p=400
Amanda H says
This is SERIOUSLY impressive, holy cow ya’ll!!! You never cease to amaze :-)
Leslie says
Wow. Nice job. The patio looks awesome.
Carolyn says
Awesome job! It looks great you guys!
Christine says
Boy, and I thought I had a tough weekend running a 5k and planting 200 impatiens. I bow to you John!
YoungHouseLove says
Oh man, a 5K sounds awesome right now. Hope you had fun!
-John
Funnelcloud Rachel says
Wow! Wow! Wow! You guys did this in TWO days?! I’m completely blown away! I thought you guys were crazy when you said you were going to do the patio yourselves – I can’t imagine the backbreaking amount of work that went into this! I mean you moved 10 tons of materials with your bare hands! So impressed!
cameron says
You guys, that looks amazing!!!! Holy cow, I can’t believe you made that with your own two (sorry, four) hands. I am jaw-droppingly impressed!!!
Tiffany says
You guys rock!!! That is all.
Marlene says
It looks great!
I think you should use your new patio as a backdrop for Claras 52nd weekly photo, it will be a nice reminder of all the amazing work you did in preparation for her one year anniversary!
YoungHouseLove says
Haha, that’s hilarious. Too bad John designed a special Clara fabric backdrop for her or we totally would!
xo,
s
RC says
You could always have two photos for the final! :-)
YoungHouseLove says
This is true! Or ten! Haha.
xo,
s
Amanda H says
Is there a final step that involves more sand or something of the like on top… to fill the crevices from the top down? Or does the edging + walking on do all the work of keeping the pavers in place when all is said and done?
(sorry if I missed this somewhere…)
YoungHouseLove says
Yup, there’s the sanding and spraying down step still to come (along with more info about laying the pavers and cutting the edges). More soon!
xo,
s
Suzanne says
I think the work is AWESOME!
Curious – in hindsight, do you wish you had started say a month earlier so you could work on it at a slower pace? Or is the deadline part of what makes it kinda fun with the super powers component? (cause you are showing super powers here, John).
YoungHouseLove says
I think we both could have enjoyed starting a week or two earlier to have a bit more breathing room, but ultimately having a deadline is nice because it ensures that things won’t drag on for months (at least we hope they won’t- haha).
xo,
s
pam says
John, you are my hero. Wow – bragging rights galore on this project!
Brittany says
Bravo! You guys rock for taking on such a labor intensive project in such a short amount of time. It made me exhausted just reading about the process but I know you all are thrilled with the results (as you should be b/c they are phenomenal). I hope you all have scheduled out some time to have some well deserved R&R. Love your blog (it’s like crack btw).
Katie P. says
I am so impressed with your work and your website. I wanted to ask if you used a particular kind of sand for the patio. The prior owners of my townhome did a similar project in our mini-backyard, but every time it rains I end up having to sweep sand up. I am thinking maybe they forgot to do a final step in this process or something has to be applied to keep this from happening. Did you run into this same thing with your research? Any suggestions?
YoungHouseLove says
We’ll be covering the sand and spraying process in our next post! Some people use a type of sand that becomes sort of fixed and concrete-like so that could solve your problem (many pros use regular patio sand though, which is what we plan to use for now- we might upgrade to the concrete stuff later though). It just sounds like someone applied too much on yours and didn’t tamp it down into the cracks. Hope it helps.
xo,
s
blake says
Wow. That looks amazing!
Anne G. says
Congratulations! It looks awesome. I can’t wait to see the final, finished result photos.
Julianne says
You two are amazing! This is beautiful.
Leslie *Fresh Out of Lemons* says
I love that you guys are such DIYers, and I’m right with you on most projects, but this one looks exhausting!! Don’t get me wrong, the final pictures are incredible, but I don’t know that my husband and I have the fortitude for this kind of work! Kudos to you guys!!
kelly says
Looks great and I can only imagine the back, arm,leg and neck pain from the comfort of my office chair! Quick question; How accurate were you in estimating the quantity of supplies? Did you end up using all of the pavers and gravel?
YoungHouseLove says
They estimated it for us at the stone yard (we just told them the square footage and the permieter measurement and they calculated the rest, which was awesome). Other than running out of that bit of sand at the end, we had more than enough of everything (extra gravel and some extra pavers too) which is definitely better than running out. Now Sherry wants to use the extra pavers for another project, which might be fun once my back works again.
-John
heather s. says
You still need sand for the top so did you have to go buy even more or was there an extra bag I didn’t see in the original pic (it looked like 3 bags of gravel and one of sand)? I’m surprised they would be that off with the calculations since I know at stores here they just plug in numbers and order exactly what you need.
Looking good!
YoungHouseLove says
We didn’t buy top sand from that stone yard because they were charging more for that than Home Depot and Lowe’s. But their underlayment sand and gravel were cheaper so we ordered them from there (and we knew we could haul the top sand from Home Depot/Lowe’s in our car) so that’s why we made that call. Hope it helps!
xo,
s
Jen says
Ha. I DO remember Temptation Island. Used to watch it in my dorm with a guy I had a crush on :)
You’re patio is really giving me the inspiration to take on some “hardscaping” projects around my place. Looks awesome!
Jen says
Ooops, uh, that should be “Your”, not “You’re”. Grrr
Christie says
Wow! You guys totally rocked this one. It looks very professional and makes your yard look so nice. I think you guys should go on that show “Professional Grade” on HGTV. You would totally win money back on a project that looks this good.
http://www.hgtv.com/professional-grade/show/index.html
YoungHouseLove says
Never heard of it! Kind of a cool concept!
xo,
s
Dana says
it looks so amazing and professional! and i believe the clinical term for that tired-drunk feeling is the “sleepy haha’s”
Kali says
John: you’re amazing and the work you guys do is fantastic! You did good. Quick question: when did the strings disappear? Or at what point do they get covered or taken down? If it’s in your post to come, you can ignore me for now. :)
YoungHouseLove says
I removed the stakes and the nylon strings before tamping the gravel. They were nice to have there before tamping (while spreading it) so I could be sure it was level in all areas. Then off they came and I tamped and measured the depth in a few places one last time for good measure.
-John
Paola P. says
You two are awesome! You never seize to amaze/inspire me. Thanks!
Mary @ stylefyles says
amazing job!!!! can’t wait to see the finished product!
Julia @ Chris loves Julia says
Jaw-dropping!!! We are following this project closely in hopes that we can tackle something similar next year. This year, we are trying to get the interior of our fixer up to par (this weekend was 7+ hours of painting).
So what is John’s treat when he gets done? My husband always wants a slurpie, I prefer a loooonnnngg, hot shower. There’s gotta be some reward request!
Chris Loves Julia
YoungHouseLove says
No way! John drove to get a Slurpie when he finished the other day. I kid you not. Boys are so weird. I would never want to go out after all that work (I prefer to shower and collapse on the sofa), but he was dying for one!
xo,
s