Check out this ladykiller in the half bathroom:
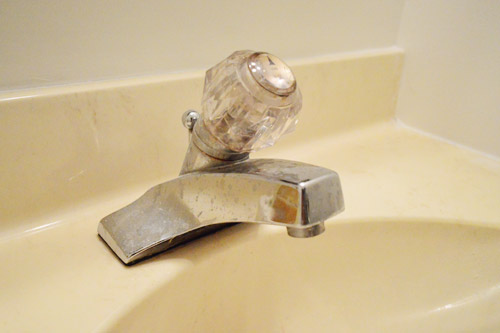
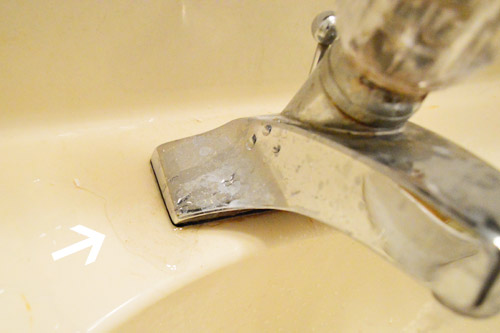
It’s not especially offensive looking, but it leaks. And with a single knob I’m always worried that Clara will accidentally turn it to scalding hot when she’s washing her hands.
So we hit up our Habitat ReStore hoping for a cheap find. Sherry lunged for joy (you need to see that in person by the way) when she spotted this $12 find in the pile… only to learn that it was inexplicably missing one handle (we dug around for 20 minutes looking for it to no avail). Just wasn’t meant to be.
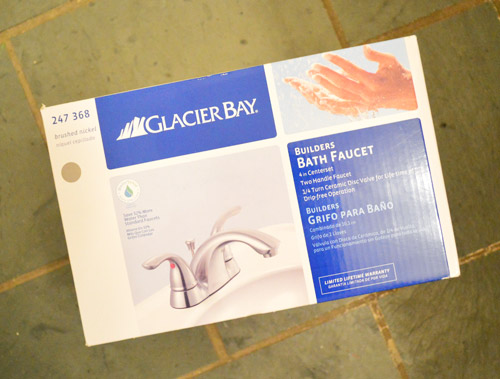
So we settled for this $34 find at Home Depot, which was pretty much the most affordable option they had. We figured that it was worth the peace of mind that we no longer had a leak and that Clara could use it more easily.
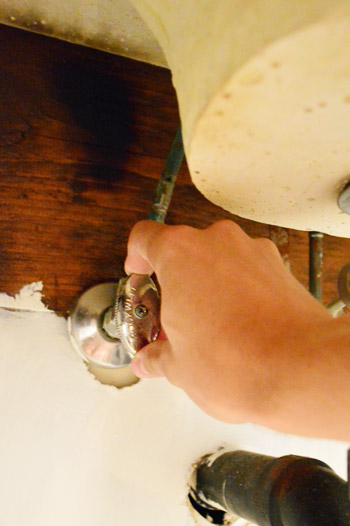
Making the switch promised to be quick and easy. Turn off the water. Unscrew some hoses. Bada bing. Bada boom. Hello new faucet. Except step one revealed a slight snag in the this-should-be-easy plan. The hot water valve wouldn’t turn off. It turned just fine, but the turning had no effect on the water flow. It just spun like a pinwheel.
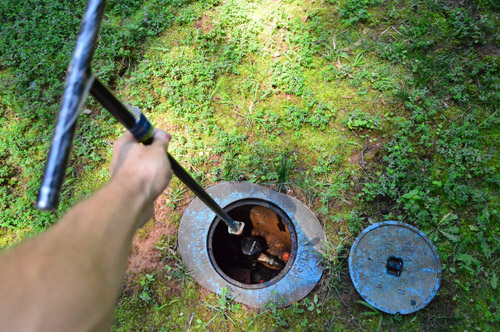
That’s how switching out the faucet turned into replacing the hot water shut off valve (something I’d never done before)… which meant turning off the water to the whole house at the street. So we whipped out our water meter key to help twist the always stubborn valve out there (these are around $7 and we use ours more than you’d think).
I don’t have photos of the next part unfortunately, because I spent most of it with half of my body stuffed into the vanity trying to wrench various valves and hoses apart, wrap plumber’s tape, and wrench things back together. And somewhere between yelling at Sherry to have a plumber on standby and quietly cursing, I forgot to ask her to hand me the camera (which probably would have gotten wet and resulted in too-dark-to-see photos anyway). #bloggerfail. But for an idea of what the installation process looked like, you can check out this well-lit and profanity-free video from Home Depot.
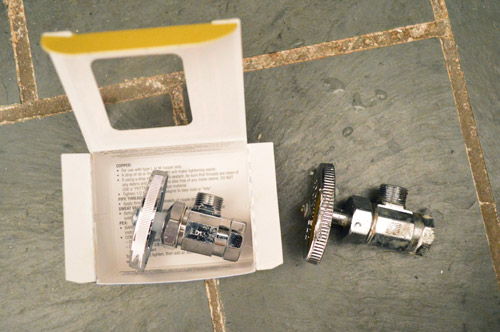
I tell ya, I was convinced throughout this entire project that I was going to break some pipe and a cartoonish explosion of water would erupt from the ground, lifting our home from its foundation like we had just struck oil. But surprise – none of that happened, and I was able to get the new hot water valve in without any problem.
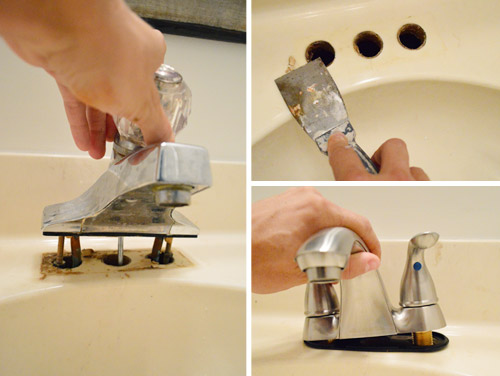
With the new valve attached, I got the old faucet out of the way, scraped away some of the gunk on the sink with a putty knife, attached the new hoses under the sink, and put the new fixture in its place.
When it came time to turn the water back on, I was certain at least one or two of the five new connections I had just made were going to leak (just call me the most pessimistic plumber in the world). So I laid some colored construction paper under everything so if something dripped, I’d be able to spot it quickly.
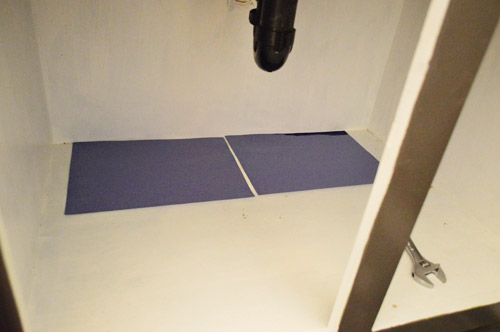
To my shock, there were no drips. And I watched for a good ten minutes – convinced they were just waiting for me to look away. Then Sherry finally dragged me away from my sink staring-contest and encouraged me to accept the victory like a big boy. Our new faucet (and its hot water valve) were officially installed!
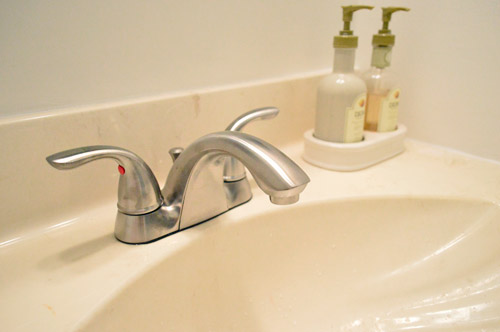
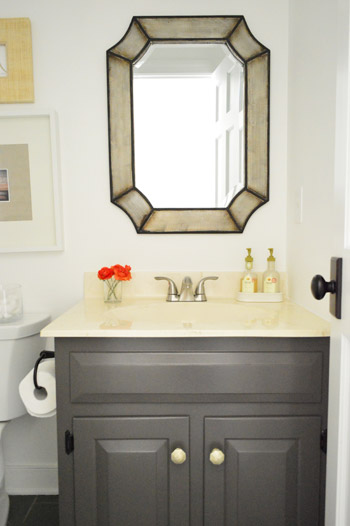
It’s not a big exciting design decision, but we’re certainly glad to have it taken care of for functional reasons. And I guess we did make a deliberate decision about the finish. We looked at a few oil-rubbed bronze options (to match things like the doorknob and the light fixture), but all of those were at least $80+ (which felt too expensive for a Phase 1 fix). So we’re glad that brushed nickel worked just fine (and was a lot cheaper) thanks to the mirror, which acts as a “transition” between the two metals, since it mixes both tones in one spot.
Hilariously enough, the new faucet didn’t fail to impress our toughest critic. Clara walked in there after her nap and just stood there for a second staring. When Sherry said “Is everything OK?” she said “Wowwww! It looks beautiful in here! Did we get a new washing thing?”
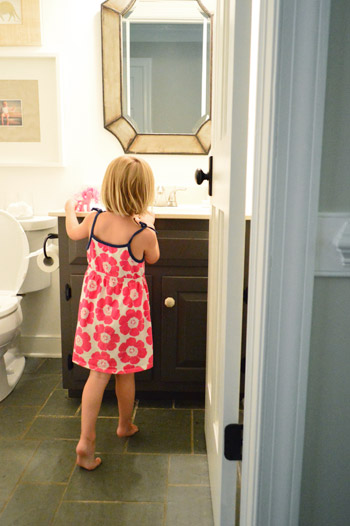
She often notices things that change in the house, but I think this is the first time she led with such a strong compliment. We’ll take it.
Oh and here are the before and after photos you guys requested on our last bathroom post:
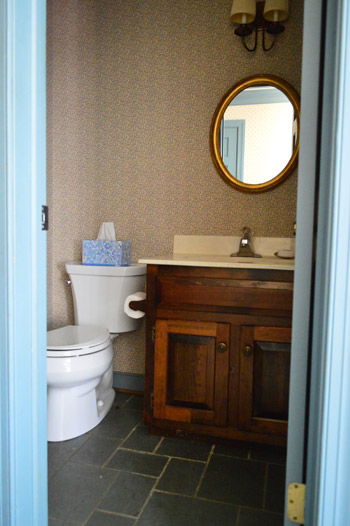

As for a budget breakdown, in our still-settling-in chaos we don’t have every receipt on hand, but our best guess is that we’ve sunk about $110 into this room in total (for the mirror, paint, light fixture, vanity knobs, and faucet). So for rooms that you use every day but are pretty pricey to fully renovate (like a kitchen or bathroom), it’s nice that an in-the-meantime upgrade can make a difference while you’re saving up for Phase Two down the line.
On to the next room!

Patti says
Such a small fix for a big improvement! Now that I see the grout up close, I don’t think any cleaning method is gonna fix that, you may need to replace it. Boo.
Rachel A says
This has nothing to do with your lovely bathroom: As a dancer/dance educator, I couldn’t help but notice Clara’s left foot in that picture! Her instep looks gorgeous and flexible, which means you should get that girl into dance classes! Ballerina Clara?
Leah says
Looking good! You totally scored by having a lovely, curvy toilet in there. I really like the unique shape.
Have you been looking for a vanity top at the restore? That might be a way to get through phase 2 without a huge investment. Your vanity itself looks so nice.
YoungHouseLove says
Wahoo! You noticed the toilet. I LOVE that toilet. Such a fancy one with a flat tank top and some nice curves. Haha! I’ve never had such a nice toilet. As for a vanity top, we searched but they’re all too wide or too deep so I think our vanity is just a strange size.
xo
s
Peggy says
Hi, my husband and I really enjoy and appreciate your blog. It is a great encouragement to us in our “adventures” in our own home. We recently avoided retiling two bathrooms because of yucky grout that was impossible to clean, and I thought I should mention it to you after seeing a picture of your tile and grout. It’s polyblend grout renew at home depot. It’s a stain and sealer in one and it is truly amazing. Our 40 something year old tile looks like brand new!
Priscilla says
Wow, no inside water cutoff? Have you looked right next to where the water comes into the house? The old ones look like the hot water cut off under the sink. We had ours replaced with a ball joint type, very nice, easy to turn off the water to the house, which we do every time we go on vacation. Did you see Home Alone? I’ve had too many issues with plumbing to leave it on when we go away from home for more than a day.
Bathroom looks way improved.
YoungHouseLove says
We probably do have one somewhere, I just had already known where the outdoor one was so I guess I just stuck with what I knew.
-John
Pam the Goatherd says
The bathroom is looking so much more inviting now. The before pics showed a place that I would not want to go into for fear of contracting some weird disease! The after pics don’t even look like the same room. It’s amazing what a little fresh paint and fixtures can do to change an attitude.
Kristin says
I didn’t think it was possible to do a plumbing project without drips! Congrats! And I wish I could get a reaction like Clara’s out of my kids. But, since they’re 16 & 18 already, it’s probably not gonna happen.
Annie says
Have you turned down your water heater? They told us at the hospital when our first was born to do that and it gives great peace of mind. Ours is set to the hottest I can stand on my skin in the shower, so I can still have a nice shower, but no one will be burned.
And man that grout is disgusting. I ended up grinding off the surface of ours until the discolored stuff was gone with a dremel and about five grinding heads, then a thin layer of grout and a good seal. Don’t waste your time with grout paint, you can only use it to go darker, and it wears off in short order.
YoungHouseLove says
Thanks for the grout tip! Oh and our water tank is at 120 (well, 121 I think because I read about being efficient/kid-safe so it’s guestimated at that number, haha!). Clara still got startled and said it was hot though – she’s the kid who eats a lukewarm hot dog and says it’s too hot ;)
xo
s
Meg G says
How about “the most pessimistic Plumber on the Planet”? Dr Seuss approved.
Ed says
Hmmmm this post has me influenced to replace our faucets…looks simple enough yet can change the feel of something
Katrina says
Unexpected water / faucet problems – don’t get me started. Last week our sprayer on our kitchen sink got stuck on and nothing could get it unstuck. What seemed like it should be an easy switch out resulted in an unusable kitchen sink and my poor hubby spending 10 hours over two evenings trying to fix one problem after the next. Currently we can get a *trickle* out of the faucet while we wait for a replacement part to arrive from the faucet manufacturer. At least that trickle allows us to do the dishes in the kitchen while we wait – I was ready to resort to hosing them down in the backyard!
Manda Wolf says
Huge difference for $110. The vanity is growing on me. I didn’t like it at first but now I think it is really pretty.
Emily @ Life on Food says
The before and after photo differences are ridiculous! I cannot believe this is about $100. I must go mirror shopping soon.
annie @ anniehearts says
Wow, what a difference. You two have really whipped that powder room into shape! It has finally entered the 20th century!
Annie XO
annie @ anniehearts says
Uhhh… I meant it has finally entered into the 21st century!
:/
Apparently, I need to finally enter into my brain…
Bridget S. says
Hi Sherry & John,
I love the look of the phase I fix so far. But what I am really curious about is the grout on your tile. I have similar grungy grout and have tried quite a few things to clean it and I was wondering if this was on your list and if you were going to try a few different methods? If so, I can’t wait for that post. I love your blog and have been following for over a year! Keep up the good work!
Bridget
YoungHouseLove says
We’ve tried a few scrubbing/spraying methods (even some heavy duty ones) but no dice… so I think either grout paint or grinding it down and regrouting is on the agenda.
xo
s
Tracy says
Am I remember correctly that this house was build in the 1980s? Mid-80s? There seems to be many things reminiscent of the 70s. Ugh, it’s like whoever built picked every darn thing style-wise that went “out” within a year!
“Beauty is in the eye of the beholder” and “If it aint broke don’t fix it!” must have been the previous home-owners’ MOs. With which there is nothing wrong :-)
Amy says
that is so funny, it’s like Clara goes to take a nap, and the house fairies come in a change a bunch of stuff and she wakes up like sleeping beauty to see the differences. i feel like most of your updates are “while she was napping”
tooooo cute!
Carli says
Said it before but I’ll say it again, love these budget friendly fixer uppers! Full of great ideas and quick fixes to make a space more you more quickly. Thanks for sharing!
Nathan says
Looking good! One question that occurred to me while looking at your before/after pictures: did you have to remove the toilet tank when you removed the wallpaper and painted? Or is there enough space to squeeze a paintbrush back there?
YoungHouseLove says
For painting I use a short handled brush that I can get back there as far as eyes can see. And we got lucky that the wallpaper only went behind the tank about an inch all around, so I could grab it without removing the tank.
xo
s
Ali says
We have the same faucet and it’s been great! Excellent choice :)
Amanda says
its beautiful, but I was thinking why you guys dont paint it in the same color as the foyer? S. said its a sand greyish color, would match perfectly and at the same I love white frames on some color wall… just a suggestion :) but its sooo much better and pretty anyways :)
YoungHouseLove says
Now that we didn’t do a pop of color in the vanity like we planned we’re definitely open to painting the walls down the line! Although we migh wait for phase 2 to make sure we pick a color that works with those other changes/additions :)
xo,
s
Nicole says
Nice job! Also, since it appears you guys are with the Bowers, tell Katie her blog needs attention. Like a “new post- attention” :)
Trinity says
I thought the same thing about Clara looking so tall! What are you feeding that kid?!
And I wanted to say that 1/2 bath is totally looking a lot more Petersik-ish these days!
Suzy B says
Love that Clara! I like the new washing thing too! She is adorable! Her hair is getting longer and she looks taller too! Agree with the cute girl…beautiful!
Diana Buchanan says
I have to say, it is a little comforting knowing that John gets as frustrated as the rest of us during these challenging ‘easy fixes’. It make him more human! haha
Also, WOWZA on the before and after effect. It looks soooo good!
Jess says
Looking good! We just bought that same faucet for our half bath reno but then opted for a vessel sink so right now it’s in home improvement limbo – return it or keep it to use in one of the other bathrooms? Decisions, decisions.
Janey says
They way she’s growing up, Clara is going to think houses just magically improve the longer you live in them. :-)
Love your bathroom upgrades! On the sink, once the faucet was in, did you run a bead of clear caulk around its base to keep splashes and dirt out? It looks perfect and I’m not knowledgeable enough to know how you did that.
YoungHouseLove says
We didn’t caulk that yet but you can use a thin bead of clear caulk (silicone) for that area!
xo
s
Sasha says
I’m not sure that I completely understand….you’re saying that 80$ for an ORB faucet is too much for a phase 1 renov? So your intention is to replace the faucet in phase 2? Why buy a 34$ faucet and then have to rebuy another one later on? Why not just buy the 80$ one now??? I’m really not liking the combo of different finishes….it looks like you don’t have a “big picture” plan…you’re just winging it as you go. Not diigin’ it at all.
I’m so disapointed in this blog!
YoungHouseLove says
Since we don’t know what vanity/sink we’ll use down the line (and some have wider faucet holes while others have more narrowly spaced slots) getting a fancy faucet now would limit our sink/vanity options later. So we plan to craigslist the vanity & this faucet for at least $35 down the line (making up for the faucet cost) or reuse the faucet somewhere else later. As for winging it as we go, guilty as charged! We call this trial and error decorating. We’re just figuring it out as we go like everyone else :)
xo,
s
Erin says
I am going to be smiling for the rest of the day about the concept of being disappointed in a blog – awesome!!
Lisa E says
Critical much?
Diana says
The before & after difference is amazing! I’ll admit I was a bit skeptical when you first shared pictures of the new house but I should have known you’d be able to make it amazing!
Amy M. says
It’s amazing what a difference a new faucet can make! I’ve had to replace almost all of the valves in our house (I’m up to about 12 at this point)when upgrading the faucets and toilets. Every one of them wouldn’t completely shut off! (btw, this post totally made me smile with commiseration) I replaced them with the ball valve style. They last longer than the traditional style, turn off in one quick motion and are only about a dollar more per valve. Totally worth it. You may want to consider them if you have to replace any more.
Yvette says
Huge change in the before and after! Looks great!
My big change is I’m currently saying goodbye to my much loved bedroom vanity, boo! I have a baby on the way (yay!) and we live in too small a place to accommodate it anymore. I can’t have nice things anymore and I couldn’t be happier.
Keep the updates coming, I always enjoy them :-)
Jennifer R. says
“wow, it looks beautiful in here!” haha she is turning into quite the DIY design diva.
We don’t have kiddos yet but have a very opinionated 6 year old niece. She refers to our spare bedroom and bathroom as “hers” and every time she comes over the notices the little changes that no one has complimented me on yet. I think it is because we decorate brightly and her home is mostly neutral/hand-me-down so she really loves the color around our house and little details. She couldn’t get over these painted flower knobs I got at Anthropology. :)
Andrea T says
I’m new to the home ownership thing, so maybe this is a silly question. Is there supposed to be grout or something around the facet where it meets the sink? I’m trying to picture what mine looks like at home. When cleaning that area, it’s hard to get in all the creases, and maybe new grout would make it easier. But then, it would be more difficult to switch out the facet.
YoungHouseLove says
We didn’t caulk that yet but you can use a thin bead of clear caulk (silicone) for that area! It’s easy to remove caulk with a knife when you change the faucet so it’s not too scary to add it if it makes cleaning easier.
xo
s
Sara says
I love the paint on the vanity! I tried looking for the name of the color and couldn’t find it, did you ever say what it’s called?! It would be PERFECT for our guest bathroom! Thanks!!
YoungHouseLove says
It’s called Silhouette by Benjamin Moore.
-John
Kim says
I’m pretty sure my husband installed that same faucet in our bathroom!
Kristin @ Little Corbin Hill says
So pretty! I’m in love with the vanity color and mirror and, of course, your new faucet =)
Joseph says
Meter key? No in-home water shut-off valve? What? I find it so strange that you don’t have a water shut-off valve. Ours is just inside the crawlspace. It’s not a terribly convenient place or anything, but I don’t have to go buy a meter key and turn it off that way. I guess it doesn’t make a huge difference either way though.
YoungHouseLove says
John said we actually might have one, we’re just not sure where it is. Maybe it’s in the crawl space which is only accessible by removing decking lattice and crawling under the deck, which is only about 18″ high. So walking to the curb = much easier!
xo
s
Kathy says
It should be right where your water comes out of the ground from the street and goes into the house. A tour around outside and you should find it. Not likely in the crawlspace. It’s designed so that you can turn off the water easily. Now you’re really curious, aren’t you…? haha
Mary says
Wowza! that transformation is worthy of some serious praise. For a little over 100 you guys have made a pretty magical spot. The mirror really does it for me. LOVE LOVE.
YoungHouseLove says
Thanks Mary!
xo
s
Katie says
How do you dry your hands in the bathroom? All these updates and I think you forgot a towel rack.. or atleast a towel with a pop of color that ties in with everything else!:)
Hope that helps!
xo
Katie
YoungHouseLove says
I’ve been meaning to get a ring for a towel to hang from the wall, but for now we’re a wipe-your-hands-on-your-pants family. No casualties have occurred yet! Haha!
xo
s
betty says
that vanity color is SO dimensional! theres a huge difference with the photo of clara, and the last one in the post. i seriously need to get some and paint something in my house!
Kelly O. says
I’m sure you probably posted this somewhere, but when I went back, I had trouble finding it… What color did you end up painting the half bath vanity? I really like it!
YoungHouseLove says
It’s Silhouette by Benjamin Moore.
xo
s
Kelly O. says
Nevermind!! I’m a dunce and just scrolled through some more comments and found it… Sorry!!!!
Katz says
Wow, I feel like I have good taste! I picked out the same faucet for two bathrooms a few months ago AND for her birthday I bought my youngest granddaughter the same dress as the one Clara is wearing!
mp says
I have an identical faucet on the pedestal sink in my master bath. I was sure a cheap faucet would be a fail, but it’s stood up to some harsh treatment in six years.
YoungHouseLove says
Wahoo!
xo
s
Shelley @ Calypso in the Country says
Nice job John! I am too embarrassed to tell you how much we paid a plumber to replace a bathroom faucet for us recently! -Shelley
Melissa @ HOUSEography says
Looks great – especially love Clara’s comments. You may want to consider an indoor whole house shut-off valve if you have any pro plumbing done. We have had to use ours multiple times and have averted major disasters. Wouldn’t put it at the top of the list but something to consider.
Jessica says
My little girl can’t turn the knobs on our current faucet, so we need to swap it out for one with handles like you did here. Thanks for the info. The bathroom looks great!
Ashley says
I wonder if Clara thinks her sleeping is magical since the majority of house projects get done during her nap-time or after she goes to bed.
“We have an old faucet, I go to sleep, and then POOF… new faucet!!!”
I wish that happened when I slept…
Val says
Looks really great! But I have to tell you guys, we have that exact same faucet in our bathroom and the finish has started to peel off in large pieces around the handles. Ours was installed by the previous owner right before she put the house on the market three years ago, so hopefully it’s a manufacturing issue that has since been resolved. Maybe you won’t have any problems, but I just wanted to let you know. Because ours looks awfully sad now. :(