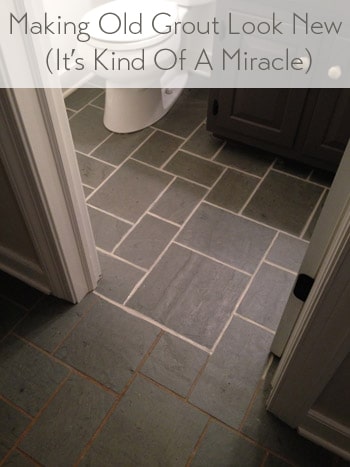
The discolored and dirt-stained grout in the tile floor of our foyer looked super old and gross, but after trying nearly a dozen cleaners and cleaning tricks we nearly gave up. Then we finally find THE SOLUTION to making the grout look white and clean again!
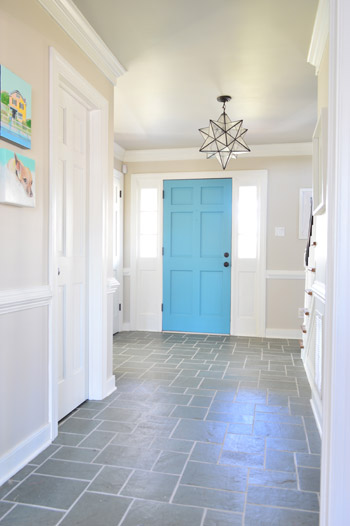
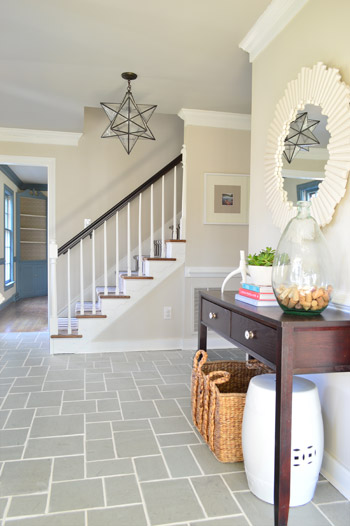
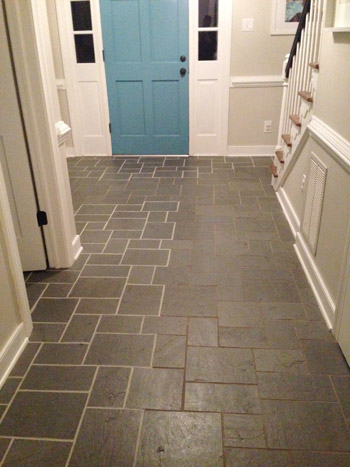
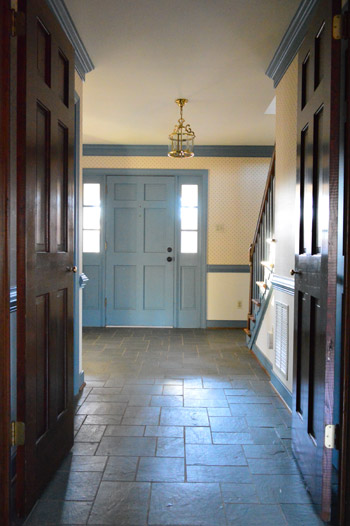
Now that we’re done, you can see how the view just got a heckova lot better around here. The crisp white grout lines play off the white trim and make the whole space feel newer and cleaner.
The funny thing is, it wasn’t actually cleaning that did the trick. So if you’ve got a similar issue with discolored or stain grout, here’s our official intervention: stop scrubbing! Well, maybe give scrubbing a fair shot, but don’t be discouraged if it gets you nowhere. There’s another way!
Cleaning Tricks That DIDN’T Work
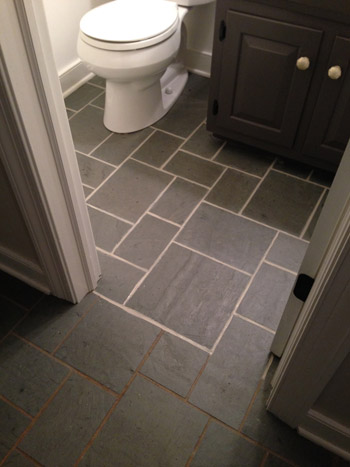
As you might recall, for the past six months that we’ve lived here, it has looked like this.
I gave nearly every method under the sun a shot to make that grout look clean. After repeatedly scrubbing the heck out of it, I knew that it was actually very (very, very) clean… it just was so discolored and stained in certain areas, that no amount of blood, sweat, tears, or elbow grease could make it look that way.
Some of my attempts to clean grout included (but weren’t limited to):
- various baking soda paste mixtures
- various white vinegar solutions
- copious magic erasers
- specialty grout cleaning floor sprays/potions/scrubs
- bleach pens
- oxygenating cleaners like Oxiclean
- Mrs. Meyers powdered cleanser + a wire brush
- Barkeeper’s Friend + a wire brush
- a borrowed steam mop
- scrubbing with a stiff bristle brush
- lots and lots of muttered cursing
The Solution To Getting White Grout Again
By this point I did what most people would do. I gave up and ignored it for another few days (what’s a few days after six months of no-dice results?). And then I finally faced facts. The grout either needed to be scraped out and regrouted entirely (which makes for a pretty messy job, especially in the main hallway of our house which connects the entire upstairs to each room downstairs) or it needed to be refinished.
Thankfully a few of you tipped me off to a product you’ve used with success called Polyblend Grout Renew. Let me just skip to the punchline: it worked, and I wish I had tried it before spending six months scrubbing my mind out.
The cost? A cool $12 from Home Depot. (Update: it’s closer to $20 now, but there are more affordable grout pen alternatives available.) Can I get a what what? Note: this might sound like an ad for the stuff, but Grout Renew doesn’t know us from Adam – I’m just beyond grateful that it worked.
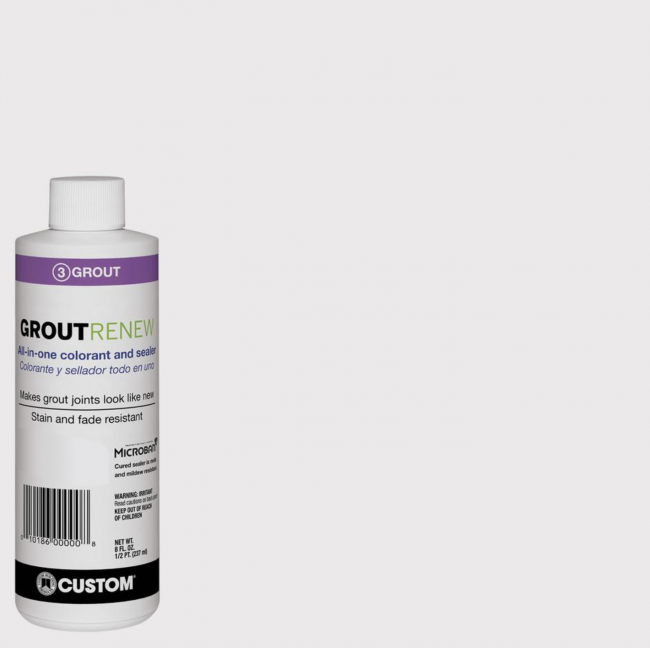
Choose Your Grout Paint Color
GroutRenew comes in several colors now – over 3 dozen, in fact, including several shades of white and off-white. So you may be tempted to go for the brightest white to get the cleanest, freshest look (that’s “Artic White” pictured below). However, just like paint colors, the brightest, whitest version may not be best for you.
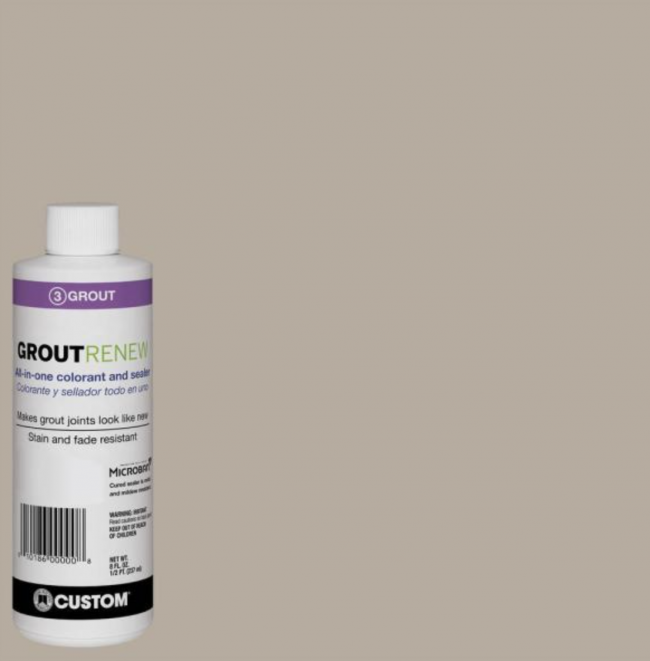
Be sure to take some time to look at your room, your tile, and your lighting to make sure you’re choosing something that blends well with your space. You can always test out a few colors too before committing to one. John and I actually considered two colors – Natural Gray and Oyster Gray, which both look pretty dark compared to the brighter whites. We had seen a neighbor with darker grout in her slate floor, so we thought it was worth considering.

In the end we chose Oyster Gray (shown below) which is still a mid-tone Ivory color – definitely not a bright white. But it looked the most natural and still seemed very bright in contrast to the dark slate tile, without looking artificiall white. Any brighter and we worried it would look like someone in a Crest Whitstrips ad! You know, almost too blinding.
Oh and the Grout Renew was low odor and low-VOC, so this pregnant lady could get down with it. I did wear a respirator, along with opening windows, just because I’m into added ventilation and bad Bane impersonations.
GroutRenew Alternatives
This is the only product we’ve used, but there are some others on the market if this particular one is not available. Lowe’s sells a similar product by MAPEI that comes in a squeeze bottle. Amazon also has a well-reviewed Grout Pen product that comes in a white or beige option. Again, we haven’t personally tried those, but they may be some alternatives to consider if the PolyBlend is not available to you.
How To Apply Grout Paint
The downside to this solution is that it can be time intensive (and patience testing) depending on the size of your surface. For this floor, it took nearly eight hours to apply. But since I had easily spent 25 hours trying various stain lifting methods before resorting to this, well, eight hours with a bottle of Grout Renew was a small price to pay for VICTORY.
Step 1: Clean Your Tile & Grout
I know I said scrubbing wasn’t the solution, but it part of the process. I’ll pause while you laugh since I had already done that TEN MILLION TIMES. But like any surface you’ll be painting, you want to make sure it’s clean of dust and debris. So at least we’re not talking a heavy-duty scrubbing, just your regular washing to remove surface dirt should do.
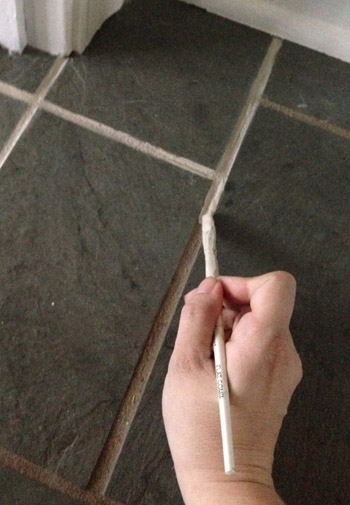
Step 2: Pick Your Brush Or Application Tool
The instructions suggested using an old toothbrush to apply the GroutRenew it into the grout lines and then let it dry for 24 hours. I went with a thin craft brush instead because I had way more control (read: way less mess on the tile surface). The thin paint brush was also easy to dip directly into the bottle when I needed to load up with paint.
Step 3: Plan Your Starting Point & Exit Route
If you’re painting a floor, like we were, you’ll want to sure you don’t paint yourself into a corner (or at least if you do, you can carefully tiptoe across your tile without stepping on the cracks). I started in the half-bathroom because I figured I could work my way out of the room and close the door behind me so it could dry.
It was the opposite of fast. But it worked. Slowly I eked my way out from around the toilet and right out the door, which took about an hour and forty five minutes.
Step 4: Be Ready For Mistakes
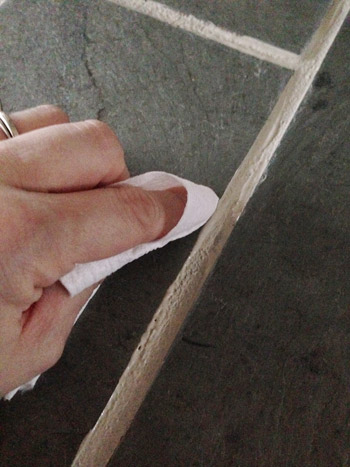
Even with a small craft brush there were still times when it got on the surface of the tile, and there was a very short window for wiping it off before it set (and then had to be scrubbed with a fingernail, which was a huge pain) so I literally would do one or two cracks at a time and then quickly follow up to smooth both sides of the seam out with a small piece of toilet paper (this would remove any from the surface of the tile as well as make the sides of each seam nice and straight looking). A paper towel or clean cloth would work as well. That is, if toilet paper isn’t fancy enough for yo?u.
Step 5: Be Patient & Pace Yourself
Being pregnant, the bathroom was all I had energy for on Day 1. Day 2 involved three more hours of line painting and wiping, and I opted to do 50% of the foyer in a strategic way so we could all still walk on the other half of it. Here’s a shot to show you how hilarious John is. I said: ok, get creative with this picture so my giant respirator doesn’t look weird. I like his version of getting creative – just lop off the whole head area.
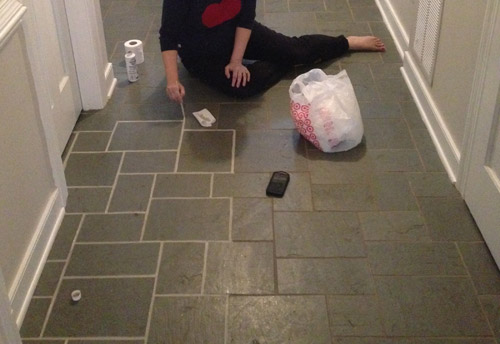
The second day was the hardest day by far, just because I was still kind of sore from contorting my pregnant body around in the small half bathroom the day before, and the little knobby parts of each of my ankles were dragging on the tile as I scooted around like a dog with fleas, but it was all worth it. Worth it and then some!
Day 3 was another three hour process, but it was the most exciting day because I could see the light at the end of the tunnel. The end of the longest-running house battle that I had ever waged was near. I just worked my way around the foyer doing the other half of those pathways that I had done the day before, and I ducked into that last closet while pausing occasionally to fist pump and work on my clean grout acceptance speech (“I’d like to thank the academy, and the grout gods who invented this cheap bottle of miracles and unicorns”).
Step 6: Let It Dry
After each application process, we gave that section a full 24 hour drying period and made sure nothing got wet for 72 hours (since that was another warning on the bottle). It’s a good deal lighter than the old grout was, which still makes us say “whoa now” when we walk through the hallway, but we think it’s just our eyes adjusting. Maybe after 6 months our brains just can’t get over the fact that it finally looks clean!
We also had about 1/4 of a bottle left all of this, which was great in case we need some touch-ups down the line. I’ll definitely update you guys if anything funky happens, but so far it has been great. I mean, just look at how far it’s come from the before:
Update: After nearly two years of use, even with semi-frequent moppings, muddy shoes/paws, and a whole lot of foot traffic, our grout still looks identical to when I applied this stuff (you can see an updated picture that we shared after six months of use here). For the folks who can’t find it in stores, here’s an affiliate link to it on Home Depot.com. There are also alternatives like grout pens on Amazon.
Originally Published in 2014
Psst- Wanna know where we got something in our house or what paint color we used? Just click on this button:

*This post contains affiliate links to things we have actually purchased and love*

Kellie says
Two Words: KNEE PADS!!!!
YoungHouseLove says
The funny thing is that my knees were fine, it was my little ankle knobs! Haha!
xo
s
Alison says
What! What!
Kaylee says
Thank you for sharing!!!! I wondered how to clean grout and I even tried steaming it!
Amber says
OMG am I ever happy that you shared this post! I was so excited about the idea of being able to clean up my grout that I picked up some of the product you used today. I just started using it this afternoon, but my gosh am I ever ecstatic about the progress! Thank you thank you thank you for being so awesome and sharing! Lol now I need to sit down….the product is beautiful but it makes my joints ache lol (who knew you could feel so old at 28 lol..Sherry I have no idea how you did it with a baby belly!) Kudos!
YoungHouseLove says
Aw you’re so sweet! So glad it’s going well!
xo
s
Lee says
Looks so much better. Glad there was a solution. Sorry it took 6 months to find it.
Jenni says
What a transformation in your entry way! This post inspired me to try out the Snow White on the tile around our fireplace last night, which had grayed, and wow, I’m so pleased with the results. I had been dying to rip out the old tile, but that project is going to have to wait while we work on some others. Now the tile looks good enough to keep for a while!
YoungHouseLove says
That’s awesome!
xo
s
Natasha says
I found you from Melissa Dell’s blogs she follows on BlogLoving. This post has me hooked. Looks great! I love the white trim and blue door. Such a bright and happy space.
YoungHouseLove says
Thanks so much!
xo
s
Cathy says
Wow!!! What a great find! Looks amazing!
Galya says
I’ve just finished applying it in my small bathroom. Wanted to do it when everyone is in bed, so it can dry overnight. I’ve sealed the door with duck-tape, hopefully this will stop people in the morning. I love how the small bathroom looks now. The process didn’t seem that tedious to me, only took me 2 hours. I’ve spent several weeks stenciling the walls in that bathroom, so 2 hours felt like a breeze. I feel now very inspired to start on the larger bathroom and entry with kitchen, though I may use another color, since kitchen and entry have different color tile.
YoungHouseLove says
That’s awesome!
xo
S
Ranna Waller says
I’ve always been afraid to try things myself, but after a trip to Home Depot while following your instructions, 8 hours later my grout looks brand new. Thank you for taking the fear out of DIY projects. I would have never tried this without you :-)
YoungHouseLove says
WAHOO! I’m so glad!
xo
s
Ann Ruggles says
I used the same product on my laundry room and powder room two years ago, and it still looks good as new! Last summer, I did my kitchen (a big job!) and it’s holding up well. Spring Break, I’ll be doing my long foyer floor. It’s a pain, but it does make a huge difference. BTW, I did two coats of paint, and then sealed it.
YoungHouseLove says
That’s so awesome to hear Ann!
xo
s
Cocinas Integrales Bogotá says
OMG guys! Great design! I would like to have enough space to build and have my house like the ones in the pictures. Unfortunately I am in Bogotá, Colombia and here houses are quite small and there is no space to get the decor you would actually love and make you feel comfortable.
I work for a company that build kitchens, closets and all that staff but I have never built one like the ones in the pictures due to the space.
Jorge says
I totally agree!
Cara says
Where did you get the basket under your entry table?
YoungHouseLove says
That’s from HomeGoods a while back!
xo
s
Lisa says
Thanks for the great tip!! I also have spent hours scrubbing with various concoctions and no luck. Ran out to buy a bottle as soon as I read your post and started working on my bathroom grout last night and so far so good.
Shelby says
This looks amazing! Can’t wait to try this product! Random question…what is the paint color in your foyer? I’m sure it’s posted somewhere, but I can’t find it :/
Thank you!!
YoungHouseLove says
It’s Edgecomb Gray by Ben Moore.
xo
s
Bonnie woolever says
Absolutely wonderful and I’m keeping this in mind!!!
Anna G says
I have to admit I was never digging the tile flooring since you guys moved in. Now, after applying the new grout, it looks like totally brand new flooring. Looks great! I’m so glad it turned out great for you guys! Way to go!
xo-Anna
Julie Kinnear says
I was discussing this problem with a friend recently, the old grout in her hallway is worn out and doesn’t really look good with the light tiles. I must tell her to try this out! Respect for your endurance searching for the solution, glad it paid out. Thank you for advice!
Becki says
this looks great. my bathroom has VERY SMALL white tile with grout that has turned almost black – I’ve tried every cleaning tip imaginable and nothing has worked. I’m pretty sure doing this in my bathroom will be an extremely long job, but this looks so good I think I need to try it! (And when I’m working on stuff like this Netflix is my go-to. I just stream a show I’ve already seen so I don’t have to focus on missing something – the last painting project I did I watched season 1 of The Office!)
mary says
Sherry- it looks amazing! I just tried doing the same thing with our slate floor. My grout is much larger though and not uniform in size. There are obvious brush strokes in some of my application. Would you recommend a double coat? Did you run into this problem? Thanks!
YoungHouseLove says
Hmm, a double coat sounds like it could work. I would try it!
xo
s
amy says
I am curious to know if you or any of the readers have had equal luck tackling water marks on a glass shower door. I have spent three years trying different methods (the paper towel/vinegar spray/mask and gloves was particularly fun.) The style of the door is not so dated as to warrant replacing(plus expensive!)but it has hard water stains that just won’t go away.
YoungHouseLove says
Anyone have tips for Amy? We haven’t tackled that yet.
xo
s
Susan says
Barkeepers Friend has worked great for me on shower doors. Just be careful not to stand in it or expose your skin to it for very long. It can cause pretty serious skin conditions.
Jennifer says
Looks great!! We have the exact same slate in our foyer and the grout is horrible. I can’t wait to use GroutRenew!! When we first bought the house I sealed the tile but months later it looked horrible(yellow stains on it). The tile guy I talked to said it was from oil that was in the slate from over the years. I just stripped my floor to take off the finish that I put on it(not fun). Do you know if your slate has a finish on it? I am not sure what to do with mine…leave it in its natural state or seal it again.
YoungHouseLove says
I don’t think ours has a finish on it, it just feels like raw slate. Good luck Jennifer!
xo
s
Penny Smith says
This looks FANTASTIC!
Any chance, since your neighbor has the same tile into the kitchen, some misdirected past owner just covered this over in the kitchen and it is there under the red brick vinyl? Wouldn’t that rock? :)
YoungHouseLove says
Oh how we wish something other than an old splintered subfloor was under the brick. As for neighbors, some of them have the same slate but love theirs, and the ones who don’t like it seem to have replaced it already. Can always keep an eye (and ear) out for someone who might just have some and not want it though… you never know!
xo
s
Michelle H. says
Thank you so much for posting this, how timely! I was just thinking after the New Year what I was going to do with ours. We have slate tiling on about a 4’X6′ foyer landing with the same grout problem. I don’t want to spend on retiling right now (though I’d love to try the new tiles that have a hardwood look someday). This will bide me time…just have to figure out how to divy it up as its the only access poing to go up and down the stairs in our house.
Jen says
we have lived in our house for 11 years with old slate like yours. I really thought we’d just have to retile our tiny foyer, because of how dated the slate looks.
My hubs and boys head out of town this weekend and I will be trying this! Just came back to reference the product and see comments. Was wondering if you, in all your efforts, had a good way to pre-scrub it?
I am so excited to try this!! Thanks!
YoungHouseLove says
I think just vinegar and a wire brush in all the cracks works well (takes forever, but seems to do the trick).
xo
s
Amanda says
You saved me with this post! We have the same exact tile and dirty grout and I had given up last year of ever getting it to look better until this. Did half of the floor today and it brightens up the whole foyer. Thank you!
YoungHouseLove says
So glad!
xo
s
Melanie says
Oh my gosh I am SO SO excited that you wrote this post! I have been trying to convince my husband to use grout renew for over a year now. Can’t wait to show him this post!! Loved your book as well, your rooms always make me smile!
jacqui says
looks great! i have tiny tiles in my bathroom floor…i can’t imagine being able to paint all those little lines, they are so thin. is it possible to do this?? thanks.
YoungHouseLove says
A few others have said they had really thin grout and it seemed to work (I’d just wipe it off of the face of the tile as you go). Good luck!
xo
s
kevz says
I am buying this tonight…very excited for my weekend project! I am loving your front door color and hoping you can share the brand and color name?
YoungHouseLove says
Thanks! It’s Blue Lake by Ben Moore.
xo
s
Ami says
So its been a month. Did you seal it and how is it holding up??
YoungHouseLove says
We actually haven’t sealed it yet and it’s holding up awesomely. Even with tons of snow and rain and messy shoes. Not a stain to be seen, and nothing has worn off or cracked either.
xo
s
.:karen:. says
Well, in a follow-up to my “thank you for posting about such an amazing product, I can’t wait to try it” comment, I just have to say we picked it up the weekend after you posted, waited a couple of weeks, then got to work and, “THANK YOU FOR POSTING ABOUT SUCH AN AMAZING PRODUCT!” You saved me more fruitless cleaning, more hanging my head in shame every time I walked on our hall/kitchen/bath floors, and $$ to the tune of $400+ from Stanley Steamer to recolor and seal. It took two of us waaaay longer than I thought it would (many late nights listening to Pandora, cursing our bad backs and knees and sipping on hard cider) but it’s done and hallelujah, holy crap it looks fantastic. I don’t even know if it was sealed properly upon it’s initial install, but it’ll be good to go for quite a while now. My “room” has gone up significantly (a running joke dating back to our SIMS playing days). So yeah, um, thanks! :D
YoungHouseLove says
SO GLAD! Wahoo!
xo
s
alana says
whoa, am i ever glad you posted about this, i have gray grout in my kitchen backsplash that needs to be white (it whispers to me) but i have been putting it off because i figured i would need to dig out the grout but alas, the grout gods are smiling down on me! thanks guys.btw, your house is looking great.
cheers,
alana
Susan says
This looks amazing! I’m so happy for you and your tile!
Was the tile dingy as well or just the grout? I ask because I’m wondering if you have any tips for getting the tile clean-looking.
YoungHouseLove says
After all of my scrubbing the tile was looking pretty good in most places (it’s damaged/cracked in a few corners, but other than that it really was the grout that had issues).
xo
s
Emily says
How did you clean the floors before applying the Grout Renew?
YoungHouseLove says
I done everything in that bulleted list above (various scrubs, cleaners, vinegar, barkeeper’s friend, etc).
xo
s
Emily says
Also, what is the wall paint color in your foyer? Looks great!
YoungHouseLove says
Thanks Emily! It’s Edgecomb Gray by Ben Moore.
xo
s
Janaya says
To answer the questions on how this holds up, my parents had me “paint the grout” in their entry way 14 years ago. I was in high school so I was volunteered to do the job, probably to save their knees. Anyways in their high traffic area (front door and garage entrances), it still looks great! It was a one product “paint” with no sealer needed, so I am guessing very similar to what you used.
YoungHouseLove says
That’s awesome! So glad to hear that it’s still holding up 14 years later!
xo
s
Alyssa says
Hi John and Sherry, I really want to do this to the grout in my bathroom and kitchen. The shower tile in my bathroom especially needs a facelift. Unfortunately we only have one shower so letting it go unused for three days (to allow it to dry) is near impossible and kind of gross. Do you think I could just hang a tarp to prevent it from getting wet? Thanks!
YoungHouseLove says
As long as you could tape off the tarp so nothing slipped under it you could be ok. Or you could time it for when you might be traveling or staying with a friend (or showering somewhere like the gym or a relative’s house just to let it dry).
xo
s
Kaylee says
Amazing tutorial and oh my goodness,’you are SO funny! My question has NOTHING to do with the grout. Where did you get your star shaped ceiling lamp? I’ve been looking for the exact same thing. I live in FL so I doubt anyone will notice I stole it from you :)
YoungHouseLove says
Thanks Kaylee! It’s from a local shop called The Decorating Outlet but we’ve seen similar ones on amazon.com or jossandmain.com.
xo
s
Cristy says
Bought this stuff today and pumped to get busy tomorrow! Woohoo!!!!!!
Melissa says
Sherry, what kind and size of respirator do you use? I bought the 3M Pro size medium from Lowe’s, and it’s too big to get a good seal on my face. I’d like to buy a smaller one from amazon. Any tips on what fits a lady face?
YoungHouseLove says
I wish I knew the brand/size of mine. It’s just really basic looking and we bought it from Home Depot about 4 years ago. It’s black and gray if that helps. We stood there and tried it on right in the store to make sure it would fit both of us (I pull the side things to tighten it when I wear it, but it makes a nice seal). Anyone have tips for Melissa on a smaller lady-sized respirator?
xo
s
Melissa says
Update: I ordered a 3M 6191 Small Respirator Assembly from amazon and it fits perfectly! I had no trouble getting a good seal with a positive pressure test. I got both particulate filters and organic vapor cartridges to go with it.
Wearing it while caulking, I couldn’t smell the vapors, but I could feel a slight burning in my eyes, so maybe someday I’ll upgrade to the full-face instead of the half. But small is definitely a good size for me. Thanks!
YoungHouseLove says
So glad it fits!
xo
s
Marie says
This is really helpful, thankyou! Polyblend grout renew sounds like exactly what I need, I live in the UK, can I buy it here?
Marie
YoungHouseLove says
Maybe try amazon?
xo
s
Rose says
Just wanted to say thanks for this post! Ever since I read about this product, I was dying to try and tonight I will finish it up (Agreed- VERY slow process but worth it :) LOOKS 1000 TIMES BETTER!! Keep up the great projects and thanks for the tips!
YoungHouseLove says
SO glad!
xo
s
Danielle says
Hi! I want to use grout renew on our slate tile in the front entry way that looks just like yours. Our tile and grout have some sort of glaze from the previous owner. I bought oyster gray, but the grout has a glaze, so it isn’t really soaking it up. It looks like we just took paint and painted over it and it doesnt look very good. I wiped it off and am afraid to try! Any suggestions? Thanks!
YoungHouseLove says
Hmm, maybe look for some sort of glaze stripper for grout first? Never had this issue. Sorry not to have more ideas for ya!
xo
s
Bene says
Hello, It looks amazing bravo for your perseverance!
What grout color would you recommend for ~1 inch black tiles: white? Gray? Your advice would mean a lot!
Tiles pic here: https://tinyurl.com/n8by24b
Bathroom pic here: https://tinyurl.com/qb6nfpz
Unfortunately for me, no Homedepot in France. I looked up “grout renew” in Amazon and found a product called Grout Refresh…Not sure it will do the same wonders, but I want to try! The work will be long, with our tiny tiny tiles!
YoungHouseLove says
I have heard that works well too! I would do charcoal (dark gray) for those black tiles. Good luck!
xo
s
Lindsay says
Just wanted to say – this stuff is amazing! I did half my bathroom tile with it (didn’t get a chance to finish it yet). We just had Poop-acalypse 2014 in there because of a clogged sewer pipe, and this stuff was so much easier to clean than our old grout. It looks like new and held up to my crazy bleach scrubbing great.
Louise says
Just wanted to say thanks for the recommendation! After seeing the transformation on you tiles I ordered a grout pen from Amazon and used it on my ‘never looks clean’ tiled conservatory floor tiles and now it looks clean when I wash it.
YoungHouseLove says
So glad!
xo
s
brooke says
So it’s essentially just painting over dirty grout? :( I would so much rather prefer getting it clean :(
YoungHouseLove says
It’s essentially painting over permanently discolored grout that has been scrubbed clean to no avail. I wouldn’t recommend this solution over simply cleaning your grout (that’s much much easier!) but if you have cleaned it many times and it still looks dirty even though it’s stripped and scrubbed, this is a good remedy to living with grout that looks grody.
xo
s
Robyn says
How good do you need to clean the grout before applying? Is a light scrub ok or do I need the bleach and a tile brush?
Great job by the way:)
YoungHouseLove says
A good scrub should work.
xo
s
LizlovesCam says
Hi! How is this holding up so far? My tile guy used gray instead of white grout on our back splash and I’d like to make it white without too much trouble (i.e. scraping out the gray grout…ughhh). Thanks!
YoungHouseLove says
Still looks great! Other commenters have said theirs has stabbed up to years of abuse, even in wet shower areas so we have high hopes!
xo
s
Jennifer says
Wow! Looks amazing! I’ve been fighting the grout battle for a year and a half, including chemical burns to my lungs (yes, I tried bleach without enough ventilation ugh). I JUST found Resolve high traffic carpet foam and a scrub brush actually works great. And now this stuff?! My little OCD heart is going pitty-pat!