Did you know you can give your whitewash your brick fireplace with paint you already have around the house? We were able to give our fireplace wall a fresh look in under a day and with no money spent!
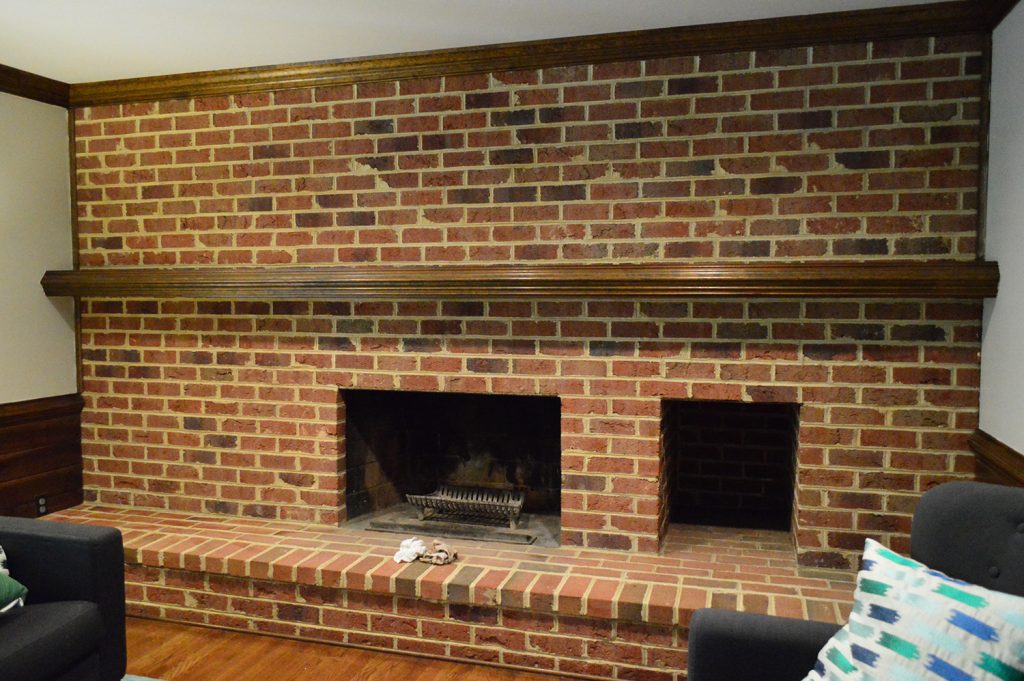
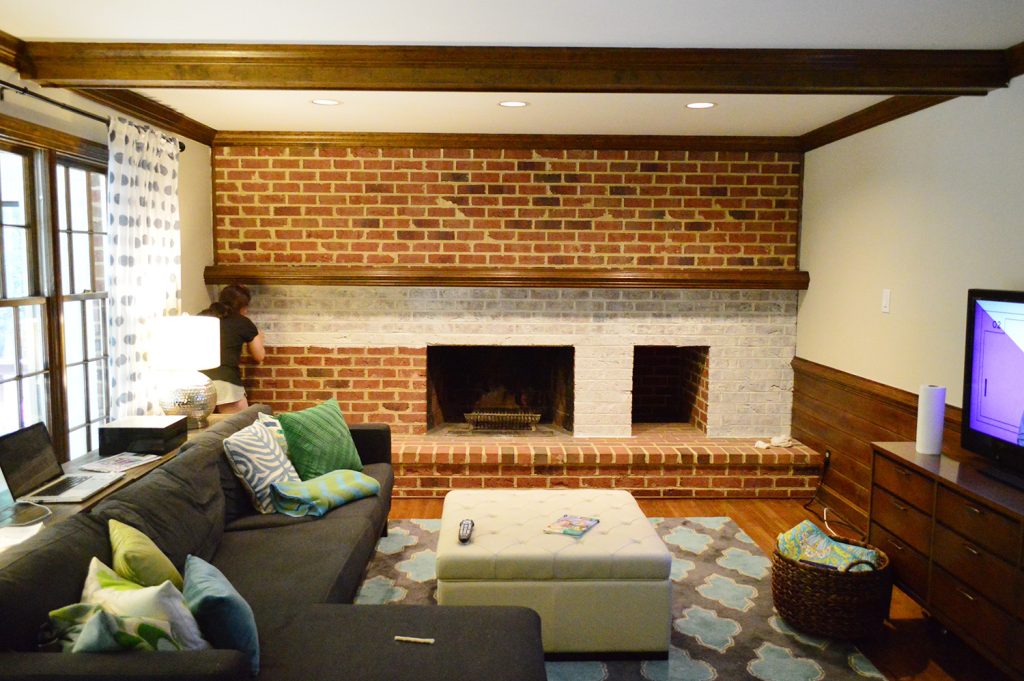
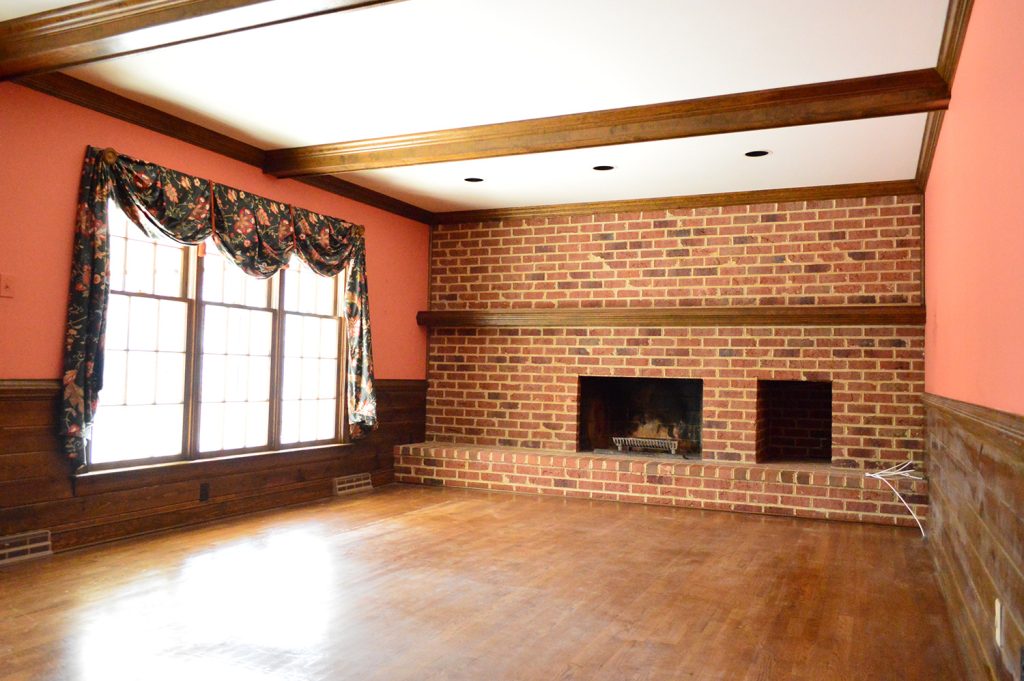
We don’t mind unpainted, exposed brick, but in all of our houses it’s been an unattractive orangey-brown brick – not that pretty rustic red brick you find in New York apartments. So in previous homes we’ve straight-up painted those walls because we LOVE the look and texture of painted brick. But after seeing a few whitewashed brick walls over on Pinterest and reading a few tutorials online, we decided to give whitewashing a spin this time. We figured if we didn’t like it we could always just paint over it!
Luckily, we really like it! The room is far from done, and it might not be a forever thing, but for a day of work and a total cost of $0 we’re really pleased with the outcome.
Materials Needed For Whitewashing Your Brick
This supply list is short & sweet and probably includes a lot of things you have leftover from other painting projects:
- Regular white latex paint
- Paint pail or other container for mixing
- Paint stir stick, spoon, or other mixing device
- Paint brush
- Water
- Rags or old t-shirts
- Drop cloth and/or rosin paper
- Scrub brush or wire brush (optional)
They do make special whitewash paints and even more durable limewash applications for exterior use (similar to the paint we used when we painted our home’s brick exterior white), but for a simple interior project like this it’s fine to save your money and use regular paint you’ve used on your walls.
And, like the material list, the steps are pretty easy too. Here’s how I knocked it out in a day.
Step 1: Clean Your Brick
First, I wiped down the brick to make sure there weren’t cobwebs and old soot all over it – just a good once over with an old rag did the trick. However, depending on the condition of your brick, you may want to use a scrub brush or wire brush to remove any loose material or dirt.
Step 2: Create Your Whitewash Mixture
Next I mixed up a mixture of one part water + one part paint in my paint pail. I used Simply White by Benjamin Moore in an eggshell finish since had some leftover from a previous project. But any of these best white paint colors would work. The consistency was pretty drippy and watery. Imagine taking a gallon of paint and pouring out half of it and refilling that half with water.
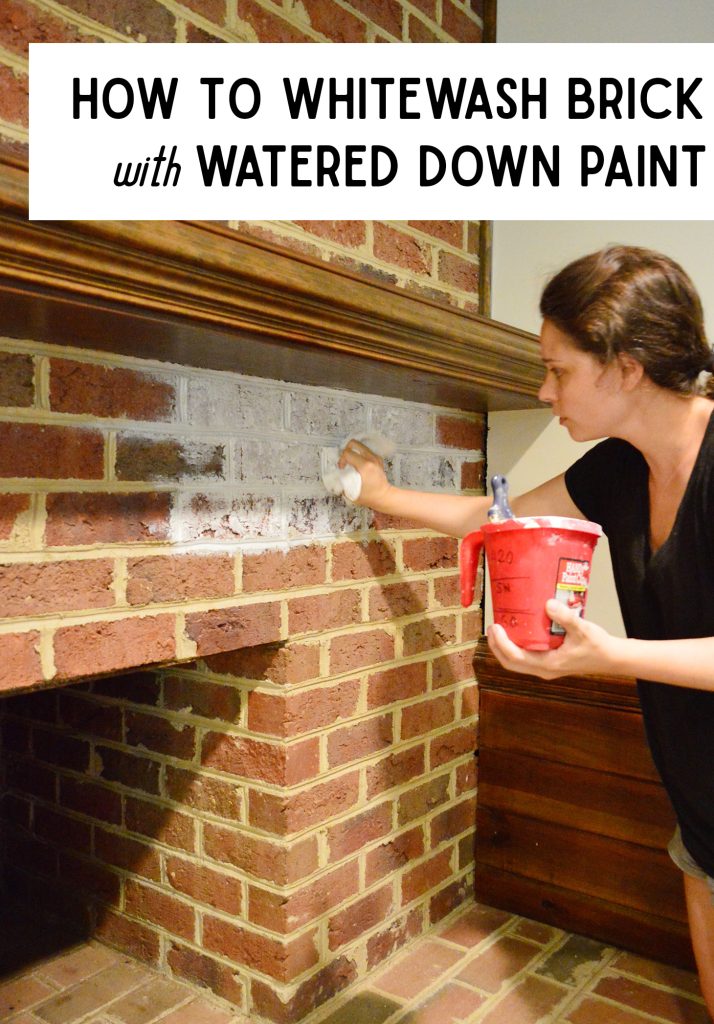
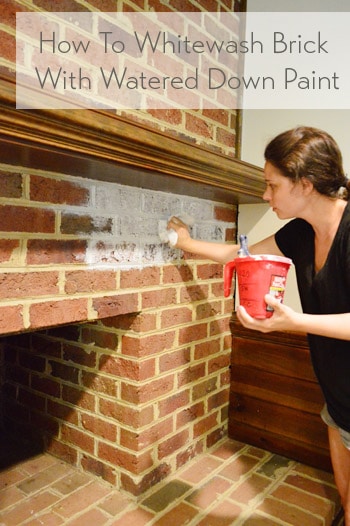
Step 3: Apply With A Brush & Rag Technique
I used a regular paint brush to “wash” on a thin layer of this watery mixture over the whole surface, brick by brick, including the mortar. I moved quickly and sort of smeared it onto each brick with the brush, and then dabbed over it with a rag – just to remove any excess paint and absorb any drips (since it was so runny those popped up from time to time).
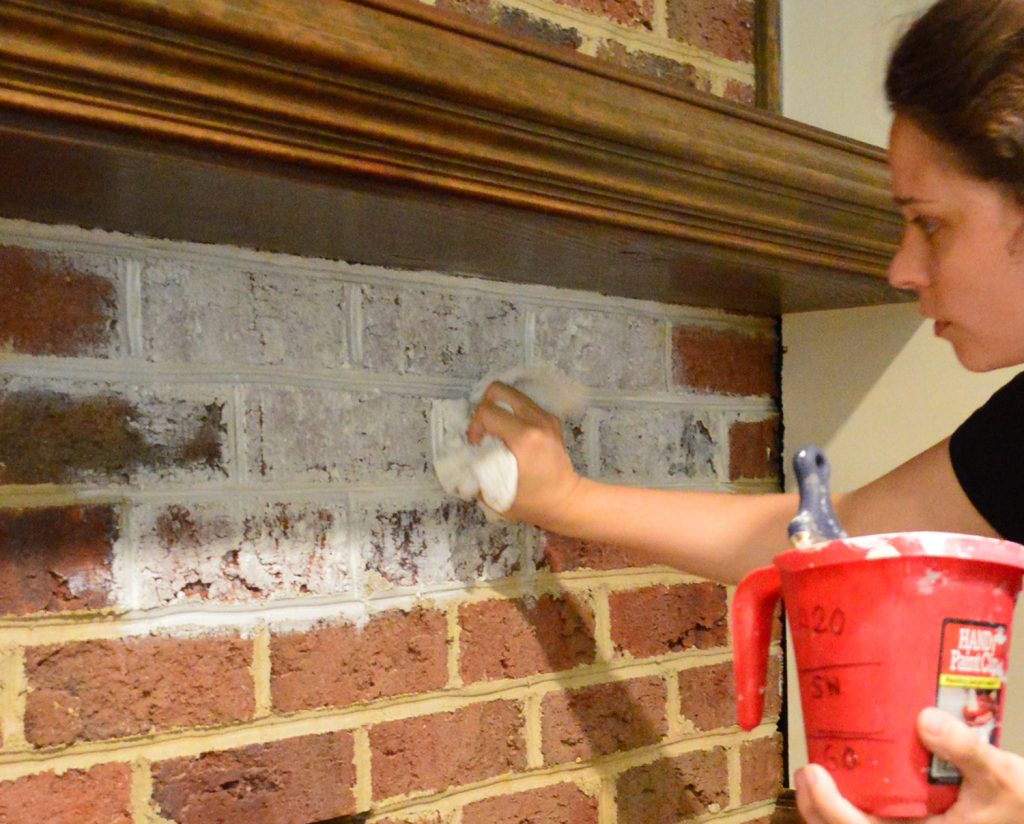
The dabbing took more arm strength than the washing-with-the-brush step, and I tried to work as fast as I could – just because I had heard that it could go pretty quickly and I couldn’t wait to step back and survey a larger area to see how it looked.
Here’s a quick video of the process for ya:
Note: You can also watch this video on YouTube.
The bricks soak up the wash pretty quickly. When you first run your brush over them it may seem like you’ve straight up painted them white. But after you dab and the paint has a chance to soak in, the brick’s coloring comes oozing through.
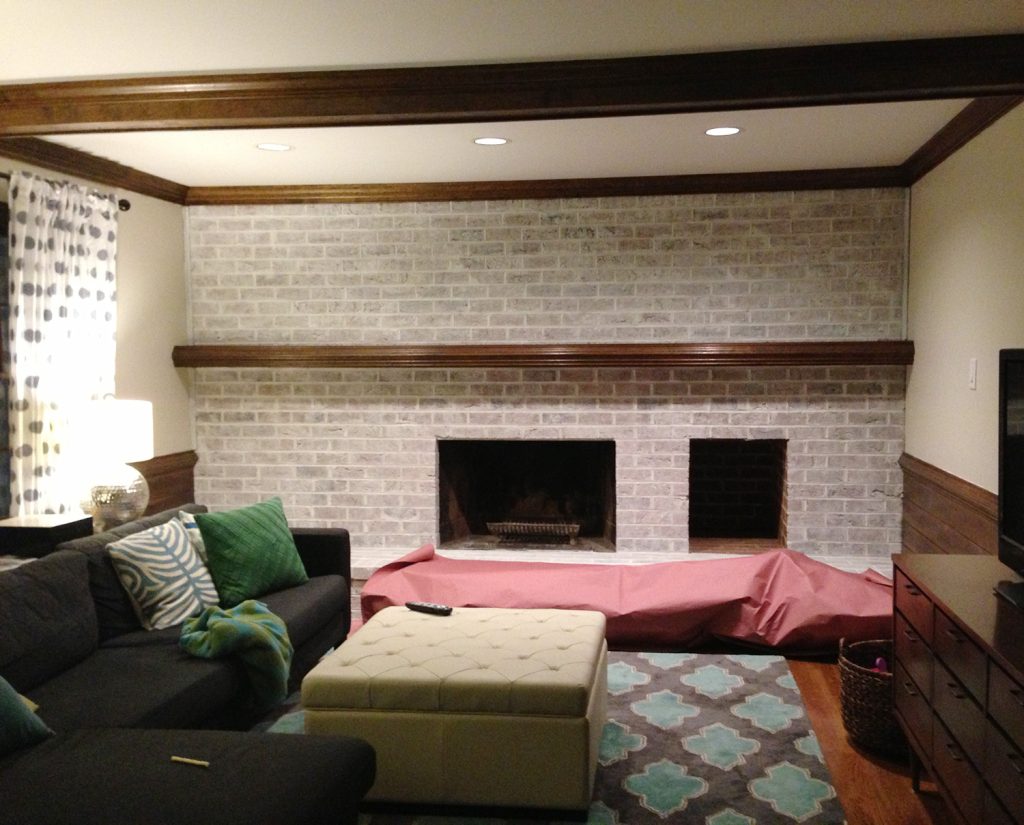
After finishing my first coat on the wall, I moved to the hearth and realized I was about to get drippy paint-water all over our wood floors. Oops! So I took a second to tape off the floor with rosin paper. It’s waterproof, which is nice because I didn’t have to worry about any drips soaking through to the floor.
Step 4: Let Dry & Evaluate
It probably took me about two hours to do the first wash and by then most of it had soaked in and dried. So, I stepped back and was faced with the question: should I leave it or do another pass? That’s the beauty of this technique – you can apply additional coats to make your whitewash more solid / opaque if you don’t like the original results.
I decided that in person too much dark red and brown was still showing through in a few areas (it’s harder to tell in these photos) so I decided to go for a second coat.
Step 5: Apply Additional Coats As Needed
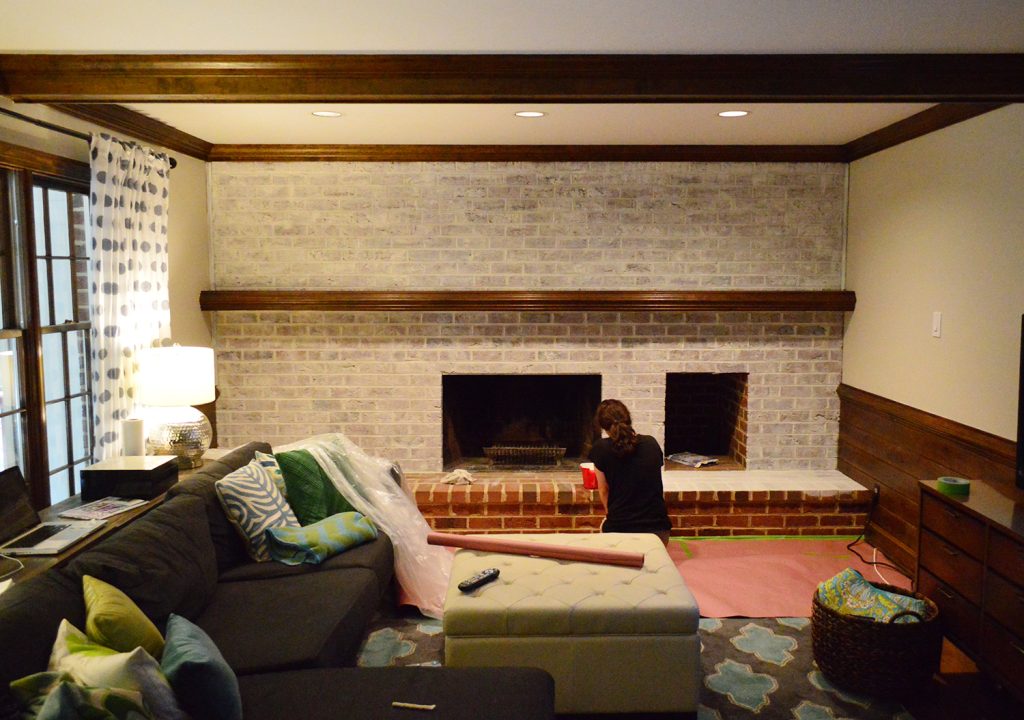
For my second coat, I mixed up an even waterier second wash and then went over the wall again – just to add a bit more haze. So if my first whitewash mixture was equal parts paint and water, this second mix was more like one-third paint + two-thirds water.
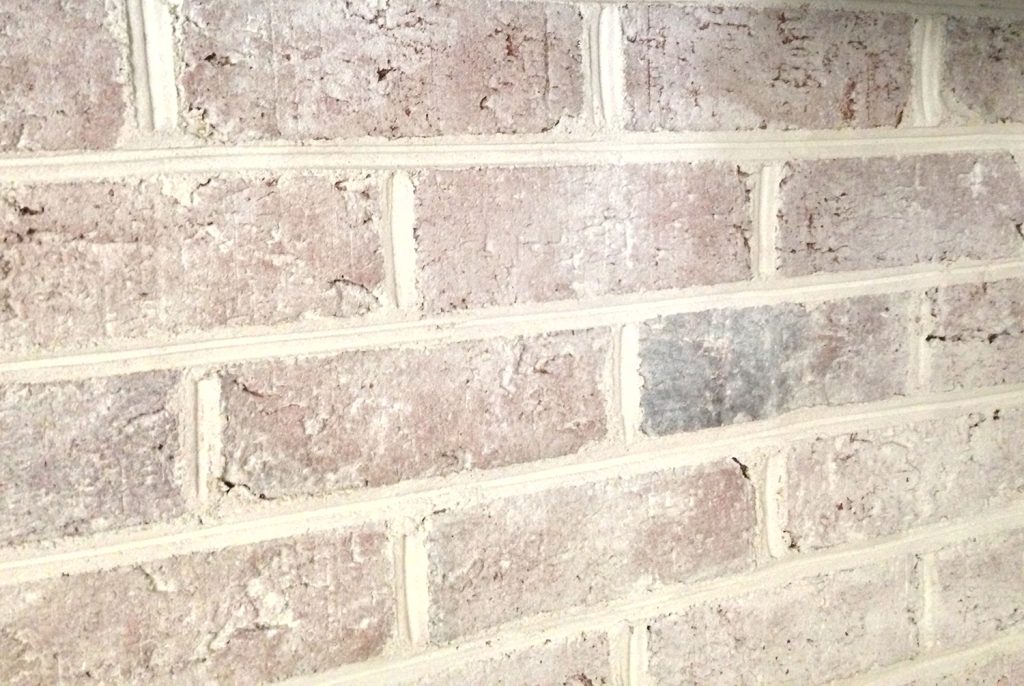
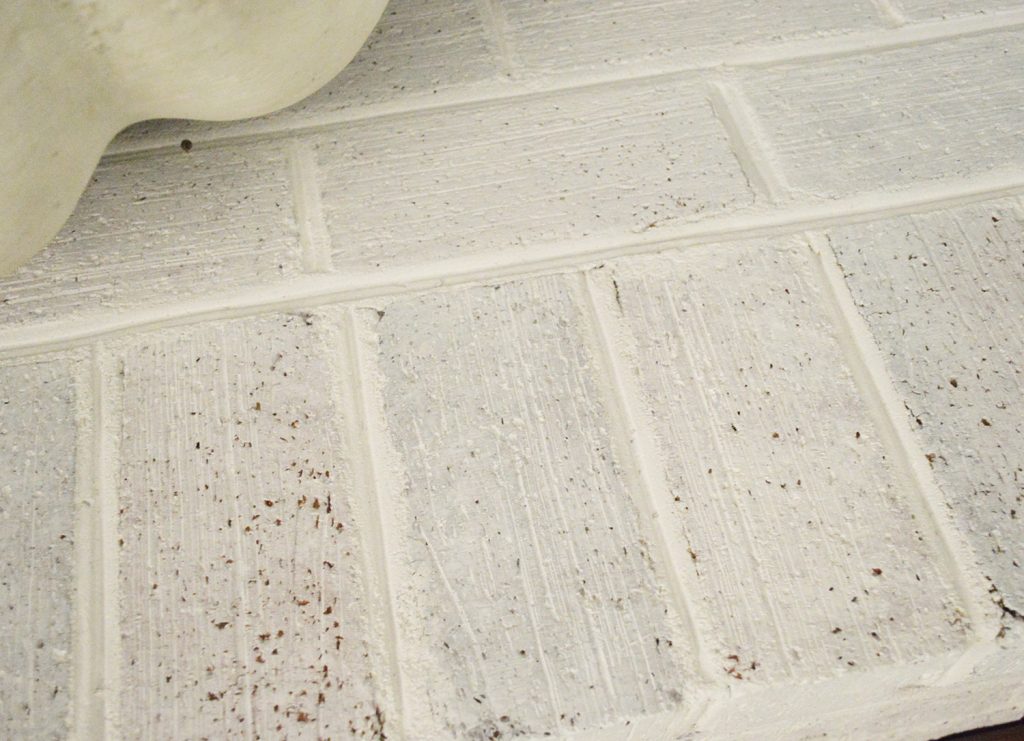
That coat was much faster – maybe an hour, tops. After that second pass, I was really happy with it. The room no longer felt as dark and cavernous, but the brick still had a lot of texture and detail in person (this photo makes it a bit harder to see than in person, unfortunately). I love the weathered effect that it gives without feeling too “faux finished” or “Medieval Times” (not that I didn’t love that place as a kid).
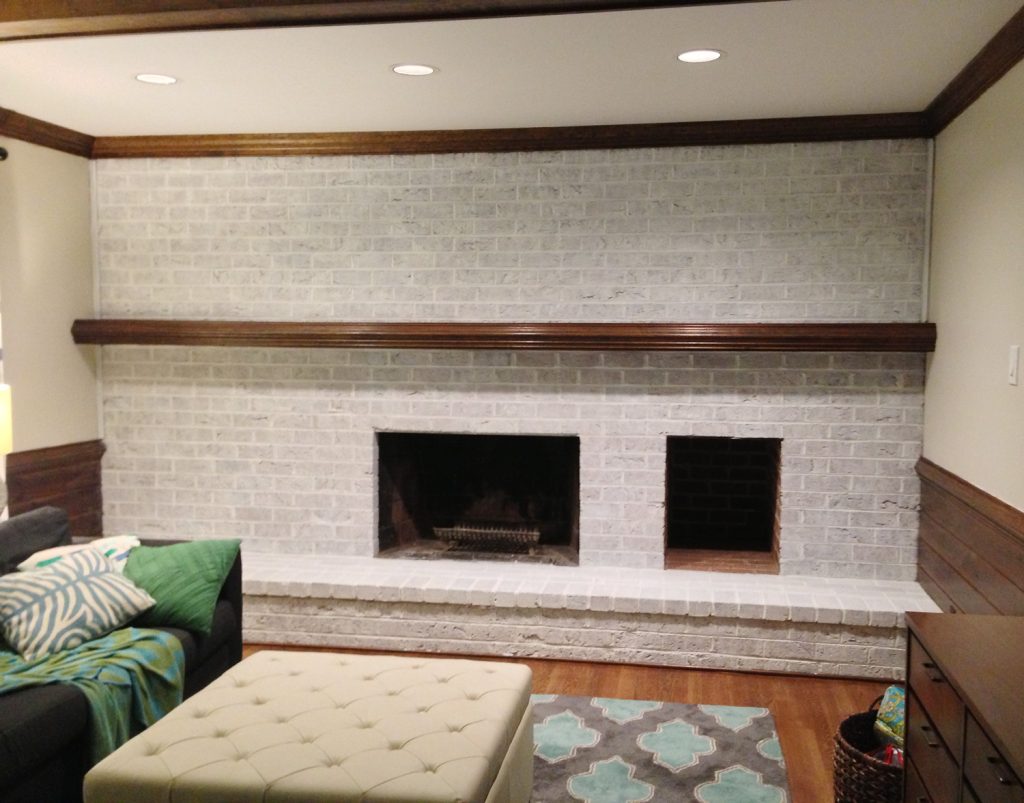
From afar the wall looks sort of chalky and textured and varied – as opposed to the glossy and super white result we would’ve gotten from painting it normally. When you get closer you see more of the pretty details of each brick. Some are a bit lighter. Some are darker. Some are craggier. It’s a nice mix.
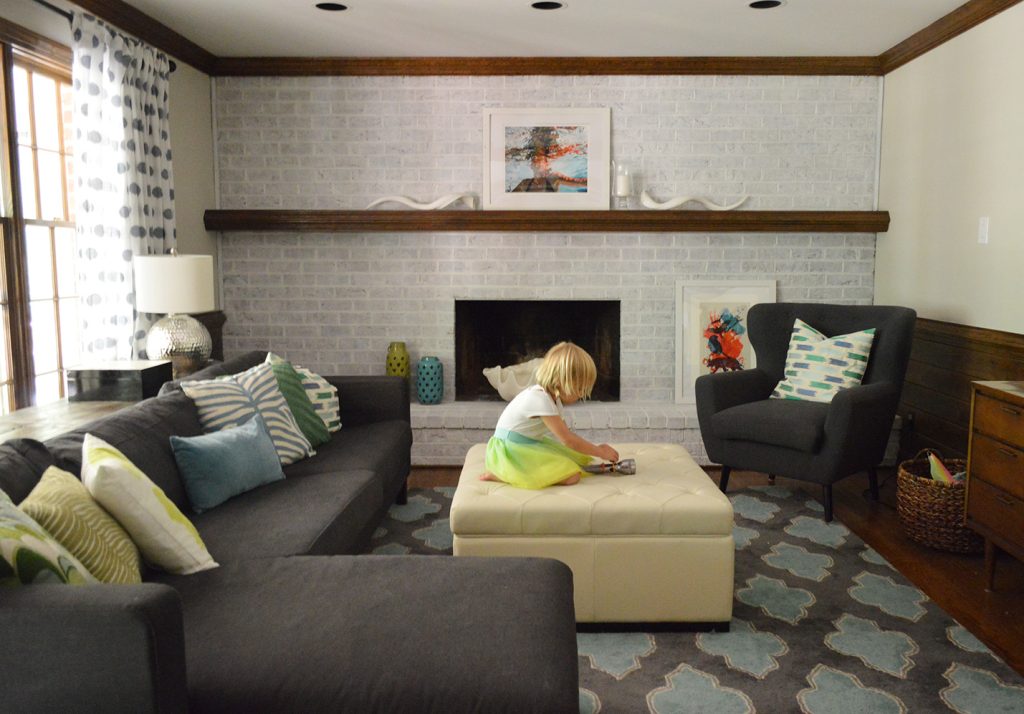
We still have a long ways to go in this room, but whitewashing this once dark wall was a HUGE help in making the space feel brighter and less cavernous (which is tough, since it gets the least natural light of any spot in our house).

Either way, I’m glad the room is looking decidedly less salmon these days.
Some folks have asked if we’ve considered painting the wood beams, wainscotting, and mantle. We’re definitely leaning towards it, but we don’t want to rush into anything. I always say never to paint brick or wood unless you are 100% sure you’ll like it since it’s so hard to undo! Basically, wait until you can’t stand waiting another second to paint it and only then should you grab a brush.
Update: We Painted It!
After a few years of living with the whitewashed brick, we decided we needed to significantly lighting up the living room even more. So using a paint sprayer with painted the brick and wood Benjamin Moore Simply White, and it did wonders for the room.
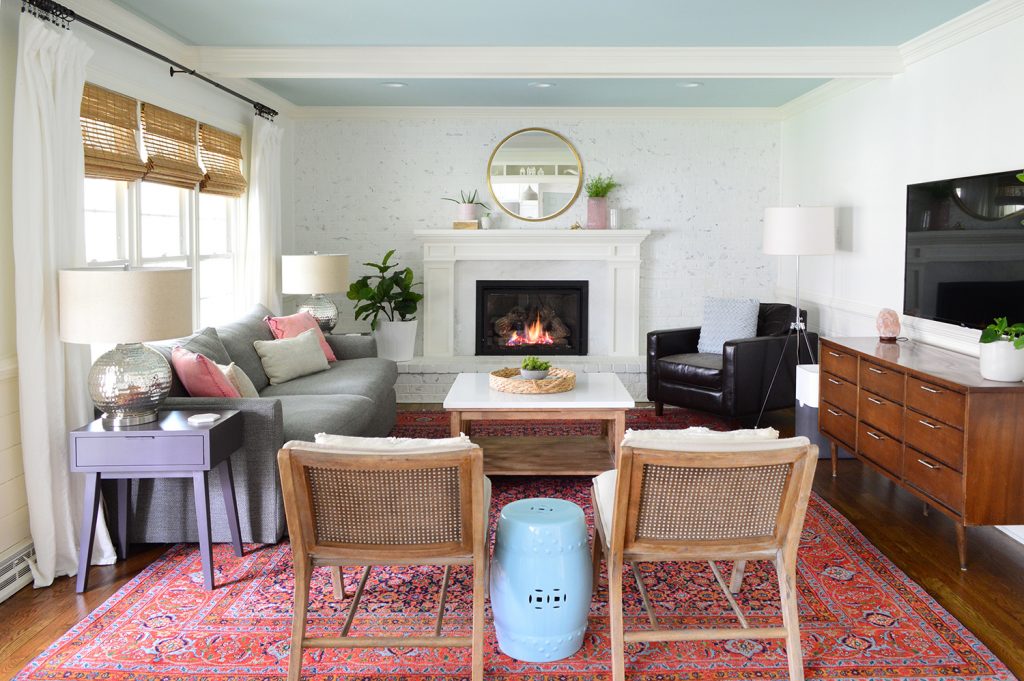
A whole lot else evolved in the room over the 7 years between the original whitewashing and when the above was taken (we constructed a new mantle, changed out some furnishings, etc), but we’re grateful that the whitewashing project gave us the confidence to make major changes to this space.
Update- We finally created this Shop Our House page to help you hunt down any furniture/accessories that you see in our house, along with all of our paint colors.

Emily F. says
Love the white washed brick! We have a not-so-pretty brick fireplace wall like this in our basement that I would love to either paint, white wash, or stain…I haven’t decided which yet though!!
Thoughts about painting the beams and mantle grey a la your last house? I know it would seem repetitive but I feel like grey (especially the mantle) would look awesome with that rug…
YoungHouseLove says
We have definitely considered other options like that! I think for now we’re leaning towards white since a lot of the rooms we have pinned have color on the walls and maybe even the ceiling but the wood trim/wainscoting/mantel is crisp and white. That’s how our first house’s living room was and we loved it so much! We’ll have to see where we end up though!
xo
s
Nadia says
Btw…how do you guys feel about those morrocan beni ourain rugs??? I kinda think one of those would be pretty amazing in there!!! IMHO :-)
YoungHouseLove says
That would be fun!
xo
s
Melissa Petcu says
My dad white washed his paneling in his kitchen rather than painting or taking it down and it looks fantastic! It’s a very long, tedious process but totally worth it in the long run. Have you considered something like that for the wood in your room??
YoungHouseLove says
We thought about that too but are leaning towards glossy white, just because we seem to like that best.
xo
s
Bailey says
Another fabulous transformation! I’ve been so excited for every unveiling in this room – it’s making such amazing progress :)
xox
Bailey
http://akabailey.blogspot.com
Kristi @ Addicted 2 Decorating says
Wow, that looks a thousand times better!! I’m still distracted by all of the dark wood (can’t wait to see that painted!), but it’s already looking so much brighter and calmer in there. I’m so glad that you decided to whitewash instead of paint. I like the dimension and texture that it adds to the room, without being so busy and distracting. It’s coming along very nicely!
Tracy K says
Hi John & Sherry! I’ve been meaning to ask this since I first saw your new home. We’ve been in our house for nine years & I’m still living with the ugly oak trim! My husband doesn’t want to paint it because our windows are also oak like yours! Will you paint the windows & trim? Just trim, or replace the windows with white ones? Would it look funny to paint all the trim white, but leave the oak windows as is? Please help me convince him that our house needs to be brought out of the 90s!!! Thank u!
YoungHouseLove says
Oh yes, we painted all of them upstairs already! We also did it in our first and second house. It’s just what we love. You can leave the windows though and do baseboard and door frames I think! Maybe check houzz or pinterest.com to see other rooms like that? Good luck Tracy!
xo
s
Erica says
Just a little side comment – I have seen some great pictures on Pinterest of painting the trim of the windows a different color. Black is common, but I think a strategically placed red or pop of color could be fun too. :)
Mamaw says
Love the whitewashed brick. Good job!
Sarah says
I’m not sure if someone else already asked this, and it may be a silly question, but why did you choose to use white instead of the color you have on the walls? Just so that you have more flexibility in the future? Or do you think the wall color would have looked weird as a “white”wash?
Sarah says
p.s. I do like it with the white, but it probably wouldn’t have occurred to me to do a different color than the walls, which is why I’m asking :).
YoungHouseLove says
Since we’ll be using the color we used for the whitewash in so many places (the wood on the walls, the trim, the mantel, the beams, etc) we think it’ll all tie in and look nice like the foyer (where we have that wall color mixed with white trim and doors and love the soft layered look).
xo
s
Maria@TheBrooklynFig says
This is a really interesting idea and something I’ve never thought of. Indoor brick is definitely a personal opinion type of thing…I actually love exposed brick and wish we had some in our house and don’t think I’d ever touch it. But for those who aren’t into it, I think this is a really cool idea over painting it because it still has that edge to it, in my opinion.
Tracy K says
Aww, you answered me! Thanks! Love u guys & everything you do!!!
YoungHouseLove says
Of course!
xo
s
Hanna Cage says
Just clicked on the tileshop ad and you guys are right on the front page. The penny tile looks so glittery and beautiful!
I love the whitewash too, especially when you see it in the closeups!
YoungHouseLove says
Ahhh! How crazy is that. Makes me all sweaty. Haha!
xo
s
Lexi says
I think if it were my home I would want it somewhere in between that and the original brick. Is it coming off that white because of the lighting? Anyway, glad you are enjoying it!
YoungHouseLove says
Yes, I think it’s just reflecting oddly in the camera (washing it out when in real life there’s more brick texture coming through like the detail shot). I’m hoping to figure out a better way to shoot it so it’s more true to life- and of course I can do a video tour :)
xo
s
Erica says
Yeeeesssss! I have been dying to see you whitewash that brick! My hubby and I are in the process of buying our first home and it too has a room of brick and wood paneling. Can’t wait until it is ours and we can take a paint brush to it! Whitewashing the brick is on top of the list! Love the result. :)
Julianne says
It looks so good, guys! Especially once you see all the mortar touchups that coloured over the lines. ;0). We have plenty of that, too & I’m so envious of you being able to white wash the darkness away & brighten up the room! My husband’s too chicken to do that here because we’re hoping to put this place on the market by next spring, but if we were staying, I’d definitely be breaking out the paintbrush and following suit. Kudos!
VV says
In the photos, I kinda prefer how it looks after going over it just once cos it kinda plays nicely with the existing wood trim – but that may just be the lighting and maybe (probably) you’re going to change up the trim?
Just looks kinda washed out (unintentional pun I swear) but again – could just be the lighting!
But it’s all infinitely better than the red brick hawdyhawhaw. Well done :D:D:D
Jill says
Game Changer! Love this room transformation. I really can’t wait until we are able to own a house. Still in our NYC apartment, but I can read your website and dream!
Amanda says
Oh my, this looks fabulous! Much better than the natural brick look!
rachael says
I usually LOVE everything you guys do and want to copy all your design choices and maybe it’s just my monitor not reading the colors right….but it makes the wall color look very blah. I think it’s because there’s a grey couch, and a grey chair and blue curtains, and a grey and blue rug, with a wood TV console and wood floors and wood trim. The couch doesn’t seem to fit in with the style of the house or the direction that you seem to be taking the room. I know, I know, the middle makes no sense!!! I can’t wait to see where you guys end up.
Gill says
I’m not a huge fan of white wash, so I think I would’ve just gone full-on white, but its way better then the brick, makes it look so much brighter!
Dreanne says
Looks great:). Where did you get your rug for this room? I LOVE it and it is EXACTLY what I am looking for:). Please share:).
YoungHouseLove says
Thanks! It was from a local outlet called The Decorating Outlet, but it’s made by Rizzy Rugs if that helps.
xo
s
Taya says
I’ve seen it pop up on Joss and Main quite a few times too!
schmei says
Sherry, I’m always surprised when people take the time to say, “blech, I really don’t like this.” Like you’re going to remove the whitewash now because commenter X disapproved. And then you inevitably respond with class. Do you have a pillow you punch or something when those comments get annoying?
Anyway, I like the direction you’re going with this, and the room already looks so much brighter and cozier. Clara playing in the picture helps, too. Good progress!
YoungHouseLove says
Haha, there’s no pillow abuse going on over here! We’ve learned that sharing our house with the internet means there are folks who will love it and folks who won’t. I think in our first year or so of blogging we were like “ahhh, why doesn’t everyone like it?!” and then we realized that would be crazy. There’s probably not a single person in the universe who’d make all the same calls that we’ve made in our house, but that’s what makes “home” so great. We love that it’s such a personal thing :)
xo
s
liz says
Not sure if it the lighting in the picture? but the ottoman looks kinda out of place in the room…with all the white you are adding the ottoman is casting a very yellow hu that takes away from everything else.
Ellen says
Love the Whitewash Brick! So fun to see this house transform into your home. Also love the chair, where is it from?
Nichole says
Love the whitewash. I can’t believe I am going to say what is coming next, but I miss the salmon pink! I know it is a crazy ass color and it’s not anything I ever would have thought I liked. I have been missing it since you first got rid of it and I miss it more now with the whitewashing the brick. It really brightened things up (at least on my computer) and played well with the teal in the rug.
I must be going insane!!! Has anyone else said this? I haven’t read through all the comments. I really feel like I must be going a bit nuts on this one. Thanks for sharing, and thanks for letting us all comment :)
YoungHouseLove says
Haha! Yes someone said it on another post (the painting one) so you’re not alone Nichole! I actually think it could be fun on the back of the bookcase (an homage to the old salmon walls, haha!).
xo
s
Charlee says
Oh, it looks awesome! I love it. You guys are always coming up with something just a step off of the typical solution to these kinds of challenges — and I mean that in only the best way.
This actually makes me think about doing this to my chimney outside, which is kind of ugly and has some awkward white sealer or something around a section of it, but the rest is that salmon-y brick color. I wonder if it’d work the same way if I used half exterior paint. Hmmm..
Kimberly says
Is it just me? Even with lightening up the walls and the fireplace, and looking forward to seeing all that dark wood disappear, it seems to me that Karl the Kouch is too big, too gray, not sure…but just not feeling it in that room. Almost like something smaller, more pieces, less moder, more classis, would do the trick. Just my humble opinion.
Taya says
Love it! Now my next question is what made you decide to switch around the rugs to different rooms in this house versus the last house?
YoungHouseLove says
It was just a size thing for the most part (our bedroom is bigger and our living room is smaller, and in the last house it was swapped) – although we really liked the green rug with our headboard so that came into play too ;)
xo
s
Caroline (the DIY nurse) says
Wow! I couldn’t imagine the white washed look before but I’m really digging it! It’s insane what paint can do for a room. It looks so modern, fresh, and open!!
Cut N Crown says
looks amazing! great job!!
Kassi says
Looks good! I am a little disappointed that y’all used paint to whitewash. There are no good tutorials on the web about how the whitewash the old school way; so many people need one. I painted my fireplace years ago and recently whitewashed the outside brick with a mixture of white portland cement and hydrated lime; the difference is amazing! The texture is stone-like and it can range in application from thick and opaque to thin and translucent. Please keep this in mind for future brick :) Thanks.
YoungHouseLove says
That sounds awesome Kassi! We had the same issue you did (couldn’t find a lot of info on other methods) so we just went with paint – but using lime sounds awesome too! I vote that you start a blog and share details/pics so I can read all about it and try it out! Haha!
xo
s
LARY@Inspiration Nook says
What a change. Love it!
HK says
Pretty! I saw this post on Apartment Therapy, they mixed latex paint with water and applied it to wood for an inexpensive “wood stain”
http://www.apartmenttherapy.com/color-saturated-how-to-make-a-wood-stain-from-regular-paint-193693
YoungHouseLove says
So cool!
xo
s
Gayle says
I love this blog, I love the controversial comments, too. I like realism and not only sucking up from the readers. I owned a house similar to this one in the early 80’s, my least favorite style of home and building ever. But I love seeing what this sweet young couple do to update and add charm. RK, there was nothing attractive here, they will make it fun, young and bright!
Gayle says
Oh, I meant to say…the bricks look awesome up close, not so much from the back of the room, maybe because of the dark trim. Oak is never a good look!
Alyssa says
LURVE it! Wow – you guys rock…. well, EVERYTHING! Keep on keeping!
Jill says
Have you given any thought to removing the mantel altogether?
http://www.sheelahclarkson.com/hotsheet/fairview/Family-Room.jpg
http://www.lighthouseinteriorsinc.com/wp-content/uploads/2012/06/interior_stone_wall_decorating_ideas_from_eldorado_stone_0.jpg
It’s just such a strong horizontal, wide element itself, and it cuts that wall in half — it definitely makes the room look shorter. I know you are intending to paint it white to make it blend better, but I can see an argument for doing away with it altogether or replacing it with something much shorter.
YoungHouseLove says
A few others recommended removing the mantel and getting a stone or building a wood surround like we did in the kitchen of our last house, just to make the room look less squat. I like that idea! Definitely thinking about it!
xo
s
oh Holland says
Big improvement! I agree — paint that wainscot, mantel and beams. But what about the window trim? Will you leave the wood tone or paint it too?
YoungHouseLove says
That’ll be painted too (we did it all upstairs already along with the trim and doors). Looks nice and the wood frames take the paint nicely!
xo,
s
Kate Craig says
um, no way! We’re thinking about white washing a piece of furniture and I’m looking up tutorials. I was wondering if you all had ever done any paint washing and came on your site to search for it. Funny!
YoungHouseLove says
So funny!
xo
s
Emily says
Looks great!! I love it that you said “Hizzy” in the title. I say that all the time, and believe me, my husband pokes fun at it. Now I know I’m not alone. :)
Marc says
Nice! When I first saw the initial house photos I wondered how long it would take for a paint job on that brick! I’ll be looking down the line for the stacked stone look too.
Crystal says
I was so excited to see this post! My husband finally gave into the idea of whitewashing our brick fireplace. Time to get busy!!
Corinna Ashley says
I’m so happy you chose the white wash instead of painting! I love the look of painted brick, but I love retaining the true nature of a material more!
And it looks GREAT in your space
XO
Ellen says
So excited for the white washing! But now the wall color seems to sort of clash? Like wearing mismatched whites. Maybe it’s just the pics! If you ever repaint down the line, I think a classic navy or charcoal grey would be awesome with the white panelling. Or even the lighter blue of your last kitchen. :)
Kate @ Happy Simple Mine says
I so admire how you guys just dive right into your projects, learning along the way. Very inspiring. :) Looks great!
Ali Em says
Looks so great! I guess I’m in the minority and I’m definitely NOT anti painting wood, but I love the wood paneling on the wall! :) As for the trim, not so much…that could be painted. I just love how the paneling on the wall is horizontal, not the traditional 70’s vertical paneling- so different & eye catching, l-o-v-e! Whatever you decide, I’m sure it will beautiful! :)
Summer says
The white wash looks beautiful! If I had brick in my house I would definitely give this a shot. Outside of the sore arm you probably have it looks fairly doable. I did do a stack stone tile on my fireplace and it turned out real well. I did it as cheap as possible with some pretty good stone tile’s from Lowe’s. The hardest part was getting all the wires for the TV/DVD, etc in the right places :) I would be happy to send you a pic. I think I am going to end up putting a coat of sealer on it so that the color comes out a little more! Can’t wait to see what you do next!! Love, Summer
Ginger says
I think your fireplace looks great! We painted ours several years ago and like it so much better! Makes a huge difference in the room! We have a sunroom off of our living room that also acts as a huge awning, so this really lightened up the room! Can’t wait to see your finished project!
Heather says
Looks uber good! I dare say you need to do something BIG and LOUD on the mantel it looks so sad!!
mp says
It looks great!!!
KarenH says
Ooh, nice transition in the mood of the room! Am I the very last person on earth to notice your curtains in the living room? LOL The change in the brick wall really brings out the curtains, and I love the fabric–I’m a sucker for dots :)
YoungHouseLove says
Thanks Karen! Those are from Ikea a while back! I’m not sure if I love them falling behind the console though, so they might end up in another room with roman shades on these windows someday!
xo,
s
KarenH. says
Why not just use that fabric to make the roman shades? It’s really great in that room. Not that I’m biased or anything :D
YoungHouseLove says
That’s definitely a possibility! We have a lot more than we’d need (there are actually four panels up there, two on each side) so I don’t know if we’d get “more bang for our buck” by using it for a room with two windows somewhere else. We shall see!
xo
s