This project gets a “don’t try this at home” warning for two reasons:
- It involves fire & broken glass so please use extreme caution & attempt it at your own risk.
- I couldn’t get it to work so you may not want to waste your time trying it anyway.
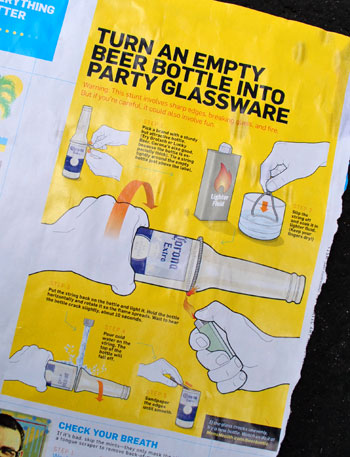
Yup, despite some die-hard persistence on my part, I couldn’t get this project to work successfully. Which sucks because I was really excited about it. According to the instructions I found in Men’s Health, it was a simple way to take beverage bottles and turn them into glass tumblers. Cool right?
Despite the project not working, we figured we’d share it with you anyway. Perhaps you’ll see where I went wrong or it will inspire you to try your hand at it (hopefully with a better outcome). If nothing else, it serves as proof that not everything goes smoothly around here 100% of the time. Plus I’d filmed just about all of my dozen or so attempts and I hated for the footage to go to waste. So check out the how-not-to video below (or watch it here on YouTube). Note: We recommend additional safety precautions like safety goggles, a fire extinguisher, and safety gloves (although Men’s Health didn’t mention them). Again, tackle this project at your own risk since glass plus fire can equal ouch!
And for anyone who can’t watch a video (if you’re at work perhaps) just keep scrolling for the written play-by-play below (which includes the sanding step that we accidentally left out of the video).
My first step was to gather the supplies that the article suggested:
- Lighter fluid and a cup to house a small amount of it
- Glass bottle(s)
- A lighter (or matches)
- Scissors
- String
- Cold water (we put ours in a watering can)
- Sandpaper (not pictured)
- Paper towels (not suggested, I added them for clean up)
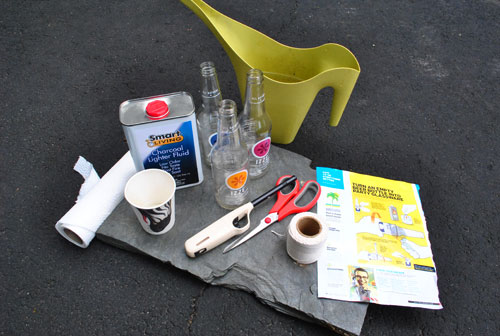
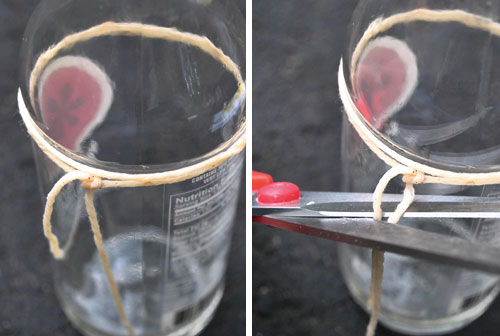
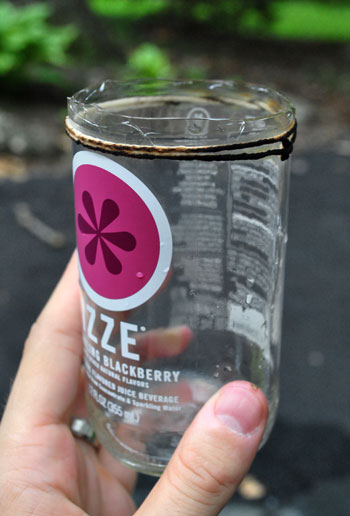
You’ll also see that I conducted this project on a spare piece of patio slate so that I wouldn’t risk burning our driveway below. The basic concept of the project is that by concentrating a lot of heat around the bottle in one clean line then suddenly cooling it with cold water, you’ll break the bottle apart leaving an un-tapered cup for drinking. So the first step is tying a string around the bottle right before it begins to taper.
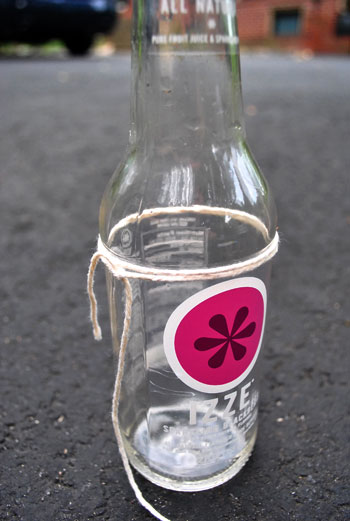
I tested this once before taking any video or photos and discovered one loop of string didn’t create enough heat to break a Boylan’s bottle, so I used two loops with my Izze bottles (seen above). Once you’ve tied the string, you remove it from the bottle and give it a good soak in some lighter fluid (doing your best to keep your fingers dry).
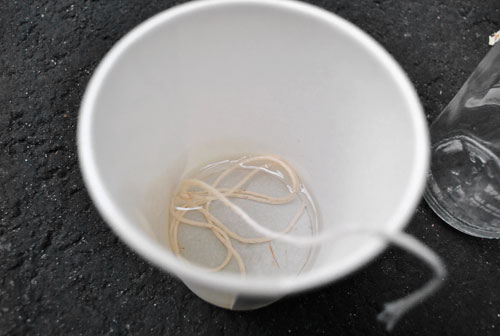
Once soaked, you put the string back on the bottle and cut off any excess (so as not to invite the flames to move down your bottle away from the spot where you want it to break). Putting the string back on inevitably got my fingers wet with lighter fluid so I washed them off in the water (so as not to invite any flames onto my hands).
Then came the fun part: lighting the string on fire. The article said to hold the bottle while doing this so that you can rotate it and help the flames spread evenly. I did this in some of my attempts, but usually just let the bottle sit on the slate so I didn’t have to have my hand near the flame. I just was sure to light the string on all sides before setting it down.
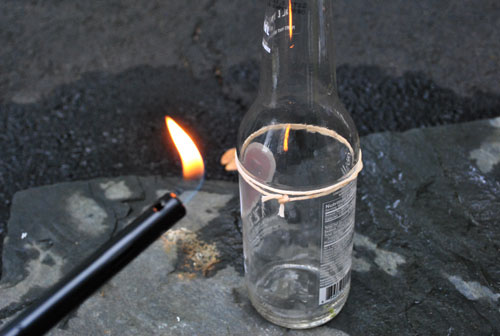
It produced something pretty like this! Oooooh, fire…
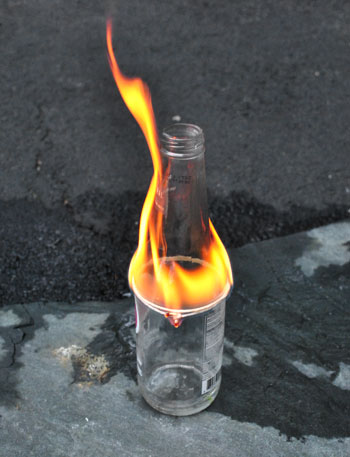
Now the article said I would hear a crack after about 10 seconds. That never happened for me (no matter how long I waited) so I jumped ahead to the next step which was pouring the cold water on the bottle which seemed to induce the cracking sound. I thought this might be where I was going wrong, but if I ever waited for the flame to go out completely before dousing it with water the bottle wouldn’t crack at all.
Ultimately, the goal is to get something like this:
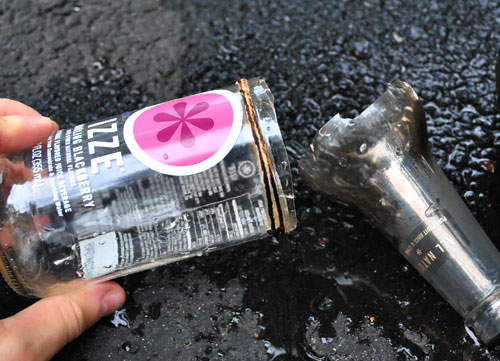
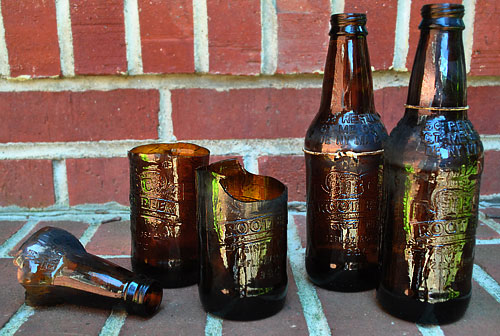
Except you’ll notice in that picture that the break isn’t totally clean. In fact it’s a lot more jagged than I would like – and certainly not something I’d put my lips to and drink out of.
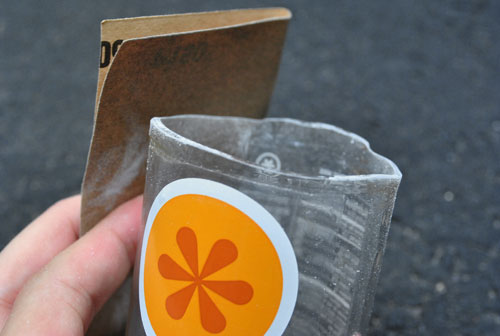
Sadly, this is actually one of my more successful attempts. I hoped that I could solve the jaggedness during the next step, which was sanding the edge so it would be smoother (you can see this being done below on my other semi-successful attempt). The sanding definitely make the edge smoother but it would’ve taken a lot of sanding to get a perfectly flat top to this glass. We did the sanding outside btw, oh and beware of inhaling any nasty silica dust if you take this on.
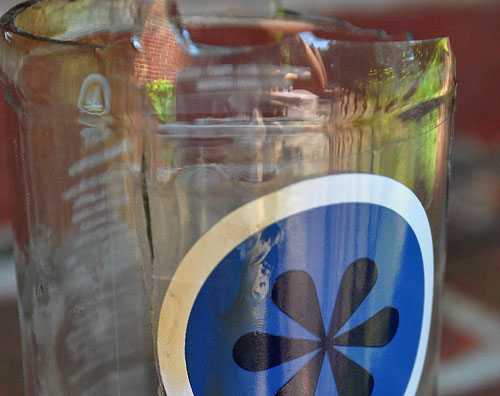
In the end this is what my three Izze bottles looked like. I didn’t even bother sanding the blackberry and blueberry ones since their breaks were so jagged. Sigh.
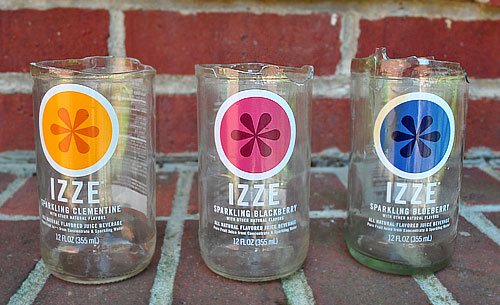
The blueberry Izze also illustrated a reason bottles like these aren’t perfect for this project. Since their logos are actually plastic labels stuck to the bottles, they can get melted and burned in the process (which is why cutting off the excess string is helpful).
After my attempts with the Izze bottles I questioned where I went wrong. I wondered if it was my bottle choice (not just for the label reason, but also because the article did suggest using a thick-ish bottle). So I tried the project again – as you saw in the video – with some IBC Root Beer bottles. They were both thicker and didn’t have plastic labels. But unfortunately the results were no better.
The thicker glass made them much tougher to break and the couple that did break were pretty jagged (while the others refused to break at all). I only got one that was semi-decent but for the most part it just looked like I had been in a bar fight.
In the end we didn’t end up keeping any of them, even though some could’ve made for decent little vases (assuming the flowers would cover the uneven edges). I have all sorts of theories about where I went wrong: was my string too thin? should I have started with cold bottles? is there some other bottle brand that would do better? But ultimately I’m just figuring it’s a “too good to be true” project and I’m not sure my belly can handle any more soda right now to try it again.
Have any of you guys tried this project or something similar? Have you had more success than me? If so, please leave your tips so someone else can try this with hopefully better results!

Amy E. says
my method: support etsy-ians! check out http://www.etsy.com/shop/YAVAglass
YoungHouseLove says
Thanks so much for sharing! You’re not the first one to mention that awesome Etsy shop and we love it!!!
xo,
s
Tess says
We used to make candle holders like this at a restaurant I work at in college! We used a sharp box cutter, culinary torch and ice water. Worked like a charm! We also used the torch to melt the sharp edges down and sandpaper to finish off any corners that needed a bit more work.
Amanda says
Why is he not wearing safety glasses?
YoungHouseLove says
Hey Amanda,
Safety first! As we mentioned in the post: We recommend additional safety precautions like safety goggles, a fire extinguisher, and safety gloves (although Men’s Health didn’t mention them). Again, tackle this project at your own risk since glass plus fire can equal ouch!
We’re not experts, just two people sharing our adventures as we take on projects and reveal our results (we just followed the Men’s Health directions, which didn’t mention them). But after completing the project we agree that it would be a lot safer to use goggles, gloves, and even have a fire extinguisher on hand. Hope it helps!
xo,
s
Adam says
An almost DIY idea, or so it seemed for you guys. A good friend of mine does this type of project quite often, and sells the completed items on Etsy as sets of juice glasses. He uses a bandsaw with a glass cutting blade, then tapes off all but the top 1/4″ near the cut and sandblasts it smooth. Sometimes he comes up with a lazer-cut stencil on sticker paper and sandblasts that image onto the front of the glasses too! Look for them on Etsy sometime!
Lindsey says
I’m sure someone has left this link by now, but just in case… http://www.youtube.com/watch?v=sFXngPx3w3M
It looks like a pretty good method. :-)
Lauren says
ReadyMade interviewed some recycler-entrepreneurs in Marfa, TX that did this for sale. I can’t find the article, but I think (?) they said they used a glass etching kit to make the first cut even and clean. Hope this helps.
RJ says
Oh wow! Now I can see why the glasses I bought were priced as they were, that’s quite the project! Too bad it didn’t turn out, but one more reason to support local artisans right?! :)
I picked a set of glasses from these wonderful artists: http://artechstudios.ca/product.asp?pid=21
Lara says
Here’s another link on finishing the edges: http://www.instructables.com/id/Drinking-Glasses-from-Wine-Bottles/step4/Finishing-the-Edges/
My dad and I are cutting wine bottles to make tumblers. We score the glass first with a scoring tool and then he uses a blow torch to heat the glass. When it cools it cracks, usually right along the score but it’s temperamental. It takes the right amount of heat. We’re still playing with the process but hopefully we’ll get some neat, recycled glasses.
Love y’all’s (yes, I’m from Texas) blog, by the way. A friend found it and sent it my way. I sent it to a friend who sent it to two others :)
Lauren E. says
Good attempt(s) John! It is refreshing to see that not all DIY projects work out the way we plan them too even though we have the best of intentions! By the way, I love the way you guys have organized the tabs on the top of the page. Your blog is one I always refrence back to so thanks for making it easy! :)
Tyler L. says
What if you used a hair-tie?
Katie B says
I had the same issues with this when I was cutting wine bottles for my wedding reception (for vases) – Check out my blog post to see how I succeeded – instead of fire, I got it to work with water :) http://lifesnextbigstep.blogspot.com/2010/03/katie-bottle-cutter.html
It was pretty easy once I got used to it! Good luck!
erin says
i saw this in ReadyMade Mag like 8 years ago and when I met my husband (then boyfriend) I was trying to introduce him to the glory of DIY. This was one of the first projects we tried. I failed miserably and he didn’t want to try any projects again for quite some time!
Debbie says
I happened to go to a market right after reading this and asked the artisan there what she did–she used a wet saw to get a clean, straight cut, just like you would for a sanding project. She was using her wine bottles for all kinds of things. I think you would still have to find a way to polish the edge though to make it safe enough to hold to your lips, but at least a wet saw would make the initial straight cut. She did say, prepare for some failures along the way!
Clare says
That looks scary! The boyfriend always raves about his method of cutting bottles (I have yet to try this). Basically you take copper wire wrap around the neck or wherever the cut is desired and take a battery, same as in lets say a your fire alarm? Then put each end of the copper wire onto each battery port (one end + the other end – ).Hope this helps!
LeAnne says
“Still haven’t figured out how to make a nice rounded rim, though – our friend put ours in her kiln and they completely slumped! Maybe someone here has an answer to that?”
Blowtorch, preferable one designed for beadmaking & lampworking. The best way would probably be to evenly heat the rim and then press down on a marble, steel, graphite, or slate surface, then reheat to polish & fuse any potential stress fractures, and anneal in a kiln or the good old vermiculite-slow cooker combo.
Jenny says
Hello! I was watching your video and was so disappointed you didn’t have any luck with it! I looked it up online to see if anyone else had had luck!
So i actually came across the Men’s Health Video where they showed you how to do it and the only thing they did differently then you is hold the bottle horizontally while the string was on fire and lightly turn the bottle round and round like a tire keeping it horizontal. Do this until it cracks (after about 10 or 15 seconds) then poor the cool water. Sand the edges, which I think they left out, and you have a great glass! He made it look easy! I’d love to see another video from you to see if this helps at all!
Hope I could be of some help! :)
YoungHouseLove says
Sweet! We’ll have to check it out!
xo,
s
Meredith K A says
How did I miss seeing this post? Maybe it was part of the huge blog backlog after getting back from a long vacation.
Anyhoo, I was very interested to find this post linked in a more recent post, because my hubby and I have been saving bottles for a while with the intent of trying this. In fact, we saw the tapered top portion of bottles used as a pendant light shade in a restaurant while on the vaca I mentioned, so now we’re hoping we can figure it out even more, and use both halves of the bottle! We’re envisioning a string of lights for our porch with glass bottle shades, and a collection of mismatched glasses made from the bottoms.
Our plan is, I think, to use a dremmel or drill with a sanding attachment to score the bottle, and hope that once it’s scored enough, the two halves will pop apart. Hubby is skeptical, but if we try it and it works, I will let you know!
I am definitely going to share this failed technique with hubby too, he will be interested. Apparently the difficulty of any method stems from the fact that you’re trying to make a break in a circle, as opposed to trimming plate glass, which is surprisingly easy (I’m always amazed, anyway).
YoungHouseLove says
Definitely keep us posted Meredith! And good luck!
xo,
s
Korinne Barry says
All this guy does is score the bottle, then run hot water over it slowly. You’ve probably seen it already….but just incase
http://www.youtube.com/watch?v=sFXngPx3w3M&feature=related
Jill says
Came across this post on bottle cutting…might be helpful to anyone wanting to do this at home!
http://plastolux.com/cuttin-glass-and-takin-names.html
Linda says
not sure how they do it, but this guy has definitely had some success upcycling beer bottles!
http://www.etsy.com/shop/bottlehood
Amanda says
hahaha Very funny video! John u have such great faces.. I really liked the one when the bottle didnt break hahaha
\o/
Tyler(plastolux) says
I have found the best way is to buy a bottle cutter, there are a few out there. I was able to cut them pretty easy and then sandblasted designs into them.
http://plastolux.com/cuttin-glass-and-takin-names.html
http://www.etsy.com/shop/plastolux
ahoypolloi says
http://www.youtube.com/watch?v=sFXngPx3w3M&feature=iv&annotation_id=annotation_513801
Try again, but here is a much better solution.
Kay says
My brother did this. But he sawed the bottles and then sanded any slightly rough edges left behind. He has pretty good success.
Sondra says
I just stumbled across this glass cutting tutorial. http://jaimelyn11.blogspot.com/search/label/http%3A%2F%2Fjaimelyn11.blogspot.com%2Fp%2Fparties.html
It’s very similar to the one you did here, with just a few differences, but maybe those are enough to make it work. Wrap the string around the glass more times, turn the object while it’s burning, and submerge the glass in the cold water instead of pouring the water on the glass. Maybe, just maybe, it’ll work?! If you try it sometime, I’d love to know how it turns out!
Love your blog!
Sondra
YoungHouseLove says
Thanks for the tip!
xo,
s
Lizz says
This was in my Google reader today and I thought of you guys. http://www.youtube.com/watch?v=sFXngPx3w3M&feature=player_embedded
YoungHouseLove says
Love it! Thanks!
xo,
s
Bee says
I recently saw this on Pinterest which led me to your blog. I realize that this post is from 2 years ago, but I wanted to share some things I did differently with successful results. :) Specifically use cotton yarn and braid it before soaking it and wrapping it around the bottle. Instead of using lighter fluid, use nail polish remover so that the flame is smaller and more controlled. Rotate the bottle on fire for 20-30 seconds so that it warms evenly all around. Then drop it into a sink full of ice water and it will separate cleanly and evenly! I hope you get a chance to try it again so that you know it does indeed work and since you were so excited about it. Good luck!
YoungHouseLove says
Thanks for the tips, Bee!
-John
Jack says
The biggest graphic in the instructions says to spin the bottle as you light the string instead of letting the flames lick the neck by leaving the bottle upright.
YoungHouseLove says
I tried it both ways and neither did the trick. My verdict was that I needed thicker string!
-John
Brittany says
I am CRYING laughing at that video. I have no idea where you went wrong as I’ve seen this on Pinterest, spelled out the exact same way you were doing it – but holy cow was that hilarious. Maybe try a beer bottle for a different glass?
Stefani says
We tried this a few times using acetone, with no success at all. We tried it on wine bottles and beer bottles – nothing broke. The youtube videos make it look so easy! Glad to hear we’re not the only ones who couldn’t figure this out.
rebecca says
Just tried this myself. I first tried using an old champagne bottle, thinking the gauge of glass and the the end result being a much more substantial tumbler. Fail. Apparently the glass was too thick, or they use a special pressure treated glass because champagne is such a high pressure beverage….not sure. Then I tried a wine bottle. Fail. I did the steps according to the youtuber’s advice: holding bottom up, keeping the heat trapped inside, then when flame goes out, dunking it into a sinkful of cold water. It DID break, but, the edge was sooooooo gnarly it was not fixable with just a little sandpaper :/ . Recycle bin….yep. Project fail. I just may look into that glass cutting tool myself :)
Patty R says
I’m sorry, but I love this! The pictures of the jagged glass are so funny, can’t stop laughing. Now I know to cross this off my interesting crafts to try. Thanks!
Morgan says
Haha! Me and my friends tried this project at her Mom’s craft center and the same thing happened, but we just took the one with the smoothest crack and sanded it down to the original line… does that even make sense?