This project gets a “don’t try this at home” warning for two reasons:
- It involves fire & broken glass so please use extreme caution & attempt it at your own risk.
- I couldn’t get it to work so you may not want to waste your time trying it anyway.
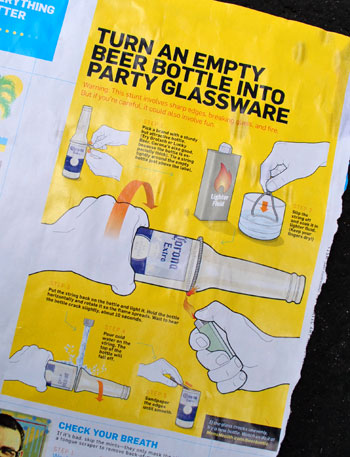
Yup, despite some die-hard persistence on my part, I couldn’t get this project to work successfully. Which sucks because I was really excited about it. According to the instructions I found in Men’s Health, it was a simple way to take beverage bottles and turn them into glass tumblers. Cool right?
Despite the project not working, we figured we’d share it with you anyway. Perhaps you’ll see where I went wrong or it will inspire you to try your hand at it (hopefully with a better outcome). If nothing else, it serves as proof that not everything goes smoothly around here 100% of the time. Plus I’d filmed just about all of my dozen or so attempts and I hated for the footage to go to waste. So check out the how-not-to video below (or watch it here on YouTube). Note: We recommend additional safety precautions like safety goggles, a fire extinguisher, and safety gloves (although Men’s Health didn’t mention them). Again, tackle this project at your own risk since glass plus fire can equal ouch!
And for anyone who can’t watch a video (if you’re at work perhaps) just keep scrolling for the written play-by-play below (which includes the sanding step that we accidentally left out of the video).
My first step was to gather the supplies that the article suggested:
- Lighter fluid and a cup to house a small amount of it
- Glass bottle(s)
- A lighter (or matches)
- Scissors
- String
- Cold water (we put ours in a watering can)
- Sandpaper (not pictured)
- Paper towels (not suggested, I added them for clean up)
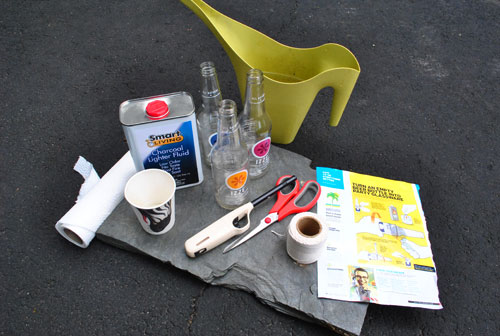
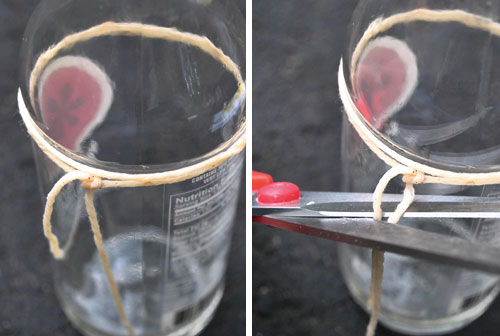
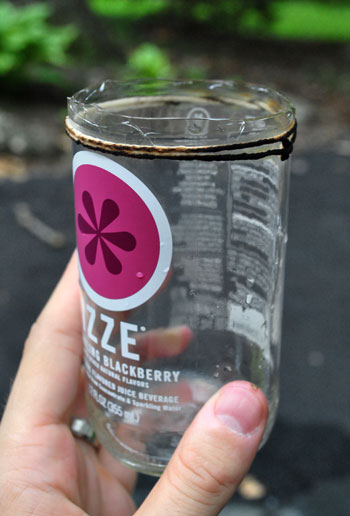
You’ll also see that I conducted this project on a spare piece of patio slate so that I wouldn’t risk burning our driveway below. The basic concept of the project is that by concentrating a lot of heat around the bottle in one clean line then suddenly cooling it with cold water, you’ll break the bottle apart leaving an un-tapered cup for drinking. So the first step is tying a string around the bottle right before it begins to taper.
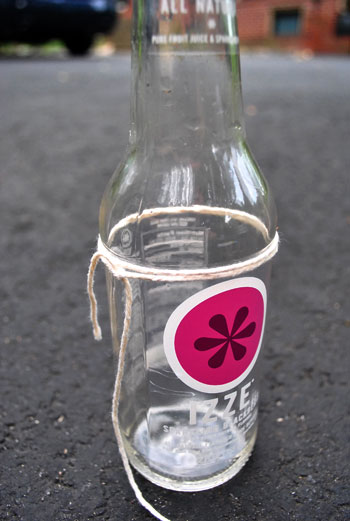
I tested this once before taking any video or photos and discovered one loop of string didn’t create enough heat to break a Boylan’s bottle, so I used two loops with my Izze bottles (seen above). Once you’ve tied the string, you remove it from the bottle and give it a good soak in some lighter fluid (doing your best to keep your fingers dry).
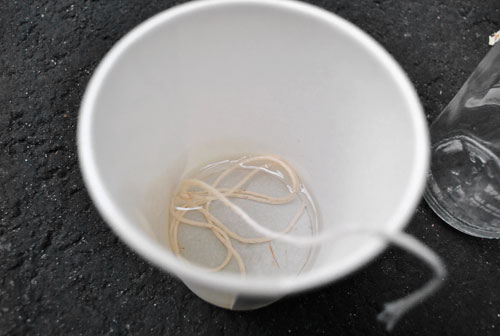
Once soaked, you put the string back on the bottle and cut off any excess (so as not to invite the flames to move down your bottle away from the spot where you want it to break). Putting the string back on inevitably got my fingers wet with lighter fluid so I washed them off in the water (so as not to invite any flames onto my hands).
Then came the fun part: lighting the string on fire. The article said to hold the bottle while doing this so that you can rotate it and help the flames spread evenly. I did this in some of my attempts, but usually just let the bottle sit on the slate so I didn’t have to have my hand near the flame. I just was sure to light the string on all sides before setting it down.
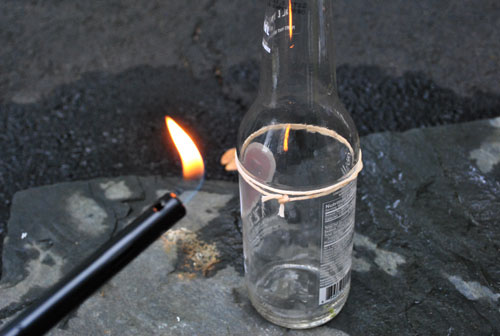
It produced something pretty like this! Oooooh, fire…
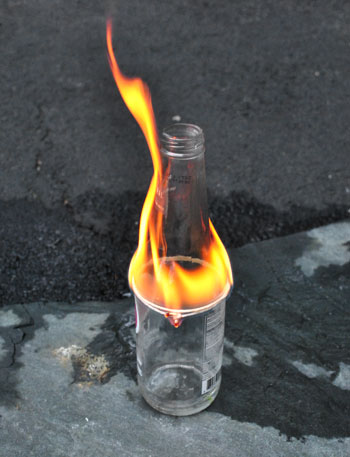
Now the article said I would hear a crack after about 10 seconds. That never happened for me (no matter how long I waited) so I jumped ahead to the next step which was pouring the cold water on the bottle which seemed to induce the cracking sound. I thought this might be where I was going wrong, but if I ever waited for the flame to go out completely before dousing it with water the bottle wouldn’t crack at all.
Ultimately, the goal is to get something like this:
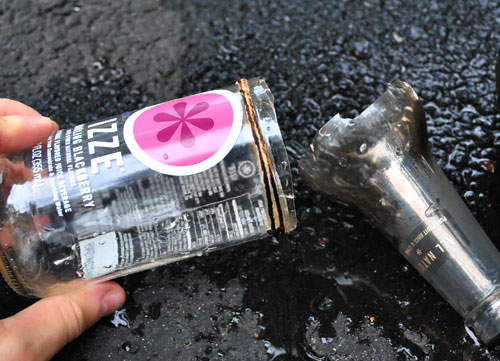
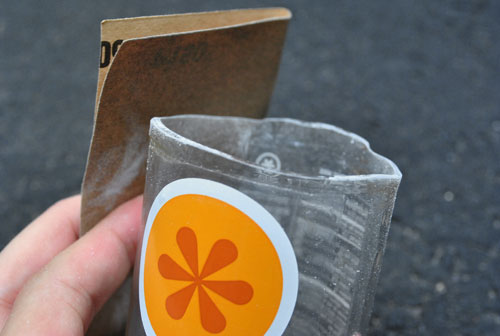
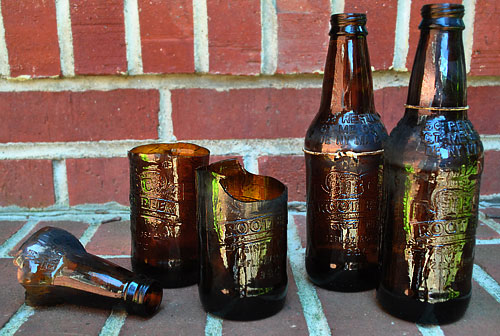
Except you’ll notice in that picture that the break isn’t totally clean. In fact it’s a lot more jagged than I would like – and certainly not something I’d put my lips to and drink out of.
Sadly, this is actually one of my more successful attempts. I hoped that I could solve the jaggedness during the next step, which was sanding the edge so it would be smoother (you can see this being done below on my other semi-successful attempt). The sanding definitely make the edge smoother but it would’ve taken a lot of sanding to get a perfectly flat top to this glass. We did the sanding outside btw, oh and beware of inhaling any nasty silica dust if you take this on.
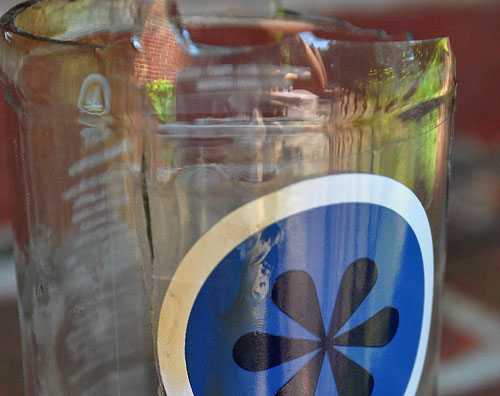
In the end this is what my three Izze bottles looked like. I didn’t even bother sanding the blackberry and blueberry ones since their breaks were so jagged. Sigh.
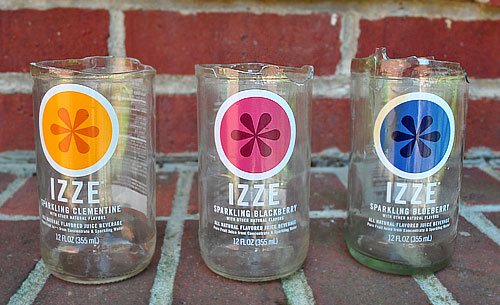
The blueberry Izze also illustrated a reason bottles like these aren’t perfect for this project. Since their logos are actually plastic labels stuck to the bottles, they can get melted and burned in the process (which is why cutting off the excess string is helpful).
After my attempts with the Izze bottles I questioned where I went wrong. I wondered if it was my bottle choice (not just for the label reason, but also because the article did suggest using a thick-ish bottle). So I tried the project again – as you saw in the video – with some IBC Root Beer bottles. They were both thicker and didn’t have plastic labels. But unfortunately the results were no better.
The thicker glass made them much tougher to break and the couple that did break were pretty jagged (while the others refused to break at all). I only got one that was semi-decent but for the most part it just looked like I had been in a bar fight.
In the end we didn’t end up keeping any of them, even though some could’ve made for decent little vases (assuming the flowers would cover the uneven edges). I have all sorts of theories about where I went wrong: was my string too thin? should I have started with cold bottles? is there some other bottle brand that would do better? But ultimately I’m just figuring it’s a “too good to be true” project and I’m not sure my belly can handle any more soda right now to try it again.
Have any of you guys tried this project or something similar? Have you had more success than me? If so, please leave your tips so someone else can try this with hopefully better results!

Cait @ hernando House says
Oh no! I’m sad this didn’t work for you guys! I saw this done on Youtube a couple of different ways, and we are definitely planning to try it at some point, so I’ll let you know how our attempt goes.
Julie says
A friend makes candles out of wine bottles. She scores them with some sort of bottle cutter (I’m sure you could find online) and then boils them to heat. Then she cracks the tops off. Most of the time the edge is very clean. Hope this helps!
YoungHouseLove says
Ooh some sort of scoring tool sounds awesome. We’ll have to look into that!
-John
Sophie says
Haha, men and fire… Always an interesting combination (:
Roo {NiceGirlNotes} says
Ouch, those look painful. Did you sustain any injuries?
This reminds me of the time I tried using a mini blowtorch and burned off my eyelashes. I’ve already said too much.
YoungHouseLove says
Hey Roo,
Nope, no injuries at all, thank goodness! But we do recommend tackling this project with extreme caution and being as safe as possible since glass plus fire can equal ouch!
xo,
s
tom says
It’s pretty ridiculous that Men’s Health would even post that article.
Have they ever thrown a glass bottle into the fire? It only melts in the white hot area of the fire. Anyone who’s used a charcoal grill knows that lighter fluid doesn’t burn all that hot (you’d think Men’s Health would know that).
So why did they think that a string soaked in lighter fluid would weaken a glass bottle enough to break off cleanly after cooling rapidly?
Silly Men’s Health.
Julie says
Try acetone instead of lighter fluid and a sink full of cool water. Soak the string in acetone, wrap araound bottle where you want the cut and then light it let, it burn till the flame is almost out, then dunk quickly in water…tops should pop right off. Good luck.
YoungHouseLove says
Thanks for the tip!
-John
nicole says
They make special cutters for this project. Probably worth the investment.
Rachel says
I saw a post on how to do this with a rotary tool just the other day! Can’t find the blog, but here are similar steps from e-how. I”m not convinced it would result in smooth edges… but I’ll let you try and let me know! ;)
Instructions
Things You’ll Need:
1 wine or champagne bottle
Bottle cutting clamp or “C” clamps with fabric on the clamps
Rotary tool
1 candle
Duct tape
Gloves
1 Wash the wine bottle to remove any leftover residue. Remove the label from the outside of the bottle. Mark the side of the bottle below the neck to indicate the cutting point.
2 Place the bottle in the clamps and score the top of the bottle with the rotary tool. Do not cut all the way through. Turn the bottle as you are scoring it to make a straight line all the way around.
3 Place a lit candle on the table. Hold the scored part of the bottle over the candle and rotate it. You need to wear gloves as the bottle becomes hot. Heat the bottle for about one minute and then pour cold water slowly on the area. Repeat this process until the bottle breaks at the scored mark. This takes 5 to 10 minutes. Be patient and careful so you do not break the bottle.
4 Line the edge of the glass with duct tape. Do not place duct tape over the top of the glass. Use the rotary tool to smooth out the edges of the drinking glass. The duct tape protects the sides of the glass from shattering.
5 Remove the duct tape. Wash your glass. It is now ready to use.
Emily says
I second the glass scoring tool- I work in a lab and we use a glass cutter to score glass tubes and then break them off where we scored them- 97% of the time we get a clean break. I know they sell glass scoring tools for small glass tubes (like what we use- basically it’s a little metal wheel that cuts the glass) but I bet you can find something larger out there for glass bottles. In fact, here’s a tutorial showing how to cut a glass bottle with a glass scorer and some hot water: http://www.wikihow.com/Cut-a-Glass-Bottle :)
Joni Tyrrell says
lol Fail!!!!
nice try guys, love this post!
Rachael Sudlow says
you need something like this- http://www.glassmart.com/ebc.asp
I’ve gotten great results using the spinning kit like that…it scores the line easily enough, then you heat it over a candle, then run the bottle under cold tap water…it splits cleanly. then the sanding isnt so bad, but what really helps is a diamond coated file (cheap on ebay), THEN sandpaper
Lisa says
Seems like the season for glass cutting. We’ve been trying to experiment with this and so far the best tool for the job has been a soon cheap £2 glass cutter. As you guys a good with your wood working skills, I’d recommend whipping up a small stand for the bottle to rotate in as your cutting. Makes things much easier and gives a cleaner cut.
Tana says
I always wondered if this really worked (I saw it on Youtube or something). I was going to suggest a bottle cutter too. Of course they sell drinking glasses made of bottles on Etsy – pretty cool as the edges are fired giving the rim a nice sublte flair, but they are pricey.
Megan B says
Perhaps beer bottles and modern soda bottles have different glass qualities. It strikes me that beer bottles are a lot harder to break in general than soda bottles. Also, beer is alcohol, which means it’s a regulated substance, which means there could be very specific standards around the type of bottle in which beer can go. Soda, probably not so much.
Try it with a beer bottle and see if you have success.
DemMom says
I can’t imagine how the edges could ever be “clean” enough to drink from. There are plenty of drinking glasses in the world, buy them at the thrift store. Entertaining “How Not To” video though!
marisa @ vinyasa mama says
Here is a post from Design Sponge about how to cut the tops of bottles. You do need to use a glass cutter, but it seems similar to what you are going for…
http://www.designspongeonline.com/2008/11/diy-wednesdays-wine-bottle-candle-holder.html
jennifer says
my aunt had rocks glasses made out of vodka bottles as a gift for my cousin’s husband… they are really cool looking. hopefully you can figure out a way to make it work becuase those izzy bottles would make some cute glasses
caitlin says
guys!!!! use gloves when you do this stuff!! use gloves! fire and burning hot glass aren’t a joke!
and ya know if youre going to drink from it, make sure it isnt all sharp. I didnt even get to the whole post because I was shocked at the no gloves!
Sunny's Life in Rehab says
Thank you for posting this! Not only did I get a good laugh, it’s nice to know I’m not the only blogger with FAIL as a category. Although I think this is only project number two for you guys that didn’t work out (I’m remembering the string lanterns and Sherry’s endearing pout). I have racked up a few more. I love your blog, you’re a daily stop.
Barbara says
Here’s the bottle cutter. They’ve been around since the swinging 70s!
http://www.amazon.com/TechnologyLK-Bottle-and-Jar-Cutter/dp/B0018N6RR8
Carole says
it was entertaining to watch the video, good for you for being so persistent.
maybe it would work best with a beer bottle? Who knows…the glass scorer is a great idea, too, it was a snap (!) to use when installing our glass tile wall in the shower.
Rebecca says
That’s alot of soda! You must have been on a sugar high for days! Bummer that it didn’t work because those would be really fun for a patio set!
Anna says
As Julie suggested, I think scoring is the way to go. I’ve never tried this myself, but just last weekend, we went to a glass blowing museum, where we saw a demo of how to create a vase. This involved cutting the glass to get a clean edge, and the glass blower specifically called out scoring the glass to ensure that you get a clean break and that you don’t get stress cracks (like you got in the blackberry bottle). If you try this experiment again with scoring, please let us know if it worked for you!
lor says
Did you try an actual BEER bottle? The instructions said how to turn an empty beer bottle into glassware. Lol. who knows, but if you don’t drink I’m sure it wouldn’t be difficult to get a few empty ones from a restaurant or something?
caitlin says
also they have workshops all about doing this at the Pittsburgh Glass Center, which is an incredible place, but I haven’t taken any. I think they use little heat flame guns like torches to do it. Not sure if some art center near you would also offer those types of classes.
now that i read the whole thing i see that yes, you sand it, and all that other stuff. sorry to get all worried!
Boice says
Good try ! making me nervous that you were not wearing safety googles. Love your blog :)
Barbara says
Also, I think charcoal lighter fluid burns less hot than real lighter fluid (for lighters, in the yellow bottle – butane) – which may not have got the bottle hot enough.
YoungHouseLove says
Hey everyone,
Thanks for all the tips! You definitely make a ton of good points for anyone else who will be trying this project out in the future!
-John
Melanie Beth says
Ok this project is too cool! I’m not sure where you went wrong… it seems like you followed the directions… either way, I’m going to have to try this! I’ll let you know if I have any success
Kristin ~ Bien Living Design says
My sister bought my husband & I Red Stripe glasses just like this (we were married in Jamaica) – it was from a reuse/recycling type store…the definitely did not DIY them!
However, one of my fellow Weddingbee writers did this with wine bottles for their centerpieces – they used a bottle cutter :) Here is the link, if you’re interested: http://www.weddingbee.com/2009/01/08/4-diy-how-to-turn-a-wine-bottle-into-a-vase-or-votive/
Faith says
How cold was the water you used? You may want to try water from the freezer thats slushy.
Cecilie says
Oh no! That looks like a big project and what a shame it didn’t work for you.
I will have a shout out for you on my blog tomorrow. I’ve borrowed you blog header for the blog post and I hope that is okay? I’ve linked to you of course ;o) Thank you for all the inspiration you share.
YoungHouseLove says
That’s awesome! Can’t wait to see it!
xo,
s
Ronnie says
That video was hilarious! Had me laughing out loud! Sorry it didn’t work out though :(
Gloria says
John: please wear safety glasses the next time you do something with glass. A piece could have broken off when the glass popped, shot up, and hit you in the eye. (Can you tell I am a mother?)
Best regards,
Gloria
Jessica @ How Sweet says
Just the fact that this is labeled “don’t try this at home” would make my husband WANT to try it!
christa says
guuuuys….I don’t remember where I initially saw this project (here?) but I have been saving wine bottles for months to make xmas gifts of candle stick holders and bud vases.
now my confidence is shattered!
Jannell says
I’ve been using a glass scoring wheel for window panes. It looks a lot like a little fabric cutting wheel, only a bit more macho. Picked it up at the local hardware store. It might be hard to run around a bottle in a straight line. Perhaps try setting up a jig of some sort?
First I’d try a thicker string for a longer burn time and then dunked it straight down (neck first) into a bucket of water and ice. I’m thinking that plunging it in will give it an uniform temperature shock, that way it’s less likely to crack uneven. My guess is by pouring water over the bottle it’s cooling at different rates and pressure, causing the jagged breaking and cracks.
Good luck if you try again!
Lindsay@Tell'er All About It says
*Note to self – do NOT show this to my husband!
Erin C. says
LOL.. sorry it didn’t work out. I saw that article in my husband’s Men’s Health, and thought that it looked pretty dangerous. I give you an A for effort :)
kiera says
http://www.ebaumsworld.com/video/watch/80731975/
Marion says
I can’t stop cracking up about this post – everything from the look on your face on the video link to the outcome being so not YHL-like. Thanks for sharing and making me laugh…
Katie says
This would be really awesome if you could get it to work! I found a shop on Etsy that sells all kind of upcycled glass: http://www.etsy.com/shop/YAVAglass
simply blythe says
what a bummer.
perhaps it didn’t work for men’s health either and that’s why they had to illustrate the instructions instead of using photos.
you sure had some cute glasses in mind!
CaitStClair says
Lots of others have already chimed in but we did this with wine bottles to make vases for our wedding. After making 100 or so, I’d say we had the method down pretty pat.
1. Score a line with a rotary blade (it sounds like tearing kleenex if you’re doing it right.)
2. Rotate over a candle to heat the line. I wanted to try a little propane torch but never got around to it.
3. Dunk in a bucket of ice water
4. Gentley tap it on the bottom/side of the bucket if it doesn’t immediately break free. If it still doesn’t break, set it aside and reheat/ice it later.
Basically, it’s the extreme temperature changes that cause the break and the score line directs it. I’d say it’s definitely worth another try but I’d skip the string.
Kim says
So glad to see the Pittsburgh Glass Center getting a shout out! Yay Caitlin! If you live in the area, that place IS awesome, it completely got me addicted to glass! Take all the classes you can! Now that I’ve moved away I realize what an amazing community resource it is. I can’t wait to set up my own torch and get back to glass!
So, while I haven’t done this particular project with this method, here is another tweak that might help. I second (or third or fourth) the scoring tool followed by a little water on the score. Then use a torch (we used a propane oxygen torch for flameworking but you can use a MAPP gas torch which is available at any hardware store) to heat the score, then it will either pop apart or you can use some gentle pressure to separate the neck from the base. If you want to get a really great smooth edge you can use a grinding wheel or a standing belt sander in multiple rounds using grit going from something like 80 up to 400 for a super polished shine.
Although someone else suggested dunking the bottle, plunging a hot bottle neck down into water is probably pretty dangerous, because the air trapped inside the bottle when you invert it and place it into water may heat up a LOT and explode the bottle which would be especially bad if you are holding it in your hand. Always have somewhere for the hot steam/air to go!
happy glass fun!
emmy lou says
okay, I have had success at doing this, but by a completely different method… I just typed it all out and then saw that CaitStClair in the comment above me already told you all about it.
So I say ditto. That method works great, and is a LOT of fun.
You can use a kiln (a neighbor’s preferable :) ) to smooth out the edges, or if you don’t mind them looking a little rough sandpaper or a dremel tool.
Also, we did it in the winter so buckets of snow were perfect for dunking the hot bottles. Have fun!
Amy says
My husband got the urge to cut some glass bottles one day and pulled out our diamond-bladed wet tile saw. It did the trick perfectly- cut a clean line straight through the bottle. So if anyone has one of those tools on hand (make sure it’s a diamond blade so that it can cut through glass seamlessly), it really works!
Nicole says
When I was planning my wedding over a year ago I remember this project that I read about: http://www.weddingbee.com/2009/04/27/revamping-the-centerpiece-process/ it includes some links (you can check out her first attempt, and then there is another link on that post for someone else’s technique) for different methods!
Kym says
SAFETY GLASSES!!!!!!!!!!!!!!!!!!!!!!!!!!!!
Now that I’ve made THAT point…..
try scoring the glass with a triangular file. It’s cheap, easy (though might take some practice to make a nice straight line), and will create a weak spot in the glass. THEN tie the string around, squirt on some lighter fluid (or you might not need it, the string may burn hot enough) and burn baby burn.
In the end, take the HOT glass and rub it in a bucket of sand, it will begin the sanding process for you…having hot glass when you do it will also help.
good luck.
Did I mention safety glasses? Sheesh!
Jeannette says
I love how ~adventurous~ you guys are! Sorry this project didn’t work out. Better luck next time!
Angela says
This brings back childhood memories. My brother had a kit to do this and it included a cutting wheel, sandpaper, and a little device to hold the bottle (you provide your own lighter). Of course, it never really worked. I’m not sure why they marketed that kit to kids either – the 70’s were a bit messed up.
Alicia says
I love that this is your post today! My fiance also cut the article out of Men’s Health, and we tried it a couple weeks ago at a bbq. We got it to “work,” but we also had the same issues with the not smooth edges. I read your blog every day, and always make mention of your posts to my fiance, so I couldn’t wait to send him a link to this one!