This project gets a “don’t try this at home” warning for two reasons:
- It involves fire & broken glass so please use extreme caution & attempt it at your own risk.
- I couldn’t get it to work so you may not want to waste your time trying it anyway.
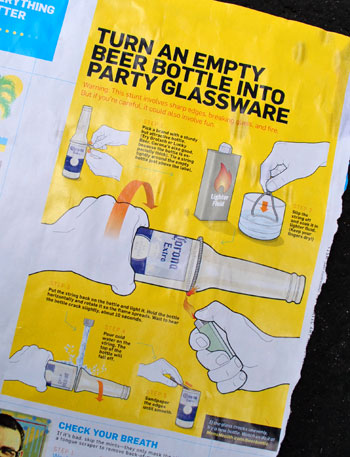
Yup, despite some die-hard persistence on my part, I couldn’t get this project to work successfully. Which sucks because I was really excited about it. According to the instructions I found in Men’s Health, it was a simple way to take beverage bottles and turn them into glass tumblers. Cool right?
Despite the project not working, we figured we’d share it with you anyway. Perhaps you’ll see where I went wrong or it will inspire you to try your hand at it (hopefully with a better outcome). If nothing else, it serves as proof that not everything goes smoothly around here 100% of the time. Plus I’d filmed just about all of my dozen or so attempts and I hated for the footage to go to waste. So check out the how-not-to video below (or watch it here on YouTube). Note: We recommend additional safety precautions like safety goggles, a fire extinguisher, and safety gloves (although Men’s Health didn’t mention them). Again, tackle this project at your own risk since glass plus fire can equal ouch!
And for anyone who can’t watch a video (if you’re at work perhaps) just keep scrolling for the written play-by-play below (which includes the sanding step that we accidentally left out of the video).
My first step was to gather the supplies that the article suggested:
- Lighter fluid and a cup to house a small amount of it
- Glass bottle(s)
- A lighter (or matches)
- Scissors
- String
- Cold water (we put ours in a watering can)
- Sandpaper (not pictured)
- Paper towels (not suggested, I added them for clean up)
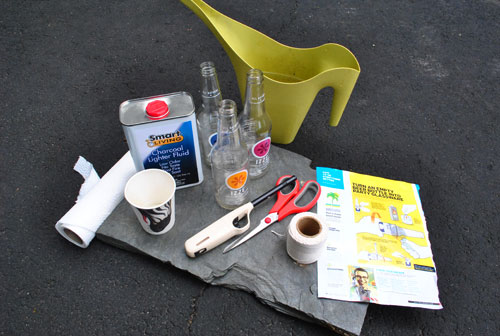
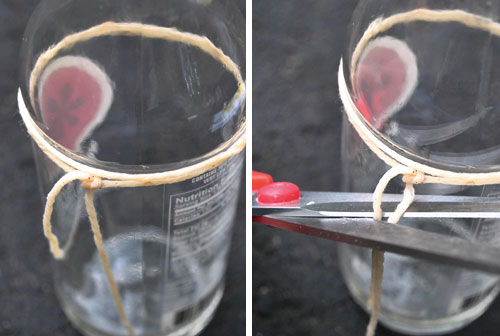
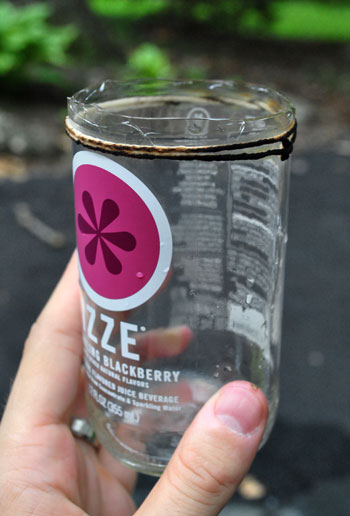
You’ll also see that I conducted this project on a spare piece of patio slate so that I wouldn’t risk burning our driveway below. The basic concept of the project is that by concentrating a lot of heat around the bottle in one clean line then suddenly cooling it with cold water, you’ll break the bottle apart leaving an un-tapered cup for drinking. So the first step is tying a string around the bottle right before it begins to taper.
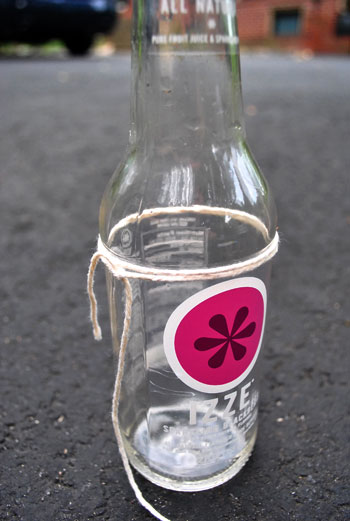
I tested this once before taking any video or photos and discovered one loop of string didn’t create enough heat to break a Boylan’s bottle, so I used two loops with my Izze bottles (seen above). Once you’ve tied the string, you remove it from the bottle and give it a good soak in some lighter fluid (doing your best to keep your fingers dry).
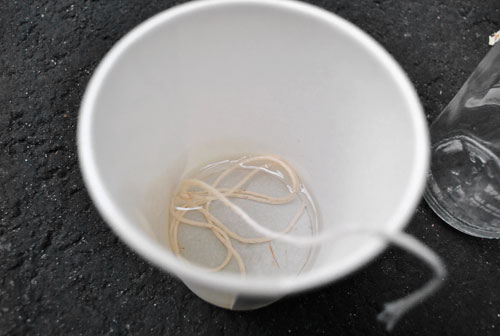
Once soaked, you put the string back on the bottle and cut off any excess (so as not to invite the flames to move down your bottle away from the spot where you want it to break). Putting the string back on inevitably got my fingers wet with lighter fluid so I washed them off in the water (so as not to invite any flames onto my hands).
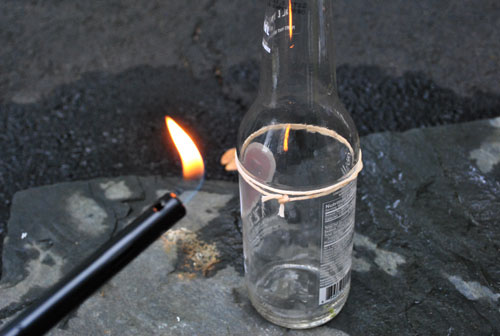
Then came the fun part: lighting the string on fire. The article said to hold the bottle while doing this so that you can rotate it and help the flames spread evenly. I did this in some of my attempts, but usually just let the bottle sit on the slate so I didn’t have to have my hand near the flame. I just was sure to light the string on all sides before setting it down.
It produced something pretty like this! Oooooh, fire…
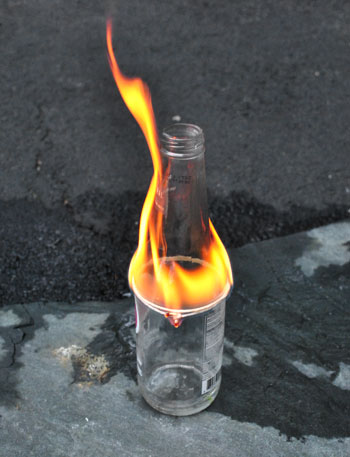
Now the article said I would hear a crack after about 10 seconds. That never happened for me (no matter how long I waited) so I jumped ahead to the next step which was pouring the cold water on the bottle which seemed to induce the cracking sound. I thought this might be where I was going wrong, but if I ever waited for the flame to go out completely before dousing it with water the bottle wouldn’t crack at all.
Ultimately, the goal is to get something like this:
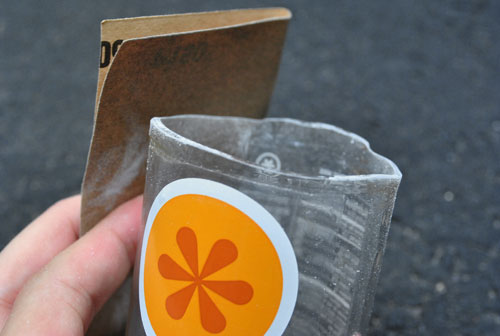
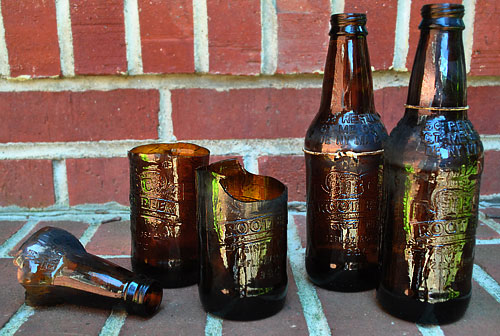
Except you’ll notice in that picture that the break isn’t totally clean. In fact it’s a lot more jagged than I would like – and certainly not something I’d put my lips to and drink out of.
Sadly, this is actually one of my more successful attempts. I hoped that I could solve the jaggedness during the next step, which was sanding the edge so it would be smoother (you can see this being done below on my other semi-successful attempt). The sanding definitely make the edge smoother but it would’ve taken a lot of sanding to get a perfectly flat top to this glass. We did the sanding outside btw, oh and beware of inhaling any nasty silica dust if you take this on.
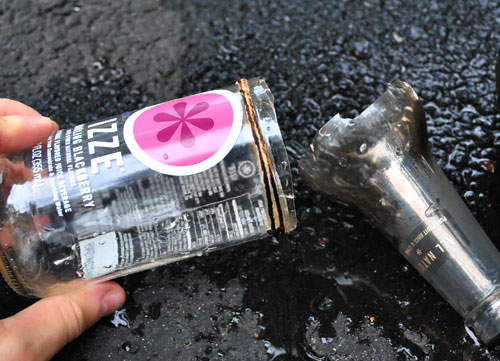
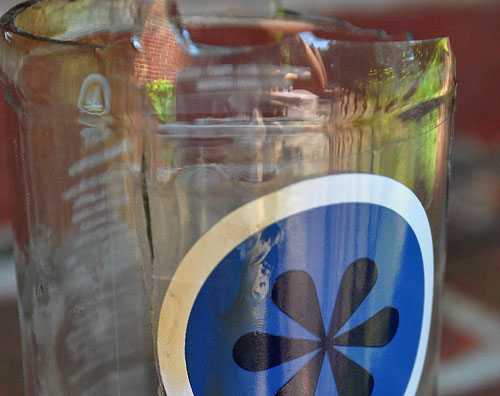
In the end this is what my three Izze bottles looked like. I didn’t even bother sanding the blackberry and blueberry ones since their breaks were so jagged. Sigh.
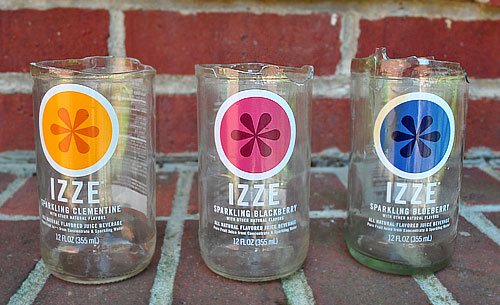
The blueberry Izze also illustrated a reason bottles like these aren’t perfect for this project. Since their logos are actually plastic labels stuck to the bottles, they can get melted and burned in the process (which is why cutting off the excess string is helpful).
After my attempts with the Izze bottles I questioned where I went wrong. I wondered if it was my bottle choice (not just for the label reason, but also because the article did suggest using a thick-ish bottle). So I tried the project again – as you saw in the video – with some IBC Root Beer bottles. They were both thicker and didn’t have plastic labels. But unfortunately the results were no better.
The thicker glass made them much tougher to break and the couple that did break were pretty jagged (while the others refused to break at all). I only got one that was semi-decent but for the most part it just looked like I had been in a bar fight.
In the end we didn’t end up keeping any of them, even though some could’ve made for decent little vases (assuming the flowers would cover the uneven edges). I have all sorts of theories about where I went wrong: was my string too thin? should I have started with cold bottles? is there some other bottle brand that would do better? But ultimately I’m just figuring it’s a “too good to be true” project and I’m not sure my belly can handle any more soda right now to try it again.
Have any of you guys tried this project or something similar? Have you had more success than me? If so, please leave your tips so someone else can try this with hopefully better results!

Amanda - Small Home Big Start says
I love that you showed this clip even though it didn’t work for you. Learning from your failures makes your successes just that much better!
bagelpower says
How could this accident have been avoided – you are an OSHA poster boy!! You need some PPE (Personal Protective Equipment) and a fire extinguisher before you become a statistic.
I 157th the scoring idea – a simple glass cutter that they sell in the glass area at Home Depot, do a bunch of runs around. Try a wine bottle or some heavy, thicker glass, looks like these bottles fracture to easily. This project is on our list for sure, love the idea or recycling all our wine bottles into glasses. Keep trying!
YoungHouseLove says
Hey everyone,
Thanks for all the tips! You definitely make a ton of good points for anyone else who will be trying this project out in the future!
-John
Marissa says
Have you ever seen the Truth campaign commercials “Shards ‘O Glass Freeze Pops?” This post reminded me of that. Check out http://www.shardsoglass.com, it’s pretty witty.
YoungHouseLove says
Oh yeah- that’s too funny. It’s totally like that. Don’t try this at home kids…
xo,
s
Clarissa says
Thank you for tackling this and putting your personal safety at risk! I have been wondering about it for a while. Now I am inspired!
jessica o'brien says
a solid a+ for effort! it makes me giggle a little because people always come into our store + see these made from beer + soda bottles, as well as wine bottles: http://www.thegreenlifecostore.com/70.html
and declare they’re, “so easy to make at home,” then come back a few weeks later to buy them. guess they had your same luck! ;)
Holly says
Hilarious
pippin says
Where are your safety glasses? You are lucky nothing happen to your eyes. Be safer next time.
YoungHouseLove says
Hey Pippin,
As we mentioned in the post, we were just following the steps in Men’s Health (which didn’t mention safety glasses, gloves, or a fire extinguisher) but we do recommend those precautions for anyone taking the project on now that we’ve done it (you can also see that warning bolded right in the post). Hope it helps!
xo,
s
Catherine S says
You really do need the bottle cutting jig (and not any flimsy plastic one that you find online)–that produces the only bottle glasses I’ve ever seen that were successful. We used to make them with my dad when I was little out of beer bottles.
Apartment Therapy had some nice directions not too long ago: http://www.apartmenttherapy.com/ny/how-to/how-to-make-your-own-glasses-from-bottles-094915
Where to buy the best jig though, I don’t know!
Robin says
Yeesh…starting to think those beer bottle glasses on etsy are now worth the 20 bucks they charge per glass…
Harris says
I really wanted this to work as the cheaper DIY version of the other method I found a few months ago: http://greenpowerscience.com/BOTTLECUTTING.php3. Skip to about 3:41 to see it work, and then watch the rest of the clip because the guy is pretty animated. Best of luck!
Heidi says
My husband and I cut and sanded over 100 glass bottles for our fabulous DIY wedding last year. We used a bottle cutter that we got with a 40% off coupon at Michaels…you score a controlled line around the bottle with a tiny blade then tap around the line which causes the glass to break at the weakest point (the scored line). There’s definitely some trial and error involved, but lots of elbow grease and several sanding parties later, and we had a beautiful candle-lit wedding, with glowing green and brown from the bottle votives! (our wedding colors.) :-D
We too saw a flames and danger version of bottle-cutting, which gave us the original idea, but it seemed way too hazardous and shards’o’glass-ish to repeat 100+ times…
Anyway, here’s the cutter we used (found a picture online)
http://bigmouthbride.com/wp-content/uploads/2009/10/bottle-cutter.jpg
Melissa C. says
“And for anyone who can’t watch a video (if you’re at work perhaps)…”
I really love you guys for this.
Sherene says
Just curious if you’ve tried any of the bottle & jar cutters on the market. They’re about $25 at craft stores and don’t require flammable liquids to work ;)
Krista says
AHHHH! I’m so glad I saw this. My boyfriend was just telling me about this the other day and how he wanted to try it. I’ll be passing the link along.
Tuli says
Here’s another person that seems to have had great success cutting wine bottles: http://curbly.com/plastolux/posts/7923-how-to-cuttin-glass-and-taking-names
Not sure if it would work as well with the smaller soda bottles you were trying. The key is obviously scoring though!
Valerie says
As a semi-educated glass artist, here is my 2 cents:
It would really be easier to just use a glass scorer/ cutter from the hardware store http://commons.wikimedia.org/wiki/File:Glass_cutter.jpg.
Just make sure you score the glass so that it makes a zipping sound and it has to be a continuous line. I recommend having someone hold the glass, and one person to cut it. Or put the cutter in a vise and turn the glass. Then, twist the opposite ends of the glass in opposite directions and it should come off in a straight line, with a few sharp edges… the better the cut, the smoother it will be.
But no matter what the method you will need to sand and polish the edge. I recommend a dremel tool and use a series of finer grit sanding drums and then polishing drums. I don’t recommend polishing hot glass with sand for the average home owner because it may be difficult to heat the glass up enough without cracking it.
And in addition to safety glasses, you should wear a mask, gloves and long sleeves. Especially when you’re sanding, there are little pieces of glass that can become airborne and irritate your skin and lungs!
stylefyles says
I’ve looked into cutting glass before (though never tried it). All the methods I came up with used a glass cutter. They seemed fairly simple. This link breaks down the method that I found: http://www.wikihow.com/Cut-Glass
Though you can also find youtube tutorials and written tutorials with the same method.
Have you tried that method also? I’m curious to know how well it would work (for someone who’s never done it before).
In any event, it was fun to watch you two play with flames!
Katie says
My boyfriend read this article and, knowing my love for recycled crafts, I immediately begged that we try it. With not quite as many attempts as you did, we did not get a single bottle to crack. We had a few ideas to make it work.
One was to use a pipe cutter to scour the glass (as someone else suggested, but with hopefully more accuracy). We haven’t actually done that yet because we don’t own pipe cutters, even though both our fathers are plumbers…
The other idea I think might work for some of yours — could you sand the edges more? Or would it really take a super long time?
I really wanted this to work too, in a desperate way! We are going to try again with some other methods.
Whitney says
I saw a while back a blog post about a similar project. While I never tried it, their technique seems like it may work better and might be a little safer too :)
Check it out here:
http://curbly.com/plastolux/posts/7923-how-to-cuttin-glass-and-taking-names
Ashlee says
Glad to watch you fail at something!
Makes me feel like you guys are real humans, lol!!!!
Jessica Mondres says
Ha. I feel your pain man, this post made me remember my old (long defunct) blog with fondness. Here is a classic from our archives that you will definitely by able to relate to.
http://modernhomebody.blogspot.com/2009/02/bottlecutting-one-of-dark-arts.html
Funnelcloud Rachel says
I’m glad to see that John isn’t immune to the strong desire to play with fire that seems to be instinctual in all guys! Too funny. Sorry it didn’t work out. (And also thanks for another YHL video!)
Jes says
I used to work at a resturant, and waitresses would always grab Hot glasses fresh from the dish dryer and they would run them under cold water, and every time they could crack. It created a smooth edge, so I might venture to guess the bottle never got hot enough/cooled quickly enough to create the clean break… =)
YoungHouseLove says
Hey everyone- Thanks for all the tips! You definitely make a ton of good points for anyone else who will be trying this project out in the future!
Katie- Sanding would have taken a super long time. John was at it for about ten minutes with tepid results. We really think the scoring tool (among other suggestions that commenters threw out) is the answer! Hope it helps!
Stylefyles- The only method we tried was the Men’s Health tutorial that we outlined here, but we definitely think a scoring tool would help!
Sherene- Nope, we haven’t tried the bottle cutters yet (just the method we outlined here) but it definitely sounds like it’s the way to go!
-John
Sara says
I’m not sure if someone has linked to this website or not, but check out this: http://www.weddingbee.com/2009/01/08/4-diy-how-to-turn-a-wine-bottle-into-a-vase-or-votive/
She didn’t use the string and used a candle stick instead of flames on the string and it seemed to work with an ice cube. Good luck!
Kate says
My boyfriend made these for our home and they are great! I watched and worried as he used the same method as above but as some of the other comments have said, you MUST score it first with a glass cutter. Oh and we used ice water.
Now we have a whole set and we gave a set to my mother who loves them!
With the right tools it is quick and easy and a little dangerous but FUN!
Holly says
Back in my stained glass making days I used this http://www.createforless.com/products/product.aspx?pid=126694. A little pricey but if you’re mass-producing it works like a charm. I think the key is the tapper tool that strikes the underneath of the score which is crucial for a clean break. It’s pretty much just a rod with a nut on the end, probably something easily made for the Youngsters!
Ever says
The main idea here is that you need something very, very hot and very, very focused to heat only the line around the bottle, and nothing else. It needs to be something that burns with a very high temperature in a very short time. The string you are using will not be hot enough and it will burn for too long, which means that glas surrounding the line will also be warm.
Once you figured that out, you need some really, really cool water and you need to apply it quickly, before the glas cools off. Not the easiest thing around, I assume, but it could work.
Another suggestion – which takes away the re-use part of it, but leaves the design part is that you pick up some cheap straight glasses at IKEA or similiar, detach the labels and put them on the glas instead. It might look just as good.
Jennifer says
Both of these glasses are made with a safety glass. My (at the time 8 year old) daughter and her friend were carrying Izze around the grocery store and one of them dropped their bottle. It did NOT break eavenly. It broke into three pieces: top, bottom and the rest just crinkled into one big piece. I bet the root beer is the same. ESPECIALLY since they are so appealing to the younger set.
That MIGHT explain the uneven edges.
I’d like to see if you have different results with a beer or wine bottle.
Just my hypothesis!
Tara Farley says
Use a wet saw for cutting tile.
Ashley M. [at] (never home)maker says
I love this idea — in theory. But yeeeeeeeooooouuucccchh! I wouldn’t put my face near that thing. I’ll have to say, though. Tempted to try making my own. Thanks for sharing it! Never thought to do something like this.
Alexandra says
just an idea, but maybe another way to tackle the same look: those wall decales are defintely a hot item and people have found you can stick them to nearly anything (I loved the blog you featured who had used one on their kitchen light). Why not reuse some old drinking glasses or hit up a garage sale and use the decals to create a similar item to your izze bottles?
**I do realize that this option is less dangerious and therefore maybe a little less fun**
Courtney says
As a source for the finished product, all smooth and shined up, I’d recommend YAVA Glass – they’re on Etsy and all their glass is recycled (upcycled, they call it). I’ve ordered twice and they have beautiful stuff.
http://www.etsy.com/shop/YAVAglass
Hope this doesn’t count as spam – I’m just a happy customer!
Libby says
If someone was interested in products to buy instead of DIY, there is a company that makes glasses, wineglasses, vases, etc. out of old pop, wine, and beer bottles: http://www.greenglass.com/
I ordered a candle holder from them once and it was pretty cool.
Janelle says
Sounds like WAY too much effort for something that isn’t all that terribly excited. Unique and novel, yes, but not really terribly cool. Not work the time put in.
Chris says
Well if the pictures are showing the way you did it, you needed to hold the bottle on it’s side. They way you show in your picture heats parts of the bottle you don’t want heated.
Try on the side.
YoungHouseLove says
We definitely tried holding it every which way Chris, we definitely think the scoring tool is the key. Hope it helps!
-John
Ashlee says
Do you ever feel like saying: Please, people. Read the prior posts. We acknowledge that safety glasses slash fire extinguisher on stand by, etc would have been preferable. You are 900th person to say that.
Just curious b/c that seems to be a recurring theme in many posts (though I like the way you diplomatically say “as we mentioned in the original post…”.
Then again, I realize people sometimes miss things, but it would drive me banana sandwich. So, hats off to you for your patience! :)
candace @ thecandace.com says
Sometimes projects don’t work out and it’s kind of reassuring that it even happens to you two DIY phenoms. It was a cool idea though! Best wishes!
Caroline @ The Feminist Housewife says
Wow. That’s hardcore.
I’m impressed at your efforts!
LauraC says
LOVE this post, so entertaining! Thanks for sharing even though it didn’t work. John’s expressions are hilarious, and it was just a fun video.
Boo to those who felt the need to act like your parent and warn about gloves and goggles and such. Didn’t they even read what you wrote?!
Julie at www.downtimeweblog.com says
Cute idea, but a little bit too scary for me!
Sarah says
very entertaining. what would happen if you froze the glass ahead of time? i keep thinking of scrapping ice off the car… don’t they say if you add hot water tot he ice it can break the glass? i don’t know, i live in california :) scrapping ice isn’t something i really know.
steph g says
So, there is something that people keep glossing over in all these tutorials that makes me crazy. Silica dust–aka, tiny particles of glass that are produced when sanding–are carcinogenic. A respirator would be advisable, and at the very minimum a particle mask.
Keri says
That seems like a neat idea if you could get it to work… I’ve always wanted to try melting down wine bottles to turn into a cheese tray. I saw them one time at our local fall festival and thought that it was so cool!
Jess says
There was a post on Weddingbee about doing something similar a while ago. The method Ms. D’Orsay used required a bottle cutter and a lot of patience, but it looks like she got some smooth edges. http://www.weddingbee.com/2009/01/08/4-diy-how-to-turn-a-wine-bottle-into-a-vase-or-votive/
kelly says
Whoa this is hardcore! This is project seems dangerous.
http://www.kellyloves.wordpress.com
Annapolitan says
When I was growing up back in the seventies, someone came out with a bottle cutting kit. We got ours as a Christmas gift. I think everybody on the block had one. You put the bottles in a sort of a holder and it would score the glass neatly at the position you chose, and then you’d tap the scored line and voila, you now had a drinking tumbler, after you sanded the edge smooth with emery cloth.
It was a little fiddly, though, and after you had turned all your wine bottles into drinking tumblers, what were you going to do with this kit? Eventually all those bottle cutting kits ended as the hot garage sale item — garage sales being the all the rage a few years later.
Those bottles are certainly cute and I can understand why you’d want to make drinking tumblers out of them. Have you checked eBay for a bottle cutting kit?
I checked YouTube to see if there were any other ways to cut bottles and found a guy demonstrating how to cut bottles with a bottle cutter and hot water. (I swear that bottle cutter is the same exact one we had.)
http://www.youtube.com/watch?v=sFXngPx3w3M
Also, cutting with a Dremel tool? Do you have one of those?
http://www.youtube.com/watch?v=wYEdkfSRgv8
YoungHouseLove says
We do have a Dremel- good suggestion!
xo,
s
Elizabeth says
I had the same thought as a previous poster that there may be some difference to glass used to store alcoholic beverages since it seems that all the tutorials and items for sale are those bottles. I say try a Pellegrino bottle to see what happens with yet a different beverage carrier!
Jackie says
Hey John,
My hubby runs an optical lab and works with glass often….I would love to see you wear some safety glasses…especially while sitting at that close level…kinda scary. I have seen glass explode and shards fly…yikes!
Annapolitan says
Ooh, now I’m obsessed with watching YouTube videos of bottle cutting.
This fellow has a pretty interesting bottle cutter that he fashioned himself with what looks like scrap wood and a few bits of hardware. Clever little device. You probably have some L brackets and nuts and bolts and scrap wood laying around your garage, doncha?
I wish he had used a tripod to shoot the darn video, though. I got a little seasick watching it.
http://www.youtube.com/watch?v=Pb8Tdk6U4X0
Jenni says
Sorry it didn’t work out, but thanks for sharing. This seems not so much of a “fail” but a myth-busting. Thanks for demonstrating that using the Men’s Health directions is a great way to make some pretty wicked-looking menacing glasses, (but unfortunately not the desired drinking kind). Good work!