After excitedly declaring “the hardwood floors are done!” just in time to move in, we got a bunch of requests for a follow up post with details about the “tricky stuff” like how we handled transitions, cutting boards shorter, cutting them thinner, how we addressed the top of the stairs, and how long it all took. So let’s dive back into floor world for a second. The entire floor-laying process took us about 6 days from the placing of the first board to the nailing of the final strip of quarter round. Sherry was able to help me for some of those days, but other days were just me myself and I while Sherry was back at the old house with Clara (to keep her out of the sawdust).
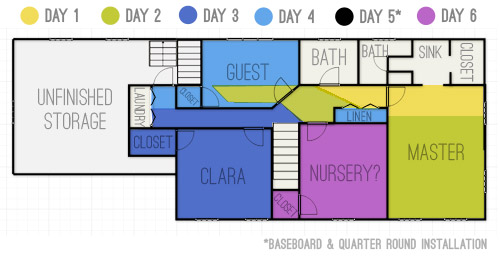
Note: Some days were shorter and tackled solo while others were mega-long with two of us working, so take this little graphic with a grain of salt, and know that four hands are faster than two.
Day 1 was a pretty slow start because we were still finding our groove. But even once we’d found our rhythm slapping boards down, a flooring installation is still riddled with various side-tasks that can eat up a lot of time. Even having installed a floor before, we had mentally blocked out many of the non-laying-floor activities so some of them caught us by surprise again. Things like…
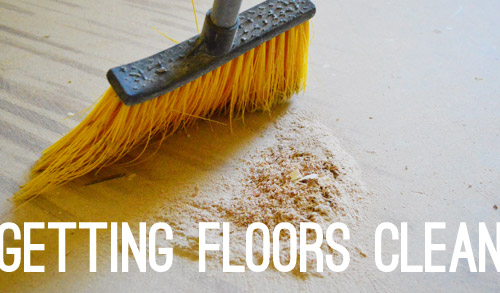
Getting Floors Clean: Since your subfloor needs to be free of dust and dirt, we swept and vacuumed each room thoroughly before we started on Day 1. But since the install was a messy process (more on that soon) we went over each floor again as we moved from room to room. You know, just to be sure.
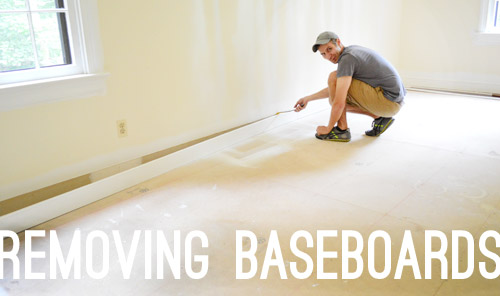
Removing Baseboards: As mentioned before, we ended up having to remove our baseboards before the install. It took a couple of pulls with a crowbar preceded by slicing a utility knife along the seam between baseboard and the wall to diminish paint peelage. It was a simple process but it can add up to a fair amount of time when we’re talking 4 bedrooms and a long hallway.
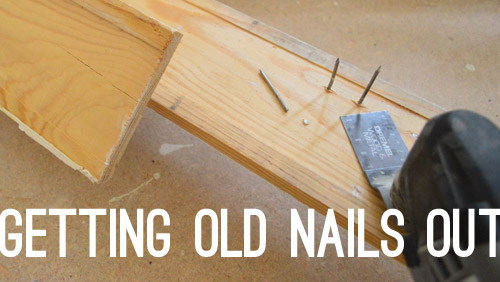
Getting Old Nails Out: Since we planned to reinstall the old baseboard, we wanted to get all of the old nails out so it’d be easy to sit them flush to the wall later. Rather than hammer them through the front (damaging the paint job), we found that our Dremel’s metal cutting bit sawed them off nice and flush.
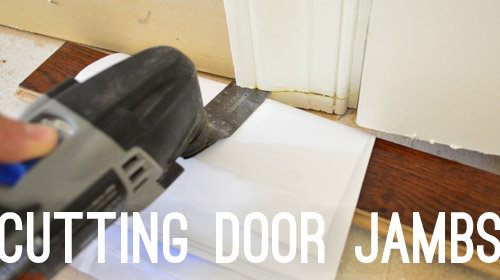
Cutting Door Jambs: Speaking of the Dremel, it was a life-saver when it came to cutting the door trim and jambs (all 12 of them!) so that the floor boards could slide under them, helping to create that seamless look between rooms. To determine the height of my cut, I used a scrap piece of wood (plus a scrap piece of underlayment) to rest my blade on as a guide. Oh and a scrap piece of paper just to protect the wood in case I needed to use it later.
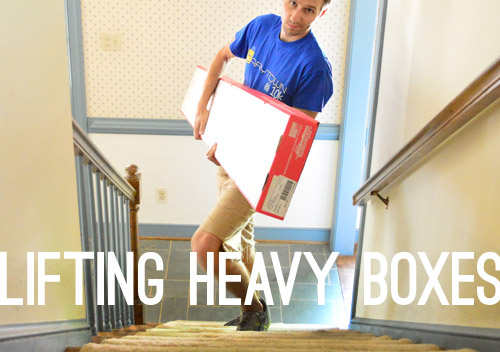
Lifting Heavy Boxes: All of our boxes of flooring were downstairs in the dining room, so every hour or two we’d need to carry up a few more to keep ourselves well stocked in whatever room was being worked on. Since boxes can vary in color slightly, we always tried to grab planks from three different boxes at any given time. So whenever it was time to take a pause from leaning over flooring (our aching backs) to carry a few 60lbs boxes up a flight of stairs … well, it wasn’t really a break, but it had to be done.
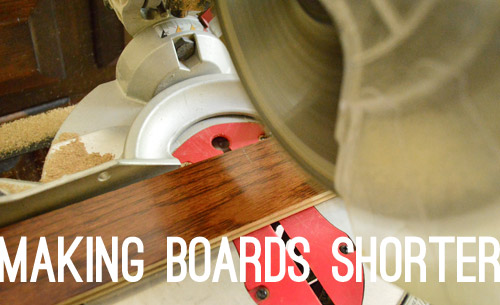
Making Boards Shorter: When you reach the end of a row of floor boards, you’ll probably have to cut the last piece to fit. We used our miter saw to make quick, straight cuts and whenever possible, tried to cut the end boards for 2 to 3 rows at a time so that we were minimizing time spent going back and forth.
Since the ends of these boards would eventually be covered by baseboard and quarter round, we knew they’d all look flush and finished as long as they weren’t too short (you’d see the gap sticking out from the quarter round). It could also be bad if we cut them too long down the line (they’d still look seamless at first, but if they expanded when it got hotter, they could warp/shift) so we were careful to leave the manufacturer’s recommended expansion gap hidden behind the baseboard.
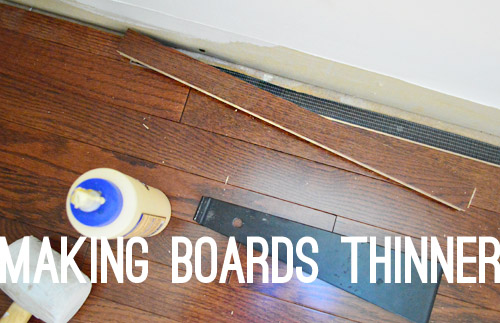
Making Boards Thinner: At the beginning or end of a full room, we often found ourselves having to rip boards the long way so that the last row would fit. To do this we used a table saw since it can make cuts of any length. Once again, we knew these would be hidden behind baseboard and quarter round, so it just came down to allowing for the recommended expansion gap.
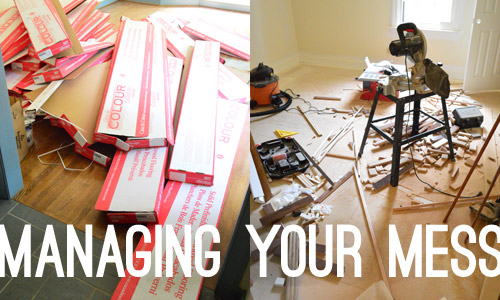
Managing Your Mess: With all of this cutting came lots of sawdust and scraps, not to mention empty boxes. We designated the spare-room/possible-future-nursery as the lowest priority (i.e. if we didn’t get it finished before we moved in, it wasn’t that big of a deal) so it became our cutting room. That way we weren’t hiking up and downs the stairs all week every time we got to the end of a wall and needed to make a cut. But when it came time to finish that room on Day 6, it meant we had to spend a good portion of Day 5 cleaning it up so it was dust free and ready for flooring.
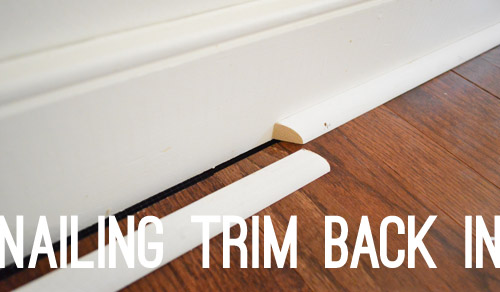
Nailing Trim Back In: As we hit Day 5 and all but the last room was done, I decided to reinstall the baseboard (and add new quarter round) in the other rooms so I had fewer piles of baseboard in my way (they were cluttering up almost every room at that point). Relying on my nail gun to reattach the already cut-to-size baseboard made the job pretty quick (maybe 2 hours?) but having to measure and cut the new quarter round slowed me down. In the end it surprised me that I spent an entire work day doing this, but it also was that turning point where the new floors finally came together and the rooms started looking a lot more finished.
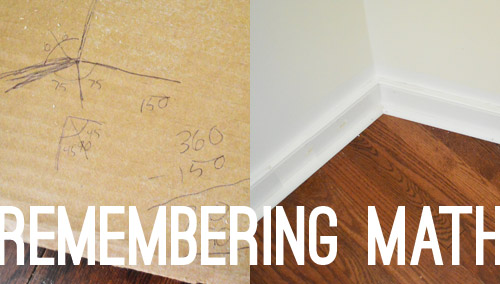
Remembering Math: We have the privilege of having an angled wall (which you can see better in photos like this). Which meant I got to conjure up some semblance of 9th grade geometry so that I could cut my boards and my quarter round at the right angle. I’m not even going to try to explain how I figured it out. I think there was a complementary angle in there somewhere. But it definitely wouldn’t hurt to have a calculator (even if it’s just on your phone) as well as a scrap piece of paper and a pen in case any unexpected math pops up during your installation.
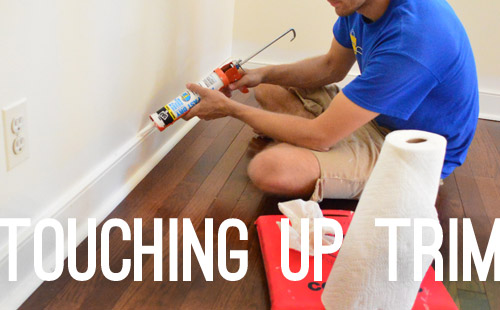
Touching Up Trim: Removing and reinstalling our baseboards banged them up a little in a few areas (kinda made us feel silly for so carefully painting them beforehand) but we were pleasantly surprised with how fast re-caulking the seam against the wall went, followed by some touch-up paint here and there. It actually wasn’t too bad. So the lesson we took from this was that installing baseboard and quarter round is the long part. The caulking and touch ups (if it’s already painted) aren’t bad at all.
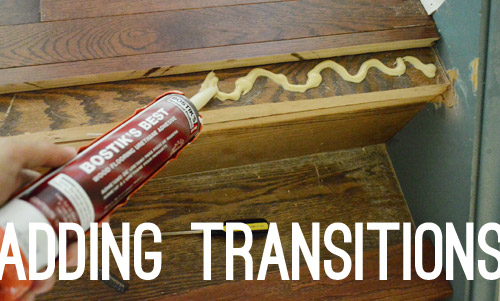
Adding Transitions: These are the spots where the new floor meets another flooring surface. Since we went seamlessly between all of the bedrooms we didn’t have too many of these, but that didn’t spare us from adding one at the top of the stairs. At the advice from the Lumber Liquidator guys, we cut off the end of the existing step (called a “bullnose”) and added some special adhesive to hold the new bullnose piece in place (which we purchased to match our new floor when we made our initial order).
We also followed up with a couple of nails with our nail gun just to hold that nice and steady. Here’s a shot where you can see the existing oak flooring on the stairs and our new floors at the top of the staircase. It’s not a perfect match, but it’s close enough. It’s less obvious in person than this photo, maybe because of the way light reflects on different planes and because photos look flatter than real life?
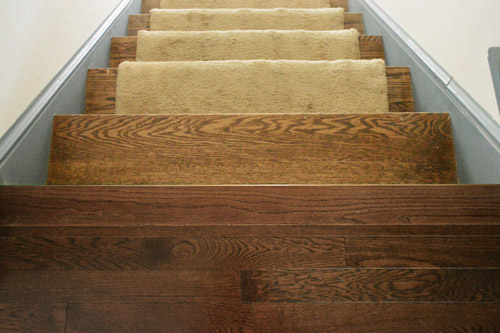
Once we had that bullnose piece at the top of the steps installed, the long journey of putting in the new floors was officially done. After which we furiously packed like our lives depended on it. No rest for a DIYer, eh? Speaking of which, that carpeting on the stairs gets the stink eye every time we come upstairs, so that’s definitely on the list…
Did any part of installing floors catch you guys off guard? Or are you working on another project that has “little” steps that seem to be more time consuming than you accounted for?
PS- Here’s the original post about how we laid our hardwoods for additional info about the underlayment, how we installed each board, etc.

Eadie says
So glad to see this post. We have re-done our floors and are deciding on our baseboards. We are looking at using shoe moulding on our baseboards- Do you think/know if there is an advantage to use quarter-round instead of shoe (or the other way around?). Also, your baseboard has a curved top — Is that added to the baseboard, or is it all one piece? So many decisions! Any advice is welcome!
YoungHouseLove says
The baseboard is all one piece (it’s just made that way and sold at places like Home Depot). As for quarter round, we just like the round look over the slightly more oblong looking shoe molding (although shoe molding isn’t a deal breaker or anything) but it was already in a few rooms downstairs, so it also was a consistent choice. Hope it helps!
xo
s
Jackie says
Looks beautiful. At some point (maybe when you do the carpet removal on the stairs) I’d like to see an image of the bullnose from the perspective of standing on the stairs – so straight on vs. looking down as you’ve pictured it here. Just trying to get an idea of how the floors look relative to the staircase and the first floor.
YoungHouseLove says
We’ll definitely snap a bunch of up-the-stairs shots as we tackle the carpet!
xo
s
LauraC says
I think six days is really fast! The floors really do look great. Question, did you ever consider taking out the linen closet upstairs? I’m wondering because I know you love open and airy and with a long, narrow hallway upstairs taking it out would have opened it up a bit more and made it roomier. Plus you wouldn’t have had to lay flooring around it. Just curious.
YoungHouseLove says
Yes, we’ve actually thought about making it an open niche, like this.
http://www.houzz.com/photos/458479/The-Helenas-1-traditional-hall-los-angeles
Wouldn’t that be fun?
xo
s
LauraC says
Nice! Thanks for the reply!
Needle little Balance says
Yay for a hall library! Love the shelfs in your link Sherry.
Emylee says
I really liked the layout of this post! The pictures with the words on top and then the description right underneath makes it feel less like “and then, and then, and then…” Also, beautiful job!
YoungHouseLove says
Thanks Emylee!
-John
Peggy says
Y’all did an excellent job- very professional-looking. One thing I noticed y’all did but didn’t mention (unless I missed it) was to stagger the ends of your boards. Whoever installed our floors (before we owned this house) didn’t stagger the ends. There are several places where the ends are nearly next to each other or only fractions of an inch off. Drives me crazy, but not enough to redo the floors! A floor guy told me they should be no less than 6″ staggered.
YoungHouseLove says
Thanks Peggy! Our boards came in all different sizes in the box, which really helped to get that randomized look, and if we laid one down but it was too close to another seam, we grabbed a shorter or longer board instead, just to keep them staggered.
xo
s
Amanda says
Hi Sherry and John!
I’ve been meaning to ask you this for a while…
Back when you were redoing your guest bath and Sherry was describing the art that she choose to hang she commented that she chose a picture from a magazine that she had saved “just in case” it could be used as art. My question is, and maybe this is a future post, but how do you organize all the stuff you DON’T use, stuff that is waiting for a future home? And how do you do this without looking like hoarders? LOL. This is my biggest challenge!
Thanks,
Amanda
YoungHouseLove says
I have one big plastic bin that’s shallow enough to slide under the guest bed. That’s where I keep all “possible future art” so it’s out of the way, protected, and stored nice and flat :)
xo
s
Sarah says
Gotcha about the closet…though (just my idea) I would probably move the closet door to face the bedroom and put the wood floors in there and then closed off the other door to the closet that is there now to make better use of the bathroom space. But I’m not a big fan of closets in the bathroom so just my idea! :)
YoungHouseLove says
We thought about whether we’d rather have a closet connected to a bathroom (it wouldn’t be in the bathroom, there’s a doorway between them, but that’s hard to see from the floor plan) or if we’d rather lose the wall space in the bedroom and have two doors next to each other (one to the bathroom and one to the closet). In the end we thought keeping it as-is kept the bedroom cleaner (it would have been three doors along one side since the door to the room is on that side too) and gave us more wall space. For example, now we can put a chair in that corner with an ottoman, but another doorway for the closet would have taken up that wall space.
xo
s
Stephanie Oh says
I had a closet off of my bathroom in our condo and miss it like woah. When I first moved in I thought it was so strange, but it ended up being super convenient (and it felt more “private” than in the room for some reason, which isn’t something I normally think of, but it was nice).
nick says
great recap john…do y’all use a particular program to draw your floorplan graphic? it’s a really nice touch with the color overlay.
YoungHouseLove says
Thanks! The plan was done in floorplanner.com and then I brought it into Photoshop and added the color on top.
-John
nick says
ah, now that is a very cool little website. thanks!
KathyG says
Good Post! I’ve laid flooring though, I don’t think it shows the real back breaking work. Not too difficult, but the time it takes is hard to deal with. Of course it depends on how much and what kind. Over the years I have learned that whatever my hubs says it will take (2 hours example) I double it! HA. That way I’m never disappointed, and occasionally really excited and surprised!
Kim says
Y’all are my DIY heroes! In the place we lived before, I was too scared to even attempt laying hardwoods on my own. But after reading your posts, I feel like its actually doable!
Page says
Despite the fact that the only time I helped install hardwood flooring I managed to shoot a nail through my fingertip, I thought the process was absolutely worth it. It makes such a huge difference and is so beautiful. I would have volunteered to help you guys, but after my story, I’m sure you’d turn down my offer. :-)
YoungHouseLove says
Oh my gosh, so glad you’re ok!
xo
s
NATHAN D says
All that hard work and effort really paid off. The new floors look great! Thanks for the tip about the door jambs. That gives it a more seamless look than trying to just cut around them.
Katie says
Very nice floors! Your blog has so much great inspiration! I’m excited to see what I might be able to use while my family is renovating our new home. Thank you!
Ashley S says
Are you guys still using floorplanner.com for all of these outlines of your place?
YoungHouseLove says
Yup and then John brought it into photoshop to add the color.
xo,
s
Jen says
Hi!!! Two things. Well, actually a comment and a question. I love how you have posted the picture first, followed by the written part. It helps to see what you’re talking about and then read about it. At least for me. Second, I was wondering why you used quarter rounds in addition to the moldings? Is there some professional reason to use these or were the moldings simply not covering the gaps? Love your blog.
YoungHouseLove says
Yup, the expansion gaps for our floors were slightly wider than our baseboards, so those bridges the gap.
xo
s
Joe Dax says
Great job you two! I’m new to alot of DIY stuff around the house, so I’m not sure if you’ve answered this questions before. When you caulk the seam between the wall and the baseboard, is the wall already painted the final color? If not, how do you go about painting along that new edge?
YoungHouseLove says
Oh all of our walls in the new house have yet to be painted (that usually happens slowly over a few years) so as we go I will use a brush and freehand it since I’ve been painting for years. But you can also use painters tape if you worry your hand isn’t steady enough.
xo,
s
kate says
Wow, just reading this makes me tired! Great work! I had to comment because every time you post about taking the carpet off the stairs or putting tile in the kitchen I cringe. Both are so dangerous of little kids. Hardwoods with out carpet is SO slippery and no matter how well behaved or cooperative a child is it is easy to slip and they can (obviously) get hurt falling down the stairs. We have four kids and have had stairs for all 12 years and highly recommend replacing the runner. In the kitchen, if a child falls and hits their head on hardwood they will most likely be okay. However kids have died from hitting their kids on tile after an accidental fall. I love your new house and hope you come out with (a newer much more stylish :) carpet runner and hardwoods.
YoungHouseLove says
Oh yes we’re completely open to a new runner, that ones just old and stained. We have also heard from folks who think carpeted stairs are more slick than hardwood so I think people have different experiences with each. As for tile floors in the kitchen it’s how both of us were raised (each with 4 kiddos in those houses) but of course we’ll be careful if that’s what we go with.
xo
s
Alex says
Definitely just one of those things that is impossible to predict! One of the absolute worst falls I had down the stairs as a kid was on carpeted stairs – personally I think they are much more slippery!
Homes come with dangers. My parents wouldn’t predict that I would fall down the stairs but never out of our giant treehouse, or slip on the tile in the kitchen but not fall in my mom’s workshop full of glass and fire and sharp tools. :) You just never know, Kate! :)
Amanda S. says
Yep. That’s exactly why we paid to have our floors installed — you’ve definitely reinforced to me why that was a good plan!! lol
You guys rock for taking it on yourselves though! Looks gorgeous :)
Tipling says
I think the crown molding was/is our never ending project. We read tons of tutorials on how to install it (yours was very helpful, we bought the kreg) but patching the nail holes has become a project black hole. Everything we read said to fill them with caulking. After doing half the house this way we found out that caulking cannot be sanded. So we proceeded to scrape off the caulking in the nail holes, re-patch with a putty, re-sand, re-prime, etc….So. Many. Nail. Holes. We just need to buck up and finish :)
Marinn says
I just wanted to say that you guys are amazing and I so appreciate your detailed instructions and pictures of your projects.
YoungHouseLove says
Happy to help Marinn!
-John
Karen says
Hey guys! Just wanted to let you know (in case you didn’t already) they are using your book in a picture for bookends on Anthropolgie.com!! I got super excited when I saw it: http://www.anthropologie.com/anthro/search/search.jsp?searchPhrase=bookends
YoungHouseLove says
How crazy is that?! I totally screamed mid sentence when I saw that!
xo
s
Kelsey says
Thank you for this post. I’m hoping to have a new house in the fall and may be laying flooring in it. This post, along with my friend who has done this before, will be very helpful!
Krystle @ Color Transformed Family says
This is one project that I don’t think we will be tackling on our current house but boy does it look good. I think hard surface flooring really helps a space to look larger than it actually is.
erin says
Y’all must have A LOT of childcare help or have the most well-behaved, self sufficient three-year-old on the planet. I marvel at how you get all of this done while she’s awake/in pre-school.
YoungHouseLove says
We are very thankful to have help one afternoon a week from John’s parents since they live nearby! Clara’s only in preschool two mornings a week and now that’s over so it’s about to get crazy! Haha! Back to evening DIY when she’s in bed ;)
xo,
s
diane says
I have painted baseboard trim and painted walls and now want to fill in the small gaps with caulk….when you caulked the trim gaps, did you repaint over the caulk with the white trim paint? Or just leave the caulk as is?
I don’t want to waste my time touching up if I don’t have to!
Thanks!!!
YoungHouseLove says
If you have the energy it’s great to touch up since trim paint is semi-gloss and so easy to wipe down (caulk tends to hold dust more if its untainted).
xo,
s
Molly Hart says
We hated cutting the door jams and making cuts for around the floor vents! Time consuming! But the one thing that scared me the most was after the hardwood was down, we still had a bump in the floor that was WAY noticable. Husband went back under the house to drop the WHOLE house down. Never want to see that again. Talk about seeing your house flash before your eyes… All is good now :) Check out our house so far! http://thehartland27.blogspot.com/
YoungHouseLove says
Woah! That’s intense!
xo,
s
Steph S. says
Not quite related to this post but just received my digital copy of HGTV Magazine…what a fantastic article that preserves house #2 perfectly! Congrats on the new digs…the floors are gorge!
YoungHouseLove says
Aw thanks so much!
xo,
s
Claire says
Just saw the British Columbia ad for the first time in many days and guess who popped out? Yep, the bear.
The floors look fab, btw. You guys are truly amazing.
YoungHouseLove says
THAT BEAR!!!!! He is just messing with me.
xo,
s
Marc says
I live vicariously through these posts from you guys! I envy your determination and chutzpah! Every time I look under my feet in my house, I think “I wish this carpet was gone and I had hardwood floors.” Your inspiration might just help me tackle a room just to see how it goes. Thanks. I loved your previous houses and this loks like it is going to be awesome too!
Mikki D says
Holy cow! You guys have such an AWESOME work ethic! Thanks for inspiring us all and allowing us lazy a$$es :) to sit back and critique ya as you wipe the sweat from your brow. Looks amazing! Go Petersiks!
Steph Nelson says
Nice post!!
I know that you guys have said that Burger has no problem with stairs, but does that include uncarpeted ones? I would think it would be kind of slippery for a pup and their nails.
YoungHouseLove says
He seems to just go slower but it doesn’t hd him back. We’ll definitely add a runner back in if he or Clara need one though. That one’s just old and dirty :)
xo,
s
Tara says
I’m sure you already know this but if you don’t paint over ALL that caulk, it attracts dust and turns yellow. I learned this the hard way so painting over my baseboard caulk required an extra step of scrubbing off all that gunk. And you REALLY have to scrub at it unlike paint which is an easy wipe.
Floors look fantastic!
YoungHouseLove says
Oh yes I learned that the hard way in our first house! Definitely worth the touch up effort in the beginning!
xo
s
Jessie says
We have been working on our stairs (removing carpet, patching all the holes, sanding, priming, painting, and sealing) since DECEMBER!!! It was definately not what bloggers said it would be! It is rather time consuming and with hubby and I both working full time and having 2 young kids, it seems like there is never time to finish!
The “little” steps that seem to be more time consuming at this point (which I did not expect) has been painting those perfect lines at the places where the risers meet the treads. It is hell! And I think I’m going to need to repaint the treads (and keept the boys downstairs) so i can finally seal them and call ‘er done!
Maybe i should have hired professional painters – ugh
YoungHouseLove says
Oh no, that sounds brutal! I have two tips for you. We hear nipper pliers are helpful to pull staples and nails, and painters tape can help with keeping lines straight. Good luck!
xo,
s
John says
Guess you will get use to the top stair riser being a little taller than the other risers. I have an exterior concrete step that is about an inch taller than the lower riser and don’t even feel the difference.
YoungHouseLove says
Yeah it’s only about 3/4 of an inch taller and I though we might notice but we can’t tell. We used to have an extra tall step at our first house leading into the sunroom that you could totally feel but it was a whole row of bricks higher than the others (like 3-4″ higher) so maybe the smaller stuff is less noticeable.
xo,
s
jacqui Bee says
Did you get extra timber for the spare room/storage for later so it all matches down the line when you so finish it?
YoungHouseLove says
It wasn’t in the budget to get enough to do that whole room (it would have added a bunch to the bill since that room is like double the size of all the others) so we got a few extra boxes of wood in case we have a leak or need replacement in some area that we’ve done and decided we might either find something that matches in a decade or so down the line when we do that room, or we’ll use something complementary like a cool wall to wall berber carpet or something befitting of a bunk room/media room.
xo
s
timothy says
oh my gosh i just got HGTV magazine and guess who i saw in there?!?!? YOU GUYS!!!! :)(and your house)
YoungHouseLove says
Ahhh! Isn’t that crazy?! We thought it was an awesome “last hurrah” for our beloved second house. It was so much fun to see it there!
xo
s
Krissy says
My parents’ stairs are the same finish. They were covered with carpet for years, and when the carpet was finally removed, the plan was to sand them down and finish them in the same color the rest of the floors were refinished (much, much lighter). The stairs had so many water stains, though (I don’t know who was spilling so many liquids all over the stairs…) that they had to leave them dark to hide the stains. It’s a little quirky, but it grew on us.
YoungHouseLove says
That sounds pretty!
xo
s
Jessica says
You guys are so inspiring! We are actually in the process of building a house (rather, having someone professional build a house for us). We’re considering installing the wood floors ourselves to save money after seeing you guys do it. :)
BUT, my burning question which is totally off topic is…Would you decide on white corian again in this kitchen??
We are trying to decide on countertops for our kitchen. We’re doing white cabinets (or gray if I get the nerve) and love the look of Carrara marble, but not the etching and carefulness it requires.
We’ve looked at a few different marble looking quartz, granite (nothing that really looks like marble), and white corian. White corian is definitely the cheapest ($29 sq ft), but I think quartz is my favorite (and most expensive at $70+ per sq ft).
What’s your opinion?? Have you considered what you’ll do in this house yet?
Thanks!
YoungHouseLove says
We were very happy with white Corian but we loved our first house’s light granite too. I think we have so much fun trying other things out that we probably wouldn’t do the same thing, just because we’re curious about other options too (ex: soapstone, black granite, butcher block, marble, quartz, etc). There’s so much out there! Honestly if you have the money for quartz and love it the most I’d say go with that (it wasn’t in the budget for us since our kitchen had that huge peninsula, but we would have loved it if we had a smaller counter area). Hope it helps!
xo
s
Caitlin S says
I’m full of floor envy here on the west coast!!! I think my hubby is starting to get the hint from all the links I’ve been sending him from your hardwood install and lumber liquidators :D.
Could we see some photos of the seamless doorways? I’m intrigued to see how that looks continuing on between the hall and the rooms…I don’t know if I have ever seen a hardwood floor without room transitions! (not saying much there though since I’ve always lived with carpet…)
Thanks for helping me inspire my husband to pull up the stained and wrinkled white (WHO CAN KEEP WHITE CARPET CLEAN?!) carpet we inherited when we purchased…
YoungHouseLove says
Here are a few pics for you:
http://images.younghouselove.com.s3.amazonaws.com/2013/05/rubber-hammer.jpg
http://images.younghouselove.com.s3.amazonaws.com/2013/05/hallway-carpet-after.jpg
Will have to take more as we go!
xo
s
Wendy @ New Moms Talk says
Love the style of today’s post!
I’ve been working on a touch pillow for our little girl that has been evolving so much it might just test out Darwin’s Theory of Evolution for Pillows.
Little steps turned big steps turned new steps turned evolved steps. Fun times!
Kate C says
My daughters room is the first off of the living room and shares an entry way wall. To blunt that 90 corner from pointing into the living room, the builders essentially cut it off at a 45 degree angle, leaving a nice flat corner facing the living room and the opposite flat corner inside my daughters room. That piece of baseboard molding is probably why my husband claims he will never install molding again and will hire someone to finish the house!
YoungHouseLove says
Oh no! That sounds tough!
xo
s
Melissa@TheHappierHomemaker says
Wow, that sounds like an insane amount of work-it definitely paid off for y’all though-it looks fantastic!
Bailey says
So informative – you guys are awesome!
xox
Bailey
http://akabailey.blogspot.com
SM says
I know you are in the midst of moving so this may not be the right time to ask but are you just doing one substantive post a day from now onwards? I know the last couple days the afternoon post has been about sponsors or giveaways. Just wondering if you were on a different schedule with the new house.
YoungHouseLove says
Our schedule has been two posts on Monday and Wednesday and one post on all other days since January (and our giveaways have been Monday afternoon for the past 3 years or so). Here’s a post with more on that schedule for ya. Of course once a month we have a sponsor shout out, but other than that, the Wednesday afternoon post can be anything from a project or a Reader Redesign to a Window Shopping or House Crashing post, etc. Hope it helps!
xo
s
Britiney @ Consider the Lilies says
I was thinking you had posted a cost rundown of the hardwood but I can’t find it now. If I’m being a nosy-mcnoserson, just tell me to bug off, but if you did post it, can you share a link to it? You’ve inspired me to consider taking something like this on. We’ve wanted to change our stairs from carpet to wood but the bid was more than $3k (*gasp*). The biggest obstacle is that we have a landing, but seeing what you’ve done makes me think we could give it a try!!
YoungHouseLove says
Oh yes, this post has a per square foot cost for ya (just multiply it by your square footage and maybe add around $500-1000 for other stuff like underlayment, a nailer if you’ll need one, etc) and that should give you a pretty good idea I think. Good luck Britiney!
xo
s
Jessica says
I have been painting my front door for what seems like forever, and I haven’t even gotten to the paint part yet! We just purchased an old farmhouse, and so the front door had SO many layers of crusty, flaky paint. I had to scrape and sand, then caulk and fill, and finally tape off the glass (12 panes of glass, ya’ll). Then the weather hasn’t been the most cooperative. Can’t paint on a windy or rainy day! The details are sometimes frustrating! Gah! :)
YoungHouseLove says
Oh man, the weather has been so bad! Best of luck with everything Jessica!
xo
s
SheLikesToTravel says
I’m curious… when you received the $4000 installation estimate, did you also hear how many days of effort that would be for a professional? I’m assuming they would have sent in a team of at least 2 people.
This seems like a large project and I’m kind of amazed how much you had done is a relatively short amount of time.
YoungHouseLove says
Yes, I think they said it would be 3-4 days for 2 people, so I wonder if some of our longer days helped us stay somewhat close to those timelines without having two people “on” at all times :)
xo
s
Cait says
I just discovered your blog today and have spent the last 2 hours back reading. What a great resource (and inspiration!) :D I’m waiting to close on ‘my’ first house and there are SO MANY great ideas here! :)
YoungHouseLove says
Thanks so much Cait!
xo
s
Mary says
One thing we’ve always done when removing woodwork is to number each piece and number the wall. That way when it’s time to nail it back in place it’s an easy task.
YoungHouseLove says
Smart!
xo
s
Lisa says
Thank you so much for your detailed posts about installing hardwood floors. We just bought a new house too which is fully carpeted and we are itching to pull it all up and put down so nice wooden floors. I am so impressed with how much you’ve already managed to do to change your home in such a short space of time . I can tell its going to look amazing !!!
– lisa x
YoungHouseLove says
Good luck Lisa!
xo
s