Yesterday you saw Day Numero Uno of what I lovingly call “Operation Granny Chic.” Mission: update my Granny’s bathroom over three whirlwind days. So with all of the prep work done, our day-by-day play-by-play continues with painting and new floors. Except for one minor step that stood in our way…
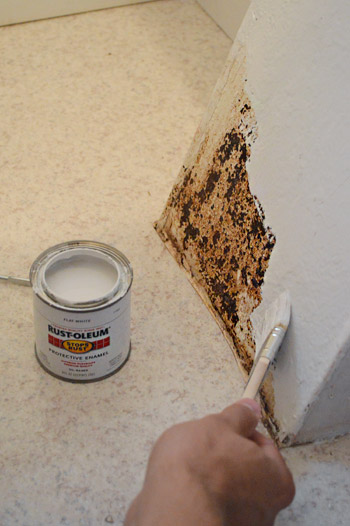
Notice that giant rust spot on the air duct near the floor? Since there’s no way paint would fix that on its own (it would bleed right through), we slapped some Rustoleum on that puppy before breaking out the paint cans. It was amazing how one fast coat worked like a charm.
The paint color we chose for the room is “Hint of Violet” by Benjamin Moore, which is a soft violet with some subtle gray undertones. Granny is such a colorful person (and often wears purple) so we knew had to do something cheery for her, but since the room is so small we didn’t want anything that would knock you over the head or make the space feel more cramped than it already is, so the plan was to bring in more pops of bolder color with the accessories, window fabric, etc.
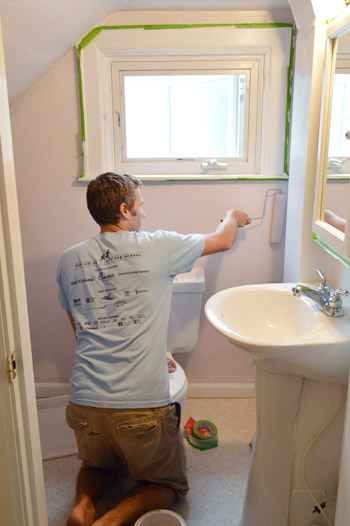
The new wall color went on in two quick coats, including the slanted ceiling (in small spaces like bathrooms we love doing the ceiling the same color as the walls since it feels less chopped up and more open), so by lunch we were ready to tackle the floor.
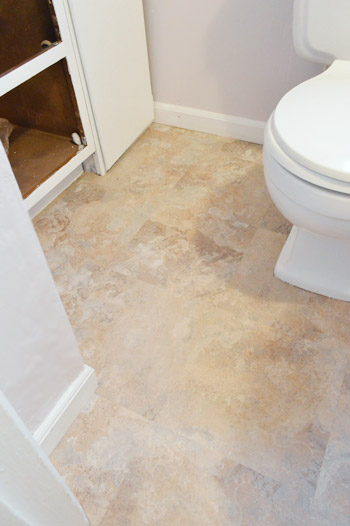
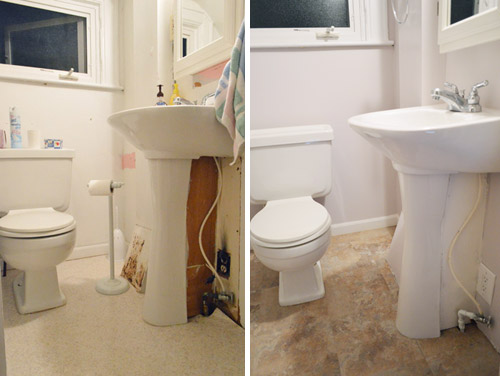
Oh the floor. The existing floor was one of those old sheets of laminate. It was actually in decent shape considering it’s age and it was neutral enough to not offend. But Granny (who doesn’t ask for much specifically) wanted a new, more updated floor in the form of those individual vinyl tiles with a lot more texture, so that was a must for our to-do list.
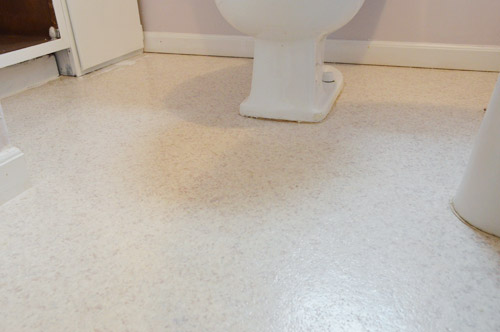
We would’ve loved to give Granny some kick-butt hex tile or something else with a vintage vibe, but given the time and money constraints of the project we had one obvious option: those vinyl stick tiles that Granny had requested. Plus my parents suggested that we not risk any major plumbing issues – which would grind our makeover to an immediate halt – by attempting a sink or toilet removal considering the age of the pipes in this older home, so we were happy to oblige.
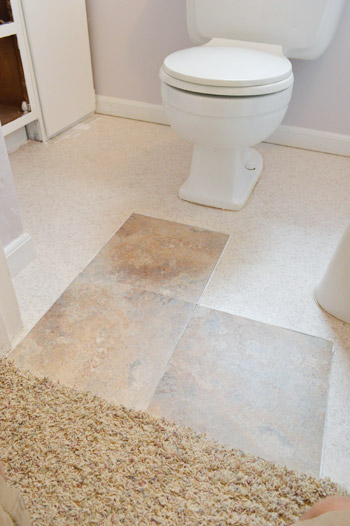
Sherry and I actually installed vinyl tiles about 6 years ago in our old kitchen, so we were a little rusty but we were quick to find our groove. The nice thing about this type of flooring is that it goes down super easy, doesn’t necessitate a wet saw or any sort of thinset/grout, and is über affordable (we got these from Home Depot for 99-cents per tile). The key is to make sure each tile is set very (very very) snugly against the others so you don’t get any seams, so we really pressed each tile firmly into the edge of the previous tile before sticking it down.
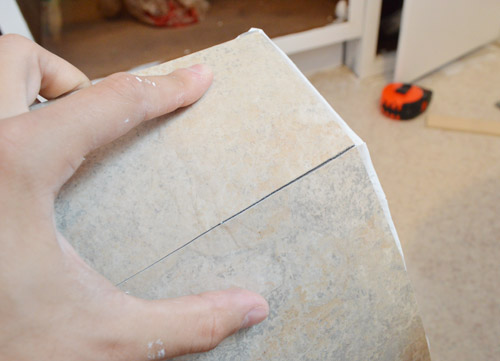
The other thing I love about these guys is that they’re crazy easy to cut. All it takes is a quick score with a utility knife and then it (I can’t believe I’m about to make a Legally Blonde reference) bends and snaps. Though unlike Elle Woods, it then breaks apart.
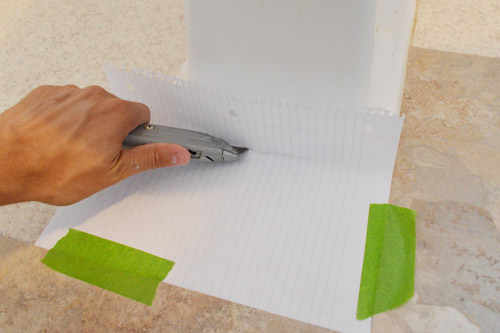
Granny’s itty bitty bathroom would’ve been a cinch to complete except that there were so. many. dang. edges. to cut. It’s not the hardest task – just time consuming. Again, since I was advised not to remove the sink or toilet – I had to cut around them (but we left Granny a bunch of spare tiles to bridge any potential gaps in case the toilet is eventually replaced). I started each cut by making a paper template. Typically I’d use a stiffer paper like cardstock, but Granny just had a spiral notebook handy – so I taped it into place and used my knife to cut right along the edge of (in this case) the toilet.
Gorgeous, no?
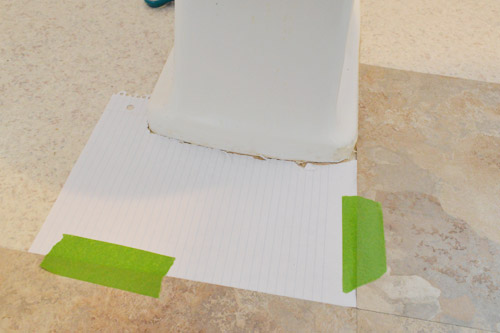
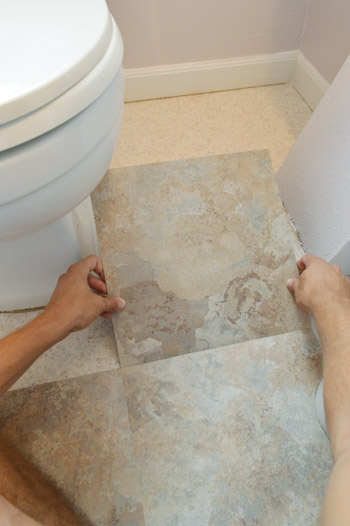
Then I taped my template on the to-be-cut tile and slowly sliced along the edge of the template.
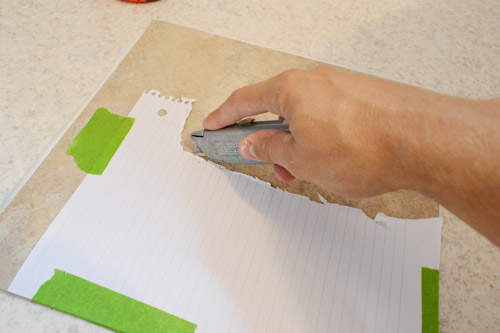
Once I bent-and-snapped out the section that would interfere with the toilet – and did a test placement with the protective backing still on – it was ready to be stuck down. Voila:
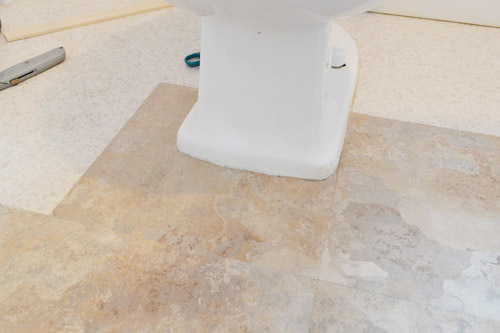
By the end of about 23 tiles and 4 hours it was completely done. And it was definitely a huge upgrade from the old sheet o’ vinyl that was there before. Again, if we had the luxury of time I would’ve loved to remove the sink and toilet to go under them (so for those of you at home who do, I’d recommend it), but leaving Granny seven spare tiles was the next best thing – so if she ever has a plumber replace the toilet or sink, she can fix any gaps if either fixture happens to have a smaller footprint.
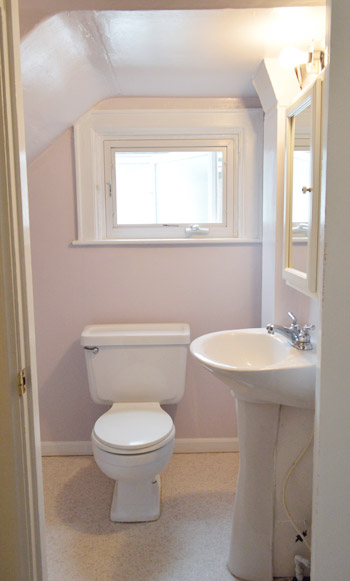
It was amazing how much the new flooring updated the room… especially in person since it has some great texture. And it looks pretty darn good with those soft violet walls.
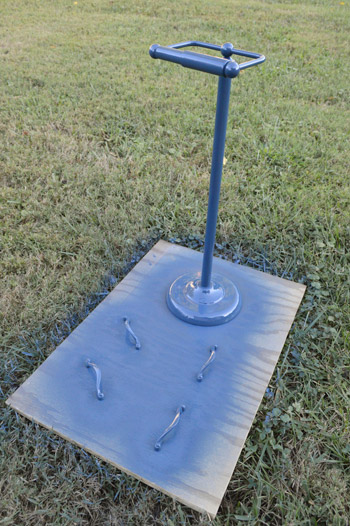
With the paint and flooring done, most of our major projects were checked off for the day, so it was just on to prepping a few more finishing touches – like breathing some new life into some of Granny’s old cabinet hardware (which we think was added sometime in the 80s or 90s, but had since peeled a bit). Enter Valspar’s Indigo Streamer in Satin to the rescue (it looks kind of bright here, but it’s a true deep navy in person).
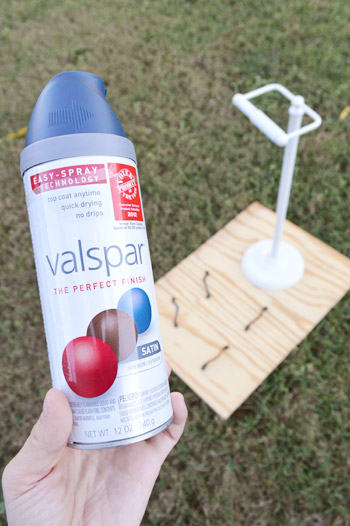
First we sanded them smooth and then it was spray-time. We had originally hoped to replace Granny’s cabinet hardware with some new shiny chrome versions, but the existing holes weren’t a standard size. That ended up being a blessing in disguise because not only did we get to reuse what she had, but we also got to make them a fun and less expected color. Navy definitely beats worn-and-peeling brass and adds tons of interest to an old white toilet paper holder.
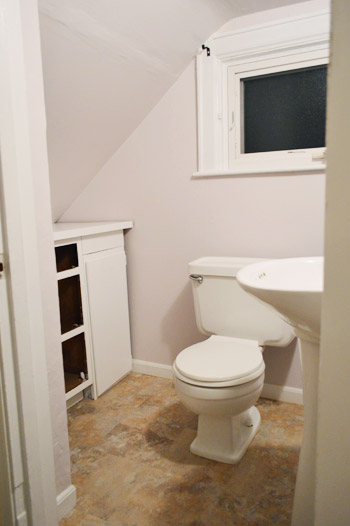
So with our spray painted items drying outside for the evening, the room was looking like this by the end of Day 2 (pardon the terrible picture, it was late at night, so the floor looks Frito-orange and you can hardly see the voilet color on the walls).
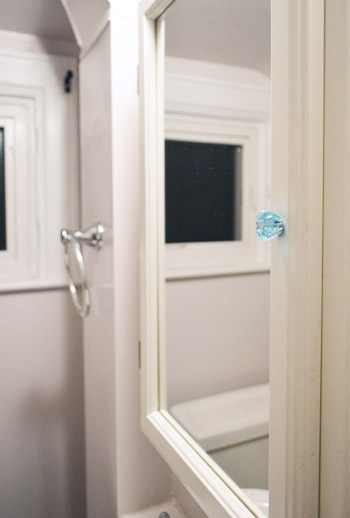
Oh but we were able to tackle a few other minor items in preparation for Day 3’s big reveal – like giving Granny a playful blue glass knob on her medicine cabinet, and hanging a towel ring into some existing holes on the duct (we worried hanging something on the duct might be a bad call, but Granny said it used to hang there for years and since my dad also said it shouldn’t be an issue, we used the old holes that were there and plugged them up with a shiny new towel ring).
Oh yeah, and we replaced a couple of her outlets – including the burned one on the floor – so they were all new and white and up to today’s safety standards (an electrician had looked a them prior to our little makeover to ensure they were nice & safe before we messed with them).

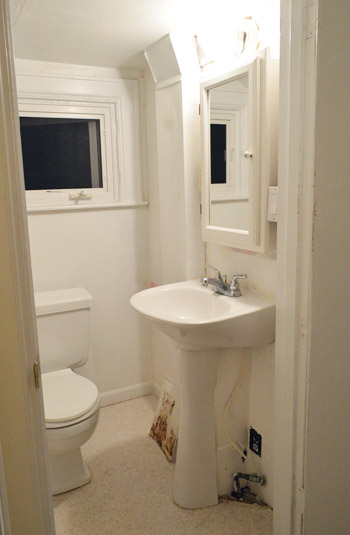
Isn’t this little problem area by her sink already looking worlds better? That was definitely one of the more satisfying views of Day 2. Although for some reason the soft violet walls are really hard to see in these late night shots.
Happily after a day of painting, changing up the flooring, and doing a few little updates to get a jump on things, our to-do list was looking like this:
Brainstorm colors & go shopping for accessories (Day 1)Spackle/sand/caulk everything to prep the room for paint (Day 1)Rebuild the cabinets a bit so they look more balanced (Day 1)Prime and paint the cabinets for a more updated and open look (Day 1 & 2)Paint the entire room, including the ceiling (Day 2)Fix a few issues, like a rusted duct and an old dingy corner below the sink (Day 2)Redo the floors, which were that old sheet laminate stuff (Day 2)Revive some hardware/accessories with a fresh finish (Day 2)- Make & hang curtains to add some charm (Day 3)
- Bring in some meaningful art (Day 3)
- Add some functional/personal accessories to finish things off (Day 3)
- Reveal the whole shebang for Granny (Day 3)
We’ll have all of the official before & afters in tomorrow’s post about our final day of upgrading the room and – the best part – video and photos of us revealing it to Granny. We’ll also have a full budget breakdown for you (we just have some receipt-math and photo-uploading to do). In the meantime, is anyone else out there using peel & stick tiles for a super affordable upgrade? Did you make paper templates too? Or did you use some other method to size them?

Jenny says
Wow, I had no idea this tile existed. I’d love to make the stained linoleum in our basement more decent-looking until we someday reno the whole space, knock out walls, etc…probably 5+ years down the line. This looks like a great solution!
Katie says
I love how the wall color makes the fixtures look even whiter!!
Mary says
Looks great!
Stupid question but why the TP stand? I have one in my master bath by necessity (tile walls) and find it so annoying. One of these days I’m going to drill into the tile and mount a wall TP holder.
YoungHouseLove says
That was just what worked for Granny (it made it so that she didn’t have to reach quite as far back to the wall, since there wasn’t a very convenient spot to put it within her reach). Hope it helps!
xo
s
Eve says
Looks lovely! I bet Granny will be thrilled. :) There’s also the option of peel & stick that you can grout, if you want something that looks like the larger ceramic tiles. I haven’t used them, but I have seen them.
We used peel & stick to cover over the white and cobalt peel & stick that was in our bathroom previously. I wanted something that would temporarily gel with the laminate throughout the rest of the house (that will all hopefully be replaced someday! ha ha). We bought some wood grain from Home Depot and it’s held up really well. There’s some pics here. I don’t remember if I used a paper template or not, but it’s definitely a good idea! And at around $50 for our tiny bathroom, it was an inexpensive fix that I won’t feel horrible about replacing in the future.
YoungHouseLove says
Love that!
xo
s
Claire says
Granny’s bathroom is looking great!
I’m another reader who can vouch for the transformation provided by peel ‘n stick tiles. My SIL used them to update the look of the bathroom floor in our new-to-us family cottage. I couldn’t believe the difference. They can even make seafoam bathroom fixtures look good! She also used them to line all the cupboards like another reader suggested. It adds a very finished look.
http://alittlesomethinginthemeantime.blogspot.ca/2012/08/cottage-update-bathroom.html
YoungHouseLove says
Such a cute little makeover!
xo
s
Gabriella @ Our Life In Action says
Wow – what an improvement. My favoite part so far is the smallest change….the blue knob on the mirror. How cute and pretty.
Julie says
Looking great already!
Isn’t this chair from Target the same fabric as your headboard? http://www.target.com/p/avington-upholstered-armless-accent-slipper-chair-gazebo-cloud-floral/-/A-13916598
YoungHouseLove says
Yes, isn’t that so funny?! Love it!
xo
s
mollie says
What a fun project for your Granny! Love that you’re doing this for her; she’s gonna love it! Can’t wait to see her response:)
Bambino by the Bay says
It looks amazing! I actually really love the wall color from what we can see and I’m not really a violet/purple person. Can you guys come over to my house next?
YoungHouseLove says
Wahoo! We wish! This was so much fun, it has us itching to do it for other folks!
xo
s
Jennifer Harrup says
Just used that exact spray paint color for a little chair update! My chairs turned out super pretty so I’m excited to see everything come together tomorrow!
YoungHouseLove says
So funny! It’s a gorgeous color!
xo
s
Terri says
We have similar peel/stick tile at the bottom of our basement stairs. The paper stencil did the trick too.
It’s been there for 5 years and still looks great. This is the home of the craft area/laundry room and access to the bathroom for the swimming pool. It’s held up through lots of glue, water and dog!
YoungHouseLove says
So glad to hear that!
xo
s
Meredith says
I really want tomorrow’s post to be titled “Boomin’ Granny” like the Beastie Boys song. That is all. :)
YoungHouseLove says
Hahahahah!
xo
s
Chris says
I used the same tiles from Home Depot in 4 bathrooms but in a different color….a grayish taupe with a hint of light blue. I used the tiles which could be grouted. They were easy to install with the help of my daughter who measures and thinks everything through unlike her mother (but I’m learning). Most people think the floors are slate and not vinyl peel and stick tiles. For under $100 we have fabulous looking bathroom floors!
YoungHouseLove says
So awesome!
xo
s
Linda says
It looks wonderful! Just wondering, did you use the BM Aura bath and spa? I did in my bathroom since I like long hot showers in there every day – and I just love that paint, especially the matte finish. It also covers just beautifully – even my beat up walls – turned out to be contractor white under the wallpaper.
Now I’m thinking peel and stick for my utility room and master bath. MB is tiled, though, so not sure it’s smooth enough to just tile over :-(
YoungHouseLove says
We used regular Aura and it turned out great (it’s just a powder room, so there’s no shower).
xo
s
Diane Taylor says
Nice color choice! I used that same color in our tiny bedroom and I still love it today. I think BM paint goes on so smooth, it’s my #1 paint choice.
I can’t wait to see the reveal :):)
meghan says
We did those peel and stick tiles from Home Depot in our tiny bathroom (to cover some dingy linoleum with roses on it until we tile at a later date) and for 25 dollars and about an hour they were so worth it. Six months later and they are going strong.
YoungHouseLove says
Wahoo!
xo
s
Jen. says
My folks LOVE the peel-and-stick tiles and have used several designs throughout the years. They’ve been disappointed lately that manufacturers don’t seem to be offering many choices in “non-faux” looks. You can get tons of faux stone and faux wood looks, but faux tile designs are out of fashion. I hope they come back into style before my parents want to do more redecorating.
Anele @ Success Along the Weigh says
Can’t wait for the reveal!
Kelli Fox says
“the bend and snap – works every time!!” love this little make-over!
Melly says
I’m enjoying Granny’s makeover so much. What a wonderful and loving thing for you two to do.
Sabrina says
I also use the peel and stick under the cabinets — and in one old kitchen used them to cover the remnants of some serious stuck on and ugly contact paper. In fact, we are deciding on new cabinets or refacing in our current home — and if it is the latter, I will be busting out the tiles again. I liked the easy clean, sense of padding for lining the cupboards.
Kate says
Hmmm, maybe peel and stick would be a solution for our kitchen, especially the kind you can grout between… The linoleum we have now isn’t horrible, but the part by the doorwall is scorched and peeling/turned purple (the scorched/peeling part is from the former owners, have no idea what happened there, and the purple is from a rug – I guess the rubber backing reacted with the linoleum?!?). We’d like to replace the (stained and worn down) carpet in the adjoining living room with wood or laminate, but wasn’t sure what to do with the kitchen – we’d end up harming the laminiate/wood with water, but hated the idea of sheet linoleum again, and I’m not sure we want to tackle tile.
Sabrina says
We used peel and stick in our livingroom and hallway. As a cheap way between the gross carpet the previous owners left and our financial issues with wanting my hard wood! It is coming up all over! I have used them before and they were fine :( I always pet the hardwood displays at Home Depot and do a wistful sigh lol I love everything you guys are doing to the bathroom, especially the knob on the medicine cabinet! I am having my kids go nuts with 3 colors for our bathroom art. On canvas, not walls!
emilymarion says
WOW! What a difference a coat of paint makes. Plus new flooring. It already looks brand new. Can’t wait to see the budget breakdown & all the accessories.
Kai says
Wow, it looks a million times better already! Can’t wait to see the reveal.
We ended up with a mold issue in our rental’s master closet (the back wall is on the exterior of the house and not insulated at all, so just collects moisture. UGH!), and the infested carpet had to be ripped out. With our landlords permission, my husband used peel-and-stick tiles to match the floors to the parquet through the rest of the house.
So simple to use and worked like a charm!
YoungHouseLove says
So smart! Sounds like an awesome solution!
xo
s
Christina Marie Interiors says
Wow, it’s looking great! I can’t wait to see what you do with the final touches! Granny is going to be so happy :)
On another note, I’d love for you and your readers to enter my pillow giveaway! It ends today! http://www.christinamarieinteriors.com/2012/09/custom-made-pillows.html
heyruthie says
Sherry, what would you and Jaohn have done if you wanted to extend the tile into another area that had a slight floor change? I want to do this in my laundry room, which currently has linoleum, which I would work right on top of. but i’d like to continue the tile past the doorway, to cover a small (5×4 ft.) landing that has (what used to be!) white carpet. the carpet and pad are on top of subfloor, so there will be a *tiny* (1/4 inch?) decrease from the laundry room to the landing when you cross the threshold. How would you all have handled that? Thank you!!
YoungHouseLove says
Hmm, I think we would have tried to even things out before tiling (with a small thin piece of wood or board or some sort of skim coat that we applied and let dry before tiling).
xo
s
heyruthie says
ahh…OK. what about if I tile the 4×5 area with the absolute cheapest stick tiles that I can find? that would even it out with the current linoleum area, and then put the new peel and stick stuff down on top of it all? I guess I’d be essentially “double tiling” the little 5×4 landing, which would make it all even, since the laundry room will be “double tiled.” this might be nice, since the subfloor is on a concrete slab, and tends to get cold….
YoungHouseLove says
Yes, that would work totally! If you could get those to lift the top tiles up to be level, it’s a great idea!
xo
s
heyruthie says
p.s. i’m LOVING this makeover, and couldn’t wait to see “day 2!” I’m DYING for “day 3!”
YoungHouseLove says
Aw thanks HeyRuthie!
xo
s
Kara G says
I JUST did the exact same tiles in my bathroom! Great minds think alike! haha jk… It’s a great quick-fix on a low budget! You guys are doing a great job!
YoungHouseLove says
So funny!
xo
s
Mary says
I used those very same tiles in our front hallway. We had skanky, holey, peeling vinyl there previously. I stapled it down where it was loose, patched the holes and on went the vinyl. I heated mine up in the oven (a tip online) to help the sticky side be stickier. It worked like a dream (except the one I overheated and got stuck to myself, oops!)
Your bathroom remodel is looking great! We have done basic renovations on all three of the bathrooms in our house.
YoungHouseLove says
That’s awesome!!
xo
s
Christina @ Homemade Ocean says
Such a sweet project, you guys really are awesome!
Can’t wait for the reveal :)
Laurie says
I am so invested in this little project! It’s a website cliffhanger….okay, maybe it’s no “who shot J.R.” but still, I am on pins and needles waiting for the big reveal. Way to keep your readers hooked! Also, I just got the latest issue of HGTV magazine and saw the quote from you about your Thanksgiving tradition of putting your “thankfuls” into a jar. The funny thing is when I saw the picture of your jar in the front of the magazine, I thought “hey that looks like John and Sherry’s jar” (we are on a first name basis!) and lo and behold, when I got to the article, there was your quote. Did you post about being in the magazine? I don’t recall seeing anything about it
YoungHouseLove says
haha, isn’t that funny?! We didn’t know they would reshoot the pic with their own jar, but we’re so glad our little quote popped up!
xo
s
Brittany says
We used peel and stick tile for an inexpensive update in our house while we were getting ready to sell it! I actually blogged about it : ) Feel free to ignore the link but I’ll provide it in case you’re bored!
http://prettybittybugs.blogspot.com/2011/02/necessary-room.html
Granny’s bathroom is looking great!
YoungHouseLove says
Love that!!
xo
s
Mari says
Hi YoungHouse!
My hubs and I just did some vinyl tiling to our bathrooms and I thought I’d add how they now have this fantastic pre-made grout. Totally easy to use. You can use it to set sticky tiles with grout lines and make it look less like sticky tiles. Or, in our case we still butted the tiles together, but went over it with the grout to fill in any spots. The result was a virtually seemless look, totally pumped with the finished product!
YoungHouseLove says
That sounds so cool!
xo
s
Melissa says
Great idea to use the vinyl tiles. I’ve been thinking about using them in my downstairs room, since ceramic is so very hard. My former kitchen had hardwood and things I dropped bounced–my current kitchen has ceramic tile and everything I drop breaks. This tells me that as you get older you don’t want to be falling on ceramic tile!
Lesley says
Now I know what my husband goes through when I design a room. I was with you on the violet walls and floor selection then started having trouble seeing where you were going with the colour for tp stand and pulls and then the blue knob on the cabinet… So I went back to your colour references in the fabric, and I TOTALLY GET IT!
Can’t wait to see the reveal.
YoungHouseLove says
Aw thanks Lesley!
xo
s
Renee says
The kitchen cabinets in the house we’re renting were in AWFUL condition – mostly just dirty the insides were wood and several layers of contact paper.
We painted the insides of the cabinets white and I used the self stick tiles on the floor and shelves of the bottom cabinets where I keep my pots/pans/heavier kitchen items. They still aren’t perfect, but they are WORLDS better than what was there when we moved in.
Tina Bland says
Love it!! Quick question – we are planning to put a new floor in our basement that has flooded twice (not huge floods, but enough to get our floor wet on one side of the space.) We believe the flooding problem has been solved (hopefully) but just in case, we aren’t going to put carpet down there again, since we’ve now had to rip it up two different times. Do you know what type of flooring would be best for this situation? We’ve had a lot of different people tell us a lot of different options, just wondering your take on it;)
YoungHouseLove says
Hmm, I would think these peel & stick tiles would be cheap and easy. Anyone else have ideas?
xo
s
Lesley says
I’d be a little concerned about the peel and stick tiles too unless you were grouting or somehow sealing the edges of the tiles.
To avoid that, I would recommend vinyl composition tiles (VCT), they are the tiles that have the look of but do not cause cancer like asbestos tiles. Because they are compressed vinyl chips they don’t have a paper layer like most lino tiles have which is what concerned us about installation in our previously wet basement as well.
Our other concern was that we were applying over top of orange lead paint and didn’t want the stick to just peel off the lead paint, so the adhesive you use for the VCT tiles was a better bet to seal the nastiness of lead under the flooring.
Rachel McCoy says
That Granny is one lucky lady! I’m on the edge of my seat to see it all come together. I can’t wait to hear her reaction to it all. Way to show how a little goes a long way in a tiny space. It’s inspiring me to maybe talk my parents into letting redo their ugly half bath!
Laura says
Yikes! It’s scary how close that outlet is to the water line and the sink, huh?
YoungHouseLove says
Oh yeah, it’s one of those older rooms with lots of things close together ;)
xo
s
Audra Repass says
I was hoping that you’d be installing peel and stick tile…I’ve been trying to work myself up to putting it in the bathroom of my house for two weeks. I’ve been nervous about tackling the project by myself…so it was nice to see yet another tutorial – I’m sold on the easy cuts/affordability.
I can’t wait to see Day 3!
Audra @ Audra’s Ally
Heidi P. says
Wow! Way to stick to the schedule! It looks great. Can’t wait to see the video of her reaction tomorrow!
Joanne B. says
not able to read all the other posts now (later tonight/promise!), but wanted to comment before I forget- love the improvemnt around the under sink area- but I keep thinking hows about a velcroed fabric skirt to match the window treatment? Would hide all that and allow Granny to hide other small items she might need handy as well. Can’t wait to see her response! Sure she will LOVE it as much as she loves you!
YoungHouseLove says
I thought about a little skirt too, but it would actually be so close to (if not touching) the toilet that we thought it would be unsanitary – so we stuck with putting pretty fabric around the window.
xo
s
shelley st. amant says
used the same slate-look tiles from home depot in my powder room upstairs. aren’t they awesome? so fast… and thanks for mentioning once again that you should NEVER caulk around a toilet… i see so much damage that could have been so easily prevented (i’m a house painter and handyman..er, handy..woman?).
Lizzy says
Granny is going to be so excited! I can’t wait to see her reaction on video!
I was reading the latest issues of Better Homes & Gardens and there is a bedroom makeover (p 65-70) that looks to have the same fabric for curtains that you used for your headboard. (Both the bedroom makeover and your headboard are beautiful!)
YoungHouseLove says
So funny! Can’t wait to check it out!
xo
s
Laura says
love it! What a wonderful thing! Can’t wait for the big reveal.
Page says
So when installing the peel and stick tiles, you don’t have to remove the trim boards around the perimeter? (Forgive me if you’ve already answered this, but on my quick read-through I didn’t see it mentioned.) Would so LOVE to do this in my laundry room. I need a quick and easy solution that I can do myself.
YoungHouseLove says
We just went up to the baseboard (you can add quarter round for an even more polished look if you’d like, but if you keep your cuts straight it should look really finished even without it).
xo
s
Christy B says
Love love love the bend and snap reference-most of all that it came from John!! Very impressed with your chick-flick movie knowledge :)
Brittney says
We used those exact same peel/stick tiles in the bathroom of our old townhome. Our reason for using them was the same as yours, budget and ease of installation especially since we were prepping our place to sell. It is a huge improvement over large sheet linoleum!!
Good work and kudos to y’all for helping out your granny. :)
Judy says
Hi YHL,
I’m LOVING this series guys! It’s so sweet for you to go make over her bathroom. You really demonstrate that it does not take a lot of money to reinvent a space. I love the paint choice and the navy is a bit unexpected & I think it will look great! I cannot wait to see the end result!