All aboard! (Can I get a choo choo?)
As promised via our little Instagram/Facebook sneak peek yesterday, here’s the story of how we made a little train board for Clara. Why a train board? Well, Clara is nothing short of obsessed with the one at Barnes & Noble (a nice big track is screwed into place on a little pedestal board and kids flock from all sides of the book store to play with it). In fact if we pull into the parking lot (which also leads to a ton of other stores) before we even turn off the car Clara is shouting “we’re getting to play with the trains!”
So when John suggested that we make our own version of one with a train set that we got for Clara’s second birthday from a few relatives of ours, I remembered seeing this one over on Aubrey and Lindsey’s blog so I googled around for a few others to gaze at (like this one). As for our specific objectives, we had a few goals in mind:
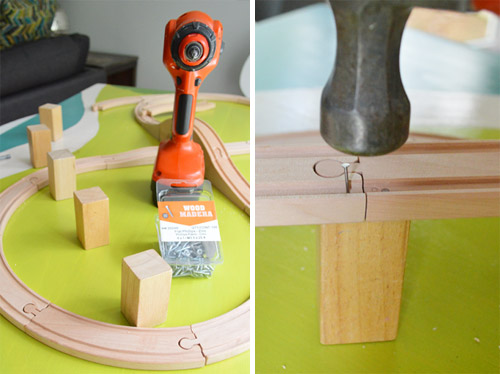
- to use all of the Melissa & Doug train pieces that we already had and make a nice big track
- to use solid wood if we could for the board part (just to avoid the off-gassing issue of MDF/plywood since solid whitewood is nice and light – and cheap)
- to paint something fun on the surface to give Clara more play ideas (ex: the train is going to the beach, the train is going to the forest, the train is going over the water)
- to paint it with low-VOC paint, seal it with low-VOC sealer, and attach the tracks with screws from beneath to avoid fumey glue (just in the same eco vein as the wood choice)
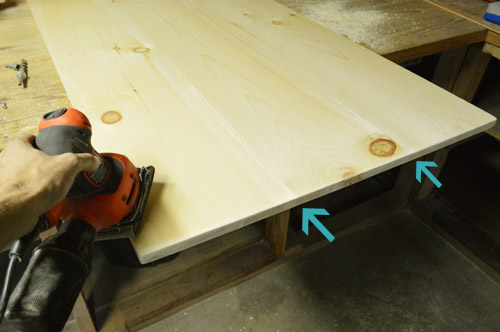
So here’s how we got ‘er done using nine dollar’s worth of sample paint from Home Depot and one plank of 12″ whitewood for $19 (also from Home Depot) – for a total of $28 spent. First John got a twelve foot long 10″ x 1″ board of whitewood and had them cut it down to make three equal 10″ x 1″ x 47″ boards right in the store. Then he joined them together with his Kreg Jig (you could also use flat bracing pieces of wood or metal along the back to connect them and add some felt pads to make sure nothing scratches the floor). Then he sanded everything to keep the board from feeling rough or splintery. See how the seams are barely visible (these arrows point them out for ya).
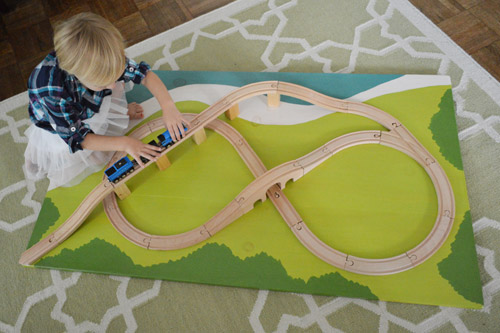
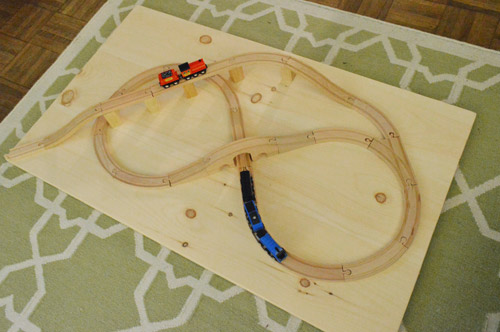
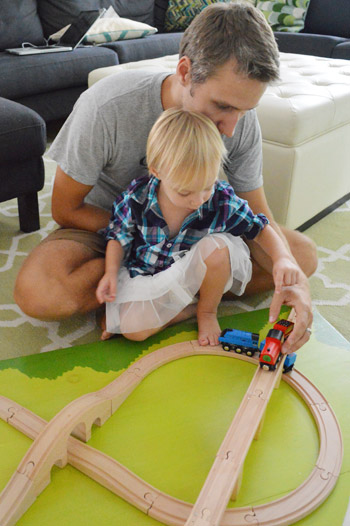
Next we pieced the train tracks together in about a million different configurations before finally deciding to go with this one (it has hills, an elevated part, a bridge, a tunnel, and even an area where the train will shoot down an incline and off the board – which we thought would be Clara’s favorite part):
Then we brainstormed what we thought the background should look like on a piece of paper and came up with this (the light green is grass, the blue is the ocean, the stripe next to the blue is sand, and the dark green is the forest):

Then I sketched that layout onto the board with a pencil – just marking the lines of delineation between the water, the beach, the forest, etc.

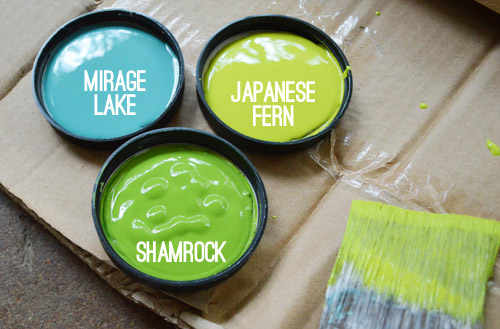
Then we ran to Home Depot and grabbed three $2.95 sample pots in Japanese Fern, Mirage Lake, and Shamrock all by Behr Ultra (which is low-VOC).
After we brought them home it was time to take the whole track apart so we could paint the background (tip: take a photo of the track configuration that you’ve landed on before dismantling it so you remember how to recreate it when you’ve painted your background). I started with the water and then I added the grass (these two don’t touch, so I didn’t have to worry about if the blue paint was still wet when I applied the green):
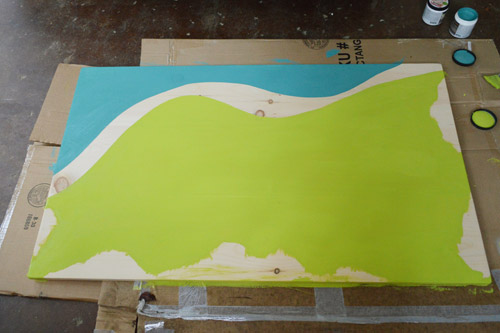
Oh and I didn’t prime anything because we didn’t mind this looking like painted wood (we thought a few knots showing through could be authentic and charming). But if you don’t want them to show through, a coat or two of stain-blocking primer should do the trick before you paint your design.
Then I gave that stuff a while to dry since I would be going up against the edges of those for the sand and the trees (and didn’t want things to smear) and came back a few hours later to paint the forest. That was the most fun because there’s that sort-of-bushy shape.
Then I added the sand, which was just leftover no-VOC white paint (we loved the idea of a white-sand beach between the ocean and the grassy plains, haha).
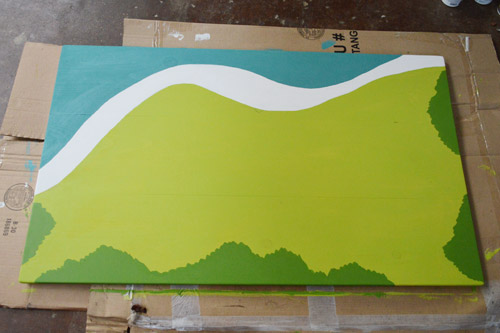
Then we let the whole board dry and I applied a few thin and even coats of my favorite eco poly (Acrylacq by Safecoat). We’ve had the same quart of it since before Clara was born and it’s still going strong (seriously, I can’t recommend it enough- not only is it low-VOC it’s actually non-toxic). I just brushed it on in thin and even coats, being careful not to belabor certain areas (if you brush things over and over they can get gummy, so I moved quickly across the board, let it dry, applied another coat, left that dry, and applied one last thin application).
As for why we decided to temporarily attach the tracks to the board:
- at this age for Clara, putting the tracks together herself just led to frustration (crying/throwing stuff) so it wasn’t really a good time for her when things weren’t attached.
- yet, we noticed how much fun she had at B&N when things were nailed down (it still led to a lot of creative, independent play with talks about trains stopping under tunnels, trains crashing, trains running out of fuel, people stopping at specific destinations, etc).
- if she ever has a hankering to build her own track down the line, we can always free up this track by just removing the small screws on the underside of the board – so it’ll still be really functional and flexible for spur-of-the-moment-building if it’s detached later.
We just saw how much more fun she had at B&N with the fixed track (no tantrums or frustration of trying to make things go together, etc) so we thought a fixed track made the most sense for now. So after we gave the poly lots of drying time (48 full hours) we laid out the track on top of the newly sealed board and attached the whole thing with screws from underneath the train board. In other words, John removed the tracks one by one, drilled a pilot hole from the top of the board through to the bottom…
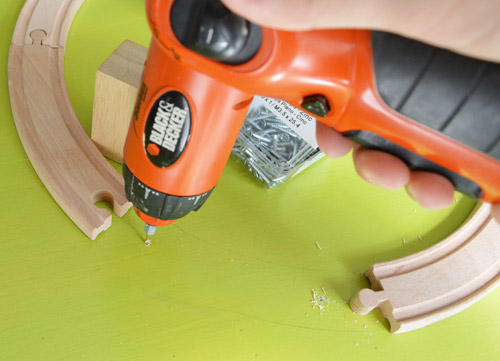
… and then held the track in place on top of it and screwed up to attach the track to the board from underneath).
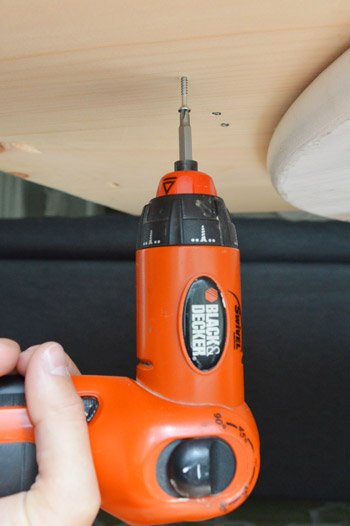
That’s how he got the track to stay in place without looking like it’s covered in screws (using counter-sinking screws meant they sunk into the back of the board and didn’t stick out and scratch the floor). We also added felt furniture pads to keep the board from rubbing on the floor/table/ottoman if it gets lots of use.
As for the elevated part of the train, we attached those blocks to hold the track up the same way we did the rest of the track (a pilot hole through the board from above followed by a screw driven from the back of the board up into the block to hold it in place without seeing any hardware). Then to hold the track in place on top of each of those blocks, we drove a small finish nail into the groove of the track and into the block, which actually proved to be really sturdy without being super obvious (you have to get pretty close to even notice them at all).
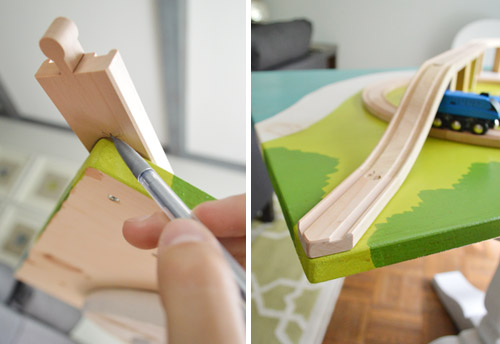
When it came to making that one piece of track look like it led off the corner of the board, John just traced the shape of the board onto the bottom of the track, and cut it along that line that he drew (and then sanded it to make it nice and smooth). Then he just drilled that track in from below like the rest of them (he actually had already attached it, which you can see in the pic on the right, so he removed it, cut it, and drilled it back in).
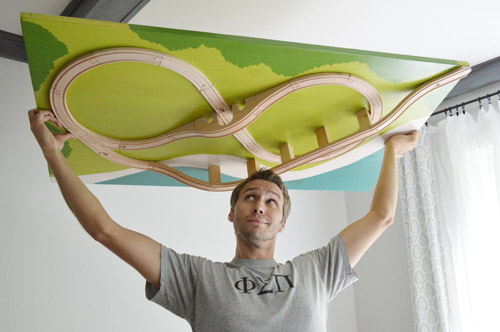
Next came the big test. Holding everything upside down to make sure it was all attached. Thankfully it’s all nice and sturdy. As in, Clara has taken great joy in kicking the elevated part and it’s all holding strong.
Choo-choo, baby. Here’s the whole shebang in action:
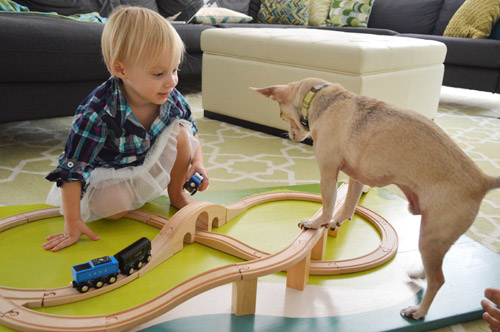
Clara loves it. As expected, there’s lots of chatter about people going to the beach, the forest, and over the hills and valleys, and contrary to our guess – her favorite feature is actually rolling them down the middle hill and into a big pile-up. Sometimes she even lets us get in on the chugga-chugga action.
Are there any other train board fans out there? At first I thought making new tracks would be part of the fun, but seeing how much Clara loves the fixed one at B&N, I’m glad we made her a souped up board with a fun little background to make playing with it even more exciting. Things like adding an environment behind it and having trains shoot off the board have certainly upped the train-playing ante around here. And John may or may not have played with it a little himself after Clara went to bed last night. Not kidding.
And perhaps the best thing about it is that it’s nice and flat, so it can slide completely under the sofa for storage when it’s not in use. Here it is halfway in:
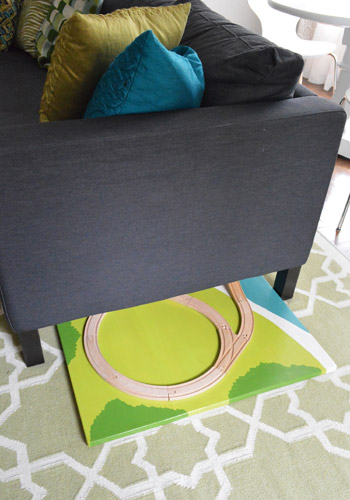
That’s actually one of the reasons we thought a board would work better for us than a table, since we used all the tracks and trains that we had to build this, so we didn’t need additional storage or anything). It’s nice that we can stash it away in a second and that seems to make it even more special for Clara (she loves things that we bring out and tuck away, like markers and Play-Doh a bit more than things that are always out at her disposal). Maybe it’s like those special “limited edition” holiday Oreos? They always feel more special than the regular kind to me. Haha.
So that’s the full $28 train board rundown. What have you guys been building/painting/sanding lately? Any fun kids stuff in the works?

GiftGuideForGuys says
Screwing the tracks down is a great idea. I have friends who have a two year old son who loves to play with his train set that is very similar to the one you have, but he gets very frustrated when it comes apart when he steps on it. I’ll have to pass this idea along to them.
eileen marie says
So…the special edition gets you too? Hubs is a real sucker for those. To me special edition usually = gross. ;) I cannot believe you missed out on a chance to make a Bob Ross (“happy little tree”) reference in your video, Sherry! And Clara?! She is so grown! With all of that blond hair, and the cute plaid top. She’s so articulate now -you can understand everything she says. “I’m torry.” and “dust” and “peanups”! Oh and the train board is awesome. I hope one day you can use these with future progeny and then they can pass them along -they will realize how blesses they were to have such handy parents!
YoungHouseLove says
Yes! You heard peanupts too! I wondered if anyone else heard it. That cracked us up.
xo,
s
Randa says
I heard “peanups” too…. that and her “I’m sorry, I’m sorry” made my day. :-)
YoungHouseLove says
Aw, thanks Randa!
xo
s
Emily H. says
Love this….I thinking this would be a great Christmas present for my son!
Andrea in Australia says
LOVE the track. Just a question, why did you buy the board, cut it into three and then screw it back together. Why not just leave it as is?
YoungHouseLove says
It was one long board (just 10″ wide, but reallllllly long) so we had to cut it down and attach those boards next to each other to make a board that wasn’t as long and skinny and was wider like a big rectangle. Hope that makes sense!
xo,
s
betterOutdoorLivingatHome says
Really like the paint colors you chose. DIY projects like this really can save money! Very nice!
Katie says
My train set was one of my favorite things when I was little! My husband still thinks its funny that at a toy store I will flock towards train stuff.
Rosemary says
I think it’s really great that you considered how Clara wanted to play with the trains, not how you thought she should. Clara is a lucky girl to have such thoughtful parents :)
Destiny says
I could so seriously watch videos of Clara all day long. She’s much more entertaining than anything on TV these days!
To hear her say “I’m sorry” over and over was just too cute. (My boy is 20, so we don’t get to hear very many sweet “I’m sorries” anymore…)
You’re a very special family — so refreshing!
Kathy says
You buys are SO smart! We had one of these train sets for our two kids for years and it was always such a pain to put it away and build it again… and the kids didn’t play with it nearly as much as they would at Barnes and Noble. Love this idea!
Kathy says
*guys, not “buys”….. oops! ;-)
Emily says
this is stunningly gorgeous! I have been planning to get our daughter an Ikea train set for her third birthday next week, but this has me a wee bit envious…
Beth says
Hi Guys,
I love your new train board…what a fun idea! I consider you two the experts on DIY child safe/green products, so I’m really curious what you’d do in my situation. My husband and I just finished staining and sealing all the boards we are using to make a Restoration Hardware knock off bed for our 3 year old son’s room. I’m super excited to get it built, and just put a third coat of Minwax Polycrylic Finish on it to seal the stain and protect the wood. I hadn’t considered using a product like Safecoat Acrylacq. Both Minwax Polyacrylic and Safecoat Acrylacq are water based sealers, so I’m wondering if it would be safer (for my son) to add a couple coats of the Safecoat product to the wood before assembly. The Minwax product isn’t marketed as being Low VOC, so it makes me think the Safecoat version is a safer product. I’m a nerd especially when it comes to making things safe for my kids, so I pulled up the MSDS for both products. The Minwax product lists a VOC of 103g/L and 264g/L less water. The Safecoat product lists a VOC of 99g/L and 231 g/L less water. They seem close, but I wouldn’t mind putting on a couple more coats, if necessary. Thoughts? Do you think the Safecoat product on top of the Minwax product would result in a mess…I’d rather not start from scratch:). Thanks for your help!!
You guys are the best…can’t wait to receive my pre-ordered copy of your book:)!!
YoungHouseLove says
Oh yes, Safecoat Acrylacq definitely couldn’t hurt – just to brush a few coats on to seal things (it’s not only low-VOC, it’s listed as non-toxic, and it’s what people use to seal in bad things like lead paint!). Then you’d have it on hand for other projects as well (it lasts forever! we’ve been nursing the same quart for almost three years!). So funny that the VOC info isn’t that far off, but I think some other ingredients might contribute to one being non-toxic (Acrylacq) while one isn’t (Minwax). Hope it helps!
xo,
s
Jenna at Homeslice says
We’ve got a train table and it’s worth it for us because our son uses it ALL the time, but I love that you can hide yours away. Sometimes I think it’s nice when toys get put away… kids tend to forget about them (momentarily) and then they’re fun again when they get pulled out!
qaseh gifts says
Woo hoo for the choo choo!
Amy Endler says
LOVE it!!!!!!!!!!!!! Going to make one too!!!
Susan Akers says
Oooooohhhhhh! How sweet!
Nicole Smith says
Wow, I always thought your rug was more lime/olive, but it looks a lot more sage-y with all those bright colors against it.
Melissa says
Is john a brother? I am a Phi Sigma Pi girl!
YoungHouseLove says
I am! Alpha Omicron chapter at UVA.
-John
Melissa says
Beta Psi Chapter Middle TN State University! I didn’t think I could love y’all anymore! But now we are brothers for real :-D
Donna says
You know those games you put together as you play and then at the end, you turn the crank and set a chain reaction in motion? Well, when I was little we had a couple of those; but they were very frustrating because the pieces would not stay in place or linked together and so the reaction would never finish. So my dad, who was both an artist and a jack-of-all-trades, made these customized game boards out of heavy cardboard with slots cut in it and lips built out of popsicle sticks to hold everything in place so the game would finally work like the one on the TV advertisements.
YoungHouseLove says
That’s so smart! What a cool dad.
xo
s
Amanda Wells says
You could totally sell those things! It looks so great! How lucky Clara is to have such creative parents who are willing to do things like this. Love it!
http://www.amandadovewells.com/?page_id=45
amber says
really cute! our train table is TOO big and sits in the guestroom…my son has more fun playing with the same table at the UPS store than his own! LOL! I LOVE how the tracks are set and can’t move…and how it tucks under the couch!
Carolyn L says
omg. the flannel and tu tu. can’t handle. genius. a two-year old can be my fashion inspiration, right? right?
Kerry says
Was just talking to my dad about model train he dreams of. I wonder if this would work; I think it’s awesome!
Darcy says
I am in love with Clara’s outfit! and the train board is pretty cool too. I’d be tempted to add some more 3-dimensional elements, like maybe some plastic trees? or little buildings?
Faith says
Tracks you can re-arrange are only really fun once you hit about 6-7 years old. My 6-10 yr olds love building different configurations for the 4 yr old (& themselves) to play with.
Until then, the fixed tracks are AWESOME. You guys did a fantastic job! I love the vibrant colors.
Ayisha says
Wow what a little nice project!! looking so creative train board. I am waiting for your another project. I’ll visit your blog again.
kym lynch says
Thanks for the idea! We have a few sets of the Ikea train tracks. So many that I was going to donate some of them. Now I think I’ll o this will some and still have some left for free-styling with :)
KarenH. says
Wow, that is such a cool train board! I may have to put that idea on the list for when the grandson comes to visit. right now, the Brio trains are in one storage ottomon, and the Duplos are in the other. And then, of course, I’d have to figure out where to store a train board :D
This weekend I was busy making the sewing space in the basement functional (aka clean), and I’ve been designing a quilt top for my ex’s niece’s baby.
http://jzygail.livejournal.com/14327.htm
YoungHouseLove says
I’d love to see it! Looks like the link won’t work for me :(
xo,
s
KarenH says
Well, how rude (of the link!)
I’ll try to post the link on your Facebook wall, then. (I know people could see it there).
YoungHouseLove says
Haha, thanks Karen!
xo
s
Lisa says
This is just amazing. Such a great idea. I will totally try to do that for my son Julius for christmas. He will be 15 months then, would you say that’s the right age or will he still be too young?
I think we will buy the IKEA trains for it, so I think we could just buy additional sets when he wants to start playing with them by putting tracks together himself. That way, we wouldn’t have to destroy the board and could keep it for a future child.
YoungHouseLove says
In Clara’s case, I’d say she was closer to 18-21 months or so before she really started to “get” how to play with the train tracks – and not ’til very recently that she sort of makes up stories with them. But every kid is different and even before that she enjoyed just holding the trains themselves and spinning the wheels.
-John
Lisa says
Thanks so much – I guess we’ll just do it for the fun of it and if he doesn’t play with it yet, well, we can always put it away for some time.
I can’t wait until he is old enough to play with cooler things ;)
And WOW I got a John answer this time, never seen one of those :D
Love from Germany to the Petersik family
Diane Taylor says
WOW – this is one of my favorite projects that you guys have done for Clara – as the ex-wife of a model train-a-holic, this just rocks. Clara is going to get many many hours of fun from this – thanks so much for sharing the how-tos :)
Karen says
I am sure it has been said many times above, but I just wanted to say that the train board looks amazing! :)
Candice Matthews says
She is so cuuute!!! Clara makes me want to have kids!
Megan A. says
This is the coolest kid project ever! My son is only 10 months old now, but I am already planning on making him a train board for his 2nd birthday. I love that you encourage Clara to play with “boy toys” (that sounds wrong, but you know what I mean). Great job on this one.
House Crazy Sarah says
Very, very cute! She is one lucky little girl! (With very creative mom & dad!)
Trish Gibbon says
This couldn’t have come at a more perfect time! I planned on transforming my older girls’ craft table into a train table for my little guy this Christmas. Thanks for laying out the instructions for me! :)
Becky says
Great idea! And great timing! My parents are bringing my old Brio train set when the visit in October, but we’re not giving it to Ethan until Christmas so I was planning on making him some sort of board/table in the next couple months. We also visit B&N on rainy days and Ethan loves the train table. I love how yours slides under the couch…amazing idea.
Emily H. says
I’m probably the millionth person to say this now, but it’s incredibly refreshing to see a REAL toy being built and used excitedly by a child. I’m sure it feels so much easier to go to the nearest MegaToy and buy the latest in plastic goods, but it makes me really happy to see how simple it can be to make something cool, creative and fun out of cheap, basic materials! My husband and I don’t have any children yet, but I’m definitely going to keep this in mind for any future kidlets (and our newborn nephew!) down the road. Thanks for sharing!
YoungHouseLove says
Aw thanks Emily! I know it sounds corny, but kids stuff is some of the most fun stuff ever! We put our Clara-hats on and think about what she’d like. It’s fun! Haha.
xo,
s
Elizabeth@ Food Ramblings says
Love the train board!! I saw a train set at IKEA that I wanted to get for my nephew…making him a train board would be a great way to make sure his little sister can’t tear it apart :)
Claire says
I love this and think it looks great! But it makes me incredibly jealous that Clara will play with it (and prefers it) with the tracks nailed down. With three boys age 6, 4, and 2 we have more train tracks (and trains and train accessories) than I would have thought possible and what they enjoy most about them is putting the tracks together in different configurations. So we are forced to clean up 6 million tracks every night or supervise the cleaning up of the tracks (I’m honestly not sure which task is more painful, lol). I guess that the upside is that they do come up with some cool configurations sometimes.
If I could get away with building this, I absolutely would- a great solution for keeping tracks together, fun, and easily put away.
shevy says
that looks like so much fun! my kids were looking over my shoulder when i was reading and and they noticed that my son was wearing the same shirt that clara is wearing the pictures!
Jasanna says
That’s such a great idea! My brother had a million of those train track pieces scattered everywhere when we were younger. This helps a lot with cleanup!!! :)
http://www.munchtalk.net/
Lindsey says
That is actually the BEST idea ever screwing the tracks down. We don’t have a wooden track (we have the bigger plastic Thomas set) but EVERY wooden track I’ve ever seen (Dr. office, my sister’s house) is taken apart. They only stay together for a matter of minutes. Changing up the track would only be fun for an older child. And even then, if you decide to have more kids, there are LOTS of tears when one is playing with the track and another ruins it. Good job to you guys! I also love that there are no legs so it can be moved around & stored easier. Very cute!
Denise Pedersen says
This post brought back memories! I’m probably one of your oldest readers (60!) but my daughter got me hooked on your blog. When our youngest son (now 23) was Clara’s age, we built him a train table because he was obsessed with one at the local toy store. I remember my husband I playing with all the configurations before we attached the track!!! Sure Clara will have hours of fun with her train table!!
Donna says
I just love that you guys make so many homemade toys for Clara. Not only do you do a fantastic job, but when she is older she will feel so loved that you took that time, and she can pass them onto her children. Very sweet. I am glad you mentioned the low VOC lacquer, but I was wondering if you guys have a link to all of your favorite VOC products? I am very new to this. Thank you so much!
YoungHouseLove says
Greendepot.com is a great resource! They sell Acrylacq and low-VOC spackle/caulk. Then we just use low or no-VOC paint and we’re all set. Hope it helps!
xo,
s
Kristin F says
I have to admit I don’t watch your videos too often since I’m usually checking out the blog at my work desk, so imagine my surprise to hear Clara talking like such a big girl! Literally brought tears to my eyes! I’m not sure why I was so surprised since you do tell us about her vocal skills, but hearing it made it so real. Kudos for teaching her manners already too, how sweet to hear her immediately say “I’m sorry” when her train hit another one. Keep up the good work!
YoungHouseLove says
Aw, you’re so sweet! Thanks!
xo,
s
Ali says
That’s very sneaky about the drilling from underneath! We have a train table for our boys and I have glued down those stupid tracks I don’t know how many times! haha. I might have to break out the drill. :)
Kristen says
Super cute!!! Love plaid and fluffy skirts! Can you tell me which Melissa &Doug set it is?
YoungHouseLove says
It’s the Figure 8 set with another add-on set. I think you can find them on amazon.com and in local book/toy shops.
xo
s
Katy says
You guys are the most fun parents ever! This is amazing! I’d play with it.
Amanda says
This is SUCH a great idea, We don’t have a train set for our son, though he LOVES them (there’s a fixed one at the toy store), for the same reason that you built this board. My husband keeps mentioning that we should buy one and glue it down but I was resisting because I want Oscar (our son) to be able to rearrange the track later on. We will be building a set like this!
sarah says
Clara is ROCKIN the plaid shirt/tutu combo. style points!!