All aboard! (Can I get a choo choo?)
As promised via our little Instagram/Facebook sneak peek yesterday, here’s the story of how we made a little train board for Clara. Why a train board? Well, Clara is nothing short of obsessed with the one at Barnes & Noble (a nice big track is screwed into place on a little pedestal board and kids flock from all sides of the book store to play with it). In fact if we pull into the parking lot (which also leads to a ton of other stores) before we even turn off the car Clara is shouting “we’re getting to play with the trains!”
So when John suggested that we make our own version of one with a train set that we got for Clara’s second birthday from a few relatives of ours, I remembered seeing this one over on Aubrey and Lindsey’s blog so I googled around for a few others to gaze at (like this one). As for our specific objectives, we had a few goals in mind:
- to use all of the Melissa & Doug train pieces that we already had and make a nice big track
- to use solid wood if we could for the board part (just to avoid the off-gassing issue of MDF/plywood since solid whitewood is nice and light – and cheap)
- to paint something fun on the surface to give Clara more play ideas (ex: the train is going to the beach, the train is going to the forest, the train is going over the water)
- to paint it with low-VOC paint, seal it with low-VOC sealer, and attach the tracks with screws from beneath to avoid fumey glue (just in the same eco vein as the wood choice)
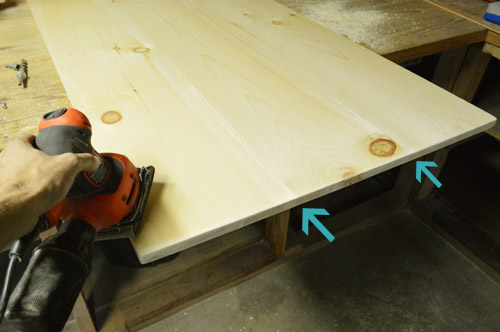
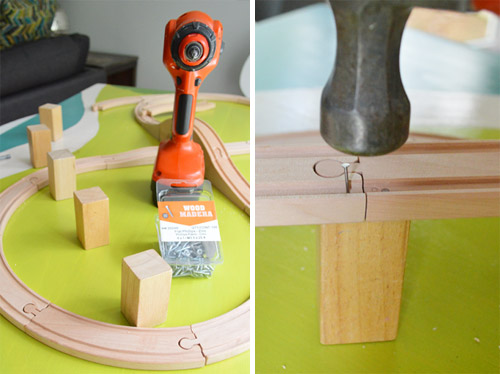
So here’s how we got ‘er done using nine dollar’s worth of sample paint from Home Depot and one plank of 12″ whitewood for $19 (also from Home Depot) – for a total of $28 spent. First John got a twelve foot long 10″ x 1″ board of whitewood and had them cut it down to make three equal 10″ x 1″ x 47″ boards right in the store. Then he joined them together with his Kreg Jig (you could also use flat bracing pieces of wood or metal along the back to connect them and add some felt pads to make sure nothing scratches the floor). Then he sanded everything to keep the board from feeling rough or splintery. See how the seams are barely visible (these arrows point them out for ya).
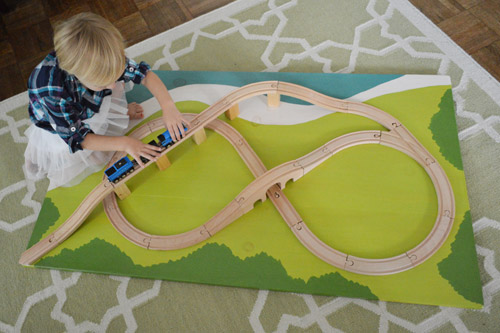
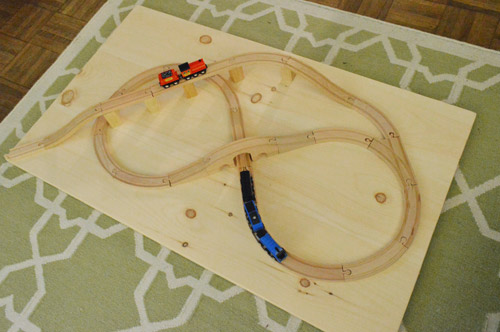
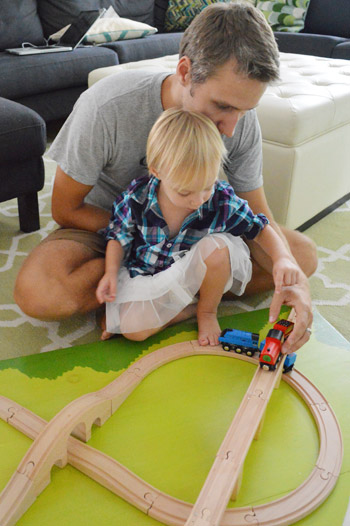
Next we pieced the train tracks together in about a million different configurations before finally deciding to go with this one (it has hills, an elevated part, a bridge, a tunnel, and even an area where the train will shoot down an incline and off the board – which we thought would be Clara’s favorite part):
Then we brainstormed what we thought the background should look like on a piece of paper and came up with this (the light green is grass, the blue is the ocean, the stripe next to the blue is sand, and the dark green is the forest):

Then I sketched that layout onto the board with a pencil – just marking the lines of delineation between the water, the beach, the forest, etc.

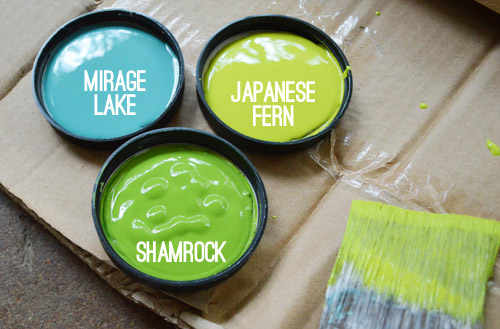
Then we ran to Home Depot and grabbed three $2.95 sample pots in Japanese Fern, Mirage Lake, and Shamrock all by Behr Ultra (which is low-VOC).
After we brought them home it was time to take the whole track apart so we could paint the background (tip: take a photo of the track configuration that you’ve landed on before dismantling it so you remember how to recreate it when you’ve painted your background). I started with the water and then I added the grass (these two don’t touch, so I didn’t have to worry about if the blue paint was still wet when I applied the green):
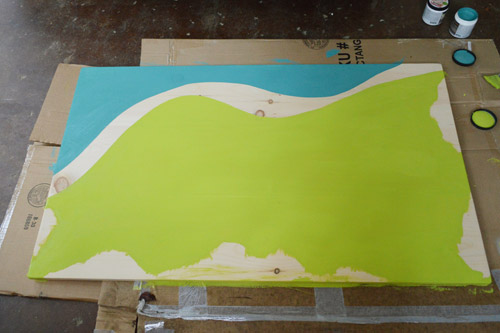
Oh and I didn’t prime anything because we didn’t mind this looking like painted wood (we thought a few knots showing through could be authentic and charming). But if you don’t want them to show through, a coat or two of stain-blocking primer should do the trick before you paint your design.
Then I gave that stuff a while to dry since I would be going up against the edges of those for the sand and the trees (and didn’t want things to smear) and came back a few hours later to paint the forest. That was the most fun because there’s that sort-of-bushy shape.
Then I added the sand, which was just leftover no-VOC white paint (we loved the idea of a white-sand beach between the ocean and the grassy plains, haha).
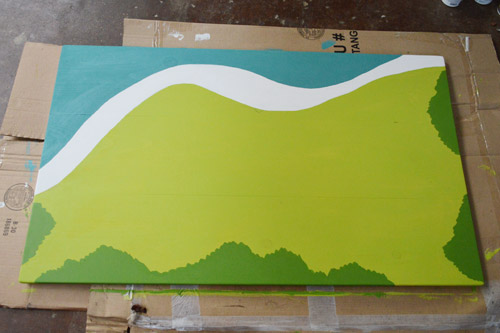
Then we let the whole board dry and I applied a few thin and even coats of my favorite eco poly (Acrylacq by Safecoat). We’ve had the same quart of it since before Clara was born and it’s still going strong (seriously, I can’t recommend it enough- not only is it low-VOC it’s actually non-toxic). I just brushed it on in thin and even coats, being careful not to belabor certain areas (if you brush things over and over they can get gummy, so I moved quickly across the board, let it dry, applied another coat, left that dry, and applied one last thin application).
As for why we decided to temporarily attach the tracks to the board:
- at this age for Clara, putting the tracks together herself just led to frustration (crying/throwing stuff) so it wasn’t really a good time for her when things weren’t attached.
- yet, we noticed how much fun she had at B&N when things were nailed down (it still led to a lot of creative, independent play with talks about trains stopping under tunnels, trains crashing, trains running out of fuel, people stopping at specific destinations, etc).
- if she ever has a hankering to build her own track down the line, we can always free up this track by just removing the small screws on the underside of the board – so it’ll still be really functional and flexible for spur-of-the-moment-building if it’s detached later.
We just saw how much more fun she had at B&N with the fixed track (no tantrums or frustration of trying to make things go together, etc) so we thought a fixed track made the most sense for now. So after we gave the poly lots of drying time (48 full hours) we laid out the track on top of the newly sealed board and attached the whole thing with screws from underneath the train board. In other words, John removed the tracks one by one, drilled a pilot hole from the top of the board through to the bottom…
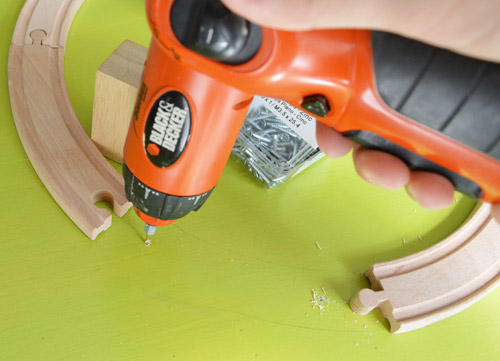
… and then held the track in place on top of it and screwed up to attach the track to the board from underneath).
That’s how he got the track to stay in place without looking like it’s covered in screws (using counter-sinking screws meant they sunk into the back of the board and didn’t stick out and scratch the floor). We also added felt furniture pads to keep the board from rubbing on the floor/table/ottoman if it gets lots of use.
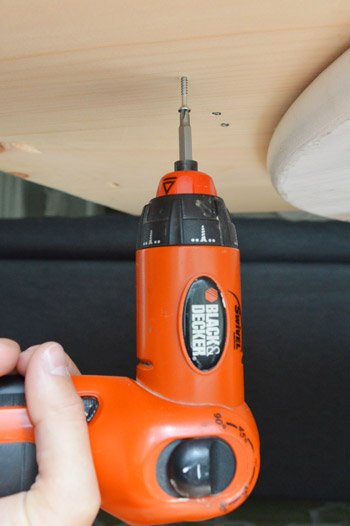
As for the elevated part of the train, we attached those blocks to hold the track up the same way we did the rest of the track (a pilot hole through the board from above followed by a screw driven from the back of the board up into the block to hold it in place without seeing any hardware). Then to hold the track in place on top of each of those blocks, we drove a small finish nail into the groove of the track and into the block, which actually proved to be really sturdy without being super obvious (you have to get pretty close to even notice them at all).
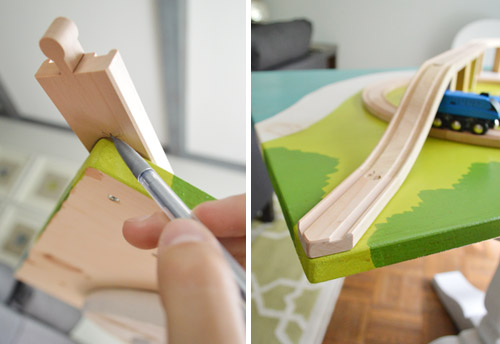
When it came to making that one piece of track look like it led off the corner of the board, John just traced the shape of the board onto the bottom of the track, and cut it along that line that he drew (and then sanded it to make it nice and smooth). Then he just drilled that track in from below like the rest of them (he actually had already attached it, which you can see in the pic on the right, so he removed it, cut it, and drilled it back in).
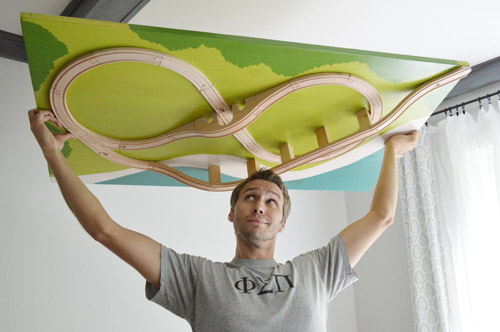
Next came the big test. Holding everything upside down to make sure it was all attached. Thankfully it’s all nice and sturdy. As in, Clara has taken great joy in kicking the elevated part and it’s all holding strong.
Choo-choo, baby. Here’s the whole shebang in action:
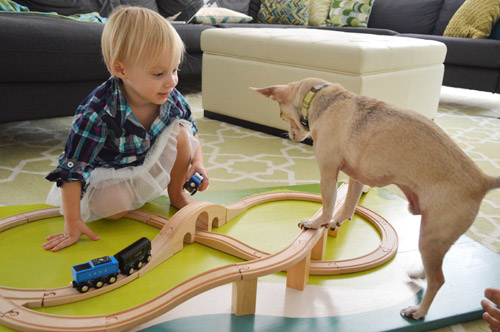
Clara loves it. As expected, there’s lots of chatter about people going to the beach, the forest, and over the hills and valleys, and contrary to our guess – her favorite feature is actually rolling them down the middle hill and into a big pile-up. Sometimes she even lets us get in on the chugga-chugga action.
Are there any other train board fans out there? At first I thought making new tracks would be part of the fun, but seeing how much Clara loves the fixed one at B&N, I’m glad we made her a souped up board with a fun little background to make playing with it even more exciting. Things like adding an environment behind it and having trains shoot off the board have certainly upped the train-playing ante around here. And John may or may not have played with it a little himself after Clara went to bed last night. Not kidding.
And perhaps the best thing about it is that it’s nice and flat, so it can slide completely under the sofa for storage when it’s not in use. Here it is halfway in:
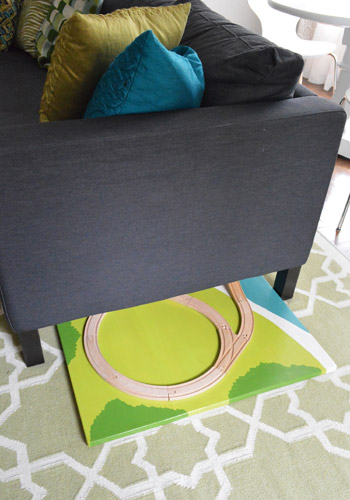
That’s actually one of the reasons we thought a board would work better for us than a table, since we used all the tracks and trains that we had to build this, so we didn’t need additional storage or anything). It’s nice that we can stash it away in a second and that seems to make it even more special for Clara (she loves things that we bring out and tuck away, like markers and Play-Doh a bit more than things that are always out at her disposal). Maybe it’s like those special “limited edition” holiday Oreos? They always feel more special than the regular kind to me. Haha.
So that’s the full $28 train board rundown. What have you guys been building/painting/sanding lately? Any fun kids stuff in the works?

Lindsay L. says
you guys are parental geniuses! seriously, i hope my babies aren’t too old when/if you ever decide to make kid furniture + toys. whenever melissa and doug get tired of making that stuff, you can just zoom on in!
Rachel says
That is SO cute! I can’t wait to start making little projects like this for my own baby.
Lindsay @ Me, Ed and Pea says
I have to comment on Clara’s outfit. Flannel and a tutu? Girl be stylin!
YoungHouseLove says
Haha – she loves herself a frilly skirt!
xo,
s
Anne says
…and you can always add new tracks to connect with the fixed set once she gets older. Best of both worlds!
btw: Her hair seems to be growing?!
YoungHouseLove says
Wahoo! Love that idea, and yes- her hair is happily growing!
xo,
s
Crystal @ 29 Rue House says
What a good idea! She sure does love that hill. haha :) I like your idea of adding stuff as you go like a barn and some stuff in the painted area may look neat (like trees, animals and houses – reminds me of those 3D town diagrams in our children’s museum that I loved looking at as a kid)
I came this close to stopping at B&N with the kids on Sunday for them to play but it was lunch time so we headed home! :)
Sara says
Nice job! My son and I spent many hours at the Barnes & Noble train table several years back – good memories!
Sam Frank says
Love it – what a cute idea! And I’m so excited to see Clara’s hair is starting to grow! I was starting to get a little worried (my hair was already past my shoulders when I was 2)!
YoungHouseLove says
Haha, oh yes, I’m a happy momma! Apparently sometimes thick or curly hair can take it’s time, so we’ll have to see what we end up with! I have wavy hair so that’s my best guess…
xo
s
Kim W Rily says
Don’t worry about the hair. Samantha had the cutest little wispy blonde curls at age 2. Barely hit her neck. Didn’t get her first haircut till she was 3. Now her hair is nearly down to her waist (and won’t let us come near her with scissors.)
YoungHouseLove says
Wahoo! That’s a very exciting prospect for a momma like me. Haha. I have been itching to make pigtails and ponytails for years!
xo
s
Cathy says
I absolutely love it! Fantastic job — as always. We have an old train table out in the shed that I can’t bear to part with since our 13 year old has outgrown it. (It was one of his favorite things when he was little.) I think I will take the top off and adapt this idea for when the littlest nephews and nieces come over. What a space saver. Thanks for sharing such a great idea!!!
Molly says
This table is adorable! I can’t wait until my little guy wants to play with trains, we are totally making this.
Haha and in a non train related story, my husband and I were at petsmary while gramma babysat and there was a little girl about Claras age with short blondish hair and my husband was STARING at her and turns to me whispering out of the corner of his mouth “is that young house love baby???” Itold him you don’t live anywhere near upstate NY so no… But it was super cute :)
Molly says
Argh. Track, not table. Swype on my phone and I are not always friends.
YoungHouseLove says
Hahaha- that’s so cute! I love that!
xo
s
Jennifer says
I think having a set track at Clara’s age is a great idea. My son is 6 and he still enjoys playing on the set tracks at stores like B&N. When I first saw one like yours with the attached tracks I thought that it was taking something away from the toy but after seeing my kids play with the loose tracks that we own by the dozen I think you have the right idea. I am sure some kids love building the tracks over and over again but my kids were always more interested in what came next.
Gabriella @ Our Life In Action says
Very nice – our little man LOVES trains. We made the mistake of buying a train table and he actually never really uses it. He prefers sitting cross legged on the floor and playing with his smaller wooden one. Oh well, ya win some ya loose some. ;-)
Julia says
OMG I totally want to make one of these – for my husband! He would be all over it!!! :)
YoungHouseLove says
Hahahahahahahahah- comment of the day!
xo,
s
Kitty says
The board looks fantastic! I had one of those train sets as a little girl it was by far my favourite toy, and now have one for the small guests who visit us. I’d love to do a train board like this for it and store it somewhere for them instead of having it in the box all the time.
I loved the video with Clara, she is growing into such an articulate and charming little girl!
Christina S. says
I cant wait till the piggy family from the doll house makes a visit to see the train board! So cute, simple and fun! I wonder if you could attach/paint magnets to the board and then do the same to the barn/ house/ trees etc so that she can move things around but it all blends in when its all left blank! Awesome work :)
YoungHouseLove says
LOVE that!
xo
s
Anele @ Success Along the Weigh says
I love that Burger is an obstacle in that one pic. Such a cute vid! “I’m sorry!”
Sara says
Y’all are like the coolest parents ever. Clara is one lucky girl.
YoungHouseLove says
Aw thanks Sara!
xo
s
Tina says
How hilarious that she apologizes (I’m assuming to the “people” in the train) several times for dropping the trains, but then proceeds to delight in crashing the trains into each other!
She’s adorable, and I love the train board idea – may have to convince my hubby that’s what we need to do with our kiddos’ trains.
YoungHouseLove says
Haha, I love that too! Such good manners while mashing them together. Haha.
xo,
s
Karen F says
very cute! and I love how you considered how you’d store it. looks like a lot of fun for Clara! lucky girl!
Isabella says
Brilliant! Our preschooler rarely plays with the train set because the toddler moves the tracks around and makes a mess. What a great solution this would be!
Any advice for attaching plastic Geotrax pieces to wood?
YoungHouseLove says
Hmm, maybe screws would work as well? Or some sort of 3M product like heavy duty velcro or picture hanging strips?
xo,
s
mribaro says
Most of all I like Clara’s lumberjack/ballerina outfit :)
YoungHouseLove says
Hahaha- ballerina lumberjack = hilarious!
xo,
s
Sara says
Yes, very hip outfit!
Laura says
I LOVE this! I have to Pin it, haha.
Did you guys upgrade your Flip to something else? The quality seems better, but maybe it’s just the good, natural lighting!
YoungHouseLove says
We actually have a new camera that does video too! Will have to post about that soon!
xo
s
Sarah says
It looks great! I think nailing down a great idea. She can still come up with creative stories with the track without the mess or the frustration. She will definiitely appreciate the years down the road when baby brother/sister can’t crawl along and destroy her track!
Kristen says
You guys are just awesome! :-)
Kay says
Oh my gosh, Burger on the train tracks! Adorable!
I just love this idea! I’m a children’s librarian and our library has a train table in our children’s room. It is definitely the most popular thing in the library so I can understand Clara’s love.
And as someone who works with children, I have to compliment you on your choice of toys for your little Bean! You surround her with these great toys that definitely encourage imagination and interactive, open ended play.
YoungHouseLove says
Aw thanks Kay!
xo
s
Kirsten says
Too cool! I love it and want one for myself:-) I remember loving my train set when I was a kid.
Bob says
Cute idea, which I will steal. But if I have to read off-gassing one more time…
Lindsey says
Where do you all buy Acrylacq? I couldn’t find it at Lowes or Home Depot.
On a side note, what paint brand do you all prefer (I know you used Behr here)? We used a eggshell Valspar (paint + primer) in our bedroom and sadly there are spots that are more shiny than others (and just forget touching up because it shows even more shiny). We tried eggshell Behr paint+primer in our laundry room and had to do 3 coats! It is also uneven. The other day, we painted our office, and I decided to just get Sherman Williams… and wow! It took 2 coats but the shine is completely even and it covered!
Anyway, I was just curious!
Also, (last think I promise) where did you all get your collection of paint swatches? I really want to get something like that so that I can avoid going to the store a million times for more swatches.. haha!
YoungHouseLove says
We used to buy Acrylacq at a local place (Ecologic) but they have closed (boo!) so now we plan to order it online from a site like greendepot.com when our can runs out. As for our favorite paint, we have pretty much tried it all and the best stuff we have found is Benjamin Moore (awesome coverage, great no-VOC options, the best colors, etc). They don’t sell test pots at our local store, which is why we used Behr for this, just because Home Depot does and they’re nice and cheap. I think we try to strike a balance between using the good expensive stuff with great coverage where it counts (on cabinets, on bathroom walls to stand up to moisture, etc) and then using less expensive stuff for smaller projects like the train board (we love using what we have, so leftover paint is definitely something we reach for too). As for where we get our paint decks, we have bought a few just to have around (most brands sell them and they’re so handy). Hope it helps!
xo,
s
April says
Love it! And love the Clara loves trains too just like my little guy!
Kim W Rily says
Very cute. Max got the train set for Christmas this year, but I insisted, “NO TABLE.” We don’t have that much room. We don’t have a couch we can slide things under, but maybe we could figure somewhere else to store it. (On its side in a closet, or maybe upside down a la John’s picture.)
Hmm…
Sabrina says
I am so doing this for my son’s train set. He has one from Ikea that is very similar and he and his sister take turns hurling the pieces at each other lol Great job guys!
Lesley says
Not sure if anyone has mentioned that the Brio, Circo, Ikea, Thomas, and whatever the Wal-Mart brand of wooden tracks is called are all compatible with the Melissa & Doug sets. Makes for some amazing sale/clearance shopping!
YoungHouseLove says
So cool! Thanks for the tip!
xo,
s
LauraC says
So cute! We were actually set to do this exact thing earlier this summer, but at the last minute we nixed it in favor of building and changing the tracks on the floor. We have a couple sets of tracks (all from IKEA, cheap cheap!) and they can cover the length of their room, make two separate tracks when S+J want to play separately, etc. Glad everyone can do what’s best for their own kiddos!
Whitney Dupuis says
So cute! I love it! I actually almost made a train board for my son and put it on casters. At the end of the day, though, I realized it wouldn’t fit under his bed so I put the idea back on the shelf for another day (and another bed).
Meg says
My older brother had a very similar board for his Brio trains when we were kids. My dad attached casters to the bottom so he could wheel it out from under the bed where it lived when not in use.
YoungHouseLove says
Ooh, I love casters! So much fun!
xo,
s
Ashley says
I just finished building my little guy a barnyard. I used an old cardboard box for the barn and a tri-fold poster board for the base. Folds up nice and neat for storage, and all of the animals fit into the box/barn.
http://thisgirlscanon.wordpress.com/2012/09/01/upcycled-cardboard-box-play-barn-farmyard/
YoungHouseLove says
Smart!
xo
s
Allie says
Lovely! So when can we pre-order your 2nd book full of kiddo furniture/toys?! You two have such a talent at figuring out simple ways to make friendly, practical, inexpensive, PRETTY things to fill Clara’s world! I love that it’s all basic enough that families can put their own spin on what works for them. Keep up the great work!! xo!
YoungHouseLove says
Aw thanks Allie!
xo
s
Elise Reed says
I love that you took the time to screw it down. When I was a little girl, I would’ve been the same way – love to make the the trains to around and around, making up stories about the journey, but actual assembly? Leave that to the future civil engineers, architects, etc! HA!
Amanda says
One of the cutest DIY projects I’ve seen! It’s been pinned! Funny, I think my husband would have more fun making this than our future baby would have actually playing with it ;) Can’t wait to share this idea with him!
Mona O | Renters In Love says
Yes, you can get a “choo choo.” Choo choo! :) You guys are such thoughtful parents.
YoungHouseLove says
Haha, thanks Mona!
xo
s
Heidi P. says
Ohmygosh! I really want to make one now!! Ingenious screwing it from underneath. Thanks for the inspiration!!
kristi says
We made a teepee for our little one. She calls it a teepee peepee.
YoungHouseLove says
Haha- so cute!!
xo
s
Kay says
My son is beyond obsessed with trains. Grandma and Grandpa have spoiled him with one of the train tables like they have at Barnes and Nobel. I wish I would have thought of something like yours so I could store it… At the moment, it is doubling as a coffee table. (To be fair, it gets more use than the coffee table ever did.)
Thomas and Friends makes a wooden Thomas that fits the Melissa and Doug tracks, runs on batteries, and is strong enough to pull trains up and down the hills. If she is fascinated with the movement (like my guy is) then I highly recommend it!
YoungHouseLove says
Ooh that sounds fun!
xo
s
Christa says
We made one of those for my son when he was 2 (he’s now 9). We attached casters to it and stored it under his bed. also added molding around the edges to make a lip so the track and trains wouldn’t slid off as he was rolling the board out from under his bed. We didn’t attach the track though. That’s a great idea. We didn’t paint ours either, another good idea. Hmmm, now that we have an almost 2 yr old, maybe we’ll have to make another one. We still have the trains.
YoungHouseLove says
Such a cute idea! Love the lip and the casters idea!
xo
s
Beverly says
So cool. Clara is so lucky to have the two of you as parents. Not only are you the DIY King and Queen, you feed her imagination with your DIY skills! Awesome… :)
YoungHouseLove says
Aw, thanks Beverly.
xo,
s
Koliti says
For your future toy-line your can endorse it with –
“Burger-Tested & Clara-Approved! Haha!
So now Clara has…umm…err…or Sherry has a Doll House and John has a Train Table.
Love how Clara & Burger can get right in the middle of the action and be anywhere on the board or tracks – well built & beautifully painted.
I applaud you for responding to your child’s needs – children can not articulate what is frustrating them (I bet we all know a lot of adults who have problems with this – haha!) – and if it’s something that results in throwing/crying then that’s not a safe situation for them or others. Sherry & John, you have a great approach in observing Clara and helping her meet her needs! Heck, when Clara’s ready, you’ll wake up one morning to discover that she’s gotten the screw-driver and taken it apart herself!
YoungHouseLove says
Hahahahah, I love that! I wouldn’t put it past her!
xo
s
Ellen says
Pinning this immediately. And man, I wish Pinterest had some kind of alert system or timer, so that when my son is old enough for trains like this, it would alert me with a “Build this project now!” hint.
YoungHouseLove says
Haha- that’s actually a genius idea! A site that reminds you when you’re ready to take something on that you’ve filed away. I’d totally sign up!
xo,
s
Meredith says
goodtodo.com has a similar capability. It’s an online to-do list and you can send “to-do”s to it from your gmail account and it will send them to different dates, recurrances, etc. So, I guess you could name the project and send it to a future date, like someones 5th birthday or somethign and you could go back to pinterest and look when you get the reminder. They have a limited free plan, otherwise it’s $3 a month. But it’s great!
YoungHouseLove says
Smart! Thanks for the tip!
xo,
s
Julie says
My favorite part about it is that you can put it away when she’s not using it. Hooray for kid-friendly houses that are still parent-friendly!
em says
This is great! We were lucky enough to have a friend that gave us his kids’ old train table and even more lucky to have a basement playroom, where the table lives. But, the table top is a rather unattractive solid green and I have been thinking about painting on a scene for a long time. Thanks for the inspiration! Those of you who have 18 month olds who like to put together tracks, that’s great. But, I’m with John and Sherry. My two year old very much prefers to ram trains into the tracks and send them shooting around. He would be much happier if the tracks were fixed. I was thinking of just gluing them down, but, clearly, this is a much better idea!
YoungHouseLove says
So lucky to have inherited one that you can paint!
xo
s
Ashley@AttemptsAtDomestication says
That is so cute! My little sister had a train table in her playroom and it was her favorite toy! And having it fixed for now is a great idea!
I haven’t built anything lately, but I did craft a fall wreath last night! I’m so anxious for cooler weather! http://www.attemptsatdomestication.com/turning-a-new-leaf/
YoungHouseLove says
So cute and fall-ish! Love the burlap texture!
xo
s
Stephanie says
That is the cutest train board I have ever seen. And I love that pic of Burger basically standing on it. I see he is ensuring it’s safety for his little sister.
Also, I am kind of obsessed with Japanese Fern now. What a pretty pretty color.
I need to get on the painting train myself and paint my dresser but I = lazy and sanding = effort. :)