“Who has two thumbs, an Instagram addiction, and just bought a bunch of jewel cases?” I think we all know the answer. THIS GUY had a little art project up his sleeves.
Ever since jumping on the Insta-wagon back in April, I’ve been itching to get some of our photos printed. We just never had a place for them and were always a little wary of the quality through various printers. But a few weeks ago when I spotted a Facebook coupon for five free Instagram prints using Picplum, I ordered away (nothing to lose, right?) and I was pretty impressed with my handful of free 5×5″ prints… so, like the sucker they hoped I’d be, I purchased a bunch more for $1 per print.
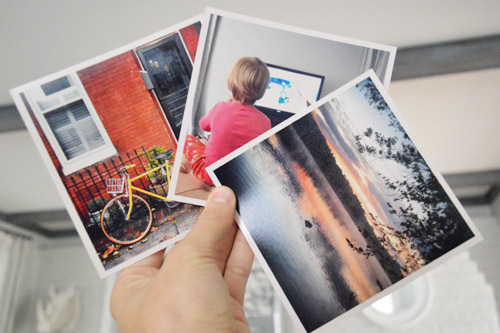
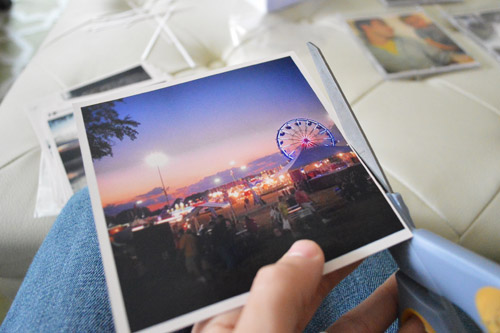
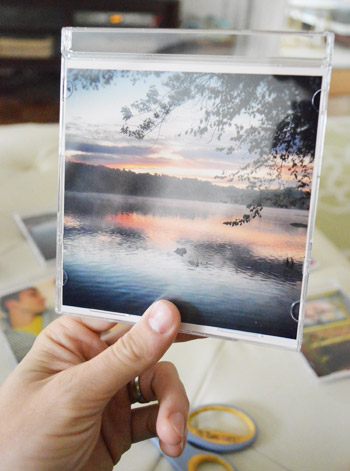
My paid order was fueled by the fact that I stumbled upon something completely accidental. With a tiny trim on two sides, these square prints fit pretty darn perfectly into the front of a jewel case (you know, the clear plastic cases that CDs come in… used to come in?… do I need to refresh everyone on what a CD is?). The only reason I ever discovered this is because my five free prints were sitting on my desk on top of an old CD case, and I realized they were basically the same size.
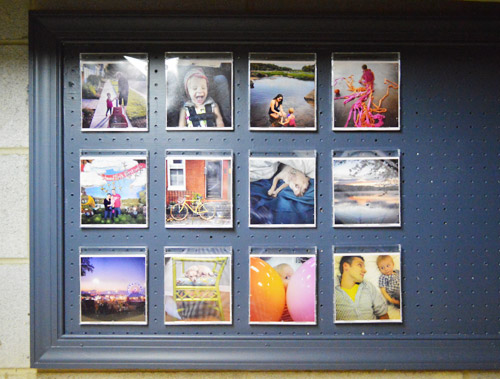
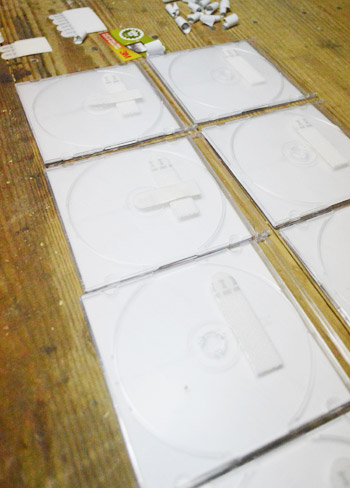
So I swung by Office Depot and snagged a $10 bulk pack of slim jewel cases (there were 30 of them in the pack, and I didn’t need that many, but it was the smallest pack of thin ones, and I thought thin cases would look the best). Then I just slid some of my favorite prints inside twelve of them.
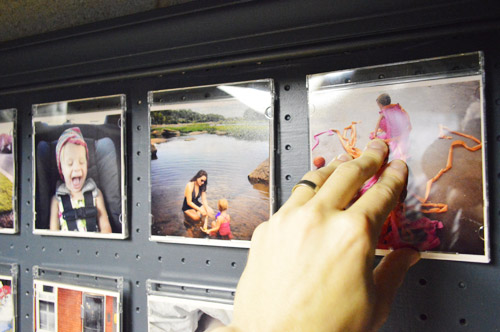
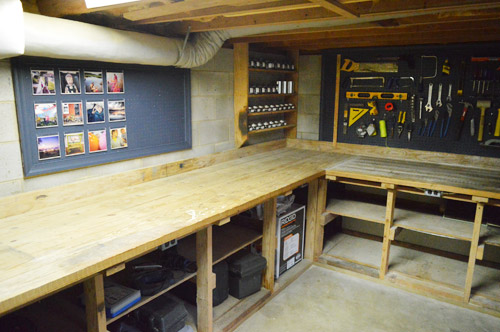
As you may have guessed from that first picture, I’m not designing homemade covers for some stocking stuffer mixed CDs or anything (although I guess this would work for that too). I actually thought they made for a cool way to display photos in my Man Cave Complete With Pegboards as I’ve lovingly come to call the basement these days. Because nothing too precious makes sense down there with pieces of wood and sawdust flying everywhere – but something to cover photos that I want to display (thereby protecting them from said sawdust) might just be handy, right?
It’s certainly not very fancy or overly fussy, but I really like how easy this was and how stress-free it feels. If a rogue screw cracks a “frame” it’ll cost less than a dollar to replace. Plus they look pretty great against my navy pegboard, amIright?
Total cost for each “frame” including the art inside = $1.30. Can’t buy much other framed art for that price, right? And you know Sherry loves to say that geek is the new black. CD cases are bound to be the next mixed tape/eight-track, right?
To hang my grid I just used 3m Command strips (the velcro kind for “damage free” picture hanging). I actually like to use the strips perpendicular to one another (rather than right on top of each other) – that way I have more flexibility to move things around once both strips are stuck in place (I can shift things up and down or side to side a bit that way).
And fortunately the holes on my pegboard made for a great guide when I was pressing them into place.
Ta-dah!

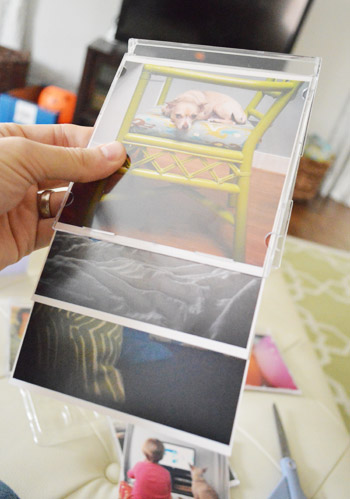
Wanna know a secret? I actually tucked an extra photo or two behind some of them. So if I ever want to mix things up I can just hinge the case open, swap the photos, and call it a day.
And since I have extra photos and extra cases, I can always expand my super classy inexpensive art installation across the whole board down there. But for now I’m leaving it open so I can hang some other non-Instagrammy item on the right. Ya never know when I might come across something else to dude things up down here. Although I’m surrounded by hammers and drills and saws, so I’m a pretty happy guy already.
Oh and every time we share pics we realize that we should mention a few other things on the basement agenda, so here they are:
- stain some of the wood going on down there (like that burned shelf and the dusty and less-forgiving-because-they’re-so-light counters)
- possibly stain the concrete floors (since they’re pretty light and not-too-forgiving either)
- paint the old scratched up door that leads to the basement (yellow like the front door)
- hopefully deal with the exposed ceilings (although there are things like plumbing and duct-work that hang down, making it less simple than just screwing up some drywall)
In the meantime, does anyone else have Instagram art projects up their sleeves? I’d love to hear ’em – especially if you know of other cool places to get them printed on paper, canvas, etc. Oh yeah, and if you want to follow us on Instagram you can find us at (you’ll never guess) @younghouselove.
Psst- We hear the Cultivate quiz from yesterday’s giveaway is still running very slowly/crashing. Looks like they weren’t quite ready for all of you quiz-loving folks! So sorry about that, guys. We hope they get all the kinks worked out soon… and there’s still a $200 gift card for one lucky winner (whether you take the quiz or not), so that’s the good news!

JennieM says
Perpendicular velcro strips?? GENIUS!
YoungHouseLove says
Thanks Jennie!
-John
becca says
I have a random question:
on a scale of its-never-happened to five-times-a-day, how often are your projects (book included) inspired by reader comments? I mean, even if the comment just sparked an idea but you did it a little differently. just curious! I wish I were as DIYcreative as you guys are.
YoungHouseLove says
Often our projects are sparked by stuff we have around since we love to use what we have and are cheap, haha (ex: free instagram photos lying on top of a CD case and us realizing they’re the same size). O they’re based on some functional need (ex: we needed a screen to cover the water heater in our first basement and realized that cheap secondhand bi-fold doors could be hinged to make an inexpensive screen). Many times readers will tip us off to great ideas too! It’s amazing how smart you guys are! It’s usually when we’re already starting on something (ex: we’ll say we have to seal the deck and folks will comment with their favorite stain recommendations, etc). We love the little we-over-share-and-you-guys-share-back exchange that happens here!
xo
s
Teri says
Just an idea, but you could spray paint the ceiling area to disguise all the stuff up there.
YoungHouseLove says
That’s a great idea!
-John
Sarah says
Those look great!
I am still not on instagram, but I have ordered canvas prints from a company called canvaspop (the quality is great).
They have a contest right now for instagram prints (they are giving away one per week).. here is the link.. scroll to the bottom of the page for the contest.
http://www.canvaspop.com/options/print-instagram-photos/
YoungHouseLove says
Thanks Sarah!
-John
Christina @ Homemade Ocean says
NOW I know what to do with all those dang cases!
Seriously those are the one thing I can’t throw away….what if I need them? I know they take up four drawers of our console…but one day…
Now they have a purpose, and my boytoy thanks you :)
Dennis says
Don’t be too hasty to stain the workbench… A light surface can be really helpful during some projects. It’s much easier to spot a fly away screw/nail.
I think an unfinished surface looks much better dinged and splattered etc (a work-in-progressed) rather than a finish ruined.
It might be much more helpful to lay down a grid for easy measurements (like a giant paper cutter). I’m sure one of the big box stores would have that kind of thing. If not, always DIY-able.
YoungHouseLove says
Thanks for the tip Dennis! I agree about liking a dinged up and splattered look, we just prefer “weathered wood” in a darker stain – like the console table I beat up so it looked old! Haha.
-John
Michelle @ Lifewithacrazypup says
Super cute idea! I printed out 72 4×4 prints a few months back on Printsagram. So far, I have some pinned up in my cube at work. They remind me of our little adventures, our pups, and my husband while sorting through excel all day. The rest I just have in a little pile on the tray on our coffee table. Whenever we have people over, they flip through them. I’ve been dying to frame some of them, but alas… life has just gotten in the way. The nerve!
Megan @ Rappsody in Rooms says
Awesome idea on the pictures Even for people like me, who are one smart phone short of Instagram (I’m so Dark Ages but save every month on my cell phone bill) you could do it with pictures you print out at home. And again, way to make a classy basement work space.
Lindsey d. says
I totally used jewel cases as frames for my high school and college dorm rooms (boarding school for high school). Alas, it was pre-Instagram and square pics, so mine were crappily trimmed 4x6s with extra space just left blank. They worked well, though, and could web stand on their own.
YoungHouseLove says
So smart about them standing on their own!
xo
s
Rowena says
What a great idea! I love it.
I have recently used stickygram (http://stickygram.com) to make ours into magnets. The magnets are the size of the photo as it appears on the iphone screen. Such fun and a little bit addictive!!
YoungHouseLove says
So cute!
xo
s
Kim says
We LOVE stickygrams! Our fridge is covered and they are nice and neet and square and dont fall or look clutterd. Perfect for an OCD Mom like me :-)
KathyG says
I totally love this idea! I bet they’ll be popping up in ‘mancaves’ all over. Trending, John.
However, can you explain Instagram a little better to those of us living under a rock? I know what it is, but I don’t know how to get it for myself. It’s not just for I-phones anymore, is it? I don’t do Facebook anymore #familydrama but I do have Twitter. Do I have to have those to use Instagram, or is it standalone? Instructables, please!
YoungHouseLove says
I’m not sure how many other smart phones can use it but it’s a free app and it has great filters to make pics look all artsy and stuff. Hah! That’s my terrible description. Someone else chime in and make more sense!
xo
s
Lindsey d. says
Instagram is available in the Android marketplace as of a few months ago, as well as iPhone. It’s a free app that you can link to your Facebook, Twitter, Tumblr, foursquare and Flickr accounts, as well as email links to the photos to yourself or friends.
You take a picture in the app or pull one from your saved pics on your phone. Then you can edit it with filters, use a brighten/contrast tool, and/or blur tools that help focus the action, etc. The Instagramed pics will save to your phone and you can print or save them to your computer from there.
You can follow people on Instagram and they can follow up back (although you can keep your photos private as well), so you can view your friend’s pics in Instagram, or you can post them to to the above services and people can view them via weblinks.
YoungHouseLove says
Ah yes, much better! Thanks Lindsey!
xo
s
MichelleR says
What a great idea! It’s looking great down there, John. Now if only I could get my husband to straighten up his work space…
Trista says
You should instagram your instagrams :)
YoungHouseLove says
Hahahaha!
xo
s
Ade@fortheloveofpainting says
Wow…such a great idea!
Tracey says
I love it. The navy paint behind the pics really make them pop.
Beth A. says
Great idea — love it!!
I finally jumped on the “insta-wagon” a few days ago and you guys were one of the first folks I looked up to follow:) I’ve only taken two pictures, so I’m a ways away from actually creating something out of my insta-work.
amy says
love this! great decoration for my office at work! :)
Jeannette says
Every once in awhile I make an order of instagram magnets with new pix. My fridge has a ton of them now. I just love looking at these sweet little memories every day.
YoungHouseLove says
That’s cute!
xo
s
Catherine says
You two are so darn crafty!
Brittany says
I just have to comment to say that it’s so sweet to put pictures of the wife and kids down in your man room. Sherry’s a lucky lady- but she knew that already :)
YoungHouseLove says
Amen! I thought it was so cute!
xo
s
Cara says
Such a sweet idea. I can’t imagine most men add “art” to their workbench. Very cute.
Side notes: I LOVE 3M picture hangers and my dog goes crazy for tv. If he sees another dog even himself or a photo of a dog he has to bark like crazy. He has now expanded to include bears, horses and a few other random animals. My husband tried to reason with him by showing him the back of the tv but he is still convinced some animals somehow snuck into our home.
YoungHouseLove says
So funny!
xo
s
Kat says
Totally sending a link of this post to my husband. He’s gonna love John’s mancave. He’s been itchin’ to fix up “his side” of the basement. For the past two years it’s held all my extra crap (yard sale/thrift store finds that need a home). This’ll be just the inspiration he needs:) Love the painted pegboard idea. Totally stealing it.
Lori says
Whoa!! Totally love this!! “Hi, my name is Lori and I am addicted to Instagram.”
Nicole @ Liberty Belles says
looks awesome! who ever thought cd cases would come back into “style” again??
Ashley@AttemptsAtDomestication says
Such a clever idea! They came out great!
Ani says
Super cute (I love your instagram feed!). I printed 35 (free) prints from shutterfly in 6×4, and then trimmed them into 4x4s and lined them up in an ikea stromby frame. What did I do when I finished the project and thought it looked cute? Instagrammed it of course :) http://instagram.com/p/M1_1asmuiC/
YoungHouseLove says
Haha, of course!
xo
s
Kenz @ Interiors By Kenz says
Brilliant.
Lori says
Hanging these with the adhesive strips perpendicular to each other is so smart! I lurve those little strips (we move every 2ish years due to hubs job) and positioning them that way is genius…perfectly aligned placement suits my OCDness and removal would be easier, too.
Now I know what I’m doing with the box of CDs we found when we redid our office last month.
Katie F says
Looks great! I’ve also heard good things about the website kanvess.com and the prints are only a quarter a piece!
Casey @ Waffling says
One year for Christmas, after two of my cats had suddenly passed away in the year, my roommate made me a whole crapload of pictures of my cats in jewel cases and hung them on the wall in my room as a collage. It was so sweet!
YoungHouseLove says
That’s so sweet!
xo
s
Kim @ Yellow Brick Home says
I’ve been wondering of a good print place for Instagrams. Thanks for the tip!
Also, I read “jewel cases” 10 times and kept thinking, why do I know what those are? Why do I know… OH!
Eve says
Those look so cute! I mean, manly! (no but really – they look very snazzy… I just figure cute may not be the best word for a manly workshop.) I see some hot pink and orange and yellow popping nicely against that navy, too. I love this idea – it would be great for our son’s pegboard. I can see using the peg holes as guides for little white finishing nails to hang the cd cases from.
So, since you have a few similar projects on your basement agenda to what we are planning to tackle in our own home, I’m wondering what exactly is brewing in y’all’s brains re: the ceiling? We eventually want ours to function as a rec room/craft room/exercise space (we have 900 sq ft to work with) and I sort of do love the industrial look of painted cinderblock walls and exposed beams/ductwork. My husband was going to use a paint sprayer to paint all of the beams/walls/ceiling white before putting down laminate floors and baseboard trim. But I’m wondering if painting the pipes/wire is asking for disaster…?
YoungHouseLove says
Ours has exposed insulation so we don’t think painting will work (it’ll just be gross furry painted insulation) so we have talked about trying to hang beadboard or drywall, but it might just be more involved since we’ll have to box out pipes and stuff. I don’t know about painting pipes and wires. Probably can’t hurt them since they have a thick protective coating, but maybe if the pipe has hot water it could bubble the paint off over time. Anyone know?
-John
Lisa R. says
Why not stick with the pegboard theme down there?
http://www.yelp.com/biz_photos/monza-charleston?select=Etau_ED-uvCXQ8xNKWXZnA#Etau_ED-uvCXQ8xNKWXZnA
Okay…that one is a little fancy for a basement perhaps, but you could just use pegboard to cover the ceiling and then use some hooks for additional storage. It would be easy to use and paint and would still be open and provide ventilation, etc. It would give you some coverage, but be easier than drywall to get down if you need to make a repair, etc.
YoungHouseLove says
That’s smart except for some things hang into the space (vents, pipes, etc) so it’s not all flat. I wish we could just slap beadboard or pegboard up there are areas that will have to be boxed out, etc.
xo
s
Lisa R. says
You could box them out with the pegboard though, instead of traditional drywall…that would likely be easier and keep it consistent. You wouldn’t have to tape and mud or sand anything, just put up the pegboard and paint.
YoungHouseLove says
That’s true!
xo,
s
Victoria says
Eve, we’ve used a paint sprayer to paint our exposed joists/ceilings/pipes/wires and all in a few basements. We just made sure to use a good bonding primer first (we use Zinsser) to make sure the paint sticks and prevents rusting or whatever. It really makes the basement look more bright and finished (even thought it’s not!) and you still have access to all the utilities.
http://frankfully.blogspot.com/2012/09/our-unfinished-basement.html
Karen @ yearofserendipity says
you’re shaming me with you nice organized work area. Mine’s beyond a disaster, I’m jealous! Wanna come over and work your magic in my basement?
YoungHouseLove says
Sure! Be right over!
-John
Kelly says
I was reading a different blog and they mentioned that Blurb has Intragram books. Little 5×5 books. Here is the link! http://www.blurb.com/instagram-books
YoungHouseLove says
Those are great!
-John
Tracy a says
What a great idea! Thanks for sharing!
heather says
This is a cute idea for the art inspired basement, to keep them clean amidst saw dust, etc. On another note, my style on those quizzes always comes out interesting. Today I was “transitional” and another quiz called me “traditional modern” (Say wwhhaat?! What does that even mean?!). Apparently I like clean lines with a “nod to the past”. Also according to the photos of this “transitional” style, I like exposed beams.
*shrug* Can’t argue with that. Says the girl who loudly and persistently suggested keeping the roof trusses exposed in the addition. I’m a book – read me!
YoungHouseLove says
Hahahah!
xo
s
Linda says
We are working on our first home improvement project, and it happens to be the basement ceiling. From the floor to the joist it’s 7’2″ and we can’t sacrifice any height but want to have access to pipes etc like you.
We’re looking at a couple of options:
1. Ceiling tiles via A direct mounted top track. The company we found is called “CeilingLink”.
2. Drywalling but having several access panels in key locations.
In our home the basement is going to be part of our living area so it’s a little different than yours. I’m excited to see your solution.
YoungHouseLove says
So smart!
xo
s
Missy says
I LOVE this! I have an empty spot in our family room and didn’t want to hang the traditional framed group of family photos. Also have a great big frame that I found curb side and wanted to use in the house, thanks for this great idea!
Krystle @ Color Transformed Family says
Such a cute idea and very practical for John’s man cave. I really need to print some of our instagram pics out. They are just too cute to be stuck in cyber space.
Michelle S says
I too have an Instagram obsession! The frames and effects are so much fun. It’s actually become a family affair. My 7 year-old has the Insta-fever too.
My son and I are turning our entry way into an Instagram gallery with a little wood, Mod Podge (that stuff rocks), some paint, and a few stray frames strung with wire. Who knows what we’ll get with a 7 year-old as the job foreman.
YoungHouseLove says
That’s so sweet!
xo,
s
Larissa says
Wait. So you PAID for jewel cases???!!!
Just kidding. I love that you have family pics in your work space. Good man.
Mary says
LOVE this idea!! Thanks so much for sharing! :)
Mary says
What do you think we could put on the back to make the cd cases into stand-up picture frames? They are the perfect size for my desk at work! I would love to have more of the artsy shots while at work!
YoungHouseLove says
Hmm, maybe cheap little votive holders so it could lean against them? CD cases themselves can stand up, but then the pic wouldn’t be covered like a traditional frame I don’t think.
xo
s
Megain says
Ok so this idea rocks!!
As much as I would like to say that you guys are totally overated…you come along and do something like this that just knocks my socks off! So easy, so simple…yet I would have never thought of it.
Damn. You are good.
Jill says
Eek! This gave me a fabulous Christmas idea!
Take some Christmas-y instagrammy pics, make an indie Christmas CD, put the photo on the front of the Jewel case and the song list on the back, and WHAMMO! old-school Christmas gift for people like me who are cheapos (i.e. on maternity leave with a student for a husband).
Caitlin @ Desert Domicile says
LOVE this idea! You guys are so clever :)
Kelly M says
Love that idea! The jewell cases are brilliant.
I actually just made some Instagram magnets for my daughter to play with. I tired to find as many photos as I could of our family members and then printed them on a magnet sheet. She plays with them every day picking out the people we talk about and rearranging everyone. My post about it actually just went up yesterday…must be an Instagram week in blog land :)
http://www.aswellplacetodwell.com/2012/11/instagram-magnets.html
YoungHouseLove says
That’s REALLY CUTE!
xo
s
Lisa says
I think someone already mentioned it,but Instagram magnets from Stickygram are a great idea for stocking stuffers!
http://stickygram.com/
YoungHouseLove says
Those sounds awesome!
xo
s
Bree says
Love that!!
I think you should flip them over so they look more like a Polaroid!! The photog in me kept trying to mentally turn them around, lol.
Thanks for the picplum recommendation!
Bree says
You could even write your instagram comment underneath.
YoungHouseLove says
Hahah, brilliant!
xo
s
YoungHouseLove says
Haha, that’s true!
xo
s
Linda says
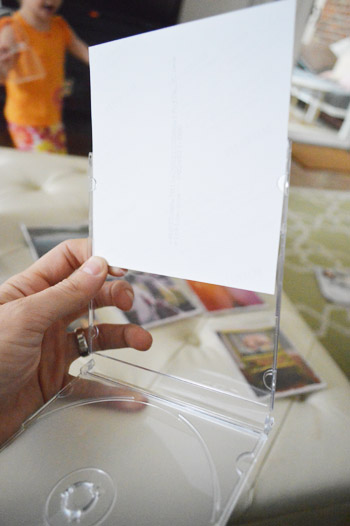
What a great project! I’m new to Instagram and need to work on figuring out the best way to edit photos – I guess taking them with the phone first, editing then moving to Instagram? Anyway I had no idea they were printable! Are the thin jewel cases you used thinner than standard CD cases?
YoungHouseLove says
Yes, they’re only thick enough for three pieces of paper/prints (not super thick like some which could hold 15 pages).
xo
s
Morgan says
Brilliant! Love how you’re personalizing the workshop. :)