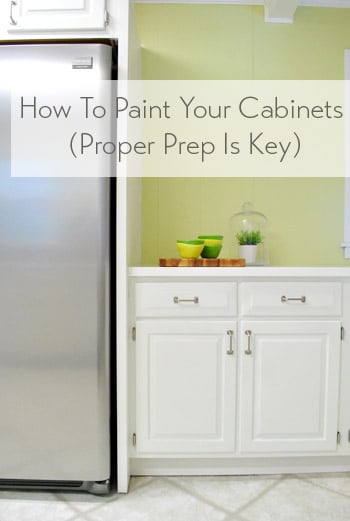
Painting your kitchen cabinets is a perfect way to give a dated kitchen a fresh look, without splurging on a big overhaul. It doesn’t cost much and with the proper preparation, it’ll look great and last long. We’ve outlined each of the steps below, including a video recap of all of the steps that we used to updated our wood kitchen cabinets.
(Rolls up sleeves, looks into the mirror, smiles, fixes weird fly aways, and whispers “let’s do this.”)
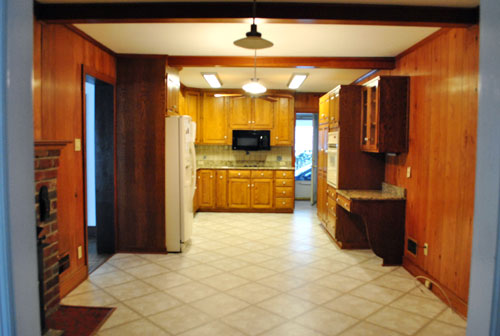
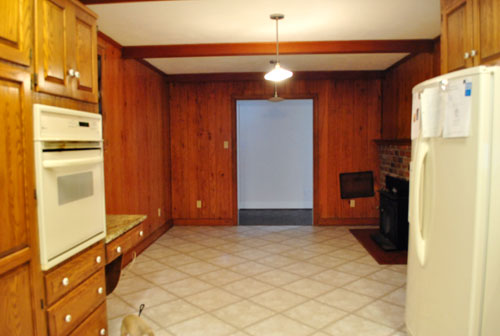
It’s finally here. The day that we get to wake up and pad into a kitchen that used to look like this…
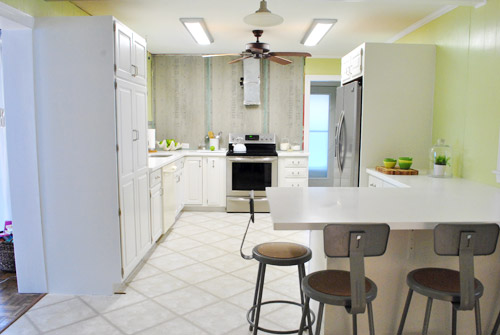
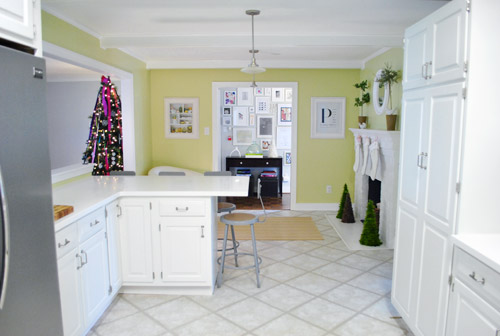
And see this…

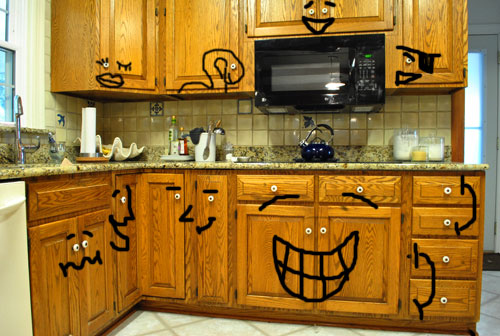
So here’s how we did it from soup to nuts. Wait, first let me gush a little more. Seriously, it doesn’t even feel like the same room. Scroll back up and picture yourself standing next to the fridge in the “before” shot. The cabinets felt about two feet away from you on all sides. I can’t explain it, but it was like the room didn’t respect my personal space and was always inching towards me. It was all up in my area. Now when I stand at the sink or pantry, I literally feel like I could perform a small musical number (with a minimum of six Glee backup dancers). It just feels so much roomier. Plus no weird cabinet knob-eyes are looking over my shoulder anymore. Bonus.
But let’s get back to the present. Ahh, much better.
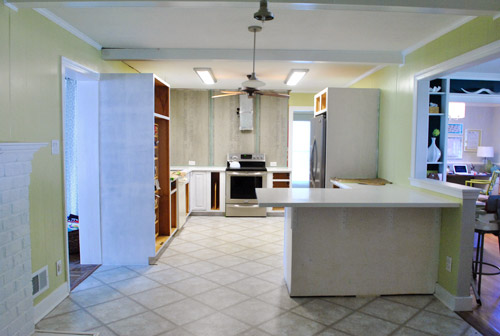
Our big cabinet-painting victory hardly happened overnight. We’ve been slowly working up to this sucker for a while now. First we painted the paneling, the fireplace, and the beams. Then we rearranged our cabinets a bit, got new appliances and, oh yeah, got a big beautiful hole busted in the wall. Then some cabinets came in, others came down, and eventually new counters made their way to us. Finally, the painting project was upon us. So first came the primer…
… and, at long last, the paint. Speaking of the paint, we used Benjamin Moore’s Advance paint in Cloud Cover in a satin finish (it’s a soft tonal taupey-gray color, so it’s not quite as bright as our glacier white counters for a subtle layered look). Benjamin Moore Advance paint actually came recommended by a few pro cabinet painters that we know. We went with the satin finish because it’s specially formulated for cabinets (they actually came out with satin first and only added semi-gloss later to help folks who wanted more shine). We used it on our office cabinets a few months back (which still look great after Clara has beat on them relentlessly with wooden fruit) so it’s safe to say that we’ve been extremely happy with it. The fact that it’s low-VOC, self-leveling, and amazingly durable is pretty much the best thing ever.
Since a bunch of you have asked, here’s a rough timeline of the cabinet painting process (we just worked on nights after Clara went to bed and weekends during her naps, so it’s a good indication of what anyone with a day job might be able to follow):
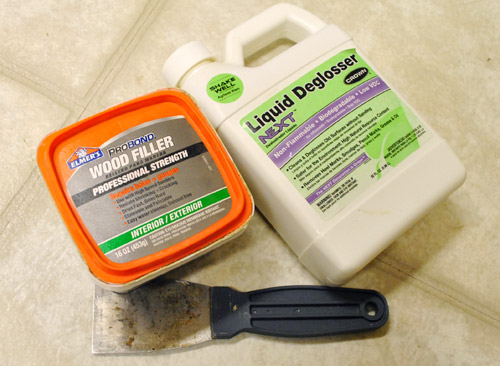
- Day 1: We removed the cabinet doors (including drawerfronts) and hardware (including hinges), applied wood filler to cracks and hardware holes, let everything dry for a few hours, lightly sanded the putty spots by hand, and refilled them with a second layer of wood filler wherever necessary. We did the same to the cabinet frames. Our wood filler of choice was Elmer’s ProBond Professional Strength Wood Filler.
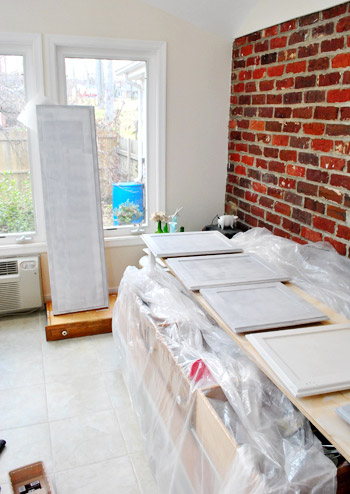
- Day 2: With the wood filler completely dry, we used a palm sander to smooth any putty spots and rough up all cabinet doors in the sealed off sunroom (it’s a dusty job). We then emptied out all the kitchen cabinets and covered appliances with drop cloths so we could also use the sander on our cabinet frames (roughing everything up = better adhesion). After everything was sanded, we wiped it down with a liquid deglosser (we like Next from Home Depot because it’s low-VOC and biodegradable). Read a lot more on the puttying, sanding, and deglossing steps of this process here (there are lots of pics too!).
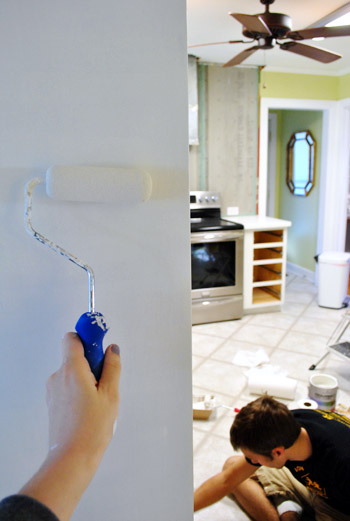
- Day 3: Cabinet door backs and cabinet frames were primed (we love Zinsser Smart Prime which is high-quality, stain-blocking, and low-VOC – the primer trifecta). We applied it with a high quality 2″ angled brush to get into all the cracks and a small foam roller to smooth everything out and ensure that we were applying super thin and even coats (there’s a video of the application process a bit further down in this post)
- Day 4: We flipped the cabinet doors over and primed the fronts, leaving them to dry another 24 hours, just like the backs. Read more about the priming steps of this process here (there are extra pics too!).
- Day 5: With the primer all done and dry (be sure to read the can – ours said not to over-prime, so one coat did the trick), during Clara’s nap we flipped the cabinet doors over again and painted one coat of paint on the backs (we used Benjamin Moore’s Advance paint in Cloud Cover). We applied it with a high quality 2″ angled brush to get into all the cracks and a small foam roller to smooth everything out and ensure that we were applying super thin and even coats (there’s a video of the application process a bit further down in this post). Clara woke up before we could paint the frames, so after she went to bed that night we put a first coat on the cabinet frames.
- Day 6: We applied a second coat of paint on the back of the cabinet doors and the frames after Clara went to bed. As for applying any sealer or topcoat, the general pro recommendation for cabinet painting is to use high quality stain blocking primer and 2-3 thin and even coats of super high quality paint with ample drying time between coats (Benjamin Moore’s Advance paint is meant for cabinets without any top coat, since sealers can drip, yellow, and even cause things to stick/crack since they thicken the application).
- Day 7: We gave the doors a full day to dry before flipping them over and applying a first coat to the fronts (the reason we did the backs first was that just in case the backs got marked up while we painted the front, at least the front would remain pristine). The day of drying time did the trick though, so the backs look as good as the fronts.
- Days 8 & 9: We applied the first and second coat of paint to the front of the doors over these two days. Read a lot more on the puttying, sanding, and deglossing steps of this process here (there are lots of pics too!).
- Days 10 – 13: We let the doors dry and cure for the recommended time on the can (always read the can!).
- Day 14: We drilled for and installed the hardware on all of the doors (more on that in a sec). We also hung the doors but ran out of time before getting to the drawer fronts.
- Day 15: We installed hardware on the drawer fronts, put the drawers back in, and restocked the kitchen. A droopy but spirited happy dance also ensued.
All that info above (and those three bolded links to the previous posts on puttying/sanding/deglossing, priming, & painting) should be enough to get you going on any cabinet-painting project – but just because I always think a video is worth a thousand pics, here’s a quick one that runs through the process for you. Although at some points I’m so delirious that I make up words (putty brush?) and refer to primer as paint about a dozen times. But it definitely can be helpful to see exactly how to putty a hardware hole or how to prime and paint a cabinet door. Enjoy!
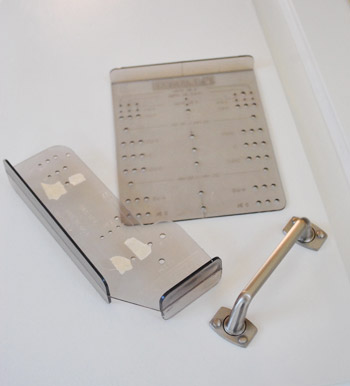
As for the hardware installation details that we promised in our timeline above, we bought these handy Liberty Hardware guides at Home Depot for $7 to help us place everything evenly (centered side to side, and consistently at the same height so all the doors match up). Let’s call it the best seven beans we’ve ever spent (it’s incredibly nerve-wracking to drill through your freshly painted cabinet doors, to say the least – so any tool to make it more of a science is a friend of mine). My only tip is to double check everything ten times before drilling. And see those white blobs on the template on the left? Those are small pieces of masking tape that we used to surround “the good holes” (the ones we were using) so we didn’t accidentally drill into the one to the left or the right.
We also realized that using a small piece of scrap wood would shift all of the handles a smidge closer to the edge of the door, which we realized we liked best (after holding the handle in various places on the template). So we used this scrap wood piece…
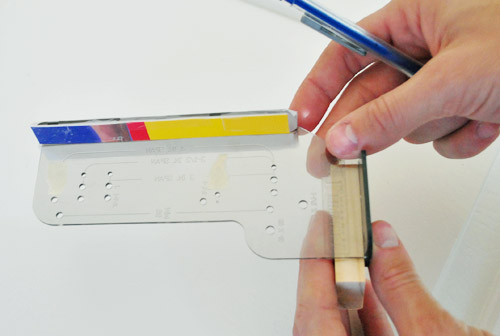
… for marking each door with a pencil…
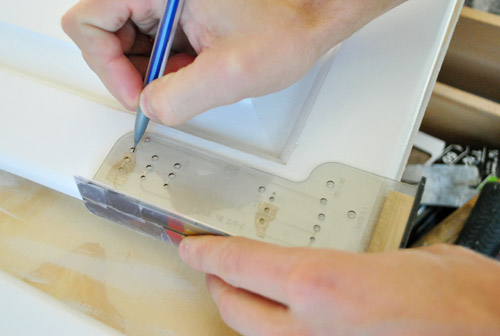
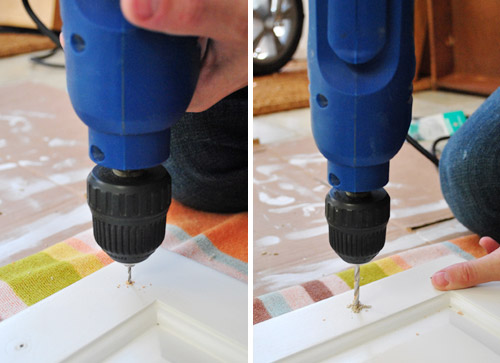
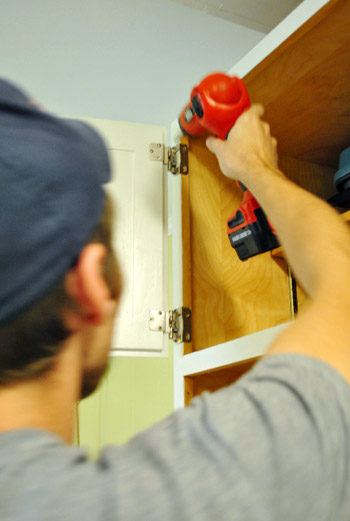
Then John drilled a small pilot hole first (to make sure he was going straight into our marked dot and ensure the wood wouldn’t crack or splinter). Then we went back through with a larger drill bit that would allow the screw that was provided with our hardware to slide right on through.
By some miracle, everything ended up looking nice and even. Whew. You know how sometimes when you reuse something (ex: our oak cabinets from the early 80’s) you think it’ll somehow be wonky or look cheap after something like a paint job? I’m happy to report that they look so solid and amazing. We had completely new cabinets in our first house’s kitchen (to the tune of 7K – ouch!) and we’re just as happy with these. I guess sometimes solid oak from 30 years ago is just as good as solid oak from today. Haha.
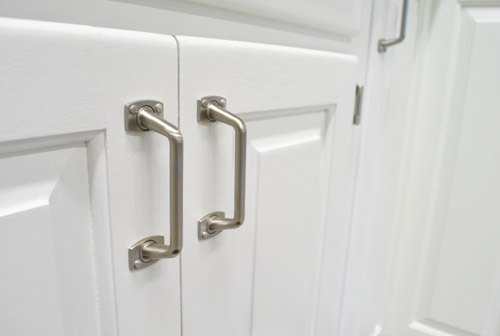
Oh and our new hardware is from here for $3.24 per handle. We love the way the satin nickel looks with our stainless appliances (and we think the soft gray backsplash will only add to the fun. We got all the same hardware for every door and drawer, but just placed them horizontally on drawers and vertically on doors. Speaking of money, here’s our entire budget breakdown:
- Wood filler (Elmer’s ProBond Professional Strength Wood Filler from Home Depot): $7
- Primer (we used Zinsser’s Smart Prime from a local Benjamin Moore store: $22
- Benjamin Moore’s Advance paint (in Cloud Cover in a satin finish): $40 (thanks to a coupon)
- All new hardware (see that link above): $84
- All new hinges (from a local hardware store here called Pleasant’s): $89
- Hardware templates (by Liberty Hardware from Home Depot): $7
- Total cabinet makeover total: $249
Not bad when you compare that to the 7K total of the new white cabs that we selected for our first house’s much smaller kitchen. Le yikes. And we love that we added an entire peninsula with secondhand cabinets for under $95 (one of them was even free) – which is definitely one of those DIY coups that makes ya proud. All that storage and extra workspace is already coming in handy.
Anyway, to get back the whole putting-the-room-back-together thing, after we added the hardware, we just needed to reattach the hinges…
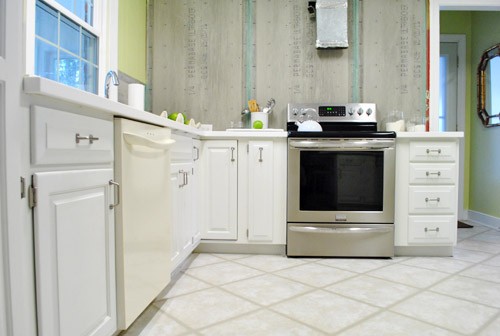
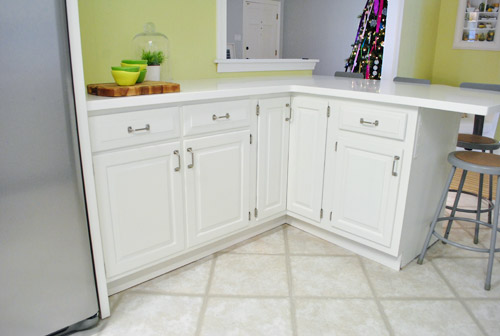
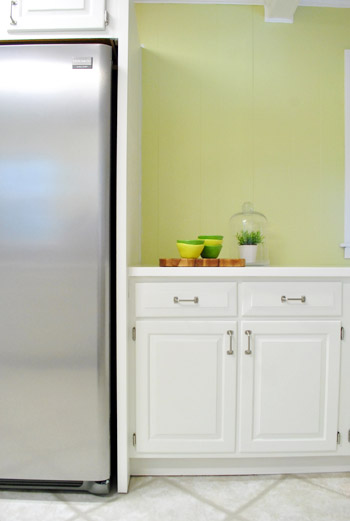
… and enjoy the view (don’t mind the clashy dishwasher- we’ll install our stainless one after we lay the cork floors so they’ll run underneath it).

I’ve totally been doing that thing where you spend way more time in a room than necessary, just staring at things. I keep gravitating towards the kitchen (ex: Clara, let’s go read this book on the floor next to the refrigerator!).
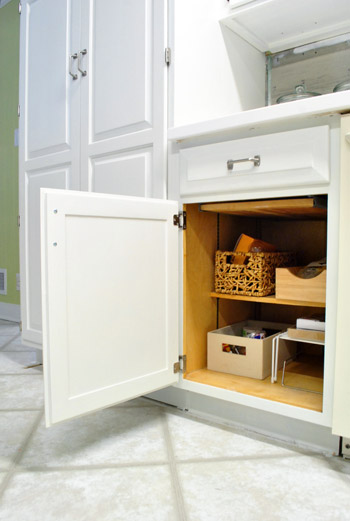
Oh and here’s a shot of how things look with the natural oak color inside the cabinets while the doors and fronts are painted. We don’t mind the two tone look at all, and this way we can toss things in there and pull them out without worrying about scratching or peeling paint (we did the same thing in our first kitchen and in our office built-in cabinets, and they really hold up nicely). Our tip would be to just keep a nice clean line around the frames when you prime/paint them (using a small foam roller sort of does that for you). That way it looks intentionally two-toned and not crazy-sloppy when you open the door. And yes, that is a slide out cutting board. Our cabinets may be old, but they still have their tricks. Haha.
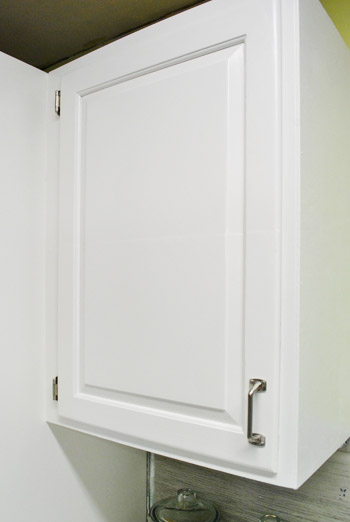
For those who can’t watch the video above to see my shot of the painted cabinets up close, the picture below might shed a little light on the whole oak-grain thing. Using high quality primer and good self-leveling paint helps hide a lot although it doesn’t guarantee 100% invisible grain (we don’t see any evidence of grain on the oak cabinets in the office but do see a hint of it on the kitchen cabinets, so it probably just depends how much grain your cabinets have to begin with). We don’t mind painted wood that looks like painted wood though, so a little grain is ok with us, as long as the paint is nice and even and glossy.
Words can’t express how much additional function/workspace our little peninsula added to the kitchen. It’s amazing to think that none of these cabinets were here before our makeover! And the fact that we gained a 3 x 5′ counter on that peninsula already makes eating/baking/spreading out and doing crafts there a regular occurrence.
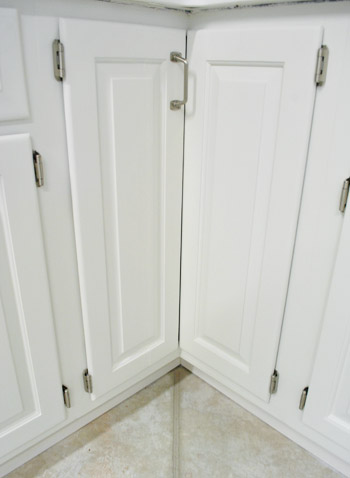
We mentioned in this post that two of the retrofitted cabinets were 100% seamless, and it’s these babies in the corner. We don’t think Sherlock Holmes himself could tell, even with his nose an inch away from them. Hurrah!
As I mentioned here, the three other retrofitted doors are tad less than perfect. By this I mean if you look at them from an inch away for five minutes (bobbing your head back and forth to catch the light bouncing off of them) two out of ten people might notice a tiny seam. The cabinet hanging above the cereal jars in the photo below is one of them. See how it’s almost impossible to pick up from far away…
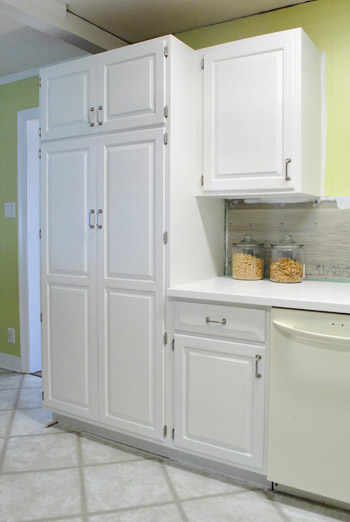
But when you get super close and the light hits it just the right way you might be able to catch a super subtle horizontal line? In person it’s so unnoticeable that we can’t decide if it’s worth doing anything about, but we’ll keep you posted if we decide to sand them one more time and use some sort of buildable primer and a few more coats of paint to hopefully make them as perfect as the two corner cabinet doors are.
I don’t know why I love this shot but I do. John’s totally my hero for figuring out how to build in the fridge like that. Mah man.
Oh my gosh, can you even believe that room looked like this last December when we moved in? In case you can’t tell, it’s hard for me to wrap my brain around that.
The doorway to the dining room definitely helps bring the light in – and the glossier cabinets and bright white counters definitely brighten things up too.
Here’s the other side of Dark City:
And the same view now that I’m the Mayor of BrightVille!
Of course there’s still tons to do, like…
- hang our backsplash tile
- add floating shelves & a range hood
- redo all the lighting (two pendant lights over the peninsula + inset lights in the cooking area)
- install our mocha cork floors (can’t wait to balance out the brightness with some rich contrast!)
- install the new dishwasher
- add quarter-round and crown molding
- possibly tweak our stools (we’re waiting for the room to take shape a bit more)
…but it’s definitely progress. Hooray, progress. So who’s about to embark on a cabinet painting adventure of their very own? I hope this post full of details (and especially that little video we whipped up) come in handy! Have fun and don’t forget to make up words (might I recommend putty brush?).
Update: Our painted cabinets are still holding up great. Check out a little update post here.
Psst – Wanna know where we got something in our house or what paint colors we used? Just click on this button:


Mel says
Beautiful! Congrats on the huge step!
Stephanie N says
So nice!
I have talked about painting my kitchen for over a year. But my cabinets are some sort of laminate over pressboard, ie cheap and nasty. But I tried it out on a sample and not bad! I was wondering about the front and back and how not to get marks, so thanks for sharing!!!!
YoungHouseLove says
Good luck!!
xo,
s
Sarah says
Love it! So pretty! I have to laugh honestly. When my husband and I were going to paint ours white, and the walls green, I saw what you guys were doing I was like “I can’t believe it, they have green and white too” We must just like white and green kitchens haha ;)
Check it out – http://ssimplyme.com/2012/01/04/im-dreaming-of-a-white-kitchen/
It’s not completely done, but getting there. White feels SO much cleaner!! :)
Sarah says
try this link. http://ssimplyme.com/2012/01/05/im-dreaming-of-a-white-kitchen/ oops
YoungHouseLove says
Wow- so pretty!
xo,
s
Shirley says
Amazing, just amazing. I am in awe of your talents. You have inspired many to realize their dreams on a budget!..Bravo!
Emily says
I’m just curious if you were dealing with ALL real wood, or if you had any fake veneer side panels, like we do. Our cabinets are that cheap builder-standard oak, and some areas appear to have what almost looks like a big sticker covering particle board of some sort. I would love to paint the cabinets white, but I’m nervous about those fake side panels.
So I’m wondering if you’ve ever come across this and what your solution was :)
YoungHouseLove says
Hmm, we had all solid wood cabs and sides but I would imagine any sort of panel of veneer or pressed wood should take primer and paint well if you gently sand and degloss and use high quality paint/primer. Good luck!
xo,
s
Karissa says
Emily, we have exactly what you do and priming and painting the side panels worked great. We ended up using wood filler on all of the oak door fronts and backs (to get rid of wood grain), but with the side panels, it wasn’t necessary and they came out with a very smooth finish.
Good luck!
Sara says
It’s so amazing that you two can look at a room like the “before” picture and visualize “after.” So many people can’t see past the surface when they buy a house, and they end up passing up something that could be fabulous just because it had dark paneling. Kudos to you for having that vision and making it a reality!
Catherine says
Nice work!
Having just painted my cabinets too I know how much patience and time this takes. Question – even after letting your paint cure for a few days, do you guys ever run into the paint getting scraped/knicked off? I used primer and Benj. Moore paint, allowed the drawers to cure for a week, and there is still the small occasional chip that I’ll need to touch up. Has this happened to you? How would you fix it? Thanks! Can’t wait for the floor to go down.
YoungHouseLove says
We haven’t had any issues with that- hmm, I’m not sure what you could do. Maybe bring the chipped door or drawer to a Ben Moore store and ask what they recommend? They might have some secret to level things out with a topcoat or something.
xo,
s
Meghan says
I love your blog. It might be the best 2 minutes (or in the case of this post, best 10 minutes) of my work day :) Your kitchen renovations could not come at a better time for me, as I’m beginning the the process of planning for my own kitchen renovation/update which (thanks to you guys) will include painting my existing oak cabinets. I apologize if I missed this in the comment section but I was wondering:
How did you decide to paint with a brush and roller vs. purchasing a sprayer that connects to an air compressor (lord knows you guys do enough painting)?
YoungHouseLove says
Haha- we just like the control of a roller and brush and have always been happy with the results. Worrying about drips from a sprayer or having to clean it feel higher maintenance to us (probably just a go-with-what-you-know thing, because lots of folks love a sprayer!)
xo,
s
Michele says
A-M-A-Z-I-N-G transformation — even with the cement board on the walls instead of the backsplash. What a transformation!
Debra says
Looks Great! What a huge difference. Congrats! Can’t wait to see it with the backsplash!
Wom Mom Ethne says
Superb. I think you should forever memorialize your old eyeball kitchen by hanging a little pic of the eyeballs and faces you photoshopped above (and way back in its original post) in your wall of photos. ~Ethne
YoungHouseLove says
Hahaha, that’s actually hilarious and quite possible…
xo,
s
Jazmin says
THANK YOU!!!!! THAT VIDEO IS WHAT I NEEDED TO SEE! i have ruined many small projects, because I didn’t really know all the steps! I now feel like I can do my kitchen!!!
Jazmin
YoungHouseLove says
So glad!!
xo,
s
Meg Smith says
It looks amazing, guys! Love the heart pride after a job well done. Don’t you? Like inner beamingness!
Violets and Cardamom says
Wow!! It is looking so lovely! I can’t wait to see it when you have the dark colored cork floors in!
Morgan says
Just gorgeous. When I feel frustrated because painting a room takes me forever to get crisp and smooth and “TA-DA” worthy, I imagine my painfully-slow painting is just me loving every last square inch of our home. Like, man. I KNOW this corner of the room now! You guys certainly deserve to feel that way about your cabinets, frontwards, backwards, inside-out, and upside-down. Congrats, guys. You earned it!
Amy Dash says
Wow, the cabinets look brand new! Can’t wait for more photos of the finished project from different angles. I noticed you used the same photo (2nd one posted) four times in this post, at first I thought my page was loaded funny!
YoungHouseLove says
Haha- I just love the full shot so much! Walking in from that hallway and seeing it from that direction is the best! I’m sure as we tile the backsplash and tackle everything else on the list there will be tons more photos/angles for ya!
xo,
s
Becca says
This looks lovely – congratulations!
eileen marie says
I seldom comment anymore (trying to help you with that balance thing -less comments to read!), but I wanted to offer you a sincere thank you for this! A lot of the houses we have looked at in Evanston (home of Northwestern U!) have grotty old kitchens, and IF we move, we might have to paint cabinets, and so will reference this uber-helpful post.
Also, congrats!! You have gotten me so excited to see the rest of the makeover after having seen the amazing transformation so far from the changes you have made! It took me until the end of the post to come around on the hardware -love it.
Sarah says
So excited to see all this progress on the kitchen. Not gonna lie– it’s always my favorite room to see being made over! Just one question, did you guys ever pin down what you were going to do to the back of the island? I think I remember you considering adding some sort of accent? Can’t remember what post this was in or the details! Good luck!
YoungHouseLove says
We’re waiting to see how the room comes together (ex: if the wall of backsplash should be the only focal point, etc) and then we’ll make the call!
xo,
s
threadbndr says
That’s an AMAZING change.
I’ll eventually be doing my kitchen cabinets. I was NOT looking forward to doing the insides, but now that I’ve seen yours, I really like the natural wood interiors! I’m much more comfortable with the idea of painting now, thanks to your tutorials. I also am glad that I have totally flat door/drawer fronts, and will be reusing the existing vintage knobs – less putty!.
The kitchen probably won’t be this year – this is the year of decluttering and doing bedroom painting x 2. But it’s on the list!
YoungHouseLove says
So glad to help! Good luck with everything!
xo,
s
Ann says
It looks like another room!
Ashley says
What an inspiring post!! We’ve been working on our kitchen for a while now. It all started a few Thanksgivings ago, when I went to put my 14 pound turkey in the built-in oven in my “new to me” house and it wouldn’t fit!! I had to cook it on my gas grill that year! So fast-forward to now and my dad has been helping us DIY a kitchen remodel – moving some cabinets, adding a regular range, and even moving the fridge location. We are now to the point of painting the oak cabinets and I have been anxiously watching your progress for tips.
I purchased the Smart Prime (had to go to Richmond to get it!), and tried a bit on an extra door. After it dried, I tried the scratch test and the primer scratched off easily. I’m concerned about the durability of the finished product. Did you all do a “scratch test”?
YoungHouseLove says
Hmm, did you sand and degloss first? That might help! Also a lot of primers are “open” for a while (3-4 days, which is when you need to apply the paint) and then they become “closed” meaning that’s when they really do the bond/cure thing (while the paint is on them to hold them super strong) so maybe the scratch test doesn’t work when it’s still open, but once you paint and give it a few days it’ll close! Ours definitely don’t scratch off! We have already been manhandling them!
xo,
s
Hesper says
Gorgeous! I have been wanting to do this for like 4 years. I have just emailed this to my hubbby. Maybe I can get him to agree to start the project as a V-day present! lol
Emily says
Looks incredible! We’re getting ready to paint our cabinets white, lay ceramic tile and replace our appliances as well! And I might be petitioning the hubby for new counters and backsplash…. we’ll see how that goes! Either way, I’m dying to get to it so I can submit a reader re-design :D
ScullyPA says
Wow that is so fabulous! I am currently painting our bathroom vanities, and that tip about painting the back first would have come in handy. :( Like you, I didn’t feel that replacing solid wood vanities made much sense, so was inspired to try painting them. I did the same thing, choosing not to paint the insides, but for me it was sheer laziness and because I used a dark brown, I thought that might make it like a cave to find things inside.
I REALLY think that the bar stools need to be some sort of funky color now, for pop. That would be fun in there!
Whitney says
OK, I love it but I have to ask you a crazy question about small details. :)
When you take the cabinet doors off the hinges, did you putty in those holes, too? And the re-install the hinges? Or do you use the existing holes?
Thanks for you great ideas and inspiration!
YoungHouseLove says
We checked that the new hinges matched up with the old holes (they didn’t) so we puttied the old ones, sanded, and John drilled new hinge holes before we painted. They still worked when everything cured up so we were all set!
xo,
s
Patti says
beauty.full!
Sharee A. says
AMAZING! And you’re home improvement show airs when? :-)
Jake Johnson says
Beautiful!
Claire @ Claire K Creations says
It looks amazing. You guys have done the most amazing job!
Elizabeth says
Wow, it’s so amazing how much brighter it looks with the white cabinets!
Melanie says
Everything looks amazing! Can’t wait to see the finished kitchen.
Is the paint/primer you used an oil based or latex?
-Melanie
YoungHouseLove says
Everything oil-based is high-VOC but companies are coming up with things that are called aklyd based, which is this magical stuff that has the durability and smoothness of oil without being as stinky (or taking as long to dry). So our paint was aklyd based, and I think the primer was too! Hope it helps!
xo,
s
Marybeth says
I just did cork floors on my enclosed porch that I got from lumber liquidators. love them. when you get yours order a few extra panels. it takes a little practice. I found that tapping on one side gently once or twice, then on the other, and alternating sides repeatedly until it’s in, gets a better result than whacking too hard on one side too many times. it is too easy to dent it that way.
YoungHouseLove says
Thanks so much for the tip!
xo,
s
Jan says
Amazing, just amazing!!! Can’t wait to see it all completed.
Kristina Dousharm says
What I find so inspiring about you guys is that you always seem to embrace and still enjoy your house in whatever stage it is in… the nice decorative jars on the counter in front of the tile backer board wall… I LOVE this. Still home sweet home, even under construction.
Hank says
Did you paint the side of the drawers or just the fronts?
Looks great as always.
YoungHouseLove says
Hi Hanks,
Just the fronts (and backs of the fronts) but not the sides this time.
-John
Denise says
Amazing before & after! A growth chart came to mind for the side of the pantry cabinet. And doesn’t Clara love measuring tapes! http://www.etsy.com/listing/89278576/the-brimfield-growth-chart?ref=v1_other_2
YoungHouseLove says
Oh yes we have plans for the side of that fridge! Will keep ya posted!
xo,
s
Marie says
What a transformation – well done guys! You must be exhausted, I hope you had a nice rest and took it easy after getting your manuscript in.
Quick question – You have lots of open doorways in your house – do you find that this makes the house harder to heat? We are considering making the knocking the wall between our living room and kitchen/dining but the chilliness factor is causing a bit of doubt.
YoungHouseLove says
It doesn’t seem to make it harder – we have better flow now so I’d say that air (heated or cooled) travels more easily now. Hope it helps!
xo,
s
Marie says
Thanks Sherry!
Oh to need cooled air! Not something we even think of here in Ireland : )
YoungHouseLove says
Haha- we hear it’s gorgeous there!
xo,
s
Shanna says
Super crazy gorgeous. Well done! One of my favorite parts of this is that John was able to create those new doors out of the old ones. I just think that is seriously inspiring, especially since they are so seamless. I can’t wait to see what is next!
Paige says
Eeeekkkkk!!!!! I was so excited to see this. Amazing! You guys rock. Can’t wait to see the rest, like the rest of us!!!
Emilie says
WOW! You two did an amazing job! What a transformation! It looks so fresh and light, compared to being so dark before. Great, great job you guys!
Melissa says
“And the fact that we can put her to bed at 7:30 and hammer away from 8 o-clock on is pretty darn awesome.”
that’s what she said. :-D
YoungHouseLove says
Haha, ya got me.
xo,
s
Katelyn says
It looks amazing…You guys are such an inspiration!We just moved into a house with brand new white appliance and are thinking about painting our cabinets a shade of gray. How do you guys feel about gray kitchen cabinets?
YoungHouseLove says
Gorgeous!
xo,
s
Kelly (Kelly is Inspired) says
Looks Fabulous! My question for you is, Does Benjamin Moore Advance Satin feel smooth to the touch? I just finished painting my kitchen Island with Valspar satin and while the finish looks great, it feels kind of rough to the touch. I think it will bother me in the long run… Just wondering if I should have used BM Paint instead.
YoungHouseLove says
Oh yes, it’s smooth. Some of that might have to do with prep of course (sanding, etc) but the paint has a nice factory-finish when it’s dry!
xo,
s
Kara says
I am so addicted to this post. I keep coming back just to look at all the clean, bright awesomeness. It’s a job very, very well done.
Apropos of absolutely nothing, how has Karl held up? I’m on the market for a sectional but I have reservations about the long-term quality of Ikea furniture.
YoungHouseLove says
Karl’s awesome! No complaints at all!
xo,
s
gcarron says
love the cabinets
Renee says
Question: on the inside corner cabinet doors (where one has a handle and the other does not) did you cut a notch for your fingers in the top of the cabinet door that doesn’t have a handle?
And I may have missed that some where – my self-diagnosed A.D.D. sometimes kicks in, and I miss things!
YoungHouseLove says
That one’s easy to pull open once you open the other one. Once the one with the handle is pulled open you can grab the second door from behind and pull it open. Hope that makes sense!
xo,
s
Maya says
Fabulous! They look terrific and that’s such a great kitchen transformation already. And I’m so glad you gave info on how to use the installation template for the hardware. We painted our cabinets a bit ago and installed the hinges, but haven’t had time to finish with the pulls/knobs (at least in part because I’m dreading making a mistake drilling into them!). Three cheers for your tutorials!!!
Kayla says
definitely the step with the most impact… it looks great! the video is actually extremely helpful by the way – thank you for making it!
YoungHouseLove says
You’re welcome! Glad to help.
xo,
s
Coletta (rhymes With Velveeta) says
love the cabinets but hate the wasted space in front of the fireplace. Are you going to put in a small round dining table in that area?
YoungHouseLove says
We have the peninsula and a giant table that seats 8 in the adjoined dining room so a small sitting area in front of the fireplace works best for our family! We do lots of reading to Clara and playing on the rug in that cozy corner.
xo,
s