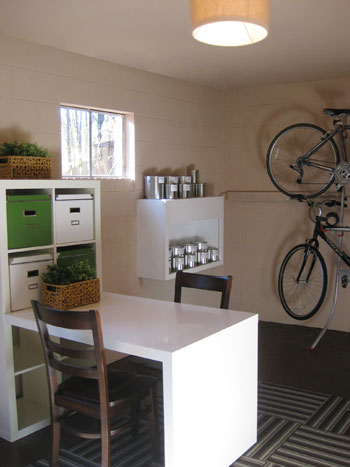
We’re back with our weekly basement update and since we’re edging closer towards the best word ever (finished!) this week’s project is quick and easy. It actually has to do with that built-in cabinet (to the right of the Ikea workstation) that we painted white last week. Remember it was bare but we promised we had a storage idea in the queue for you guys? Well, here it is…
Yup, those are matching paint cans. And yes, we’re ok with you calling us nerds. We’ve actually been meaning to move our paint from the garage to the basement for a while. It’s a lot more temperate thanks to its underground location (it stays cooler in the summer and warmer in the winter) and because paint can freeze, dry out, and otherwise “spoil” when it gets too hot or cold, the basement is definitely a smarter place for it. Before moving it to the garage, we used to store our paint in the house until we read an article about how paint cans can off-gas and pollute your indoor air (so a lesser used basement or garage is a better choice).
And although we could easily have brought all of our old mismatched and gunked-up cans straight into the basement and called it a day, we just love the organized look of our “new” basement so much that we suddenly even hold paint storage to a higher standard and yearned for a more cohesive and effective solution. Not only do new cans look good, they create a tighter seal on our paint to help it last longer (which is always better than “casualty cans” sadly lost each year due to dried out paint- what a waste!). And for a few bucks a pop, new cans would be great “insurance” to keep all of our $25+ paint in ready-to-use condition.
Lucky for us, True Value sells these awesome empty paint cans (in both gallon and quart sizes) that we decided would be prefect for unifying everything for that newly spruced open shelf in the basement and keeping our paint nice and fresh for years to come. Remember how awesome True Value has been to us by giving us a spot on their DIY Blog Squad and offering us a generous gift card? Yeah, we kind of love them.

But seriously, how cool are those empty paint cans? Industrial-chic at it’s finest, no? Plus the act of transferring our paint allowed us to go through all of our old gallons and quarts to eliminate colors that we no longer need (like the old green color that we first used in the living room or the yellow paint that was on our front door) and you know we love to pare down, organize, and donate things that we’re no longer using (giving paint a second life is like two makeovers for the price of one!). Note: never toss old paint out with your regular garbage, either bring it to your local recycling center and drop it in the paint section or donate it to places like The Habitat For Humanity ReStore.
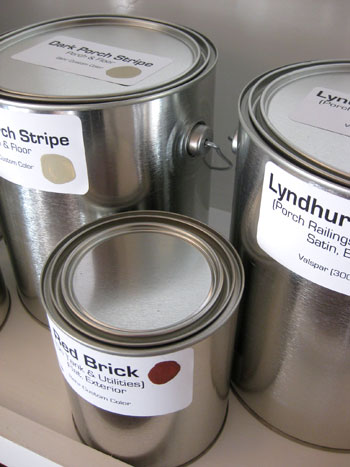
Of course before we grabbed our empty gallons and quarts we counted how many of each we’d need (and snagged a few extras for future additions). Then John’s inner “account guy” came out and he suggested that we head over to Office Max and buy some printable labels so we could transfer the name, brand, finish, and paint formula to each of the new cans (so we’d never have to worry about getting more whipped up if our supply ever dwindles). Sure it seemed a little obsessive (ok, a lot obsessive) but printing the labels only took about 15 minutes and they seriously make my little organization-loving heart skip a beat whenever I see them. Even John’s man heart swells with pride over his paint label making skillz.
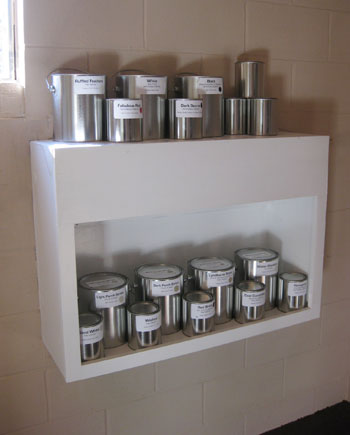
Plus John even took a cue from the paint pros and left a little thumb print of each color on each label (you can never be too careful when it comes to guarding those paint formulas). The result: mouth-wateringly delicious open storage that keeps up with the rest of our basement while keeping our paint fresher thanks to a tighter seal that isn’t all gunked up with years of paint between the lip of the can and the lid. Gotta love a little “paint maintenance” to keep from having to trek out and rebuy paint all the time (nothing’s more annoying than needing a tiny bit of paint for a touch up and finding the entire can dried out which calls for the purchase of an entirely new one).
So what’s next on the basement agenda? Well, we still have to obscure our no-privacy windows and build a DIY screen to cover that eyesore of a water heater. Stay tuned for those details next week (in what will be the final chapter of our basement makeover!). Then it’s on to a big bathroom reno that has us laying awake in bed talking about tile options (and subsequently dreaming about said tile options). Do any of you have a big project that you’ll be taking on before the holidays? Maybe because people will be coming over and you want to spruce up the place or even because you know you’ll be traveling so leaving refinished floors to dry or going kitchenless for a bit while your new cabinets are ordered won’t be so bad? Do tell.
Update: One of our lovely readers chimed in with a solution to keep our new cans looking new and sealing securely for years to come. We plan to pick up a “latch on pour spout” which attaches to the lip of a gallon or quart and helps you pour paint without getting any around the lip of the can for a pristine look and a tight seal every time. Amazing!
Psst- Want to look back on our big basement makeover from start to almost-finished? Here’s the first post, the second post, the third post, the forth post, the fifth post and the sixth post. Ah memories.

Leave a Reply