Q: I would like to know your guys’ thought process BEFORE you start a big project (like your kitchen, living room, bathroom, a nursery, etc). Could you delve into how you ‘read’ a BEFORE and how to consider function along with style? Where/what do you research? How do you decide which projects to do when? What makes a project top priority while others take the backseat for a while? How do you determine your budget? How do you live with the mess while a project is going on? Basically, how do you mentally and physically get from BEFORE to AFTER? Lots of questions, sorry. On a lighter note, how do you unwind and NOT think about every single thing that you want to improve all the time? Sometimes I feel CRAZY making my mental home improvement list! Thanks for all the inspiration and hard work. – Dana
A: Good question! It’s actually one of the most often asked queries that we get- but unfortunately the answer isn’t really that cut and dry. There’s very little method to our madness as we sometimes tackle hard projects because we’re particularly inspired while other times we blow them off to do something easier while we wait for more motivation (and less sore muscles) to arrive. As for research, that really depends what we’re tackling. The first time we switched out light fixtures we did some pretty extensive googling and turned off the power to the entire house in the interest of not killing ourselves. But when we were searching for the perfect curtains to flank the window between our bedroom built-ins the research was a lot less involved… we just picked up a bunch of curtains at Bed Bath & Beyond and tried them all and returned every pair except the ones that made the cut.

When it comes to determining our budget, that’s always the easy part. We’re cheap. And if we can’t afford something we don’t get it. This might sound harsh but we often think that it’s this very fact that causes us to get creative and come up with more affordable solutions (like hanging two blinds next to each other to mimic the look of one long expensive one in our living room). And as for how we live in chaos and prioritize our projects, we did learn pretty early on into our big home makeover that it helped to focus on completing one task entirely before moving on to another one whenever we could.
his method helps us feel more accomplished and focused instead of being all over the place and living in an environment where every room looks like a war zone. Sure we painted a bunch of rooms over the course of a few weeks (leaving them all in disarray) but we quickly learned that was no way to live, so when it came to remodeling the kitchen or adding the bedroom built-ins, we focused only on those tasks with 100% of our brainpower and manpower, and then happily checked them off our list and moved on to making a mess in the next room.
But enough general jibber-jbber. We thought it might help to visually share one room’s specific journey from before to after- so you can really take a peek inside our home-improvement-crazy minds (and watch the process unfold firsthand). Fasten your seatbelts, this could get intense.
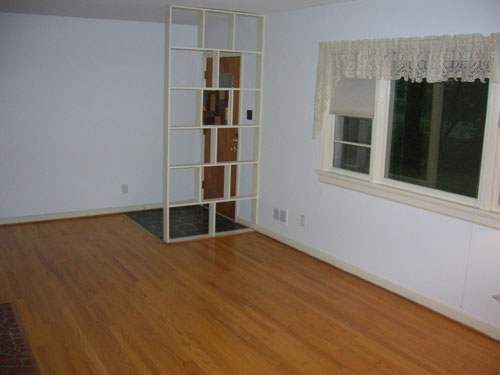
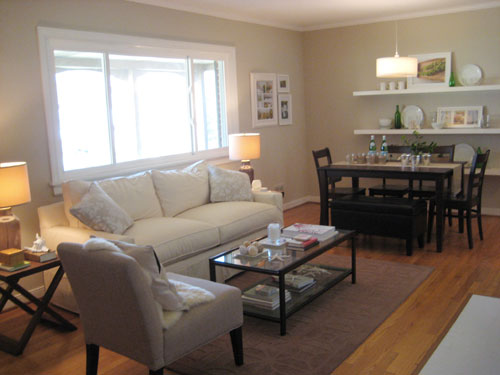
Let’s take our living room (seen above in its raw “before” form). When we first moved in we had no idea we would ever turn it into a living and dining room and convert our small formal dining room into a more-functional-for-us third bedroom. That came waay later after living with our home for a while and learning what we truly wanted before doing anything rash. So we started off with the obvious things that were a lot less intimidating. First we got rid of that dated wooden divider near the front door (I actually took a hammer to it and had dragged it all the way out into the garage by the time John got home from work). A bit of spackle and sanding had the wall where the divider had been affixed looking as good as new. And then it was time to remove the dated old curtains (leaving only the basic honeycomb blinds) for a cleaner and more updated look that would tide us over until we could later snag some curtains and blinds down the road.
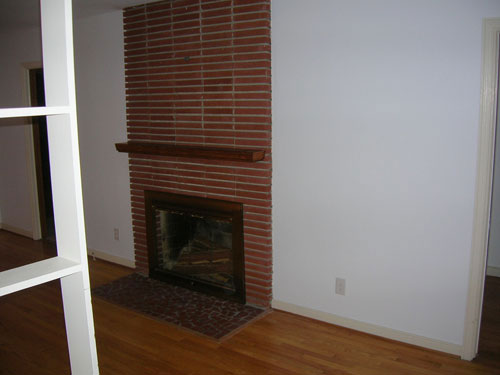
Then we moved on to slapping some paint on the walls. Our first color choice was anything but flawless (we were going for a soft celadon and ended up with a too-bright pastel green tone instead), but just getting some color on the walls and painting the pinky-beige trim and baseboards a crisp white tone made the whole room feel a lot fresher and we knew we could easily repaint it once we developed a better sense of the colors that we gravitated towards (which was as easy as finding some inspiration photos and quickly discovering we like warm creams, sandy tans, and blue-gray tones). And we can’t forget about tackling the dark fireplace that sucked a ton of light out of the room with some fresh white paint.
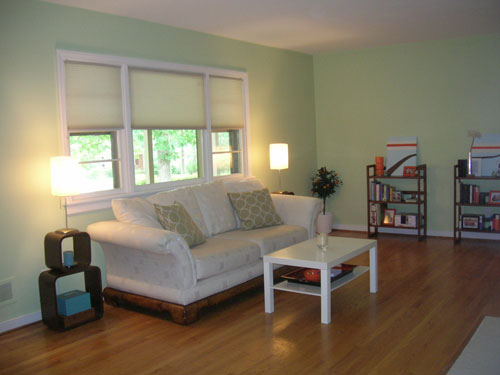
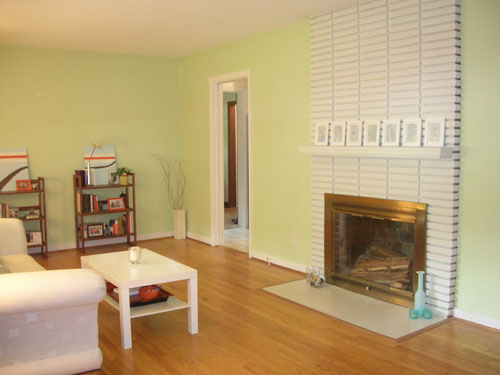
We know, we know. We were SORELY lacking in the furniture department (moving from NYC in a minivan meant we had virtually no furniture to our name so we had to make due with hand-me-downs and cheap Craigslist finds until we could save our pennies and add the items that we liked). So in the meantime we slowly upgraded from our cheap-o Ikea coffee table to a cheap-o thrift store find (that we still covet today) and switched out the small wooden bookshelves for inexpensive floating shelves from Ikea for more of a built-in feeling. We also were gifted two slipper chairs from Target that were on our wedding registry (hooray for free much-needed furniture) and switched out the too-small frames on the mantel for one large dark hand-me-down mirror that we painted white.

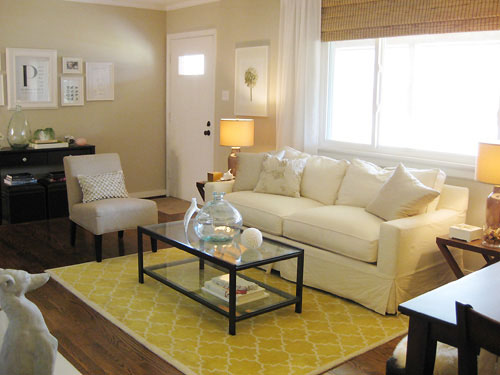
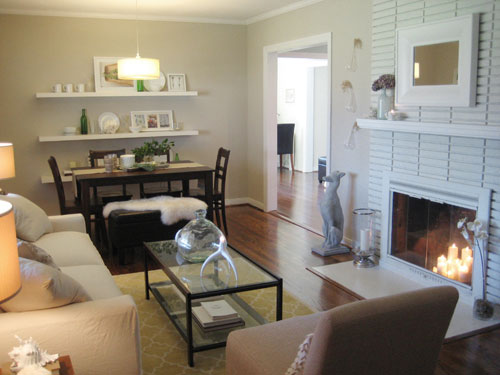
Soon enough we found ourselves repainting those green walls a soft sandy tan tone (Glidden’s Sand White) and then we were popping a pendant light above the table and extending the doorway that led into the kitchen to create a bona fide dining space. Our windows were still bare but we were able to snag an affordable wool rug to define the seating area and two side tables from Target with matching Nate Berkus for Linens N Things lamps (also from our wedding registry). We also finally found a sofa that we loved (and could afford!) so we sprung for it (and saved $400 more than we did when we got our Pottery Barn one in the den). Then I secretly arranged for a handyman to install crown molding around the room (as a gift to my very-sore-from-other-projects hubby), which really added a more polished feeling to the whole space.
And that brings us to the final after pictures. You can see that we hung our favorite bamboo blinds & white curtains to finish off the picture window and add height and softness to the whole space. Also in the softness department, we tossed a $19 Ikea sheepskin on the bench in the dining area to break up all those dark tones and add inviting ambiance. We also got a killer deal on the yellow moorish tile rug from Pottery Barn (it was a floor model) which brought a lot of life and interest into the entire room. It just feels happier now, right?
Oh and we had the existing wood flooring that runs all the way into the bedrooms stained deeper to match the new hardwood in the kitchen and adjoining den so all of those rooms finally feel truly open and seamless.
So that’s the sort of progression we’re talking about when we say that we live with things for a while, save our pennies, take things one do-able project at a time, and inch towards the finish line. As for the nursery project for John’s sister, we knew we needed to:
- Settle on bedding for the crib and create a coordinating but not matchy-matchy crib skirt for concealed storage (we actually found the crib sheet first and it served as our color palette inspiration for the whole room, so it was definitely our starting point)
- Paint the room (with our crib-sheet-established color palette in mind, we worked with Emily to settle on a color that would fit in with the rest of her house and still felt perfect for a little boy’s room)
- Meet certain must-have requirements like a place for the baby to sleep, a chair for nursing, somewhere to change the baby, and a piece for storing toys (Emily already had a thrift store chair, a hand-me-down crib and an armoire that we would be bringing in so we just needed something that could function as a changing table so we selected an affordable piece that worked with the existing items we would be bringing in for a cohesive feeling)
- Add some modern fun and whimsy to really make it come alive (hence the vertical striping idea)
- Make it a lot lighter and brighter since it’s a windowless space (so we brought in mirrors to bounce around light, and added more task lighting to keep things ambient and inviting)
- Add some finishing touches that are functional and easy on the eyes (we didn’t have specific objects in mind but knew we’d need some hooks, baskets, art, and sheles so we just played it by ear as we shopped and kept our color scheme- and the overall function of the space- in mind).
And of course we remembered to have lots of pickle & ice-cream breaks with Emily to keep things fun and to keep from burning out. We basically spent about a day per week for around 5 weeks piecing together the new nursery (which left us with enough time away from it to stay motivated and really think things through). And we’ll be revealing more project and ultimately the “after pics” pretty soon, so stick around for that.
If you ever feel like you’re moving too fast on something (which can make for a less than functional or practical end product) it’s always smart to take a big step back and impose a much-needed break. Go see a movie, go out to dinner, take the dog for a walk- do whatever it takes to give yourself a mental and physical break. It’s sort of what we did when we felt like our wedding was getting out of hand (too expensive and not the intimate event that we pictured). We took a step back, regrouped, and planned the day we always imagined. Sometimes you just need a time-out to see what you really want and slowly figure out how to get there.
If we hadn’t taken our time with our house, we’re certain we never would have come up with using bamboo blinds instead of pricey cabinet doors in our laundry nook or bringing in Ikea wardrobes to create curtained closets that flank our bed. Even things like widening doorways and adding the dining area to the living room weren’t ideas that came overnight at all- so although every bone in your body may want to be done done done, it’s always nice to live with things for a bit and slowly evolve your home so it’s customized and perfect for the way you live when the decorating dust does finally clear. We hope it helps! Happy renovating…

Leave a Reply