Adding a headboard to your bed is one of the best ways to add polish and coziness to your bedroom. And, lucky for you, making your own DIY upholstered headboard is super easy and affordable (ours only cost $66!). This means you can customize the fabric, size, and design to get exactly the look you want. Believe us, we’ve done A LOT of them over the years!
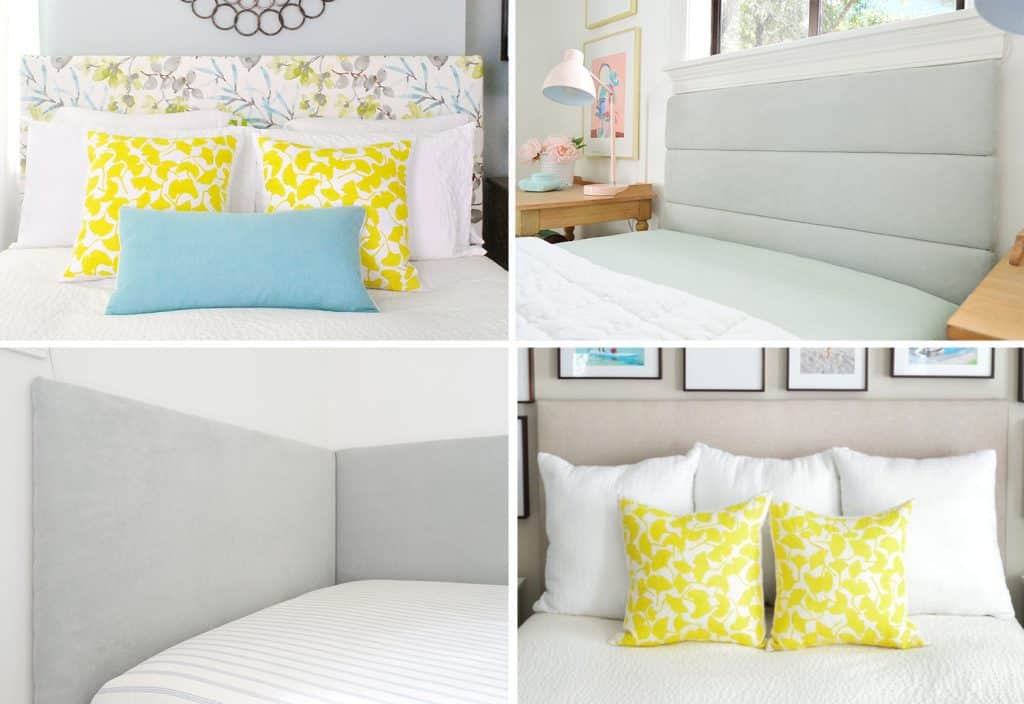
Today we’re going to take you through the step-by-step process to create the first headboard in the grid above (top left), but you can check out these other posts to learn more about the others:
- How to make a DIY channel-tufted headboard (top right)
- How to make a daybed-style headboard (bottom left)
- How to make a wall cleat to hang a headboard (bottom right)
Materials & Tools

Your exact supply list may vary from ours, but generally, this is what you’ll need to make your own upholstered headboard for your bed:
- Fabric of your choosing (we used 2 yards)
- Extra loft batting (we used 4 yards)
- 5/8″ plywood
- Two or three 1×3″ whitewood boards
- Miter, table, or circular saw to cut your wood (optional)
- Heavy-duty staple gun & staples
- Screwdriver and screws
Why Add A Fabric Headboard?
We explained why we personally wanted a headboard in this post. The short version is that we fell out of love with our 4-poster bed (so we cut off the posts!) and wanted something cozier instead. You know, something plush we could lean up against at night. And the short wood headboard that we currently had wasn’t cutting it.
But generally, headboards can add a lot of personality and polish to a bedroom. Bedrooms without proper headboards can scream “college dorm” or “first apartment,” so adding one is a no-brainer upgrade. Plus, depending on the fabric you choose, it can add some bold color and pattern to a room OR add to the restful, zen space you’re trying to create.
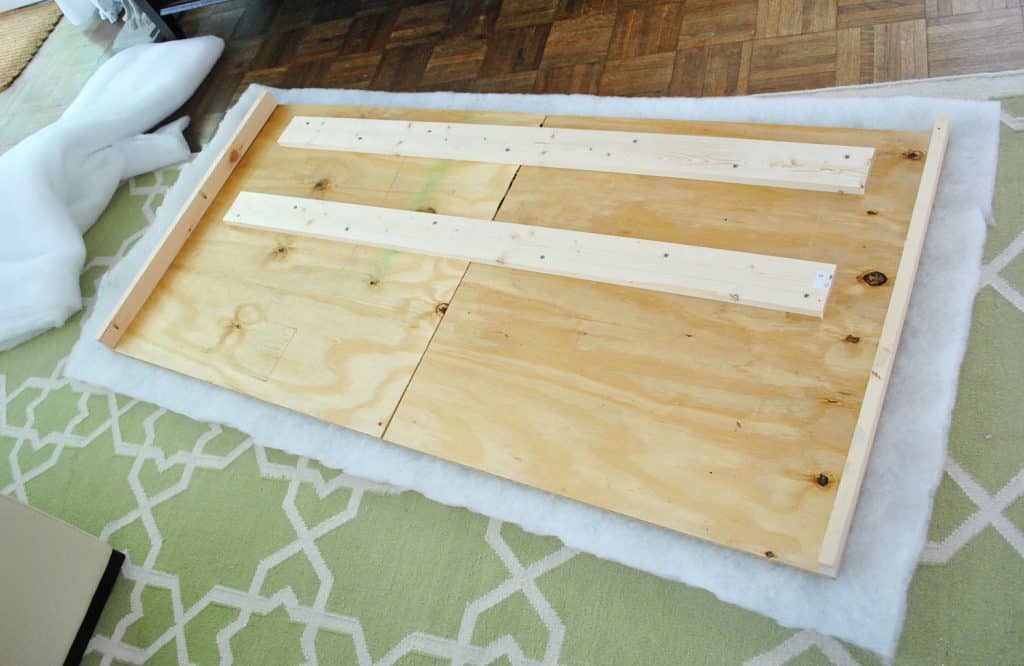
Step 1: Build Your Wood Frame
There are a few ways to create the wood frame for your headboard (including this super lightweight option) but for this particular bed, we constructed a sturdy plywood frame. If you want a simple rectangular design, this step can be as simple as cutting your plywood sheet to size (or having them cut it for you at the home improvement store). For our queen-sized bed, we ultimately decided on 65″ wide and 31″ tall. But you can easily customize your dimensions depending on your bed size or location.
Ours looked a little more complicated, and I’ll tell you why…
First of all, we were planning to place our DIY headboard around the existing headboard/posts leftover on our Ikea Edland bed. We concocted a plan that would sort of “wrap around” the existing posts, which we mocked up in Photoshop below. But this concept would also work if you wanted to create a popular “winged” headboard look as well.
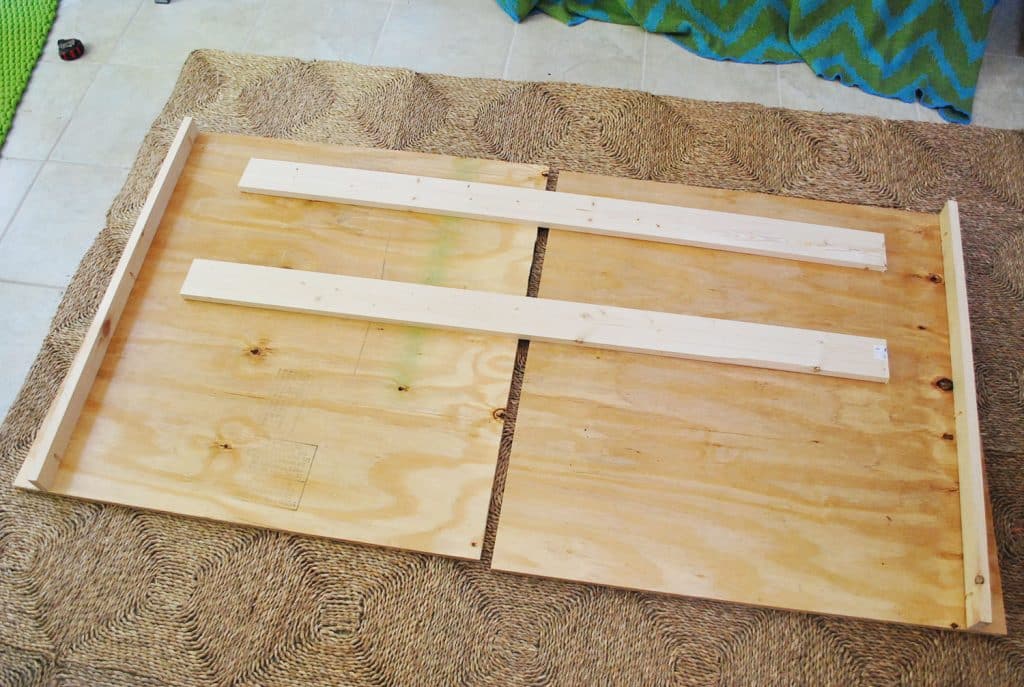
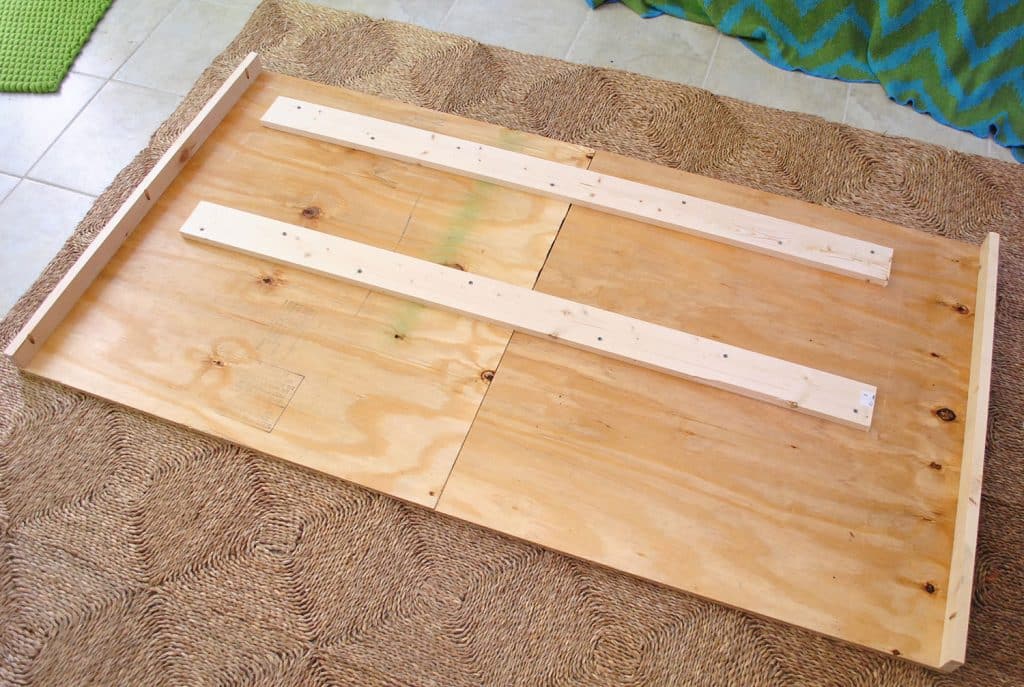
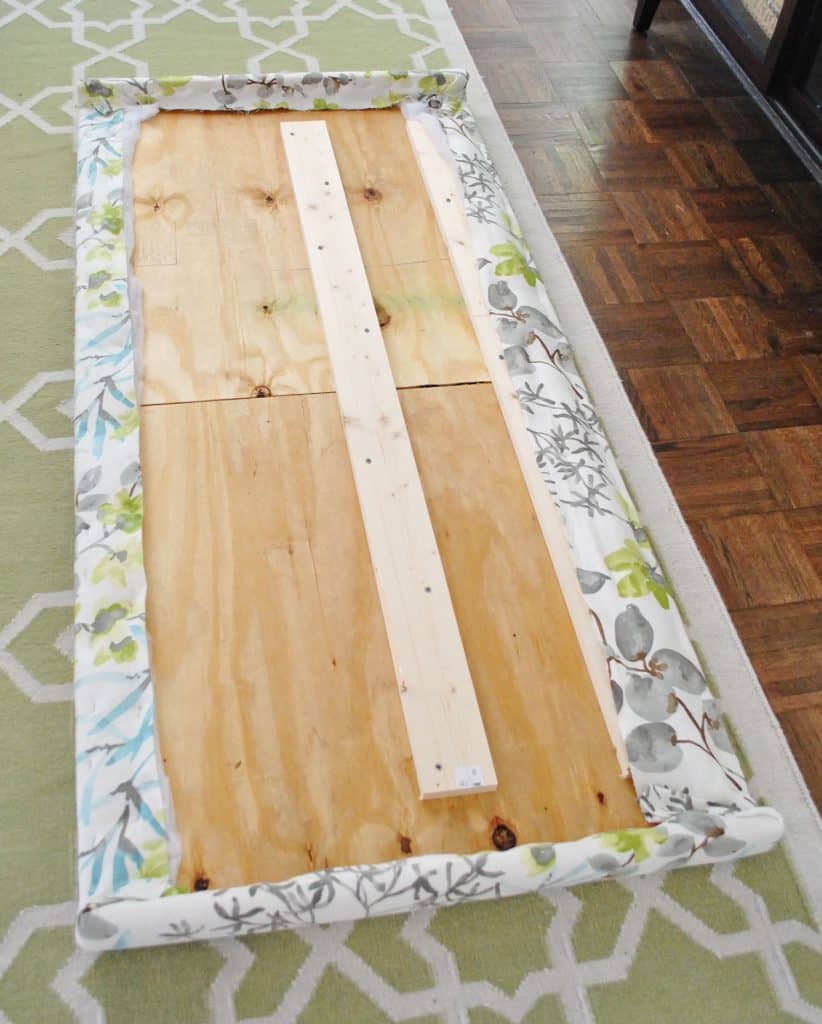
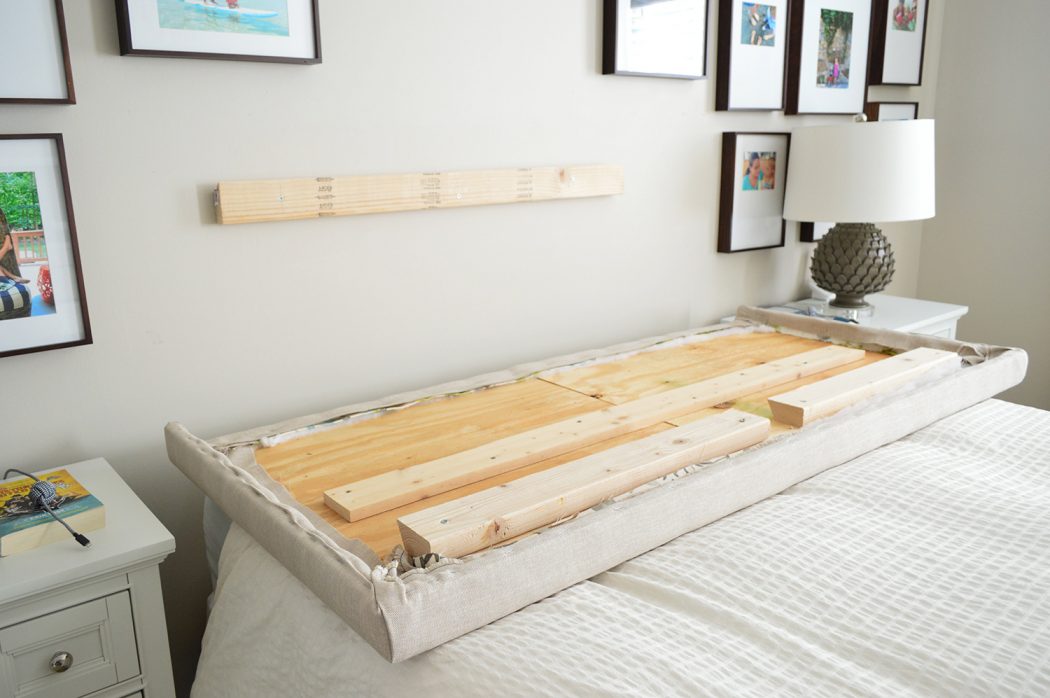
To add these small side pieces, we attached two 1×3 whiteboard boards to each edge using screws drilled into pocket holes we drill using our Kreg Jig.
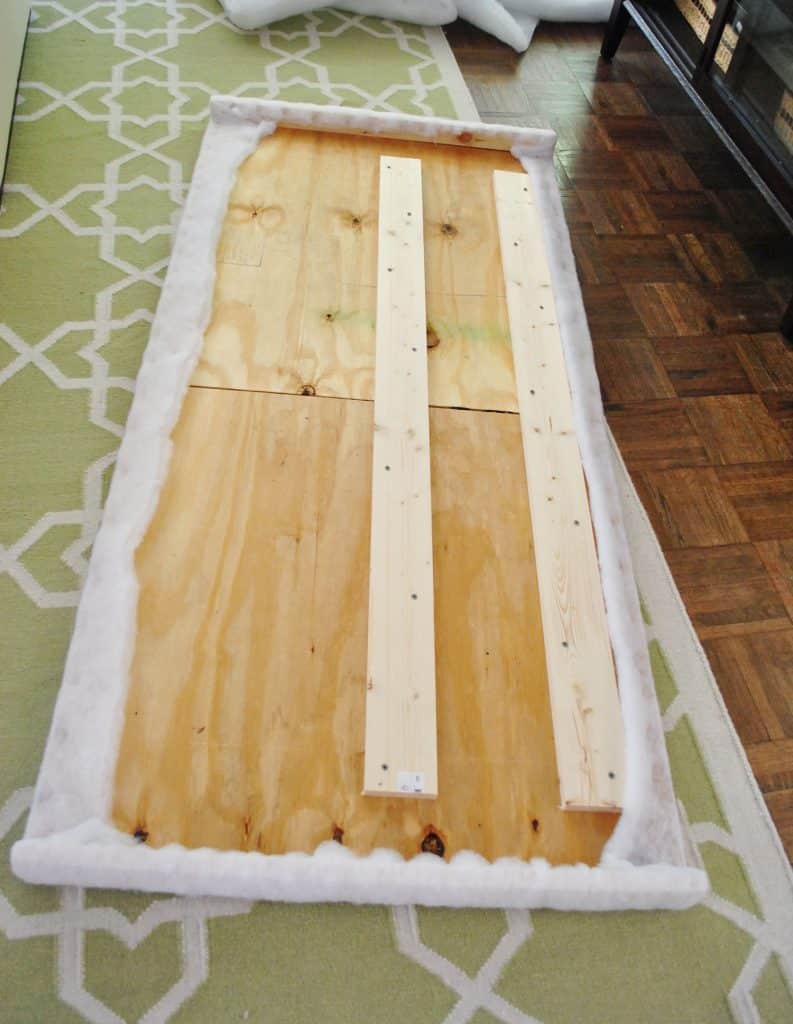
The other reason ours was more complicated than a solid sheet of plywood was that we couldn’t fit it in our little car (ha!). So at Home Depot we had them rip it in half, and we reconnected the two halves at home with scrap pieces of whitewood boards. We’re fancy like that!
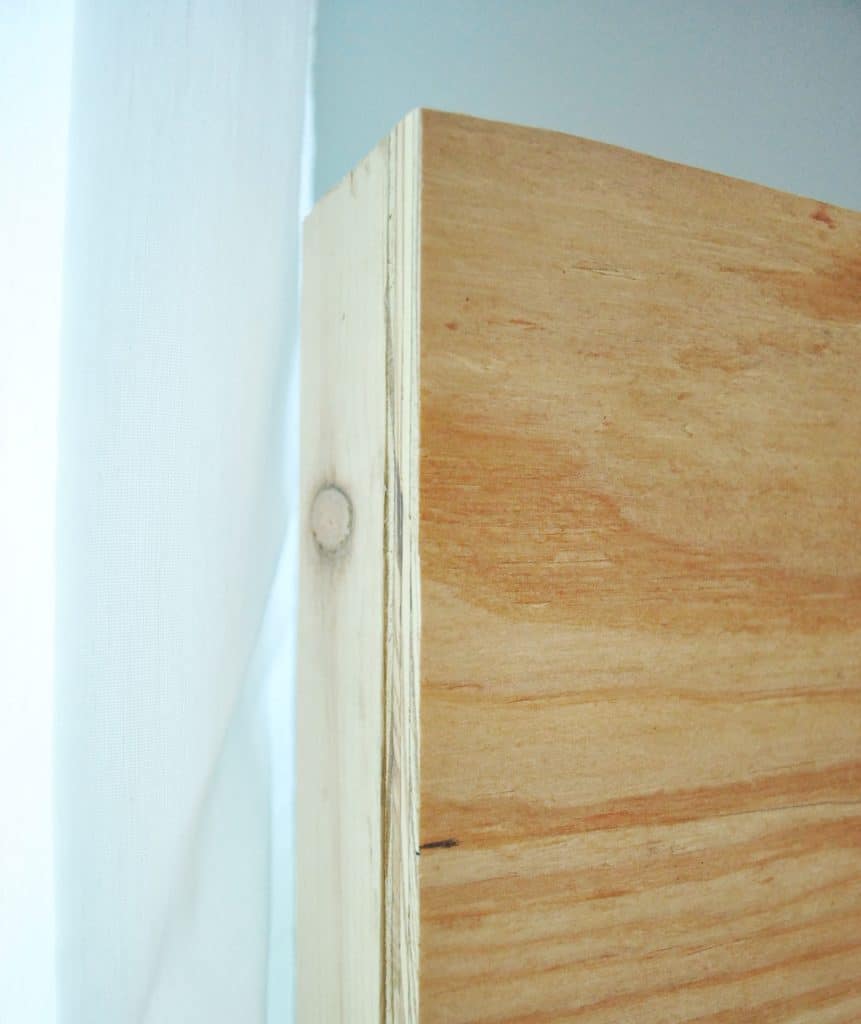
Before proceeding we upholstery, we brought our frame in to make sure it fit around the existing bed frame like we planned. Phew – it did!
You can also now see what that wrap-around piece looks like, and how it hides the existing bedpost. And since we’d soon be upholstering it with fabric, it didn’t matter that the edges were a little raw looking.
Step 2: Add Your Batting Layer
If the carpenter in you trembles at the idea of upholstery, just remember: if you can wrap a present, you can upholster a headboard!
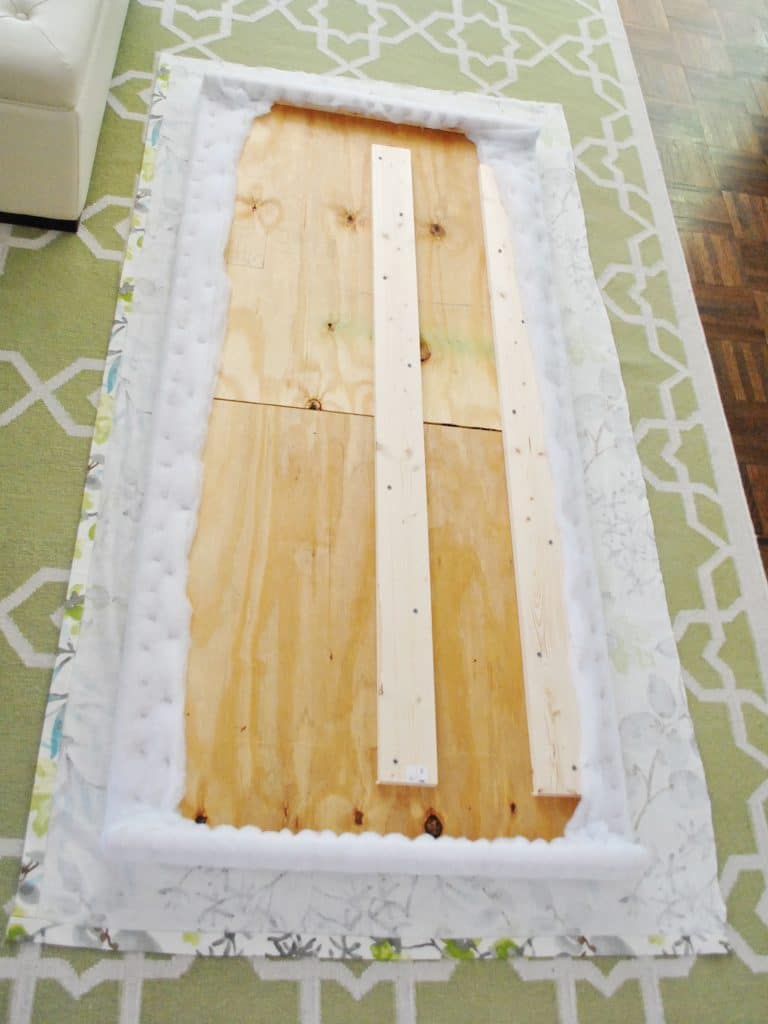
Before adding our fabric, we wanted to first add some padding in the form of extra loft batting. We decided to do two layers so it’d be plenty plush, but still not lose its shape. Sherry trimmed a 2-yard section of batting using regular scissors, laid it on the floor, and we placed our frame on top of it. You’ll want about a 2-3″ overhang on all sides.
Then we used our staple gun to begin attaching the batting. We just wrapped the batting tightly around the edge and stapled it every few inches.
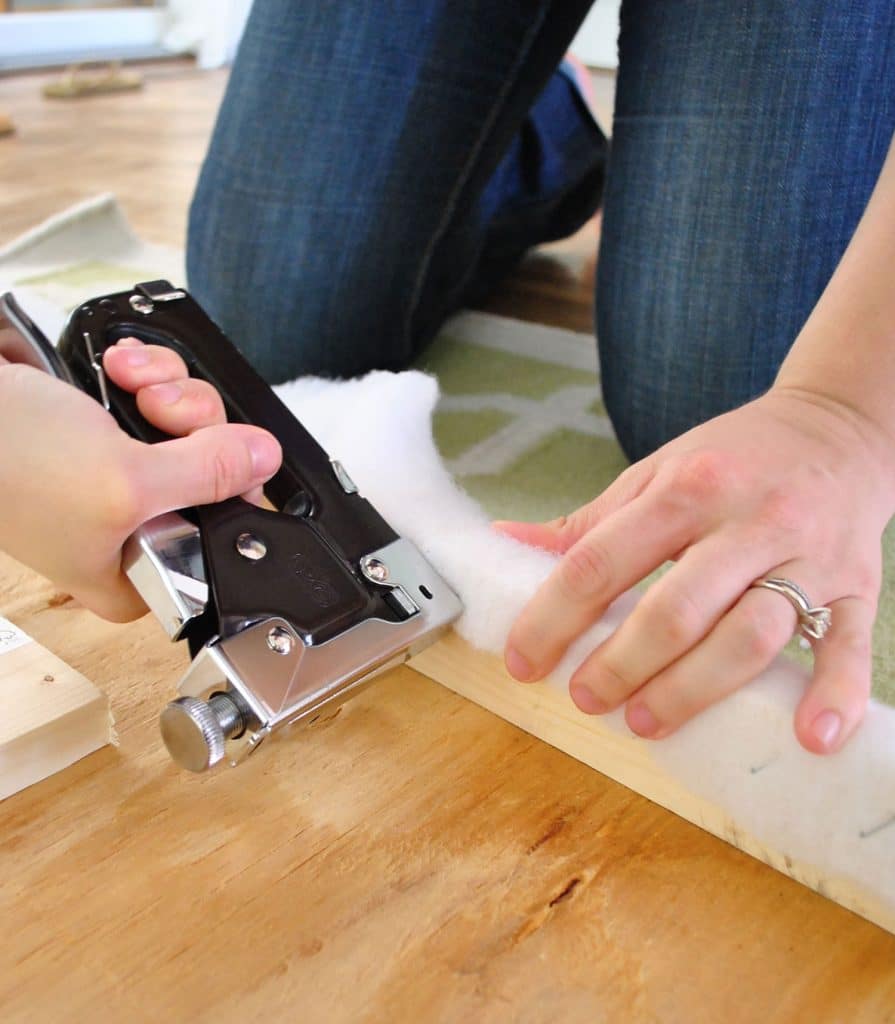
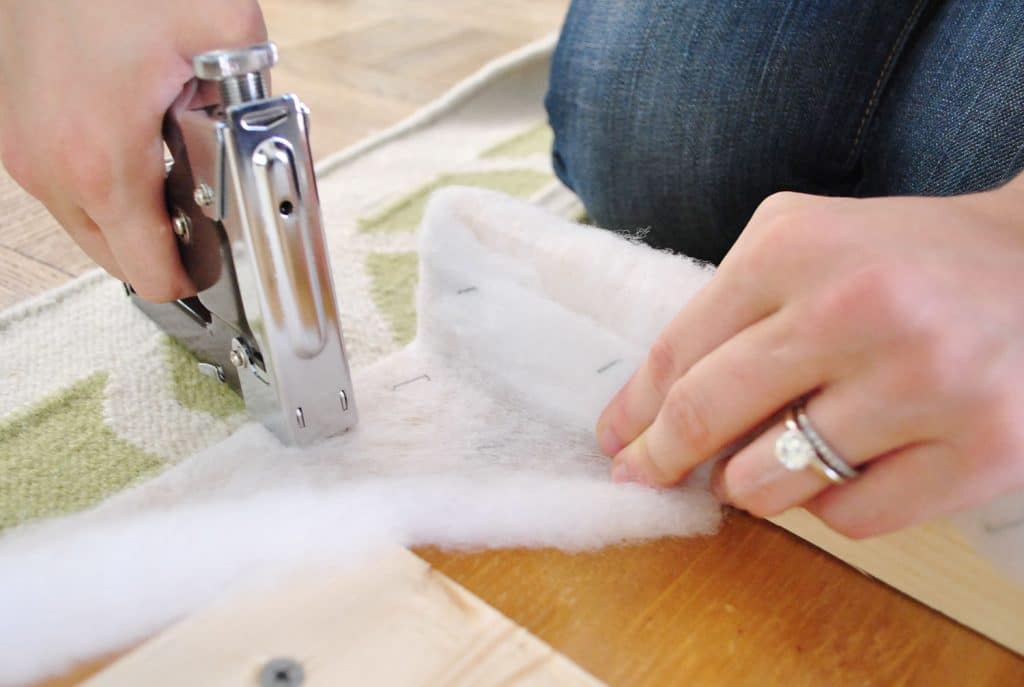
When we came to a corner, it was just like wrapping a present. You just fold it back and staple it so it all looks smooth from the front. Try to pull the batting tight so your corners don’t get too bulky. Bam, bam, bam – it’s done.
We just worked our way around the back of the headboard, stapling away. At some point John made me pose for this awkward photo too. Winning.
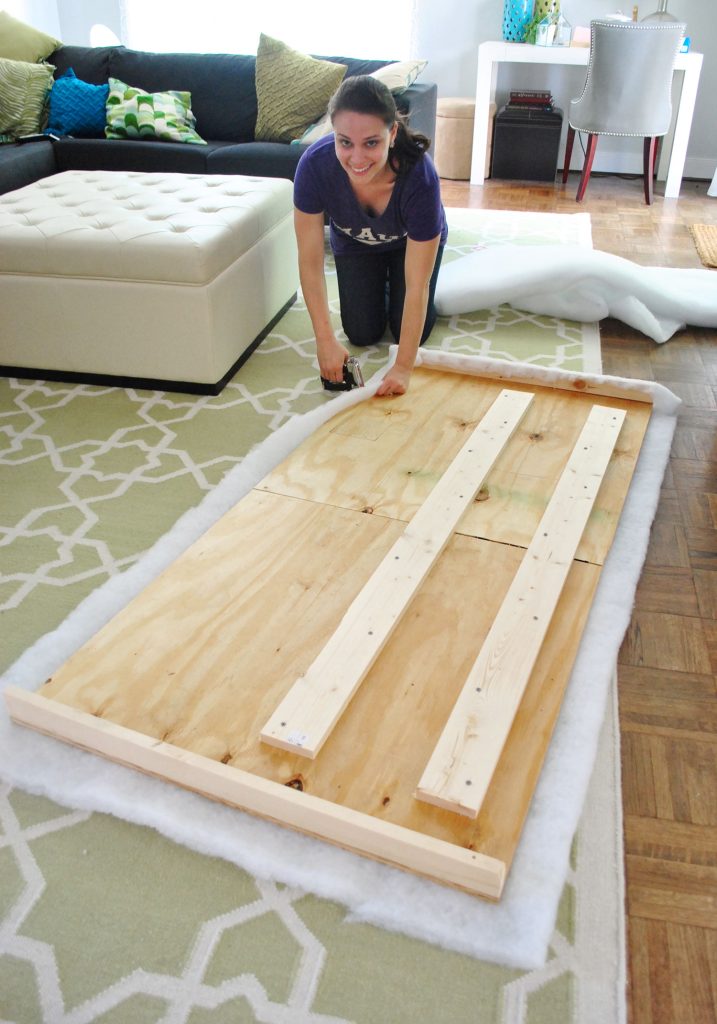
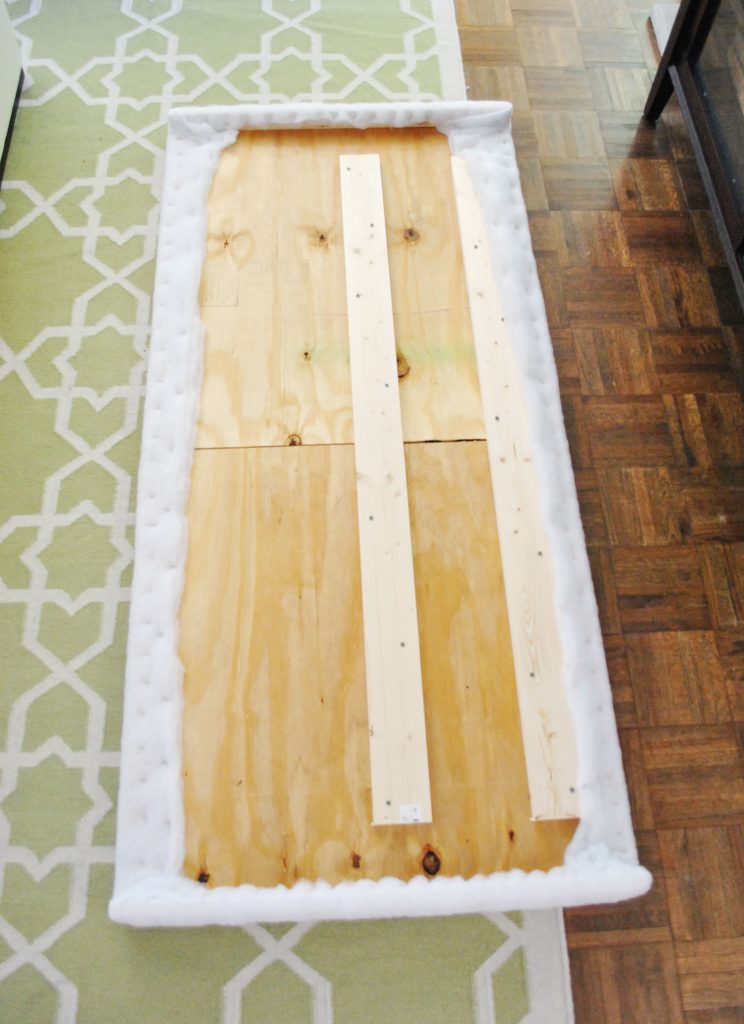
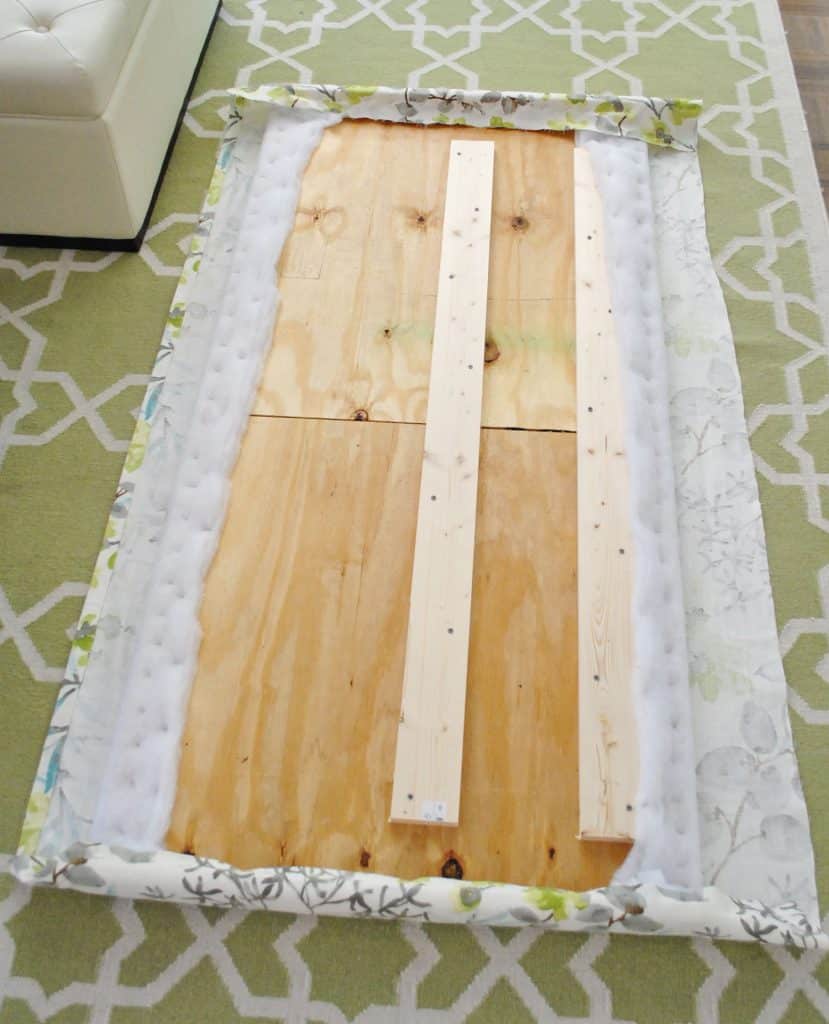
Eventually the whole thing was stapled nice and tightly around the back.
You can check yours at this point to see if one layer is enough. We decided to do a second to make sure the hard edges of the plywood were sufficiently padded. So we rolled out more batting for a second layer (call it extra credit when it comes to a cushy result).
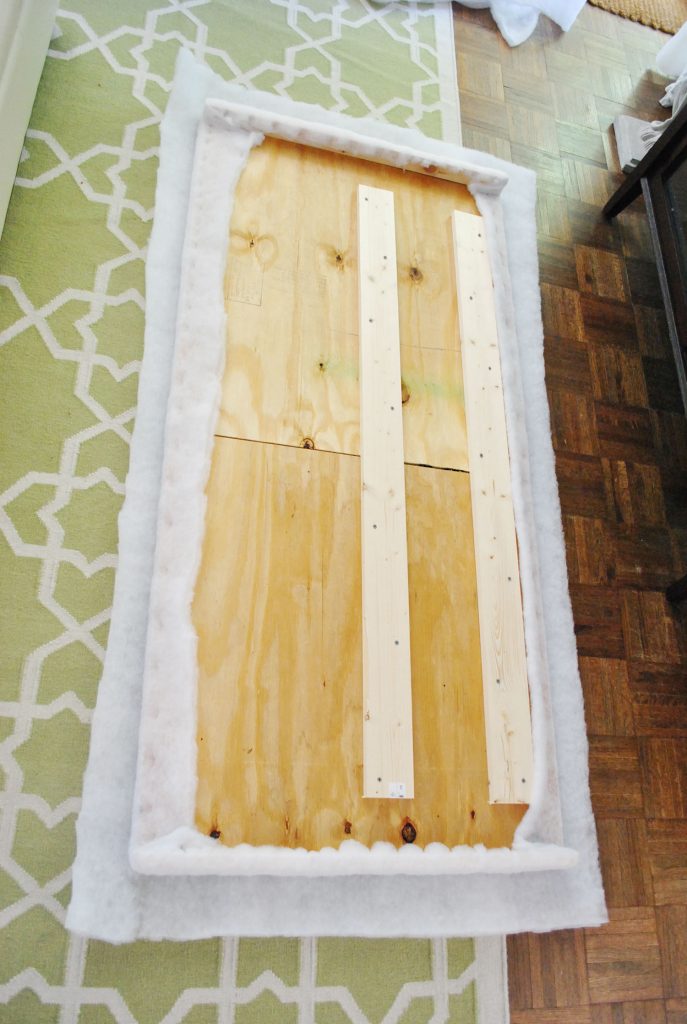
Again I trimmed around it and used the staple gun to secure it around the back perimeter of the frame, being sure to pull it tightly as I went.
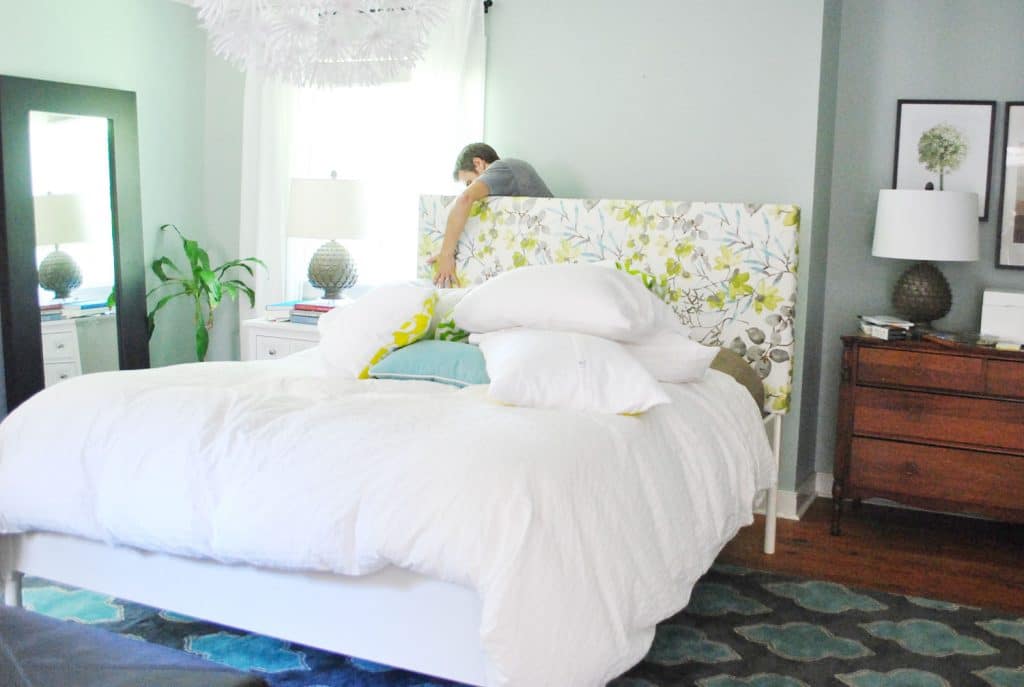
Then John leaned it up so we could check it out again- just to make sure it was wrinkle-free and plenty soft. John even went in for a sensuous caress. To each his own, I guess.

Note: Another option is to use upholstery foam that you attach to your plywood with spray adhesive. We prefer the batting method since it’s easier to wrap around the edges. But if you’re looking for a much thicker, cushier feel – it may be faster to use foam, rather than wrap 4 or 5 layers of batting. Too many layers of batting can also make it difficult to staple into the wood.
Step 3: Staple On Your Fabric
Here’s where the fun really begins. Now you can repeat that process, but with your selected fabric! Just make sure it’s free of creases or wrinkles before you start, so you may need to give it a good ironing first.
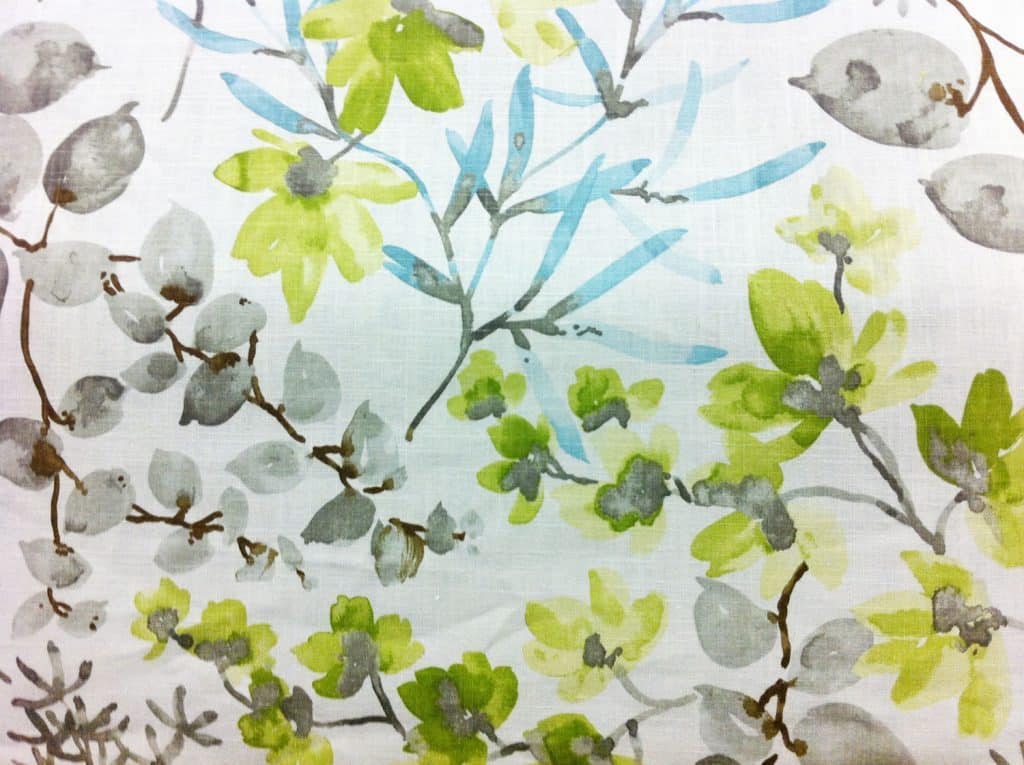
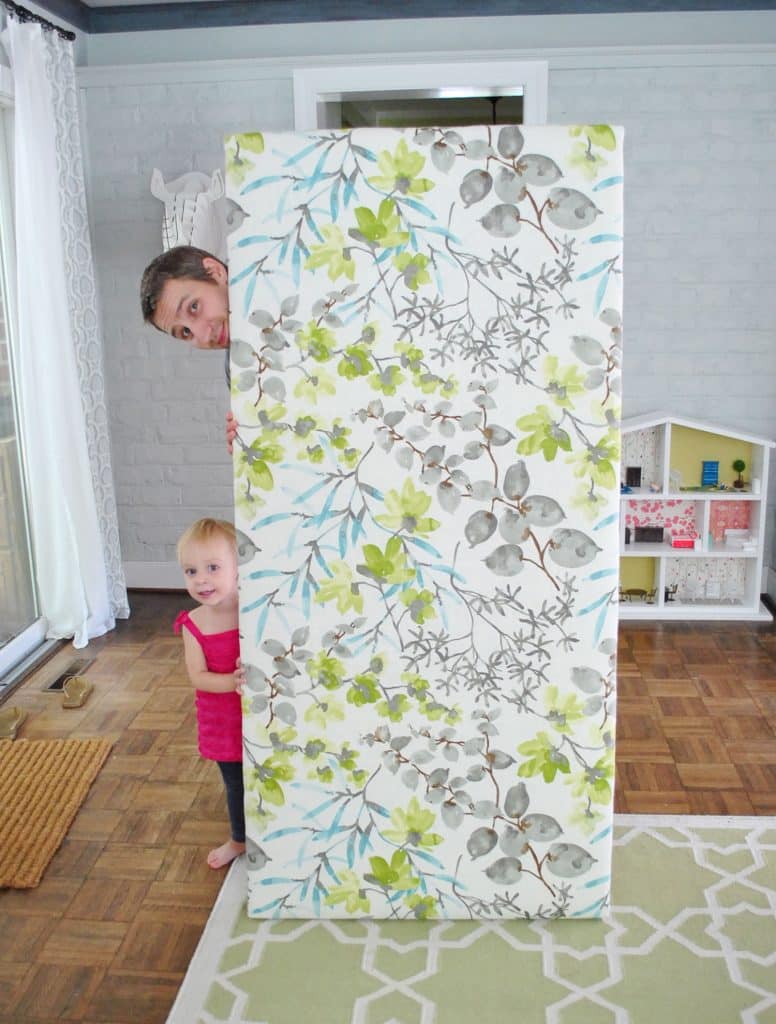
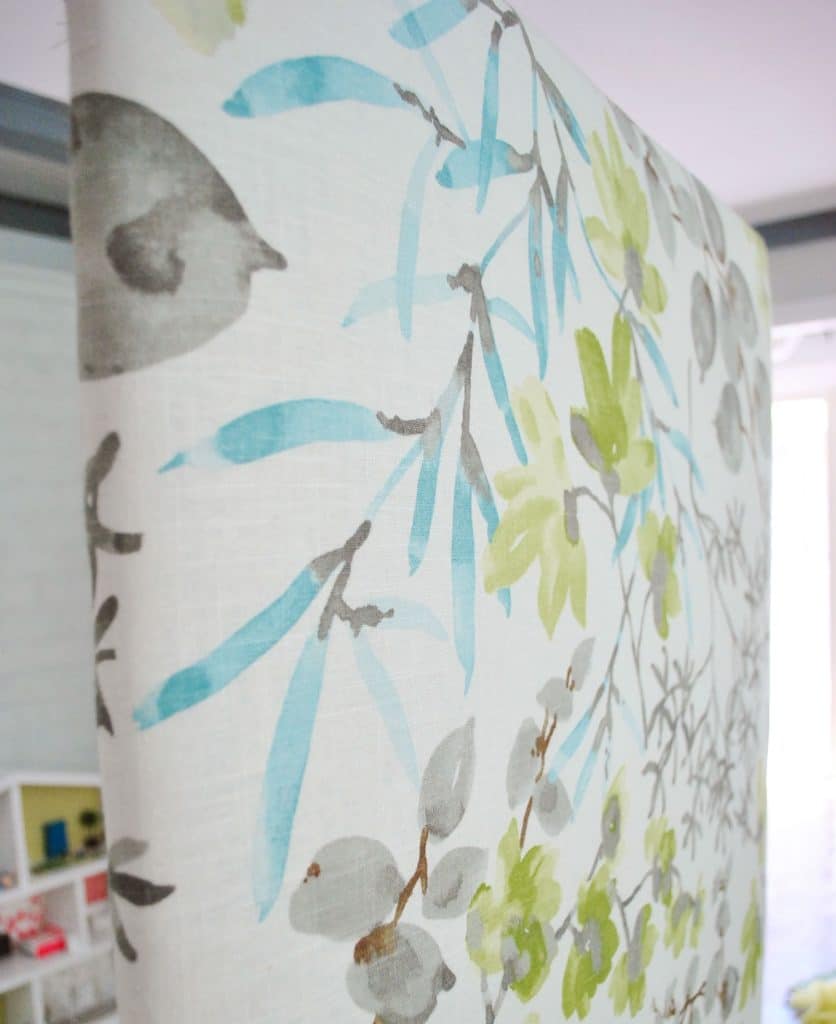
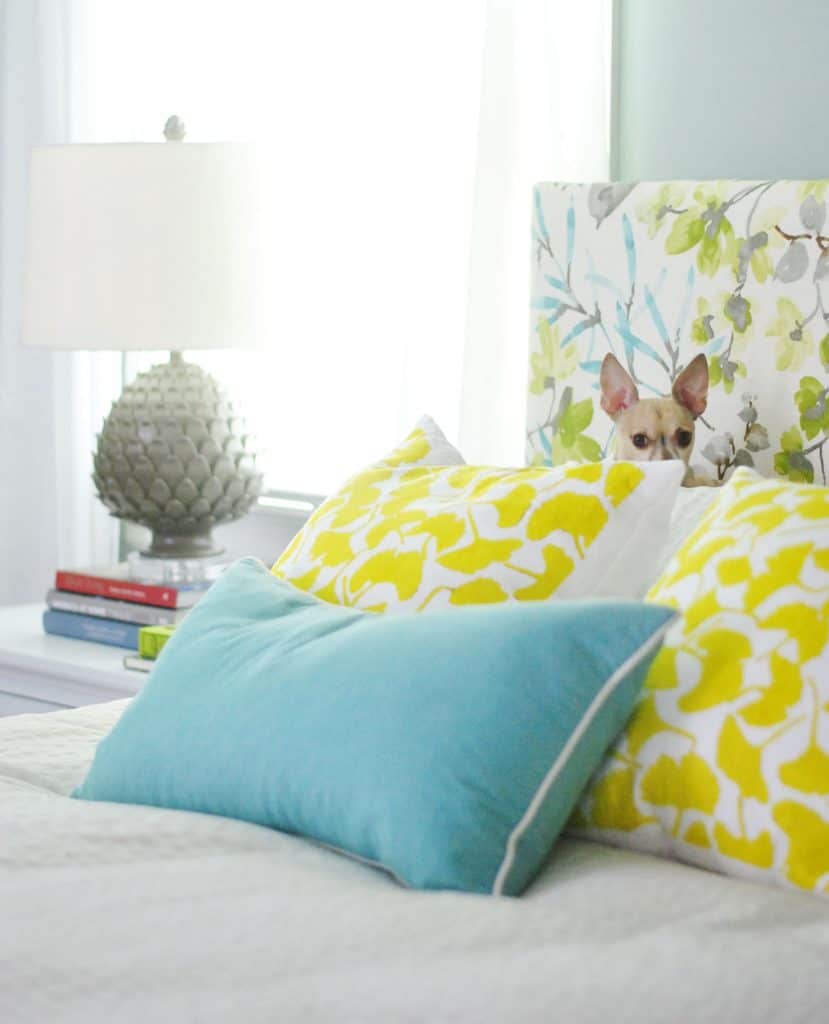
We were using this fabric we found at a local discount outlet called U-Fab. It’s by Braemore, called Gazebo Cloud (here’s an affiliate link to it on amazon for any non-locals). We liked how the leafy splashes of turquoise picked up that color in our geometric rug, but in more organic vibe.
Just like with the batting, we laid it flat on the floor and placed our (now batting-covered) frame on top, making sure it was pulled taut underneath to avoid any wrinkles. Then I trimmed offthe excess fabric around the perimeter, leaving a few inches for it to be wrapped and stapled around the back, just as I had with the batting.
We started by stapling each side, being sure to pull it extra tight so it won’t end up all loose and baggy over time. I started with one side, pulling it all very tightly, then stapled along the opposite side, again pulling it nice and tight.
Once it was secured on those two sides, I did the same thing to keep it secured vertically, by pulling tightly and stapling the top side and pulling it tightly and stapling the bottom side as well.
Then we flipped the headboard up to see it in all of it’s plush, tightly upholstered glory. Bing, bam, boom. The whole upholstery step took less than forty five minutes to complete. Is it weird to call it one of my favorite fabric projects to date? I just love love love the pattern.
It’s hard to tell above, but in this angle you can get a sense of how plush it is. It’s cushy, but still tight – so we won’t worry about it getting baggy with everyday lounging against it.
Step 4: Hang Your New Headboard
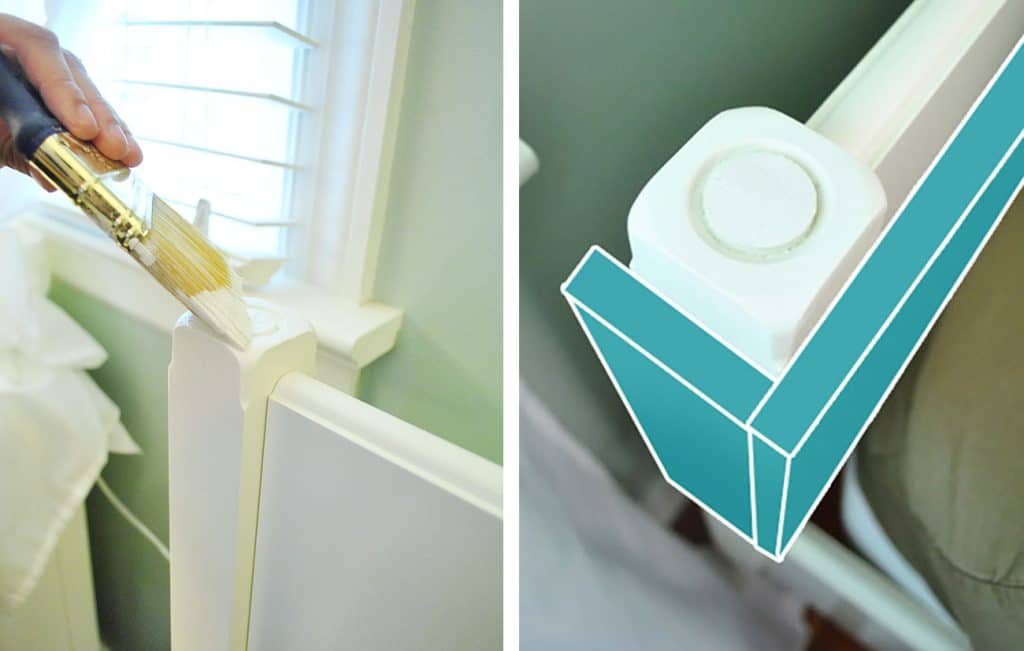
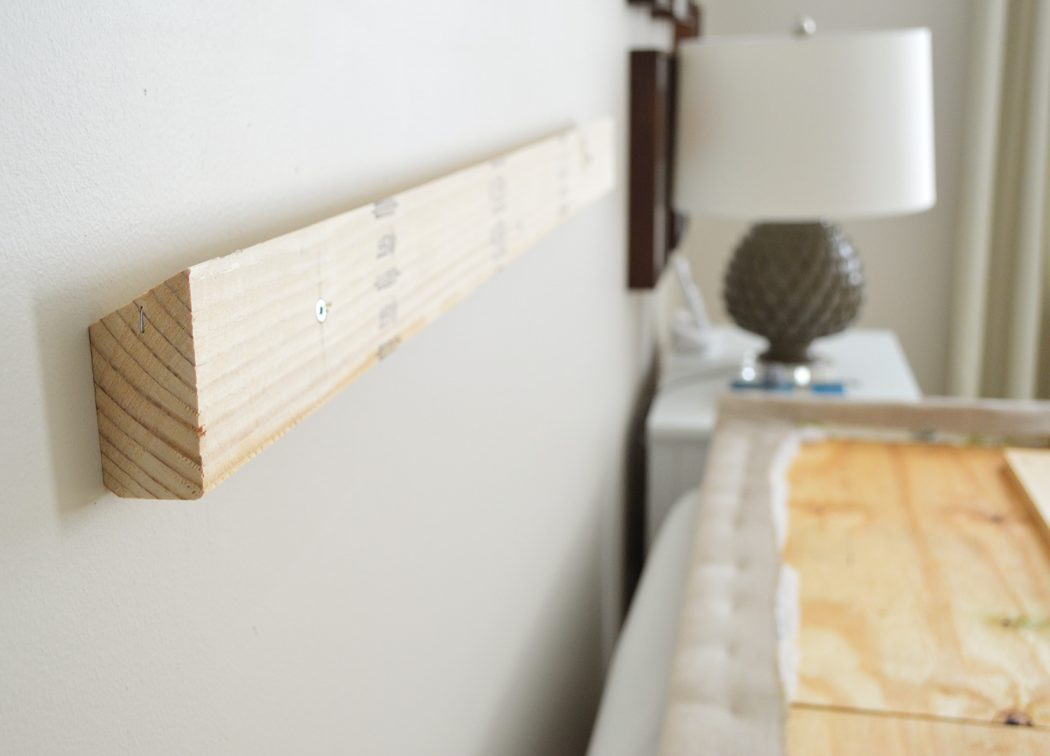
Now you’re ready to attach your headboard to your bed. This can be done in a few ways, depending on your bedframe. When typically like to install a headboard directly into the wall, since it’s often sturdier than attaching it to the bedframe. To do that, usually a french cleat works great. We cover how to DIY a french cleat in this post.
Actually, the headboard pictured above is the same one constructed during this tutorial – a few years later we just updated it for our new home with new fabric and a new top piece (just like we had added the sides pieces in this post). You can see the french cleat below, which is essentially two 2×4″ cut at an angle. One goes on the wall, the other on your headboard. You can also purchase pre-made metal cleats for just a few dollars.
TIP: Try to hang your headboard so it hits the top edge or slightly below the top edge of your mattress, that way there is no gap between the two.
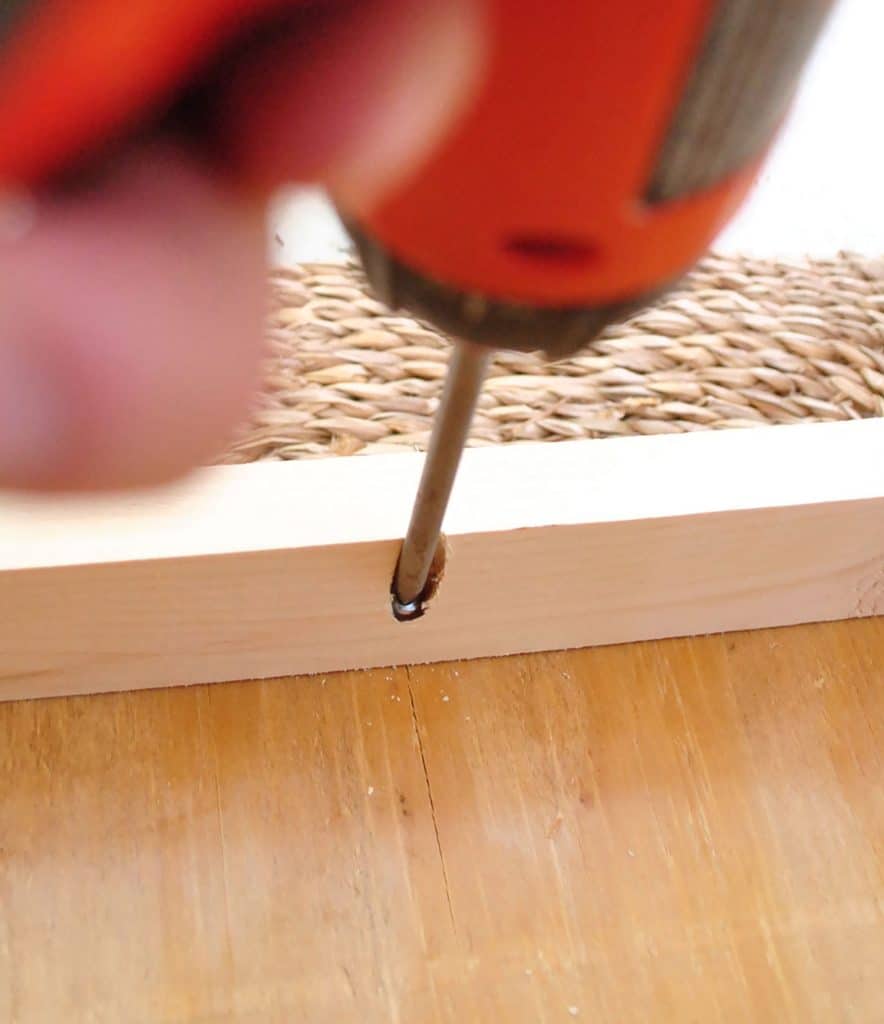
But in the case of our postless-four-poster bed, we chose to screw the new fabric headboard into old wooden one that was part of the existing bedframe, just careful to use screws that wouldn’t poke through the other side.
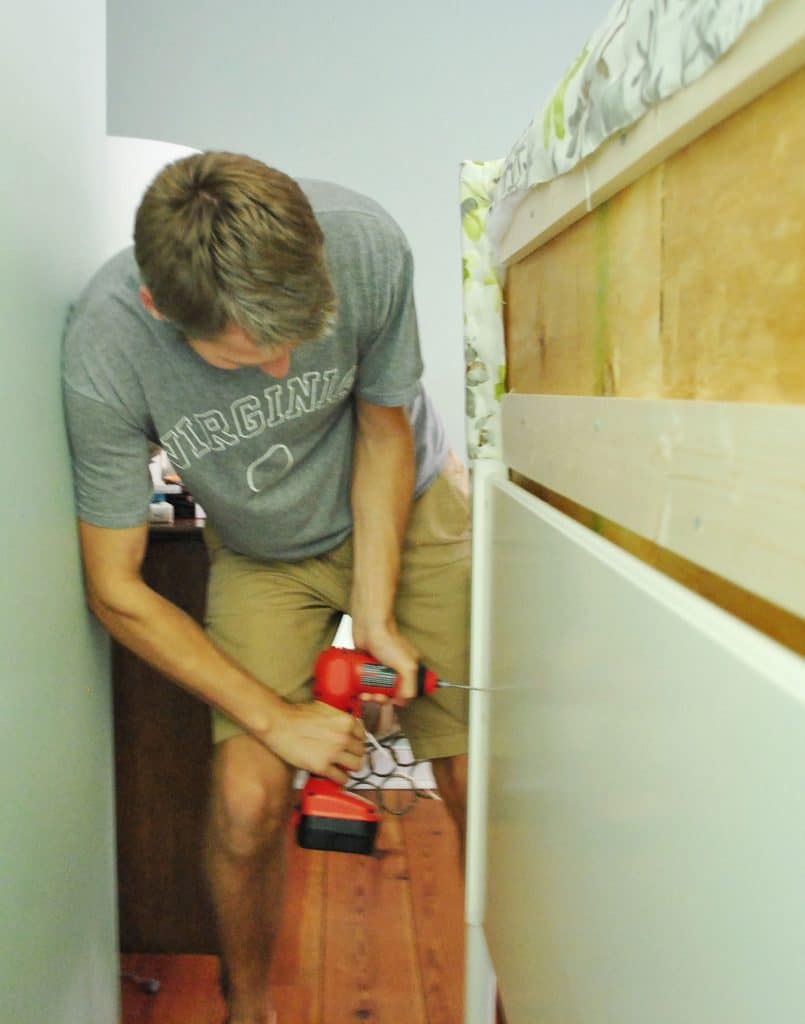
Here’s John putting the final screws in on the backside, pushing the new fabric headboard tight to the bedrame for a snug, secure fit.
Step 5: Enjoy Your Handiwork
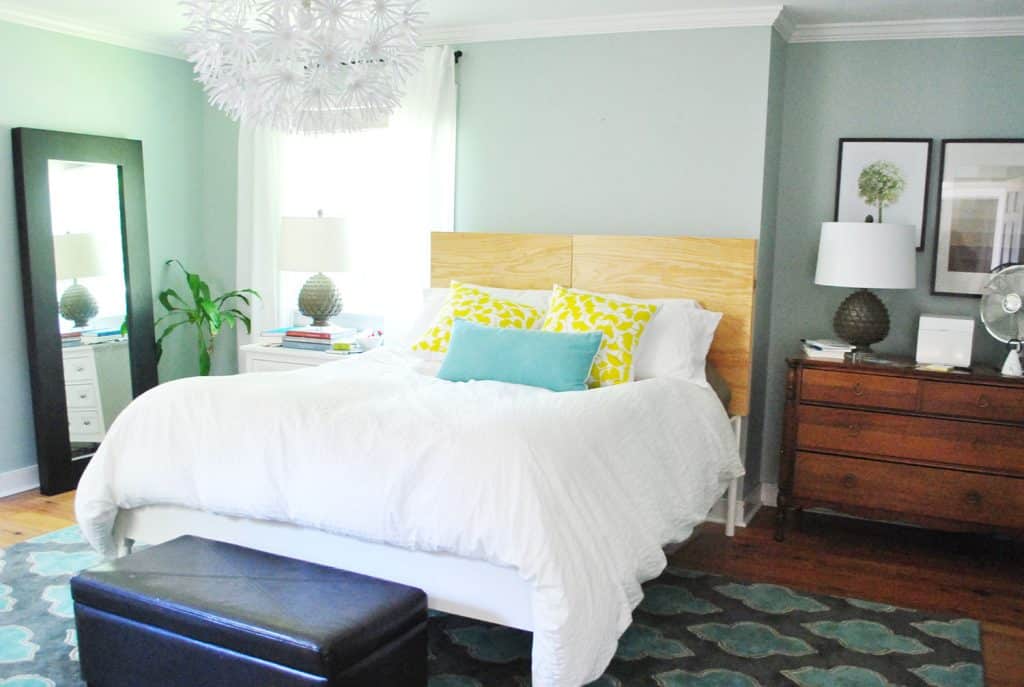
Once it was attached, we just pushed the bed back into place and beamed at it. If only it had been bedtime already that so we could immediately enjoy it’s plushness!
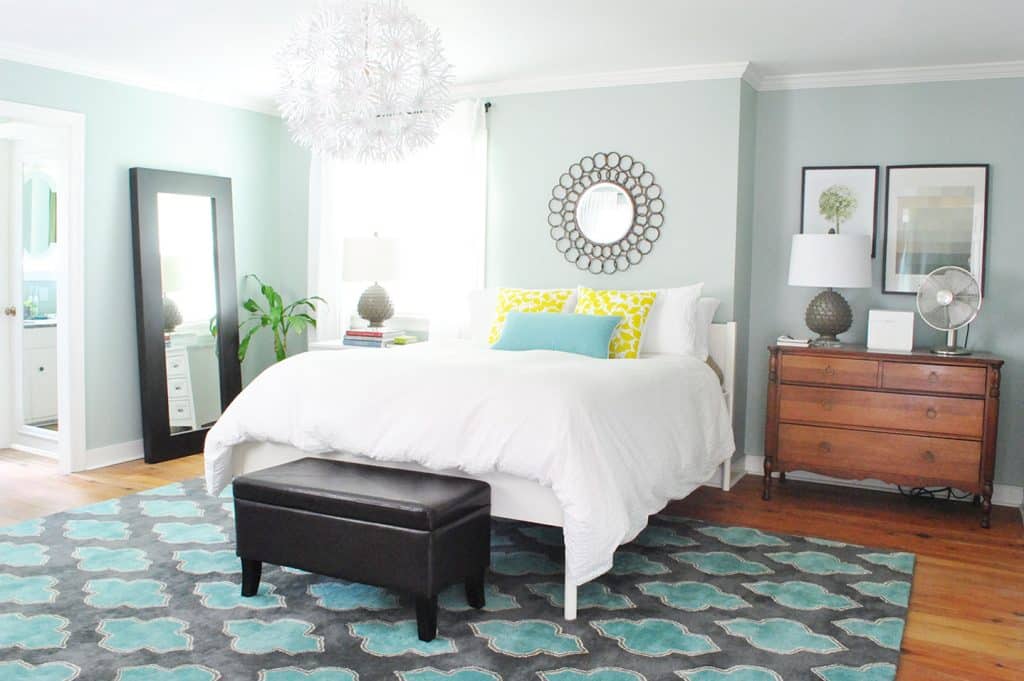
We loved how the fabric is sort of like the bridge between the yellow ginko pillows (since there are greeny-yellow flowers in the headboard fabric) and the turquoise in the rug (thanks to those subtle leafy sprigs of turquoise in the headboard).
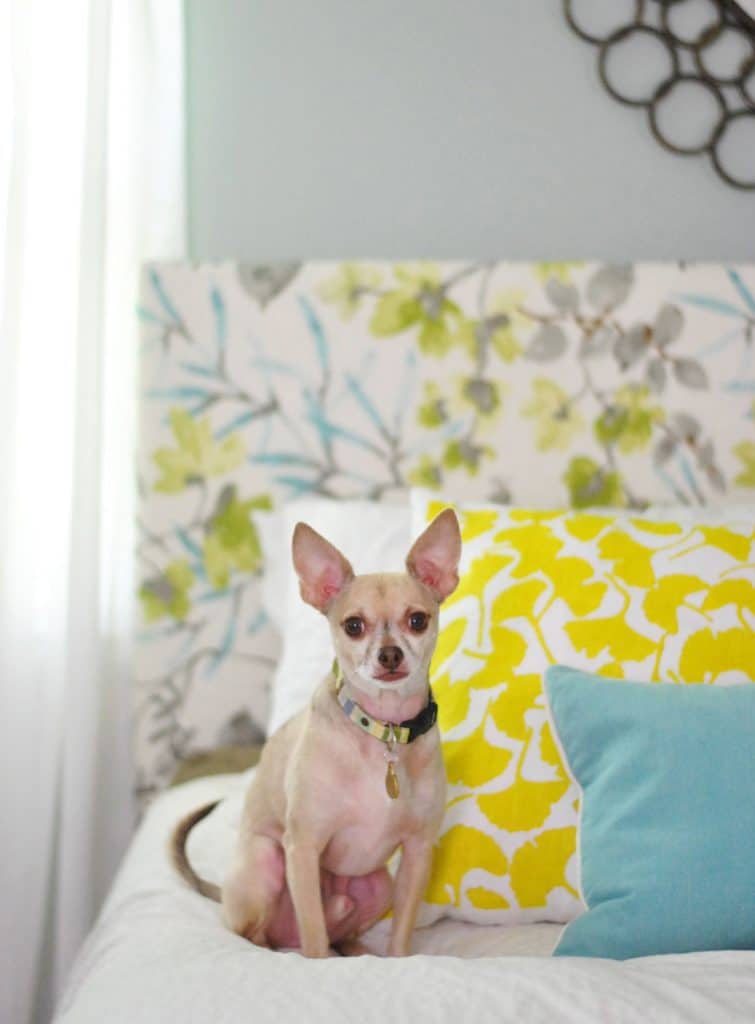
I even think Burger looks especially dapper in front of this new backdrop.
DIY Upholstered Headboard Cost
As for a budget breakdown here we go:
- Wood frame (plywood and some bracing boards from Home Depot): $22
- Two layers of extra loft batting (from JoAnn thanks to a 50% off coupon): $4
- Discount designer fabric (from a local fabric outlet called U-Fab): already owned – but it was originally $20/yard ($40 total)
- Total spent: $66 (if you add in the fabric we previously bought for a book project and reused for this)
Sixty six bucks isn’t pennies, but compared to upholstered headboards that are sold at places like Overstock, it’s at least $100-200 cheaper than even the most basic types. And considering places like Ballard Designs charge around $400-$700 for custom headboards (where you get to pick the fabric) it was awesome to get to choose the fabric and whip this up ourselves.
I’m sure things will still evolve over time in here, but this has been a huge upgrade for us already.
Is anyone else making headboards with fabric? What about wood or something even more unusual, like tin? We have four different DIY headboard projects in our book (all of which we made and shot in various corners of our house) and only one of them is fabric – so there are definitely other ways to go! I think we just were craving the plush softness of something padded to lean on. You know what they say (and by they I mean Al Green and Bill Withers): we all need somebody to lean on.

Update- We finally created this Shop Our House page to help you hunt down any furniture/accessories that you see in our house, along with all of our paint colors.
*This post contains affiliate links, so we may earn a small commission when you make a purchase through links on our site at no additional cost to you.

Catherine says
Love, love, LOVE it!
I’m nervous about you staining the dresser because I really like the warm color as-is, but everything you two do turns out wonderfully, so I’ll trust your instincts. ;)
Gina (Lady Goats) says
L.O.V.E!!!!! I can see how the headboards and rug “go” – love it!!! I just did a fully upholstered bed here. But I wasn’t audacious with the fabric at ALL since I am FICKLE and change my mind (and favorite color) about every other week. I also did two layers of batting, but I don’t feel like it’s enough! I’m thinking about going back and adding foam (which is saying a LOT! That bed is all put together, and isn’t coming apart easily!). Did you guys consider foam at all? Or is batting really enough for ya?
YoungHouseLove says
Awesome! Love the upholstered bed! As for the batting, it’s really plush! You don’t feel the wood at all, even the corners are soft- just go for super super extra loft (I always grab the thickest most expensive one and try to use a 50% off coupon for it, so I get twice as thick for half as much. Hope it helps!
xo,
s
Erin says
Wow I love the changes you’ve made over the last few weeks. That fabric is just gorgeous!!! I can see how it would go well with the rug. It really did make a huge difference in the room!
Dani says
It’s so cute! I love the fabric you chose! I did an upholstered/tufted headboard a couple years ago, and I wanted a fun pattern, but my husband didn’t like anything so it ended up just black. It looks okay for now, but I might be sneaky and redo it with something I love while he’s at work and I’m off for the summer.
Kathy says
I absolutely LOVE the headboard fabric!! I’ve been looking for something to go in my bathroom with the yellow walls, turquoise sink and footed tub that is painted turquoise on the outside! I’m thinking shower curtain and curtain in front of the washer/dryer that is in there too. Hmmmm.
That Clara is just adorable. And OMG – Burger’s little face peeking over the pillows – adorable.
Minette says
I made a tufted headboard recently… You can also use foam cushioning to add padding. It may be too thick after first purchase, but it can easily be cut down using an electric knife! I also glued the foam to the plywood, then covered with batting, then the fabric. Turned out great!
YoungHouseLove says
Sounds awesome!
xo,
s
S'Mo (aka Sarah) says
The new headboard looks great! And I love the idea of going a little darker with the wall color…can’t wait to see what y’all decide to do!
Anna-Lisa says
I think slightly darker walls and darker floors would look awesome! I like small bedrooms so the darker walls would make it feel cozier to me. I wouldn’t stain the dresser though if I were y’all – just because you have the dark espresso-toned mirrors and ottoman in there – it would be a lot of dark brown to deal with. Although maybe it’s just looking off in the photoshopped pictures because it’s the exact color of the photoshopped floor, I don’t know.
What are y’all doing with the old night tables? They were so cute it’s too bad they didn’t work in there.
YoungHouseLove says
We’re thinking of using them in the guest room or playroom. Will keep you posted!
xo,
s
Loren says
Hi! I love this! Could you post the demensions?
YoungHouseLove says
If you check out the Part 1 Headboard post yesterday, the dimensions are in that. Hope it helps!
xo,
s
Jordan@the2seasons says
Wow I can’t get over how different the room looks now. Very grown up now it makes me want to go spiff up our master bedroom. What we do have is a headboard that I made very similar. However we have a king size bed so I just bought a hollow door from Home Depot and then covered it with the foam and fabric. The size fits great and it was only $20 no cutting involved. Enjoy the room I love how it all came together!!!
YoungHouseLove says
That sounds awesome!
xo,
s
eileen marie says
You DID take a photography class, Sherry -at Haven -I was in it w/ you. ;). Everything looks great so far! -I learned a lot about pairing botanicals w/ geometrics from the Design Studio workshop at Haven. I was also the lucky recipient of the ginkgo stencil & was wondering where you got the ginkgo throw pillows (sorry if you’ve answered this a million times!).
YoungHouseLove says
Haha, it’s true! But I need more help I think! That class was so inspiring!
xo,
s
Sam @ The Junk House says
It looks great! I can’t believe how much the room has changed over the past couple weeks! I have my sleeping bag all ready – when’s the sleepover?
I’m planning to make an upholstered headboard for our bed soon. I just can’t decide on a fabric!
YoungHouseLove says
Haha, let’s set a date for the sleepover. Who is free in a couple weeks?
xo,
s
Nikki G says
Hi there,
I really feel compelled to comment because this makeover is SO GORGEOUS! I am so impressed with how you guys can really tie things together and make them relate, even though the space isn’t truely symmetrical, etc. I think using the same lamps (and putting them at the same height) is genius, and really unifies the space (the other things you mentioned do as well, but the lamps really hit it home for me). I also really love that you put the older picture (of the bed on the old wall) in for comparison – I think just having the bed on the wall w/more things going on (the nook vs. window) makes it more interesting and visually appealing (like it’s a more comfortable, lived-in space? And I think the mis-matched dressers, window and headboard make it look softer/more inviting). Okay, clearly I’m rambling now, bottome line – LOVE how this room is turning out!
YoungHouseLove says
Aw thanks Nikki! You’re so sweet!
xo,
s
Lauren M says
Love the headboard! Such great craftsmanship, and a great fabric choice!
I think I agree that the looks would look good darker… but they look good now, too.
I have to plead my case though… please, please PLEASE do not stain that beautiful dresser… it has such a beautiful, natural finish right now. And it doesn’t need to be darker to go with darker walls!
YoungHouseLove says
We promise not to rush into anything and to think long and hard before doing anything. Who knows where we’ll end up!
xo,
s
Jen. says
I LOVE that fabric! Do you know what maker/designer it is? So airy and beautiful …
YoungHouseLove says
It’s by Braemore, called Gazebo in colourway “Cloud” – which was $20 a yard from a local fabric outlet called U-Fab.
xo,
s
Lesley@ChaoticallyCreative says
It’s also online at MaryJo’s for $15.95 a yard just and FYI cause I am dying over this Fabric right now. This exactly what I’ve been looking for, for curtains!
YoungHouseLove says
Love Mary Jo’s!
xo,
s
Alison says
Have you thought about spraying it with Scotchgaurd, to protect the fabric? Very nice fabric choice and you even already owned it. I looks really nice in there.
YoungHouseLove says
Never thought about that! Will have to see if we think we need some extra protection (we’re usually pretty clean when we get into bed but you never know…).
xo,
s
michele says
pulls it together perfectly! amazing how it takes only one small thing to make a room feel “finished.” too funny, though … that fabric has been at the top of my Want pile for more than a year for our great room curtains. seeing it in use tells me two things: i still really love it, and now it will probably become a trendy pattern so i need to move on to something else. lol
Juliana says
Wowzah! That looks awesome! You guys are so creative!! Thanks for all the inspiration!
Paloma R says
That’s really cool! It totally brings your kitchen colors into the bedroom making your house feel just that much more cohesive without it all being too matchy matchy!
caroline says
I’ll admit I was a bit scared yesterday when I saw the fabric but I LOVE it. The colours, the prints, the light, wow! It really adds to the feel of the room and I believe you when you say it’s cosy in there!
I recently found an upholstered bed on the street but I couldn’t stop to rescue it. My husband ended up driving past a couple hours later but all that was left was the footboard. Better than nothing I guess! I’m making it into a flower bench for my balcony (you can see it here http://bunniesandstripes.blogspot.fr/2012/06/summer-garden.html). Watch this space!
xx
carrot
YoungHouseLove says
Aw, that sounds like fun! Cant wait to see how it turns out.
xo,
s
Seriously Sassy Mama says
I love the fabric. The room looks great!
emily says
HOLY MACKAREL. This might be my favorite project y’all have *ever* done. Our bed could accommodate this type of project, too, and I might have to tackle it one day!!
Thank you soooooo much for the inspiration and the instructions. Keep on keepin’ on, Petersiks!
YoungHouseLove says
Aw thanks so much Emily!
xo,
s
Katie says
If you didn’t have Ed’s old headboard to attach the new plywood one to, how would you do it? For instance, if you had just a mattress and box springs? Your old headboard tutorial is for hanging a framed headboard, not plywood. Just curious because I have some old plywood I was thinking of putting to use as a new headboard…thanks!
YoungHouseLove says
I would attach it to the wall or add legs so it could be freestanding. Check out our projects page to see how to make a headboard that’s easy to hang on the wall!
xo,
s
Amanda says
It looks fabulous! My husband and I LOVE our upholstered headboard and swear we won’t ever have anything else – it’s so nice to lean one while reading in bed! I love the fabric choice!
Stephanie says
It looks so great! Your room looks really calm and serene, I really love the paint color.
You have inspired me to DIY a fabric headboard! :)
Katherine says
It’s beautiful! I have some definite fabric envy going on.
Trela says
Looks fab! It really makes your ginko pillows fit — Loved the rug you chose immediately, but the pillows were a hard sell for me. Now it blends beautifully.
My own headboard is waiting to get a similar treatment — we lived with an old door as a headboard for years, it’s currently getting a new paint job and new lighting (my husband attached wall sconces to it when it was in our room… hotel style, very cool) for its new life in our guest room. My life has been paint stripping and sanding for the last three days. It will be nice to toss the paint brush for a while to go fabric shopping when I get to my own room!
Christine says
So pretty! I swear Burger got an extra serving of personality when he was made. I know the darker stain and paint are probably officially “better,” like more design-y correct, etc., but I sorta kinda like the variety of shades, even if they are mismatched. There’s something comforting and homey about it.
Brooke says
I LOVE it! I am so excited to do our headboard now. Maybe this weekend for my birthday project :) And I think the room would be awesome a few shades darker – I like the sunny light color you have now, but the darker photoshopped color made it all look cozier.
Stacy says
Not like you need an excuse to buy pillows (sorry, John) but I would love to see how gray colored pillows would look in the mix. Might help give the dark feel John is looking for until the walls and floors are redone in a darker shade.
Ed’s makeover is awesome but John’s face already told you that ;)
YoungHouseLove says
Haha, pillows change a ton around here, so I’m sure there might be some gray ones that squeeze their way in!
xo,
s
Jess says
So beautiful!! I love it! I’m also a fan of painting the room that darker shade, but I would, I love dark, dramatic walls. :)
Megan says
I am such a fan of headboards compared to posts! So much prettier and more comfortable!
I think that if you stain the floors, you should totally leave the dresser alone. It’s great a great aged patina look going on and it’d be a shame to change that. Plus, it would look great against darker wood floors. But I love natural wood (although some painted pieces are nice too). I recently just stripped the paint off my front door and am waiting on getting some help from the “professional” (aka my dad) as to finishing it off… it can be seen here: http://thependletonhouse.blogspot.com/2012/06/front-door-progress-day-2-part-2.html -it’s defintely come a long way but need some more TLC to make it beautiful, but it’s solid oak so it’s going to shine!!
YoungHouseLove says
The front door looks great! As for the dresser, we have lived with it as-is for over a year and still are promising to think long and hard before doing anything. Who knows where we’ll end up!
xo,
s
Sabrina says
I love the photoshopped darker walls! Go John! :)
Allison says
You guys seriously killed it with this one. I’m obsessed with upholstered headboards (as seen by my pinterest boards), but I was a little skeptical of patterns. Not anymore… it looks AMAZING!
YoungHouseLove says
Aw thanks Allison!
xo,
s
Amanda says
I know you already answered the “skipping the foam” question, but I’d love to for you to do an update about this down the road to let us know if the batting holds up (the corners don’t poke through, etc). We love our DIY headboard, and I wish there was a way to save a little when we make one for another room… the high-density foam is PRICEY!
YoungHouseLove says
Oh yes, we can do an update! We have had a batting and fabric upholstered headboard for over 7 years though (the green one in our guest room was something I used while living in NYC, in our apartment in Richmond, and in the bedroom and then guest room for years here in VA) so it definitely holds up if you use two layers of extra loft batting (the thickest kind they sell) with upholstery grade fabric!
xo,
s
abby says
Woohoo! Way to go. I’m Team John when it comes to the wall color – the photoshop rendering looks fab!
A.J. says
We weren’t as enterprising as y’all and ended up getting a really good deal on a platform bed with an upholstered/nailhead headboard from Wayfair. Other than loving how it looks in our room (makes it look way more finished) I was surprised at how much of a sound barrier it is! We don’t live in a loud neighborhood by any means, but as soon as I was in bed that first night it just seemed more…silent! Which is good when you want to sleep! Have y’all noticed that with your new cushy headboard?
YoungHouseLove says
I haven’t noticed that (our neighborhood is pretty quiet and our bed is in the back of the house) but I’ll have to listen tonight and see if I notice that!
xo,
s
~h~ says
I did nearly the exact same thing this weekend! Who knew that making your own headboards was so popular (and easy!). Certainly beats the multi-thousand dollar alternative of buying a plush fabric headboard at a store. My blog is covering my headboarding adventures this week… I’m going to be attaching mine to my bed a little differently than you though.
Also, you guys are awesome. I love your blog.
YoungHouseLove says
Aw thanks! Your headboard sounds awesome!
xo,
s
Lesley@ChaoticallyCreative says
All I can say is, ” I WANT THAT FABRIC NOW!!!!”
Stephanie @ Legally Blinde says
This looks beautiful! Great job!
Jen says
1. I fell in love with your blog last week and i can’t get enough! Spending far too much time here! I can’t wait until I have my own home, but for now decorating and redecorating my apartment will have to do.
2. This post is just perfect timing! A friend recently moved into her own place (moving up from the parents’ house!) and I told her my gift would be a headboard. I was thinking about doing it pretty much the way you did, but I was wondering what suggestions you might have for mounting it. It will be behind a bed that is just your standard metal stand, box spring, and mattress. I thought about getting an extra tall piece of ply wood so that the bottom is on the floor, but then I wouldn’t be able to wrap the fabric under the bottom. I could mount it to the wall, I’m just not sure how I would keep it from flopping around like it’s just a picture frame on the wall! Any suggestions from you or your followers would be great!! Much love from Bethesda!
YoungHouseLove says
I would check out our project page for a headboard we made with a canvas stretcher frame that’s so easy to hang on the wall! Otherwise a french cleat (google that to see for more details) can always work. Hope it helps!
xo,
s
Jen says
Thanks so much, Sherry! I think I will try to go the french cleat route with this sturdier version you guys have! Hopefully it’ll turn out as good as I see it in my head!
YoungHouseLove says
Sure thing! Good luck Jen!
xo,
s
Tiffany says
Everything looks so great guys! This is a random question and hopefully not a repeat, but what is that cute little yellow book I’ve been noticing next to the bed? I love the tiny pop of bright color and it keeps catching my eye!
YoungHouseLove says
That’s a book from John for Mother’s Day that we mentioned here. Love it!
xo,
s
binhtheredonthat says
I love the fabric and the final product!
Mindy says
Oh. My. Goodness. I love, love, love the room now. All of it. I love all the fabrics together and I love the bed in all it’s unadorned glory. It looks really great you guys. That headboard fabric is AMAZING.
I, too, wanted an upholstered headboard, but didn’t want to pay the $574 dollars for the Pottery Barn one I coveted. So I made one. And saved $532 buckaroos. Um, yeah, not bad for a days work. Here’s the link if ya wanna check it out:
http://rindymae.blogspot.com/2011/08/diy-upholstered-headboard.html
YoungHouseLove says
So awesome!
xo,
s
Carla says
I’m a new YLH addict who discovered you through the “Top 100 Blogs for Women” list Forbes just released; congrats! Your bedroom is beautiful! I think I’m in the minority, but I love the current paint color. The dark color starts feeling too matchy-matchy and less airy; I think the current paint color actually provides another “layer” of interest. Thanks for sharing your lives with all of us for inspiration!
YoungHouseLove says
Aw, thanks so much Carla! So glad you found us!
xo,
s
Luisa says
Very nice but I am dying to see it all without the mirror. Please indulge us with a pic??
YoungHouseLove says
If we have a spare moment to take the mirror down, take a pic, and upload it we will! Otherwise maybe just cover it with your thumb? Haha. We definitely prefer it with the mirror, but it’s a different strokes for different folks thing! It looked empty without it!
xo,
s
Jennifer says
I would love to DIY an upholstered headboard but doesn’t the fabric get grubby over time? Does anyone have experience with this? Especially if you are leaning against it in one spot all the time….. How hard would it be to unstaple and wash the fabric? It’s not that we are dirty or anything (this is sounding worse and worse!) but have you ever noticed how especially on hubby’s side, the pillows get a bit sweat stained over time and it doesn’t really wash out well (oh dear, getting even worse!) and this is with weekly washing of bedding….. OK, I sound like a freak. But I’d like to know. Thank goodness this is fairly anonymous – ha!
YoungHouseLove says
We had a green upholstered headboard for the past seven years (in my apartment in NYC, our apartment in Richmond, in our bedroom and then our guest bedroom, it’s still there now!) and it looks great! I think people are generally clean when they get into bed and you lean back on pillows behind you (not necessarily resting your whole body on the headboard – ya know?) so if you use nice durable upholstery grade fabric it should be great! You could also unstaple it (pop the staples out with a screwdriver) every few years if you wanted to launder the fabric and then staple it back on!
xo,
s
Elaine says
Such little changes have a huge impact. Love it!!!
Ed definitely looks better with a buzz cut.
elizabeth says
I’m really interested in the remote for the lamp that you mentioned – we have a lamp in the bedroom that that would be perfect for! Could you post a link? Thanks!
YoungHouseLove says
A few folks have said they sell them at Home Depot. Anyone have links for Elizabeth?
xo,
s
Jenny B says
Oooh I luuurve that fabric so much! I want it on my duvet and on my couch cushions and possibly on my body.
Love the headboard and I think the darker walls would be gorgeous. I think it would make the bed and new headboard pop!