#FAIL
Oh how I wish that hashtag was in reference to some cheeky Internet meme. Instead, it’s about the result of our deck’s footing inspection. Sigh. Picture us singing “you take the good, you take the bad, you take them both, and there you have, the facts of DIY life.”
So here’s the deal. We scheduled the inspector to come look at the six holes we had dug for our footings. By my understanding, he’d simply be looking at each one to make sure they were in the correct spots and dug to the right width & depth. Pretty straightforward by my assumption.
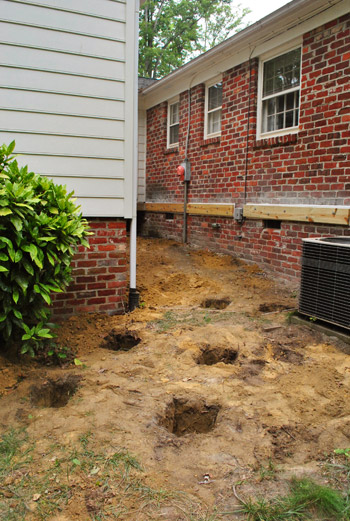
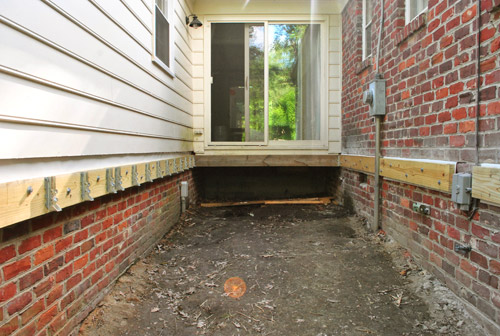
But if you recall, we chose to go above and beyond by having some of the ledger boards attached so that the inspector could check those for us too. I figured it was best for him to see that before I went through the trouble of finishing the whole darn thing (in our county, the second inspection happens after the entire deck is completed) – that way he could catch any errors sooner rather than later.
And boy did he catch errors.
As soon as he rounded the corner to our job site, he did three things that made my heart drop:
- He shook his head.
- He said “we’ve got some problems here.”
- And then he silent started writing in his notebook.
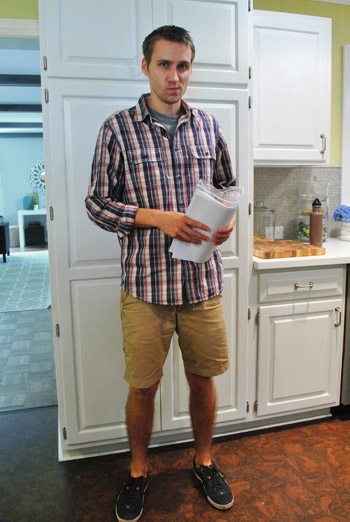
It was around this point that Sherry, whom I had tasked with taking some covert pictures of the inspection from within the house, snapped this picture out the guest room window. Don’t I look like a happy camper?

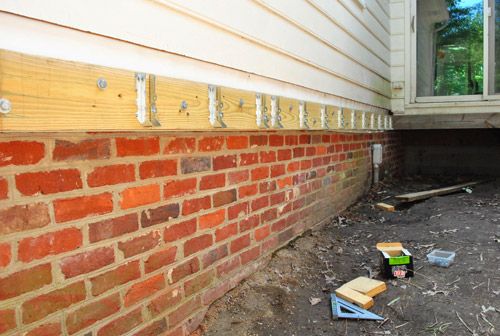
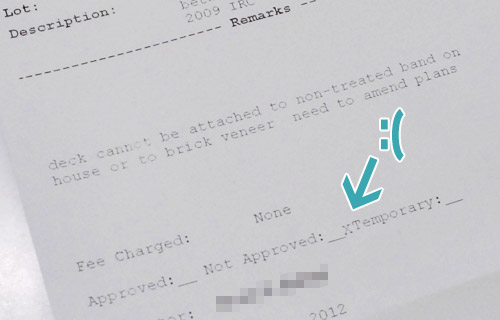
Despite being the bearer of bad news, the inspector was fairly helpful in explaining what the issues were (once he came out of the silence that had me sweating bullets). First, I had overlooked two tiny (yet apparently critical) letters on one of the diagrams in the county’s deck building guide. That “P.T.” highlighted below means that the house’s rim board where I attached my ledger board on the siding side of the alley needs to made from pressure treated wood. Ours was not.

So although we had added the required water-proof flashing behind our ledger board, the inspector said that if I wanted to put a ledger board on that side I’d need to also either replace the rim board with a piece of pressure treated wood (but messing with the structure of the house does not sound like my idea of a good time) or lower my deck by about two feet so that I was bolting into the masonry foundation instead.
But that ledger was only half of the reason for our failing grade. He told me on the other side of the house that I wasn’t permitted to screw into the brick side of our house because it wasn’t sound enough to bear the weight. I had read about this online before beginning, so I told him I thought I had solved that by purchasing screws long enough to go through the rim board of the house as well (for added stability). But apparently everything you read online isn’t true (go figure), so he explained that it still wasn’t acceptable in our county.
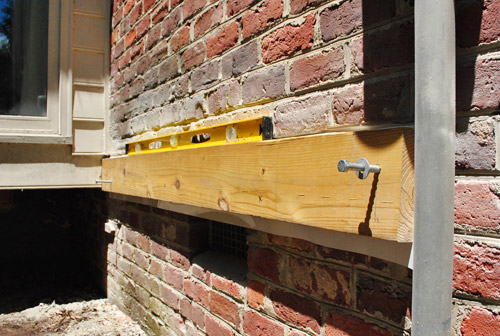
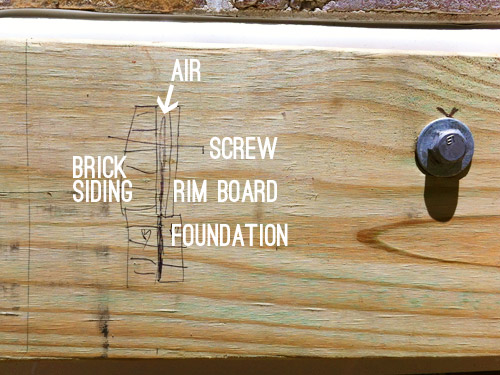
He even drew this little diagram on my ledger board to explain why it was wrong. Don’t you love having the error of your ways illustrated? The problem is that the air gap that is left between brick and the house (which I knew about, but didn’t realize was problematic) prevents the load from ever being fully transferred from the brick (which is just built to bear the vertical weight of itself). Again, my only solution here was to lower my ledger by about two feet so that I was going into the masonry foundation instead.
The other option he gave me was to forget the ledger boards and just built a free-standing deck – i.e. one that’s just supported by posts in the ground. Since Sherry and I didn’t want a deck that was two feet lower than our doorway (we wanted to just walk out there and eat, without having to carry things up or down stairs or worry about people tripping out of the house), it quickly became clear that free-standing was our best option. Translation: we had to revisit our plan, dig more holes, and attempt to pass our second inspection after our little course correction…
At that moment I was pretty close to devastated because it almost felt like starting back at square one. But I held it together long to get a few more questions answered by the inspector, thank him for his time, and wish him on his way. But I did take a second to pout at Sherry when I saw her snapping this picture through the window.

Of course, the inspector then handed me my official rejection receipt. He really knows how to twist the knife, doesn’t he?
When I walked into the house Sherry said she heard everything. I told her I need a few moments to be upset. If I were a drinker, I’m sure there would’ve been a beer or three involved. But instead, me and my sober self enjoyed a few moments of self loathing. I was mad at myself for wasting my dad’s time. For delaying our building progress. For ignoring my instincts to build a free-standing deck in the first place. For having to tell my dad we had more holes to dig. For (despite having done hours of research and planning) not having done it carefully enough.
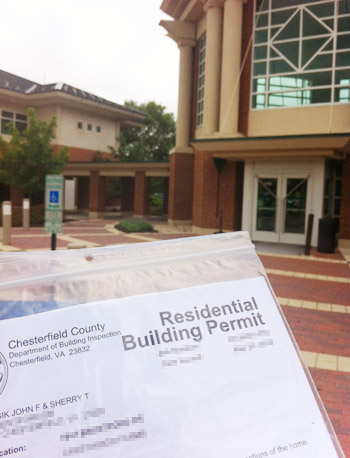
If you couldn’t tell, I’m pretty good at beating myself up. Though I was also a bit ticked off at the permit office that okayed my plans in the first place (I was right there if they had any questions for me to clarify before we spent days executing a plan they approved!). In their defense, they didn’t have the info about what type of housing I was attaching to, but I wish they had at least asked. As you may remember, I was all dressed up in my permit-getting outfit and ready to be grilled that day (more on that here)…

… but they didn’t ask me a single thing, and sent me on my way with a nice big “approved” permit to hang in the window.
Soon enough Sherry swept in with a positive spin on the situation. Number one: She wasn’t upset – she had actually expected that we’d fail at least one inspection (we’ve heard that more people fail then pass in our county, it’s apparently very strict and it’s sort of a miracle if you get through both inspections without having to redo something unless you’re a repeat pro builder who works with the county a lot). She pointed out we were much luckier to catch this early (if we hadn’t started on the ledger board until after our hole inspection, we would have built The. Entire. Deck only to find out that it wouldn’t pass at our last inspection and the whole thing had to come down). Point taken. This was starting to feel less like the end of the world. I might have even been writing punny titles for this post in my head to cheer myself up, like “The Petersiks: We Put The “F” In Footing Inspection.”
Sherry was also glad the inspector had been helpful with his suggestions so we knew what to do from here on out. And she was glad to have a learning experience that we could blog about. Seriously, she hugged me and said “this’ll be a funny story someday – and it’s just another example of how DIY isn’t always easy, but in the end it’s always worth it.” So before long I was out of my funk and was on the phone with the county’s building inspection making an appointment to get this:
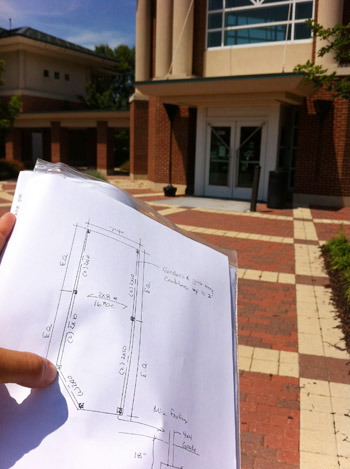
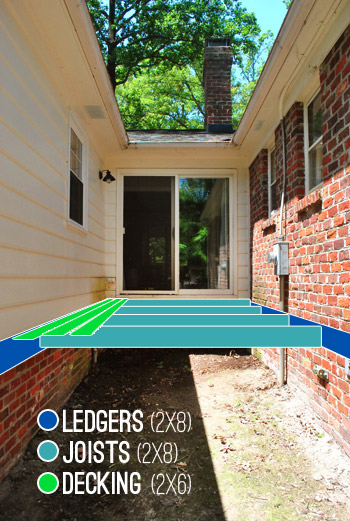
That’s our new plan. The inspector suggested that I meet with the reviewer who okayed my first plan and just have him draw me a new one for a free-standing deck. Part of me wondered why this wasn’t offered in the first place (certainly would’ve saved everyone some time!), but mostly I was just glad to have the very people drawing my plans who would later approve them. He was also considerate enough to keep our new post holes to a minimum (7) and to try to work with as many of the existing materials that we had already purchased (we’ll still need to pick up some new stuff, but it could have been much worse). The best news is that he believes we can still use our ledger boards – but as rim boards instead (with flashing over them as well, which we’d planned to add from the get-go). Even though they’re not approved to bear the full weight of the deck – those seven new footing holes will do that – he’s confident they can still be used as the stabilizing rim boards that I’d be required to add around the perimeter of the deck anyways.
So the only real change from our original illustrated plan below is that there will be seven posts added to convert this to a freestanding deck with girders (which are boards that will run in the same direction as our ledger boards, but they’re attached to the posts, so no weight is put on the house).
Overall it was a good, quick meeting that – if nothing else – helped open a line of communication between me and the building department (I have since called this same guy with two follow up questions). Perhaps I won him over with my more casual-slash-approachable-revised-plan-getting outfit:
So that’s where we are folks. We’ve got some more holes to dig (btw, my dad took the news very well) and a few more materials to pick up – but we’re gonna wait on getting those until our footing inspection is successful. Fingers crossed! Hopefully by this time next week I’ll be running around singing “The hills are alive with the sound of an approved footing inspection!”
We’ll definitely keep you posted on this roller-coaster of real-life DIY tribulations. But now it’s time for your failed inspection stories. Or really any general life failures are fine by me. Let’s commiserate. Especially if your story has a happy ending to go along with it. I just keep reminding myself that Sherry’s right about DIY not always being easy, but it has definitely been worth it when we look back at all of the major things we’ve accomplished in the past five years (like a bathroom gut job, two kitchen overhauls, built-in laundry cubbies, a built-in double desk, a 12′ long console table, and our big patio project). So I’m keeping my eye on the prize: a new deck that we’ll spend lots of family time on someday. And even with all of these snafus, it’ll still be a lot cheaper than hiring someone else to build it. At least I hope so. Off to knock on some wood…

Leave a Reply