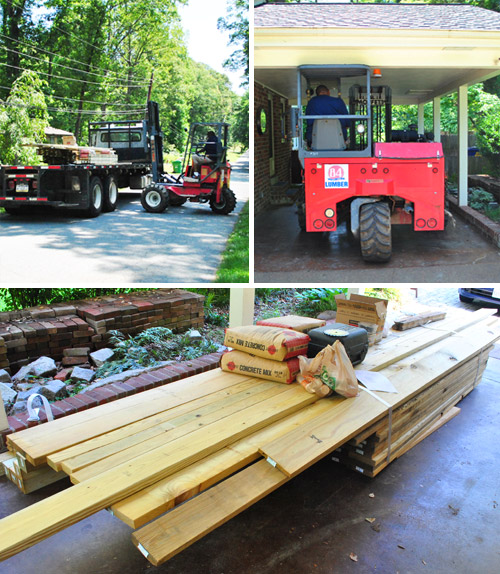
Good news: we made progress on deck building. Huzzah! Bad news: we didn’t make as much as we’d hoped. Harumph. I’m kind of having flashbacks to our bathroom remodel project back in 2009, when we’d schedule a long weekend with my dad to hopefully complete the whole thing but found ourselves just having started tiling by the end of the last day with him. But that’s just how real DIY life tends to go. So let’s rewind to the middle of last week when we got all of our materials delivered from our local 84 Lumber store (totaling about $1,000 including delivery and screws/metal hardware/concrete for footers/etc). That all went smoothly, especially when we realized that our carport was barely tall enough for a forklift to fit under. Seriously, the top of it just grazed an old plant hook hanging from the ceiling. Phew.
My dad arrived on Thursday morning to lend a hand while Sherry Clara-wrangled/tended to the blog/took pics/conferred as we went. We all spent the first hour-ish talking through the plan together. It was my chance to double-check that I knew what I was doing (or at least sort of knew what I was doing) and my dad’s chance to get up to speed. Here’s roughly what our deck frame will look like (except it’ll have stairs, which we’ll talk more about when we get to that step) thanks to the plan that 84 provided me. Oh but this isn’t the plank pattern that we’ll be attempting (that can be seen in this post).
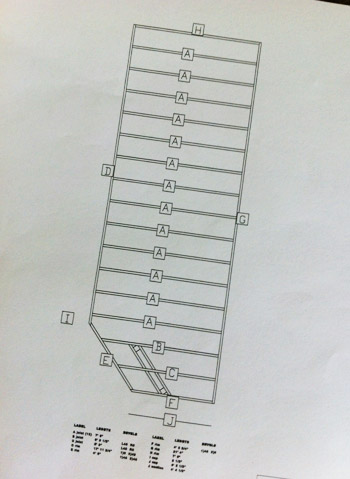
I realize that’s not a terribly descriptive picture, so bear with me. The only thing to note right now is that our deck-itself (not including the stairs) only requires two posts (near labels B and C) since most of it will be attached directly to the house. The only mid-project inspection from the county needed is a footing inspection, which ensures that I’ve dug my post holes to the right depths and widths. So theoretically I could just find those points, dig, get the inspection, and then do everything else. But Sherry and I figured we should start other portions of the deck before the footing inspection because (A) they’ll help us be more precise about our exact footing placement so there are no woopsies later on and (B) the inspector can warn us if we’re off track with anything else during the footing inspection – rather than telling us to take everything apart once the whole sucker is done. So the focus of Thursday’s work was to hang ledger boards and joists. Allow my little Photoshopped picture to explain that a bit further…
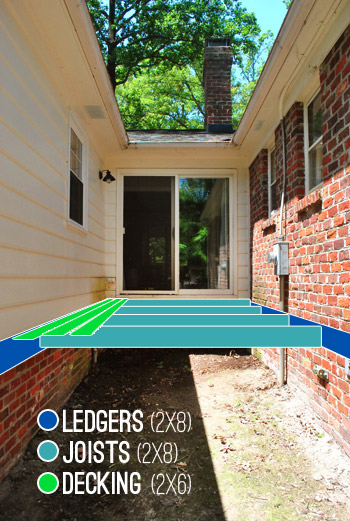
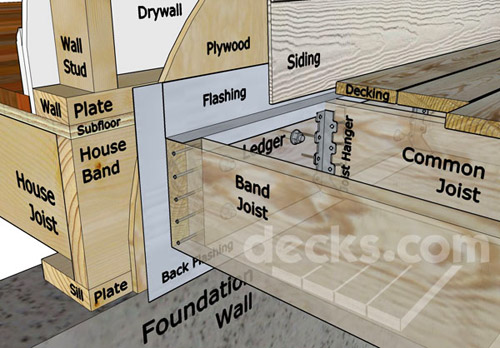
The ledger boards are bolted or screwed into the house on both sides, then joists will attached to each side, creating a span on which the decking boards can be nailed. Pretty simple, right? Well, there’s all sorts of considerations and steps that need to be taken – especially in regards to hanging the ledgers. For instance, they need to go all the way through your house into the band board (i.e. not just into the siding or brick facade) and you need to install flashing to prevent moisture damage. This graphic from decks.com is the closest thing I found online (after LOTS of searching) to what the whole dealio looks like:
So our first actual step was to installing flashing. Our county just requires back flashing, but I also plan to add some on the top too since after a bit more research we hear it’s generally a good idea to further protect things from water damage and rot. I had trouble finding info about attaching flashing to brick, until I happened upon these “Flash The Ledger Board” steps on One Project Closer‘s deck tutorial. Looks like my first step was to “trench out one of the horizontal mortar joints above the ledger board” about an inch – which I did by setting the depth of my circular saw and using a masonry blade:
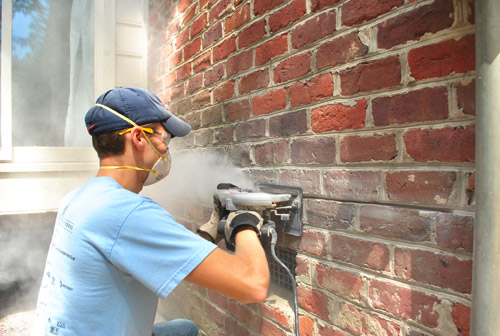
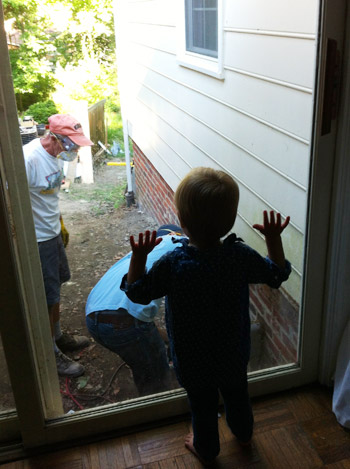
It was quite dusty. At this point Clara and Sherry were glued to the sliding glass doors inside, watching all the action. And Clara started yelling “fire is hot!” because all the dust actually looked like hibachi smoke (more on how we might have permanently scarred her with that experience here). But it was all good. No actual fires started and Clara simmered down and actually enjoyed watching the process when Sherry explained that the white dust was kind of like snow (the girl loves Frosty, so we were all good from there).
The idea here is that we could fold over a small hem on the end of the flashing and stick it into the exposed joint, sort of wedging it into place (though it also says to add a bead of clear silicone caulk over the seam, which we’ll also be doing). You can see my test strip of flashing below. I’m using vinyl flashing, since standard aluminum flashing isn’t recommended for pressure-treated wood applications (and is actually not permitted by our county). My other option was copper, but it was about three times the cost and seemed more finicky to work with, so I went for the cheaper and easier option.
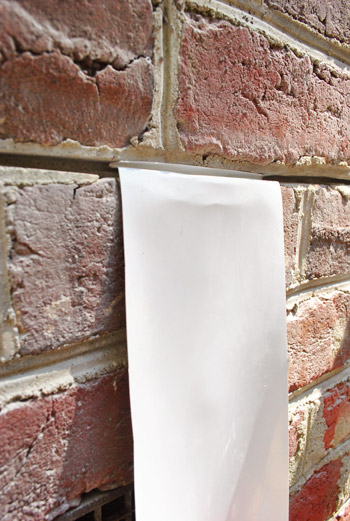
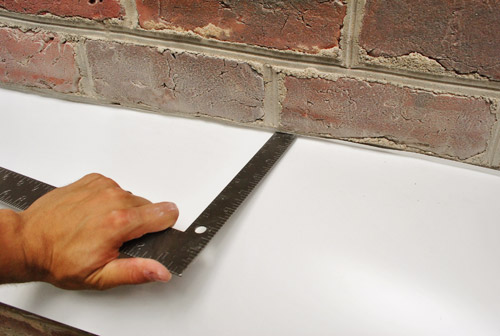
I rolled out the right length of flashing, cut it with my scissors, and bent the folded hem by hand (which was actually really easy to do). Though it did take the assistance of a ruler to actually force it back into my trench (probably a good sign that it’ll stay in place).
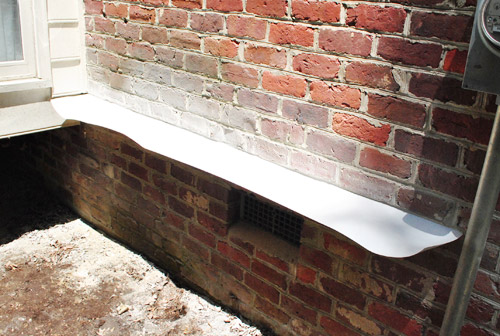
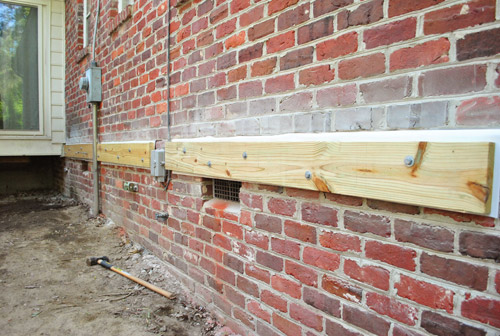
Here’s our first piece of flashing in place (though it will lay flat against the house once the ledger is attached by being drilled through the brick over the length of flashing). This is a good time to point out that the ledger board on the brick side of the house will be broken into three sections, since we have to work around a couple of obstacles like the electrical meter on the right side of this picture (thankfully the electrical municipality in our county is all good with us building this deck although it makes the height of the meter a bit lower so someone reading it will have to crouch). The lesson: be sure to call yours to make sure there’s no odd zoning rule like “the meter must be at eye level” that could ruin your deck-building plans. We hear in other parts of Virginia this entire deck could have been a no-go due to that rule.
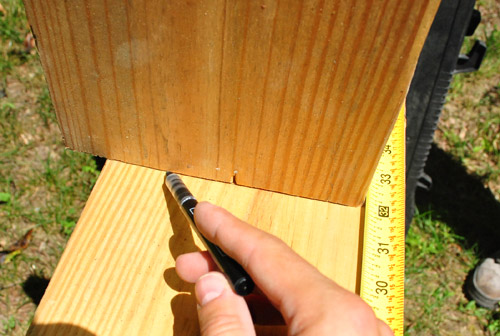
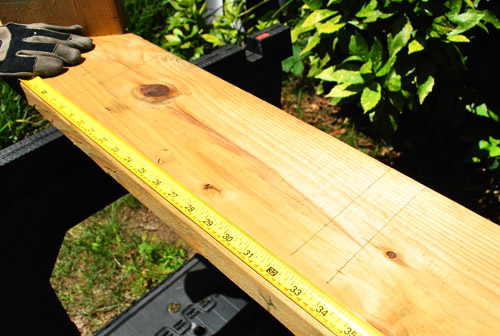
With the flashing held in place, we went to work on our first piece of ledger board (a 2 x 8′ board of pressure treated lumber). I cut it to length using the circular saw and starting by marking where my joists would go (my county guidelines required them to be no more than 16″ apart when measured center to center). I used a scrap piece of 2 x 8 to draw where they would go so I was sure not to place any screws in the way.
Speaking of screws, our county is very specific about those, as illustrated by this graphic in their deck guide:
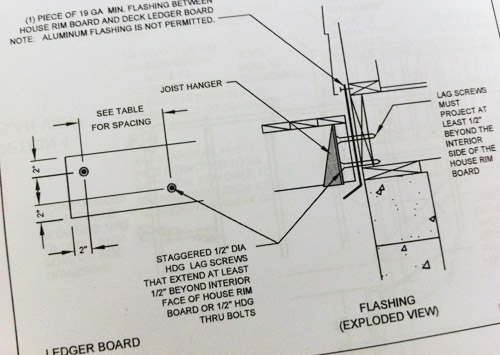
The spacing guide said my screws needed to be no more than 23″ apart. I opted to do them at 16″ increments because it’d be easier to remember that I just had to do one between each joist.
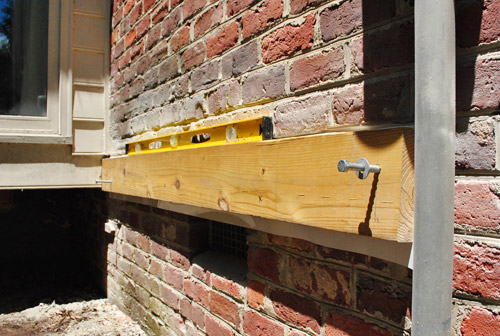
So after marking the ledger board and pre-drilling some pilot holes in both the wood and in the brick, my dad held the board in place so that I could get our first screw in on one end just enough to hold the board up. When then checked that it was level and put a screw on the other end the same way, that way we didn’t have to exhaust ourselves holding it up against the wall.
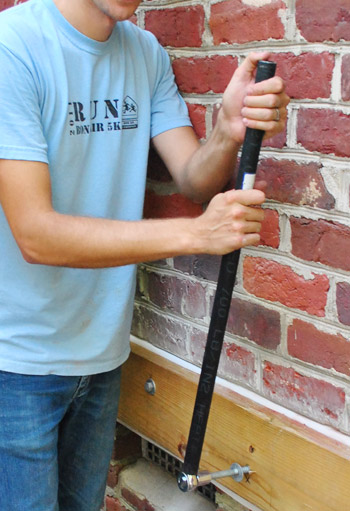
The screws we’re using are technically HDG (hot-dipped galvanized) lag screws, which are one of only two types of screws that are approved by our county. They’re massive: 1/2″ thick, 6″ long, with a big hex head on the top. My power drill didn’t have enough torque to help me, so we had to hand wrench all of them in place…

… fortunately my dad had the bright idea of buying a piece of $2 scrap pipe to extend the handle of our socket wrench to give us more leverage. It actually made it quite easy to drive them in.
The not so easy thing? The hiccups we hit that caused some delays. First off, we had to go out and buy longer screws – 8 inchers – because the county requires the screws to stick out the other side of the house’s band board. When I checked on our first two screws in our crawl space I could see the 6″ guys weren’t making it all the way through. The 8″ screws did the trick, but we had to be more delicate with them because a couple of them broke off mid-way, requiring some extra work to remove the broken screw and drill new holes. So by about 2pm (after over four solid hours of work), this is all we’d accomplished. Can I get a womp-womp?
Fortunately we found our rhythm after lunch (my Whopper must’ve done wonders) and made lots of progress in the next couple of hours – completing the rest of the ledger board on the brick side of the house. Woo hoo!
Wasting no time to celebrate our accomplishment, we turned our attention to the ledger board on the siding side of the alley. I wanted to make sure it sat level with brick-side ledger, so we decided to temporarily set a joist to help us out. The joists attach to the ledger boards in these metal hangers. I just loosely nailed in it place at this point.

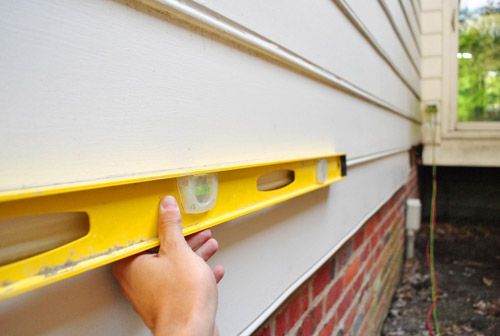
After having cut another 2 x 8′ board to act as a temporary joist, I held it up using my level as a guide. Then I marked the siding wall to indicate where the top of our ledger on that side should go.

Since a ledger board is never supposed to attach through siding, it meant we’d need to remove the siding that was in our way. And since we have wood siding, it meant cutting it with a circular saw. Not gonna lie, the idea kinda got me nervous. It just felt so wrong to cut into perfectly good siding. But I measured up from my ledger board mark to accommodate for the width of the decking (as well as a small extra gap, which I had read was helpful to keep moisture from getting trapped against your siding). Then I used my level to make a straight line down the length of the wall. A laser level would’ve done this much faster, but we had left it at my dad’s house. Oops.
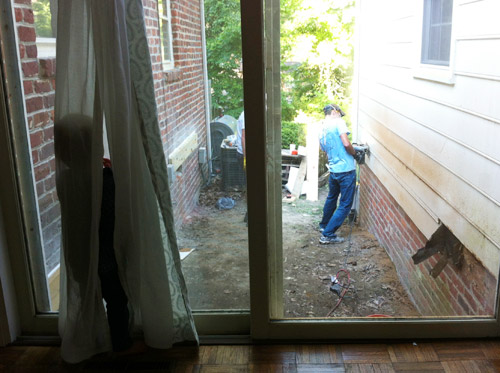
This must qualify as the “exciting part” of the day, since Clara again became glued to the window. I’d like to pretend she’s fascinated by construction, but really I think she just wanted to get her grandpa’s attention (picture a broken record of hearing “Hi Tom Tom! Hi Tom Tom! Hi Tom Tom!” like a kid on the way to Disney asking “Are we there yet? Are we there yet?”).
After setting the depth of my circular saw to be sure I’d only go through the siding (and not the band board of the house), I followed my line as carefully as possible.

The noise and the dust from the saw must’ve been too much for Clara, as this is about the time she took cover in the curtains.
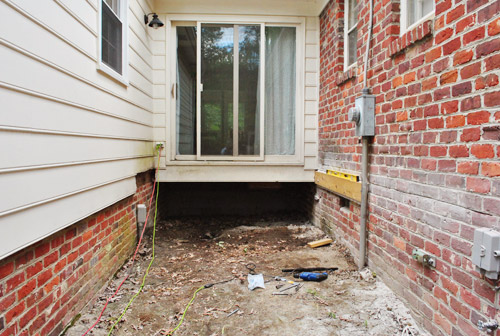
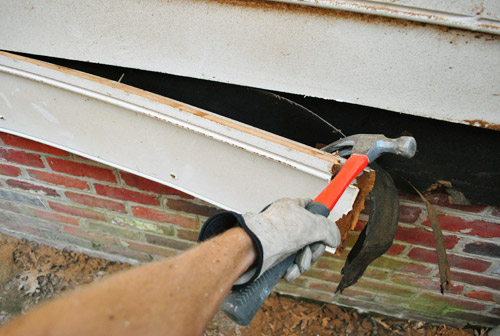
Once I had my line cut, it took a bit of prying but we quickly got all of the wood siding loose from the wall. It was a beautiful sight.
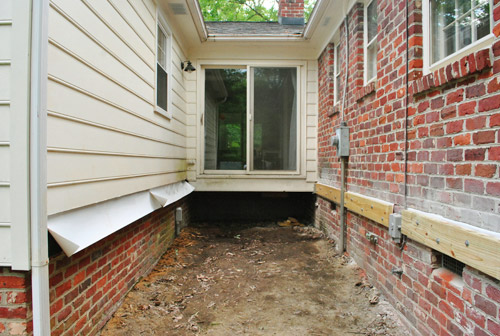
It was getting on about 6pm at this point, and Sherry and my mom had dinner waiting for us inside. But since a thunderstorm was forecasted for that evening, I wanted to at least get the flashing up on the now exposed siding-side of the house. To do this I took sheets cut to length and shoved about 5 or 6″ inches up under the bottom edge of the siding so that it overlaps. Then I nailed the flashing in place right under the siding (I’m later going to use silicone caulk on these nail spots to make sure moisture doesn’t seep through and will also run the bead that I’m supposed to add across the flashing on the brick side of the house).

With that, we decided to call it a day. We didn’t get anywhere close to measuring for post holes. Heck, we didn’t even get both ledger boards up. But I feel really good about the work we did accomplish… even though it doesn’t look much like a deck yet. We hear it’s this leveling and framing stuff in the beginning that takes the most time, but really lays the groundwork for a nice long-lasting end product. So we’re looking forward to smooth sailing when we get all of this annoying stuff out of the way. Here’s hoping, anyway! We certainly won’t be setting any speed records for our construction method since we can only work on this baby about one or two days a week, but we figure that’s actually pretty close to how it works for most evening-and-weekend-DIYers out there.
Oh and I definitely could’ve earned the “dirtiest” award for the day. Between the dust kicked up by cutting out the mortar and slicing off some of the siding, I was quite the looker. Sherry especially loved that goggle line I was rocking.

So next up will be finishing the ledger board installation and making some pretty sizable footing holes. Then we have our first inspection. And you know we’ll keep you posted. Here’s hoping slow and steady wins the race builds the deck…
Who else is in the midst of a project that’s taking them longer than expected? Have you been hitting snags or are things just more complex and time consuming than you anticipated? I know I always feel better knowing I’m not the only one behind on a project – and it’s also pretty satisfying to get something done right, even if it means things take a little longer to knock out. Hope to be back with more deck progress later in the week! Until then, I can be found trying to get all of the sawdust out of my eyebrows…
Pssst- See how we stated planning the deck here, how we cleared the alley so it was ready for building here and here, how we selected our deck materials here, and how we got our permit here.

Leave a Reply