Before we get to our weekly deck update, we just have to say HOLY COW you guys have awesome homes! So many folks submitted house crashing photos for our upcoming trip to Atlanta for the Haven conference – and we wish we had time to see every last one of you! We’ve worked out a plan to crash as many as we can fit in and are crying a little inside that we can’t get to all of you – but we might be back out that way for book tour stuff in the fall so there’s always next time! So this is just a huge thanks to everyone for offering to allow a toddler, a chihuahua, and two curious bloggers to snoop around.
Ok, back to business. I’m quite proud of this post title as it includes not one, but two deck puns about our latest accomplishments: leveling more stuff and digging holes. Continuing with the theme of Deck Day #1, Day #2 wasn’t quite as productive as we had envisioned. Day #2 actually happened the day after #1, but since that progress wasn’t really post-worthy we wanted to squeeze in a bit more ’til writing another update. But we finally accomplished both a fully completed ledger board and made all of our post holes thanks to Deck Day #3, so here’s the rundown on those last two days of deck work.
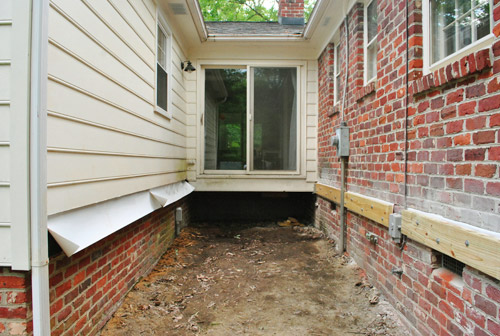
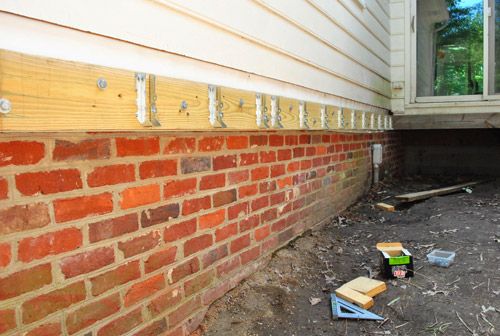
You may recall that we left off with hanging one ledger board on the brick side of the alley and had readied the siding side for ledger board-ing as well.
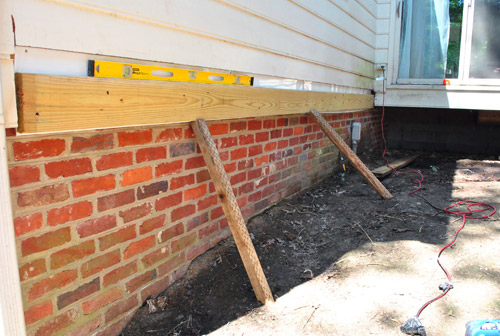
Obviously the first task for Day #2 was to get the other ledger board hung against the house (for more explanation of what these guys do and how they’re installed, check out this post). So the first thing we did was mark where all of our hangers would go (the metal piece that a joist sits in) so that we didn’t put any bolts in those spots. Since the hangers would have to line up with the hangers we had already marked on the brick side of the house, I created a little diagram with all of my measurements so we could mark them accurately. Clara is responsible for the crayon scribble.

The ledger was a bit of a bear to maneuver because it was one 17-foot-long 2×8′ board. But my dad and I managed to get it into place – and between our two sets of hands and some scrap board for propping, were able to level and screw it in without too much trouble. The actual bolting process was faster since (a) we only had to use 6″ lag screws this time and (b) we were going through wood, not brick.
Since the ledger board attachment phase went faster than expected, we decided to insert another task to our to-do list: attaching all of the joist hangers. Our ultimate goal was to dig post holes by the end of the day, but since it was barely 11am we thought we could knock out the hangers pretty fast. So off we went with our level and scrap joist, hammering in the hangers right down the line. Although we actually did every third hanger first (to take advantage of the full length of our level) and then went back and filled in the ones between.
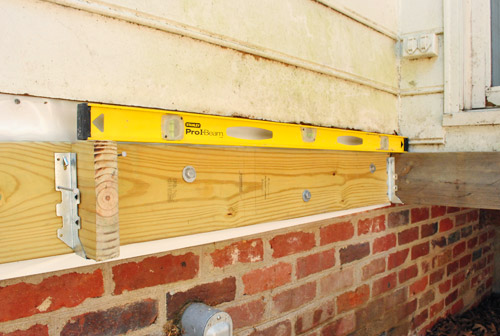
It was a relatively straight-forward process, though a bit more time consuming than we had bargained for.

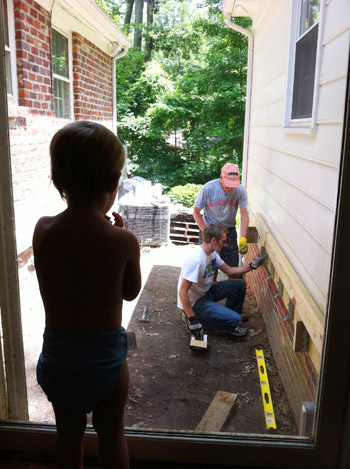
And just like the day before, we had our cheering section observing from the door. Unlike the day before, the cheering section was no longer wearing clothes for some reason (except, thankfully, for a blue cloth diaper). This doesn’t include my wife (she was diaperless, yet clothed – and thankfully very helpful for photo taking and conferring throughout the day while she Clara-wrangled).
By about 1pm, my dad and I had finished all of the hangers on one side of the house. And we were growing a bit less confident about our schedule and more than a little hungry.
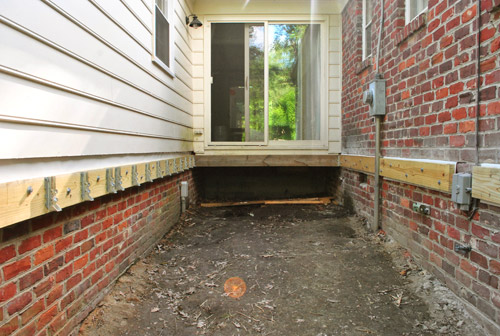
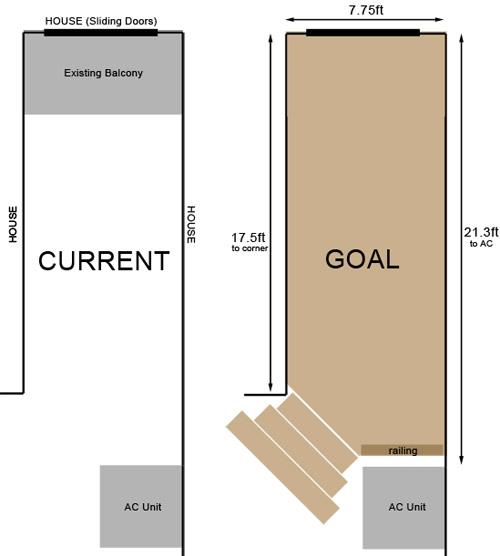
So instead of tackling the hangers on the brick side of the house, we decided to get some food in our bellies and then turn our attention to digging post holes since our first inspection was only about footings, not ledgers or hangers or any of that other jazz. But can’t you just see it- our future deck. Try to squint and imagine beams going across these ledgers and boards running on top of those. Bam: instant imaginary deck. If only making that a reality were that easy. We can only devote one or two days a week to it since it calls for such big chunks of our time (we’re also working around my dad’s schedule, which we’re happy to do in return for his help) so our goal is to complete it before the end of July. So expect weekly updates for the next month or so and then hopefully we’ll have a nice purty after picture for ya. Haha.
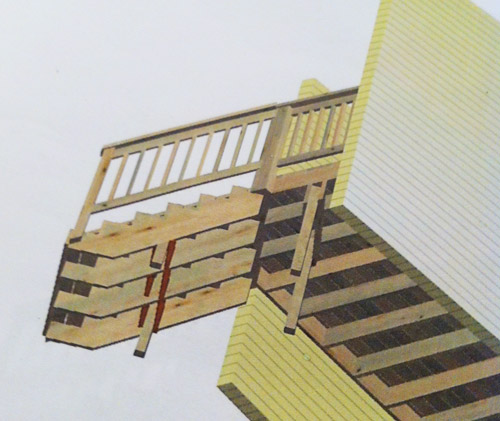
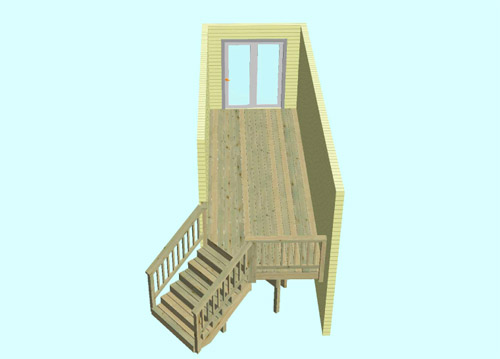
After our late lunch we got right to planning where our post holes needed to go. On paper, it looked fairly straightforward. As you can sort of tell from this 3D rendering that 84 Lumber provided with my plans (this is a few from underneath – almost as if you were beneath our AC unit) – we’d need two posts at the end of the deck, two in the middle of the stairs, and (although not shown clearly) two at the very bottom of the steps.
Actually figuring out where those holes went on the ground was a bit more involved. For the two at the end of the deck, we first had to figure out exactly where the end of our deck was and what angle the stairs would come off at (we made it easy on ourselves and went for 45 degrees). We marked our lines with some string tethered between two bolts hammered into the dirt.
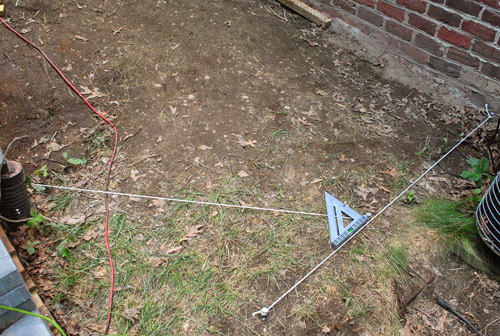
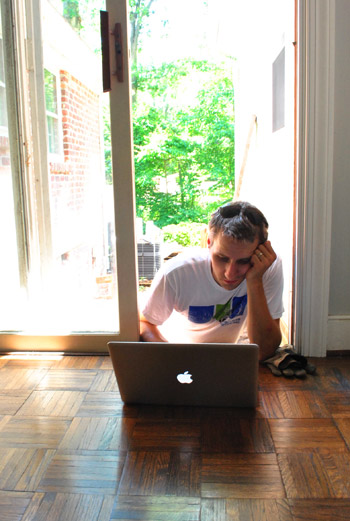
Figuring out the stair posts meant actually figuring out how long our stairs would be. My geometry is a bit rusty, so thank goodness for this EZ Stair Calculator I found online. And thank goodness for my fancy schmancy temporary desk:
Even with the calculator, we spent more time staking out our stairs because Sherry, my dad, and I got into this big debate about what the stairs should look like (and what we felt capable enough to build). We had at one point envisioned stairs that flared out at the end. But there were seven stairs instead of three, so that would have gotten too wide for the space.
We even talked about three stairs with a large platform halfway down and then three more stairs. But ultimately we opted to keep things simple and just go with basic straight stairs for now (we didn’t want them to go on forever – which they would do with a platform in the middle – and with the air conditioner to the right of the stairs and the house to the left of them, it sort of limited our creativity). Oh but see the railing on the deck to the right of the stairs in the picture below? We think that’s going to be a big built-in planter box instead. Will keep you posted as we go!
At least our decision to go with “classic stairs” was easy to mark with our string (we later shifted them over five inches away from the house – oh and we’ll plant something to the right of them so there’s a buffer between the steps and the air conditioner – not too close though, so it won’t inhibit the air conditioner’s function).

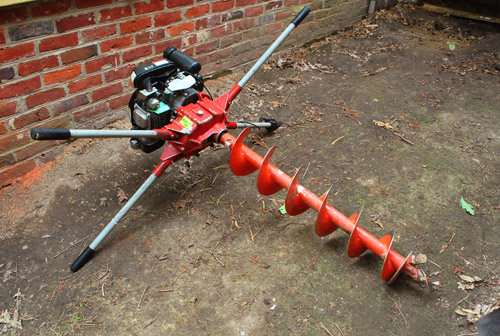
But by that point it was about 5pm on Deck Day #2, and two straight days of work were catching up with us, so we made the call to leave hole digging for another day. So let’s skip ahead to just a few days ago when my dad arrived with this in his trunk. Enter Deck Day #3, stage right.
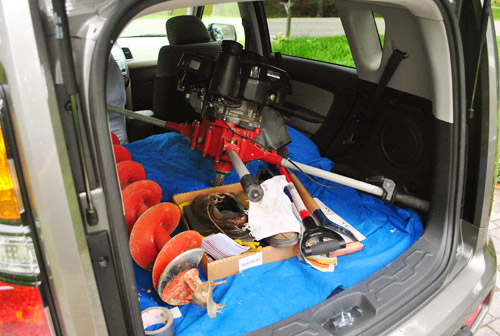
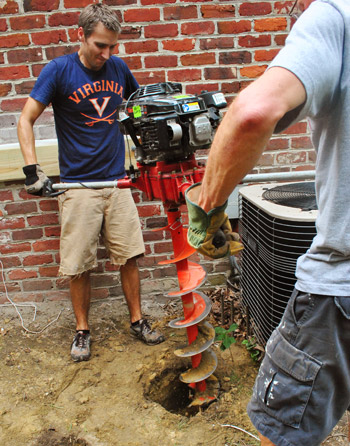
That’s a two-man auger from the Home Depot Tool Rental Center. After having not the most fun manually digging holes for our fence last year, I figured we’d got the power tool route this time. It was $60 to rent for 4 hours (and it would have been $85 if we wanted it for a full 24).
To get us started I dug a shallow mark in the ground where we needed our hole to go, which also helped the auger bit sit in the right place before we powered it up.
The thing started up like a lawn mower (you pull the cord and it starts to rev) and, although a bit unwieldy it wasn’t all that challenging to use. It took both of us holding tight while I controlled the speed of the bit with one hand. We’d let the motion and weight of the machine do most of the work – we just had to keep it from falling over. And occasionally we pulled it out to help the dirt actually get out of the hole. NOTE: Always call your local Miss Utility first to ensure you’re not digging through any wires or pipes that could be damaging to yourself or your property. We did this as one of our first deck planning steps way back in May (more on that here).
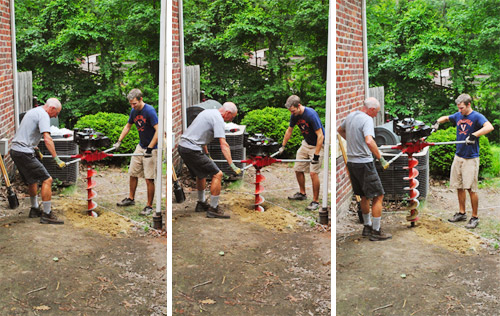
If you asked me today, I’d say the auger wasn’t that hard to use. But looking back at these pictures, boy does my face tell a different story.
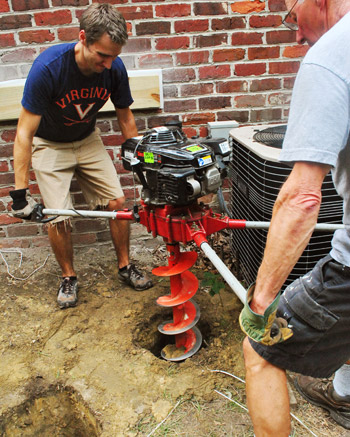
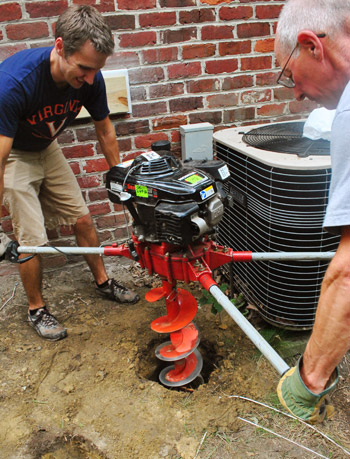
And I guess it wasn’t only my face trying to prove just how hard we were working. Sherry thought it was funny that the veins in my arms were bulging… even several minutes after putting the auger down to rest.

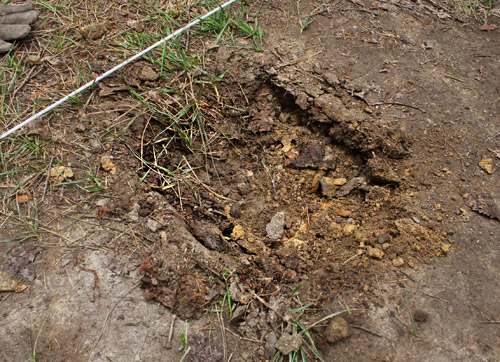
Also contributing to the vein-bulginess was the fact that following each spin with the auger, we had to go back manually with a shovel and a post hole digger to “tidy up” the hole and get it to the required dimensions.
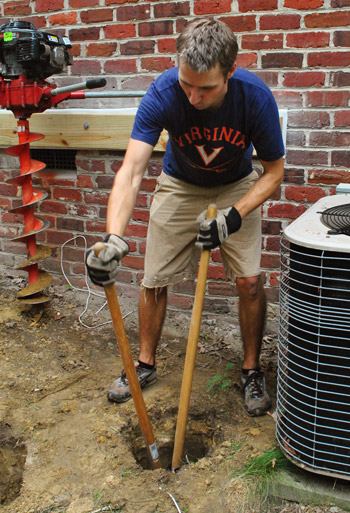
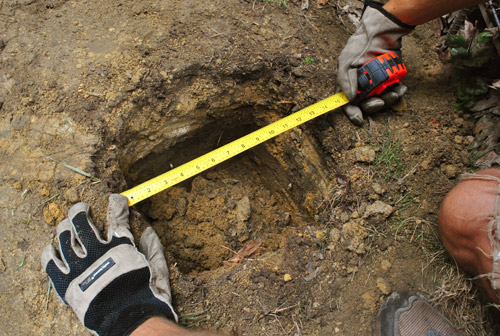
Part of the reason we did this was just to get some of the loose dirt out that the auger had churned up, but not successfully carried out of the hole. The other reason was that (due to a miscommunication with my dad on my part) he rented an 8″ auger bit and we needed 12″ holes to pass inspection. So you can see from the picture below how a “just augered” hole wasn’t quite as wide as we needed.
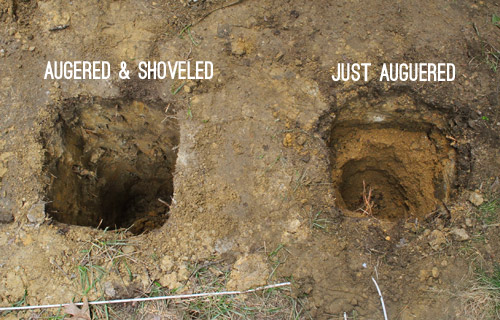
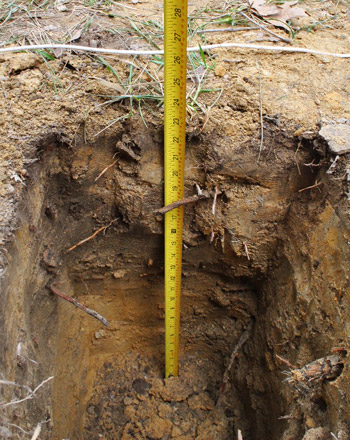
But once everything was cleared out, we checked all of our dimensions to make sure they would pass inspection. The holes had to be 12 inches wide. Check!
And at least 18″ deep (which is the local requirement given our frost line). We tried to get at least 21″ though, because I plan to put a few inches of gravel in the bottom to help for drainage before I put in the required concrete.
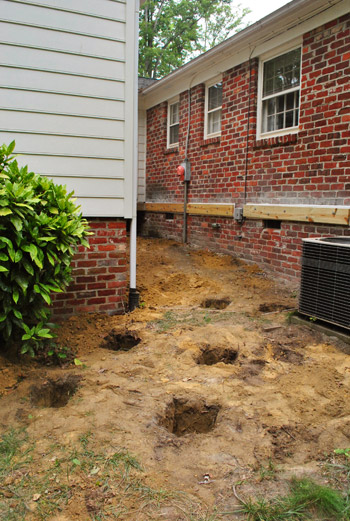
Digging the six required holes only took us about two hours. Pretty speedy compared to all of the other work that had gone into this deck so far. Of course, the day we worked felt like the muggiest and most humid day of the summer so far, so my dad and I were both pretty well spent (not to mention drenched in sweat). I’ll spare you that picture. Instead, I’ll leave you to admire our holes. Wait, that sounds inappropriate…
With our footer holes done we’re now able to proceed with scheduling our first inspection. While I’m super confident about our holes, something about the inspection just makes me nervous. So please keep your fingers crossed for us! Perhaps I’ll have to put on a fancy inspection-getting outfit much like my dapper permit-getting one. Or should I just send Burger and Clara out there to charm the guy?
What did you guys tackle this weekend? Any other auger users out there? Or do you dig the old fashioned way like I did for the patio’s fence installation? I gotta say it took a lot less time, so the $60 rental fee was money well spent!
Psst- Want to follow along as we inch towards a finished deck from the beginning? Here’s a post about planning it, clearing the area, getting a permit, demoing the old deck, and day one of deck building.

Leave a Reply