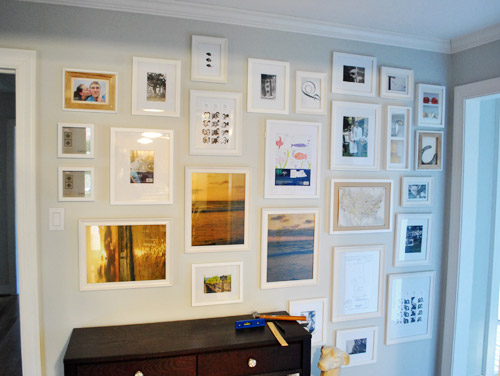
We’re back with pics of our hallway that we “wallpapered with frames” for lack of a better description. We think it created some pretty quick dimension and interest that’s sure to be fun for the whole family. Literally. We love that we can work in drawings by Clara, class pictures, and photos of favorite vacations for the whole family to enjoy.
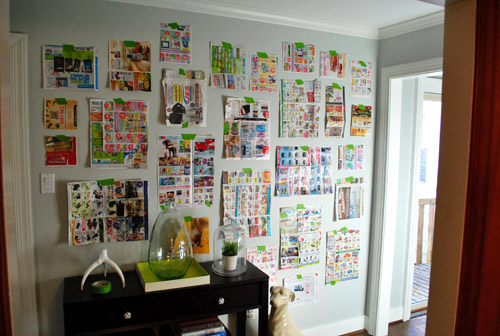
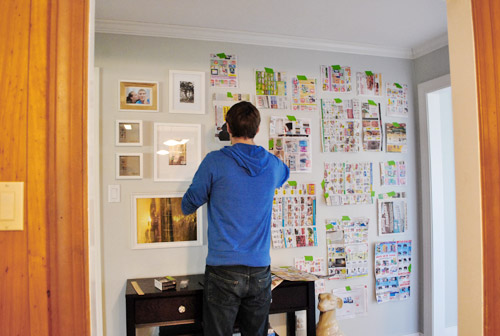
As for how we did it, you saw how I cut out little newspaper templates for all of the frames that we already owned (we actually had a lot of them from various arrangements in our first house, seen here, and even had a few unused ones snagged on sale a while back that were begging for some action). So we just taped up all of our pre-cut templates with a few of the larger ones staggered in the middle (to ground things) and built things out from there, placing most of the smaller frames around the perimeter for some subtle balance. We shifted things around a little, stepped back, went back in and moved stuff around, and stepped back to look at everything again. This happened about ten times with smaller and smaller tweaks until we decided we liked it. But we still wanted to sleep on it and study it one more time the next morning before breaking out the hammer (hence this post about that first phase of the project).
Yesterday we mentioned that The Washington Post scooped us by sharing this shot of our frame-riddled hallway here:
We try to stay as real-time as possible, but we also like to take a ton of after pics and write a big wordy post for ya, so it can take a few days from project completion to post publishing. If only we had a live camera feed going 24/7. Just kidding, my nightmare is to get caught picking a wedgie on camera. It’s why I never auditioned for the Real World (side tangent: John actually sent in an audition tape once when he was 19).
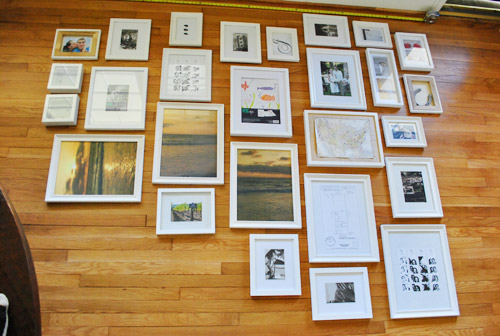
Anyway, so when we woke up the next day and agreed that we still liked the proposed frame placement, it was time to lay out all of our frames on the floor of the dining room in the same arrangement, just to check if some of the actual frames conflicted (since all we were looking at on the wall were their outlines and not their actual styles). Of course we ignored the art since most of it would be switched out anyway.
The frames all looked just fine together, so we decided to bite the bullet and grab the hammer. It was hangin’ time (here’s where a lot of MC Hammer was sung). Since our newspaper templates were still up on the wall, it was actually really easy to hang stuff. We just measured how far down from the edge of the frame that our wire, hook, or other hanging device was and just marked a centered “x” right on each template (the horizontal line is the measured center of the template, and the x below it is the spot where the nail should actually go to catch the wire or hook so the frame hangs in the right place).
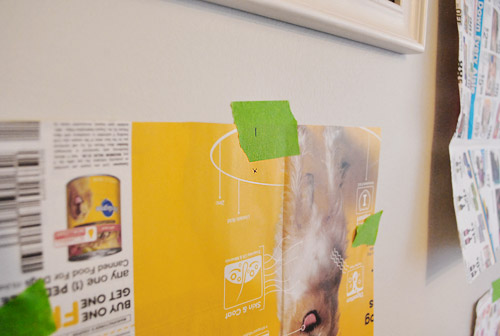
Then we just hammered directly into the “x” in the template…
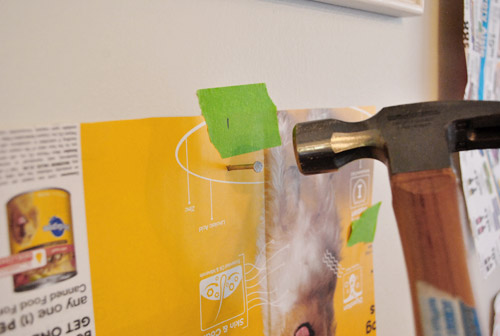
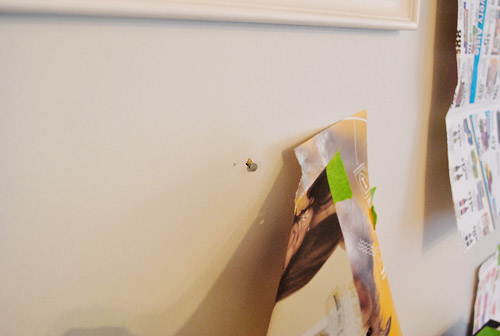
… and pulled the template off the wall to reveal a lone nail waiting for a frame (even though it looks like a jacked up hole, that’s just a tiny bit of paper caught above the nail that we easily removed with a finger flick).
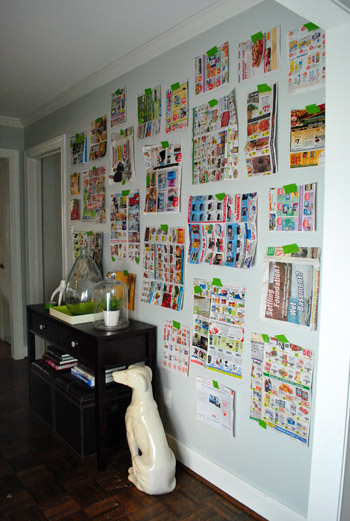
We slowly worked our way around the wall using this method. It probably took an hour or so.
Sadly our old plaster walls don’t work with 3M Command hooks or velcro alone (since that’s always an easy way to create a frame collage without making any holes) but we do plan to add heavy duty Command velcro to the lower frames that may be within Clara’s reach when she starts toddling around. She’s a pretty docile girl who definitely seems to listen when we ask her to be gentle (when petting Burger for example) so our plan is to sweetly request that she be nice to the frames and “look with her eyes” and we might even try the “you can only touch them with one finger” technique that an awesome varsity mom shared with us a few days ago (she said it actually works!). But of course if we think those few low frames ever start to pose a safety hazard, or even just become too high maintenance for the way we live, we’ll definitely just get rid of them until the bean is a little older. Clara first!
But back to our process. After following our templates and hanging every frame we stepped back for a little look-see and frowned. Somehow they seemed a little tighter in the top right corner (which we actually really liked) and a bit too loosey goosey everywhere else…
… so we adjusted some of the frames on the left and added in a few little “filler” items to get the same full look that we had on the top right corner going on everywhere else.
So yes, there are probably ten extra holes in the walls hiding behind those frames from fine tuning them an inch one way or the other. Our bad. But they’re all out of sight so we’re at peace with it. They can just be our little secret. Oops, I just told The Interweb.
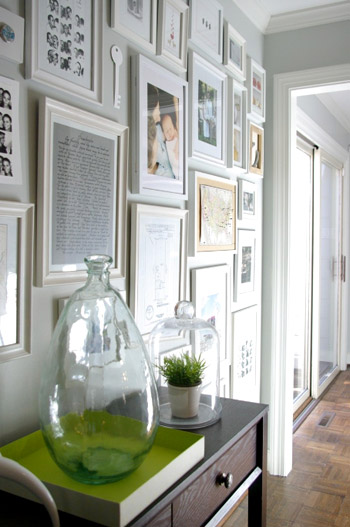
Once everything was hung we scavenger hunted the house to find things to display (since many of the existing items in the frames were horizontal images that were now hanging vertically or the frames were completely empty to begin with since we hadn’t used a few of them yet). Which puts the cost of the entire frame wall plus all of the “art” that you see (since that was also already owned) at 100% f-r-e-e. Except for this cool $16 frame from Target that we splurged on because we adored it’s “special capabilities” to store and easily showcase lots of kid art. We love that we don’t have to take it off the walls to change things out. Come on Clara, don’t you feel like drawing mommy a picture or two?
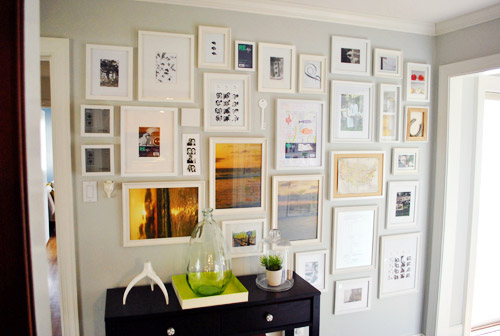
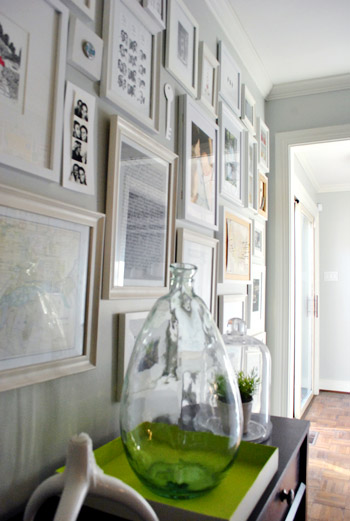
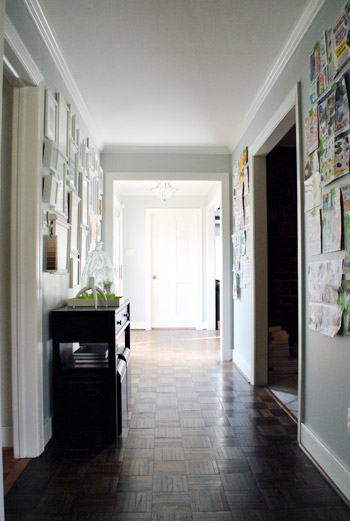
So this is our current arrangement with all of the just-for-now stuff that we found around the house. First here’s the view from the kitchen (which is why we placed the console table there, so it looks centered through the doorway:
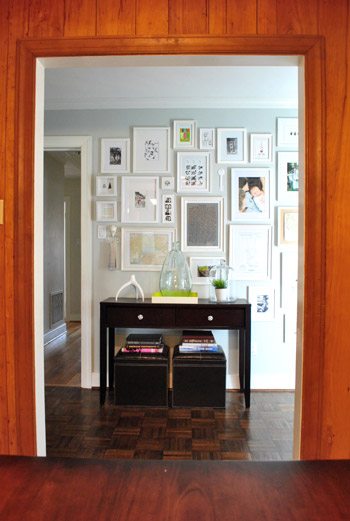
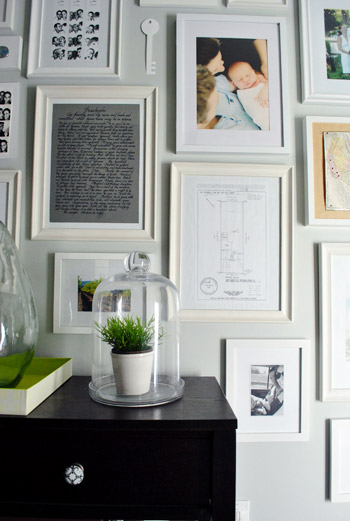
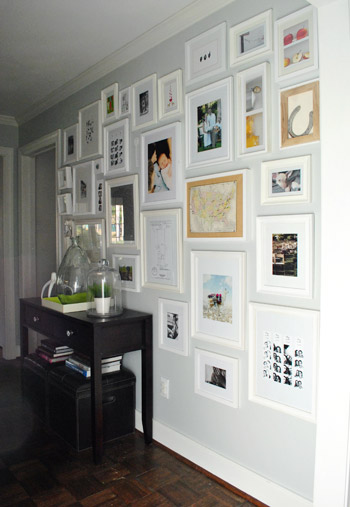
And here are a bunch of other angles:
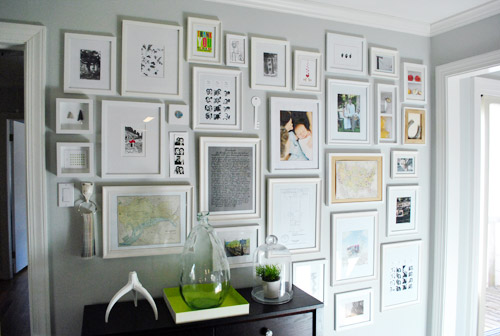
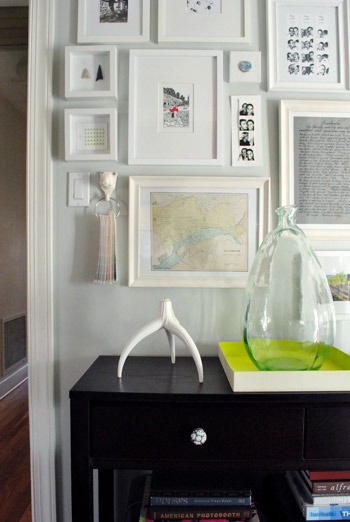
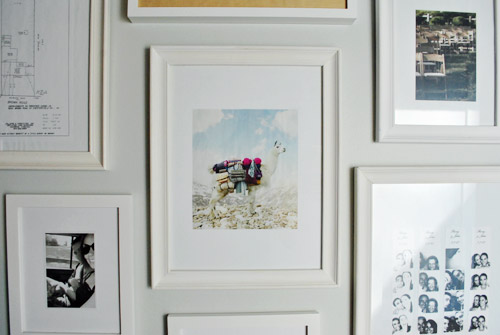
From an old Banana Republic ad with a llama (or is it an alpaca?) carrying sweaters…
… to a vintage milk cap that we found at our first house glued to a small square canvas…
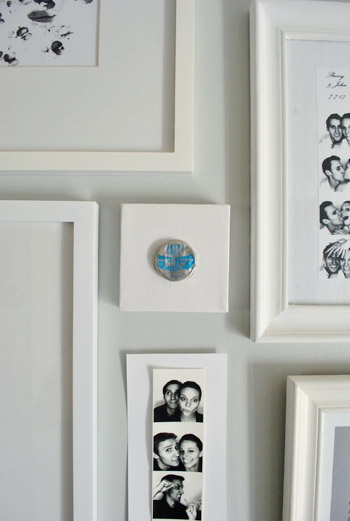
….and a white paper key that I cut out of card stock (which I hope to replace with a DIYed ceramic-looking one)…
… it’s definitely a smorgasbord. And there are probably way too many photostrips, but they’ll do for now.
We’re actually planning a post later with more detailed shots of various items and directions for making your own stuff, like an arrowhead shadowbox for example. Or a long skinny wooden pinboard (still have to make that, for now we have a placeholder piece of card stock with a photostrip taped to it). We also thought it would be fun to take a picture of the wall every few months just to see what comes and goes (new Clara art? updated family pics?) and what always stays (the sketch of our first house’s lot? a favorite photobooth strip of the whole fam?).
We anticipate that at least 25% of the wall will be changing pretty regularly as new things steal our hearts – like a particularly good (or bad) fortune cookie fortune and Will Bower’s first birthday invitation. You know, the important stuff. We definitely feel like this gallery will be the most personal, eclectic, and fun display spot in the house. So while I’ve already asked for some awesome art prints for my birthday (which is this Saturday- woot!) we also want to frame everyday objects that hold meaning to us. From Clara scribbles to little love notes and even particularly funny greeting cards with chihuahuas on the front.
In short: We are so in love with the whole hallway frame gallery. It took a spot that was just a way to get from A to B and made it feel like a bonafide destination. We both keep finding ourselves being drawn to that wall like magnets, just standing there gazing at all the frames. Even Clara loves to stare at it. Ah gallery wall. How can you make us so happy? We’re nerds.
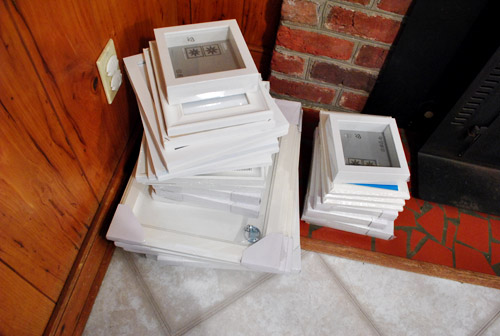
And surprise. We’re so enamored that we’re planning to “wallpaper” the other two walls on the other side of the hallway with frames too.
Here’s the pile that we grabbed from Ikea (feast your eyes on that pretty shattered fireplace tile).
Should be good times.
Psst- We announced this week’s giveaway winners. Click here to see if you’re one of them.

shana says
Thanks for the inspiration – we just finished putting up the frames for our gallery wall – the template and nail tip was killer!! If you have time and want a peak see here – http://tinyurl.com/3mdkpfs.
YoungHouseLove says
Oh my gosh I love it! Especially the elephant!!!
xo,
s
Michele says
I love the color of the wall paired with the white frames. What paint color did you use?
YoungHouseLove says
It’s Moonshine by Benjamin Moore (color matched to Olympic’s no-VOC paint). Hope it helps!
xo,
s
Tara says
This post inspired me to do something similiar! :-) It’s on alot smaller scale, but I really liked how it took a large collection of smaller things and made into one gallery.
http://www.capturingstarlight.com/?p=76
YoungHouseLove says
Wow- that turned out amaaaazing!
xo,
s
katy says
Do you happen to know which Ikea frames you buy? I always end up with the Ribba I think. Are there other good white ones there? thanks!!
YoungHouseLove says
We have no idea of the names, but we just get an assortment of whatever grabs us (I think some are ribba while others are more ornate or traditional). Hope it helps!
xo,
s
Sammynopies says
What is written above the framed set of 3 photo strips??? Did you write that to fill the opening in the frame?
YoungHouseLove says
Those were from our wedding so the photo booth company programmed the booth to print “Sherry & John” at the top of them so folks who took them home remembered they were from our wedding.
xo,
s
Rachel says
I’m currently working on a wall like this in my own house because I love yours! Any advice on how to matte the photos cheaply? Buying matte can be so pricey!
YoungHouseLove says
Sometimes I just tape things on a piece of white card stock or even white poster board for a matted look. Ikea frames also sell the mats within their frames really cheaply (with their frames, not separately).
xo,
s
ian says
Hi Sherry,
Nice Photowall. Looks like you put a lot of time and effort into creating that, well done. I am a photo wall lover as well and have a very large one in my lounge room with hundreds of photos of family & friends. I know it can be a daunting task to get started. These links might be helpful to your readers who are thinking about creating their own photowall.
For the firs timer here are 7 things to think about
http://www.fridgi.us/photo-wall/7-things-to-consider
And for those looking for s simple way to create a photo wall at home
http://www.fridgi.us/photo-wall/how-to-create-a-photowall
I hope they are helpful!
Regards
Ian
Jess says
Question: What size is your three-photostrip-frame? I also have three photostrips and I am tired of worrying about damage- I WANT A FRAME :)
Thank you!
YoungHouseLove says
The inside window is 7 x 12.5″ – hope it helps!
xo,
s
Shunta says
J&S, HELP! I purchased a ton of Ribba frames to do wall gallery in our bedroom and when I went to hang the largest frame in the center I realized that the frame dangles. It does not sit directly on the wall. I can’t tell from your pics if you had the same outcome? Is it just me? Particularly with the large square frame. Thanks so much!
YoungHouseLove says
They definitely don’t sit absolutely flush, but you can minimize it a lot by (1) clipping the wire high up on the frame and (2) making sure the wire doesn’t have much slack. That’ll keep it from having a lot of loose wire to hang far from the wall.
-John
Shunta says
Thank you so much John!!! Truly appreciate you guys taking time to answer our questions!! Here’s to hoping our wall gallery comes out as nicely as you all’s! Thanks again!
Emily says
Just wondering what the map with pushpins in it stands for. Places you’ve been? I looked around but didn’t happen to notice anything about that one.
Thanks. :)
YoungHouseLove says
Yes, we use black pins for the places John and I have been together, and yellow ones for places Clara has been with us! Got that map on ebay a while back and just used cork behind it in a frame (with the glass popped out) so the pins would stick!
xo,
s
Emily says
That’s great! I love that idea since as a military family, we’re always on the move or traveling.
Thanks for the response. :)
Scotty says
You guys are awesome. My wife and I love your blog and this week decided to try your hallway idea. Looks great thanks to you guys… http://monicaburns83.blogspot.com/2011/12/wall-of-frames.html
YoungHouseLove says
Oh my gosh- it looks amaaaaaazing!!!! You did a fantastic job, I love that they fill the whole wall! And even the wrapping paper that you used is so much fun! Love it. Hope you’re feeling awesome (about the frames, and just in general too- haha).
xo,
s
Nan says
Love love and love!! You guys got me going ( husband not happy lol) I got my first gallery wall up in my family room .. Except that I hate hanging ribba frames gggggrrrrr they get me another kind of ‘hot and bothered’. Do you have another Trick or trip for me. Some have wires( not so bad ) some have that thingy giggly that does help me because it so far in the frame that the nails don’t really reach properly etc. is there something else I could be doing ? Thanks a bunch. Love reading your blog. Makes me happy. Xx
YoungHouseLove says
You could always try nailing some small sawtooth hangers on the back of the frame (you can get ’em at the craft store). On the bigger frames you may want to do two though, since we’ve found those frames tend to bend a bit at the top if they’re only hanging from one spot in the middle. Hope that options helps!
-John
Ellie says
Hi…so love your wall! Is there any rule of thumb on where gallery walls go? I’ve heard master bedrooms are out (would love one in there anyway!), but what about living rooms vs family rooms? Can’t wait to get started!
YoungHouseLove says
Oh man, we don’t like rules! Why wouldn’t a gallery wall work in a master bedroom? That’s crazytown! It’s your house, I’d put it wherever you please! Hope it helps!
xo,
s
Robin says
LOL @ thenester.com ‘s new post: I have no excuses to be afraid of a eensy weesnsy wittle tiny itsy bitsy nailhole or 83 and I have zero regret for making so many holes to visually see my gallery wall even though yes, I know Young House Love is brilliant and makes a template for their walls because they are smarter than I am patient and pin holes don’t bother me.
I love it!
YoungHouseLove says
Haha- I love her. Hilarious.
xo,
s
Lezlie says
Just curious – do you have problems with the pictures shifting, getting crooked, etc? I take tiny pea-sized pieces of poster putty and put on the back of the bottom corners of the frames and press to the wall. So far, this has worked great…even on walls with doors that get slammed all the time.
YoungHouseLove says
So smart!
xo,
s
Kim says
Love your gallery. I was wondering about white matting….are all of your mats & frames the same white color? I have a couple of glossy b/w photos and the white mats looked really stark. Wondered if there was some other trick. Also do you have thoughts about the use of white vs. black frames? Thank you
YoungHouseLove says
Oh no, they’re all different shades of white (the mats and the frames) but it just sort of looks soft and layered. Hope it helps!
xo,
s
Kim says
Thank you. I will stop being so fussy. Ha.
Sarah M. says
I’m always trying to ‘pin’ pics from your posts to Pinterest, but every time it tells me there are no large images found. Do you guys know if there’s a better way to do it? I wanna pin ya! :)
YoungHouseLove says
So sorry! Not sure what’s happening for ya since it seems like others can pin our pics. Have you downloaded the “pin it” button to your browser’s bookmark bar? That’s how I pin stuff. Also, maybe try clicking into the post (by clicking the title) so you have those images associated with that link? Hope it helps!
xo,
s
helen says
loved the artwork but love the updated frames even more! i especially like how it drops over the side of the table. many of the ones i have seen stop where the table top would be.
Heather says
You’ve inspired me to create a wall collage of frames! I’ve been procrastinating on what do to with the biggest wall in my living room, but after seeing your blog and how you went about creating a collage, I went to Ikea and bought a bunch of frames, cut paper templates and today I’m going to start taping them up!
Heather says
I finished it! It’s based on the design you posted from Ikea. :)
http://instagr.am/p/HR3yDMp4Rw/
YoungHouseLove says
Gorgeous! I love it!
xo,
s
ankita says
wow these are so lovely….I wish to do the same in my home….but dread shopping for frames. :)
Megan says
How did you decide how many frames and the sizes? I’d love to do this but I’m sure I’d end up going back to IKEA 5x in order to get it “right”.
YoungHouseLove says
We just had a bunch already in various sizes and then guessed how many more we needed. We ended up with a few extras but just used then in other rooms!
xo,
s
grace adkins says
Thanks for the amazing inspiration as usual! Here’s how our attempt at a collage wall turned out: http://graceadkins.blogspot.com/2012/01/dining-room-collage-wall-by-jad-and.html
YoungHouseLove says
Looks awesome! I love it!
xo
s
Nicole says
Hi Guys,
I came across your site by chance. I was looking for pinata ideas for my twin daughters 1st birthday and wella clicked on your pull-string pinata. My 3 girls were napping when I first started exploring your blog. Now some 2 hours later I have 1 8 month old on my lap and the other 8 month old and 28 month old still napping. I just like to say how much I have enjoyed reading your blog. I live in Melbourne, Australia and my husband and I are renovating our 1st house which we purchased in 2008. Renos have slowed a little since having our girls, but it’s just nice to read about other young couples doing the same.
Cheers
Nicole
YoungHouseLove says
Aw thanks Nicole! So glad you found us! Good luck with your girls’ first birthday party and your first house. So exciting!
xo,
s
bachsbythebeach says
WOW! this is just amazing and breathtaking! I LOVE LOVE LOVE it! And what great tips!! I love white picture frames and have such a hard time finding them! Our closest IKEA is 3 hours away :-( boo. Did you buy all those frames? Or have they been collecte over the years? I was thinking of painting all of my frames white…any tips? Can i use regular house paint? Thanks for reading!
YoungHouseLove says
Almost all of them on the main wall are leftover from the old house (they were hung all over in a bunch of different rooms but since we always bought white it was nice to combine them all) and we bought the ones on the other smaller two walls at Ikea and Target whenever we saw them on sale. You could even find them at yard sales and thrift stores and spray them white!
xo,
s
DeeDee says
Love your photo display in hallway. I have 3 daughter’s 16×20 wedding photos in my hallway in very traditional gold fancy frames. Love my daughters – tired of these 3 LARGE photos. Anyway to update? Would like it to be more modern but of course hate to throw away the frames. Any suggestions, or should I just remove pics and give back to daughters :)? Then I could start from scratch with my many pics of grandkids . . . Thanks for any help.
YoungHouseLove says
I would just spray paint the frames any color you like more for a more modern look (black, white, chocolate, etc). You can hang them three in a row like a gallery or even add a bunch more frames like we did in our hallway of the same color (some of those are 16 x 20, so it totally would work)! Good luck!
xo,
s
Kristen Fenn says
Love the hallway gallery. I’d love to do the same b/c I love photos/artwork. Our hallway is about half the width of yours with small hallways to bedrooms coming off of it – sort of “C” shaped. Do you think it would feel to cluttered to cover all of the walls? Thanks so much!
YoungHouseLove says
I think it could still look great. Keeping things low-contrast (like we’ve got white frames on gray walls) keep it from feeling too busy and more like a wallpaper. Our walls are Moonshine by Benjamin Moore and the trim is just the white base from Olympic Premium.
-John
Kristen Fenn says
What color are the walls and trim? Thanks!
Ashly Coggins says
Love the wall! I did something similar on a living room wall a few years back, but with funky wooden frames. We live in a ranch now with a long hallway and I was thinking of doing it there too, but it’s more narrow than y’alls…like basically enough room for walking through- no furniture. I was worried that frame collages on both sides of the wall might be a bit clausterphobic, but it looks a little odd with frames on one side and nothing on the other… thoughts?
YoungHouseLove says
Hmm, maybe try a few on the other side (maybe a few larger ones instead of a mass of smaller ones) and just see how it feels?
xo
s
Glenda says
Do you use all the same style of white frames or do you mix it up a little but keep the colour consistent to tie it all together?
YoungHouseLove says
We mix it up. Some are whiter and some are more cream and some have ornate details or are thick and chunky while others are more standard. They all seem to layer in there together! Hope it helps.
xo
s
Dawn L says
I know this post is super old but I’ve been searching for ideas for a gallery wall centered around a 20″x30″ canvas photo! We have a very long wall (13′) that I’m working on and I’m having HUGE issues!! The room needs color so I ws trying to incorporate a small shelf or 2 for colorful things but I still want it clean/simple. any thoughts???
YoungHouseLove says
My best tip would be to use paper and make templates for everything (even the shelf) to picture it and just play with different layouts by taping them up until you find something you love!
xo
s
Ariana says
What is the wall color?
YoungHouseLove says
It’s Moonshine by Benjamin Moore :)
xo
s
Karen says
Haha, I was going to apologize for commenting so long after the post date, but I just saw the date of the last comment. I just wanted to say that the wall color & frame/mat choice is really genius. I was having a conversation with my SO about doing our own gallery wall, we’ve been disagreeing about whether to go less cluttered vs. more. Whenever I think of gallery walls, I think of this post. I decided to reread this post and I realized that because the wall color and frame colors are so similar, it tricks the eye into seeing the arrangement as more “open” than it actually is. Not sure if anyone has pointed that out yet but I figured I’d drop by and say thanks! I love your blog.
YoungHouseLove says
Aw thanks Karen!
xo
s
Nicole says
how do you hang your ribba frames? do you use the wire that is attached or do you just use the actual frame to hold them up? I have a bunch and they ALWAYS look crooked! :(
YoungHouseLove says
We use the wire and the key is that we hang it over two nails (both level and about 4″ apart). That seems to help it stay straight, and poster putty stuck to the back of the frame can keep them in place too :)
xo
s
Caroline says
Greatest thing I have ever seen in my life. Truly inspiring. Just found your blog. I’m addicted. Y’all comin’ over to decorate my house? Great! See you soon ;)
peggy says
hi – sorry to ask a question about a post from 2011 lol. i just saw a write up on young house love in BHG and now i’m hooked! great stuff. can i ask what is the grey color in the Hallway (full monty)? i searched a bit and couldn’t find it. thanks!
YoungHouseLove says
Sure thing! It’s Moonshine by Benjamin Moore. Hope it helps!
xo
s
Mike says
Inspiring and stunning.
PS My wife and I used IKEA frames for our gallery wall as well. (Tons cheaper).
Celia Rodriguez says
Where did you get your map from and what size is it?
Thanks !
YoungHouseLove says
That was from ebay! It’s around 12″ tall by 18″ wide.
xo
s
Jen @ City Farmhouse says
Hi Sherry & John, I love your wall, just beautiful & great tutorial!!! I just wanted to let you know I shared your wall on my blog as a part of my Top 10 BM colors. I hope that is ok:).
Have a wonderful day!
Jen
YoungHouseLove says
Thanks Jen!
xo
s
Christene says
Hey! I loooooveee this frame wall idea and we are trying to do it in our home right now. I keep going back to all these posts to get inspiration. We have a few items we would love to put in a shadowbox – most need the extra space.
Are the shadowboxes you used for the arrowhead and other smaller things still available at Ikea? I didn’t see small ones last time I was there. I picked up one shadowbox frame that was $9.99 from Ikea but was a little bigger (maybe 9″X9″). I’m just looking for slightly smaller ones.
Also, where did you find taller skinny frames? One of the things we wanted to framer were our college tassels – we met at school and we thoght they would look cute in a white tall shadowbox with a white background.
LOVE THIS BLOG!! I have gotten so much inspiration from you guys!
-Christene
YoungHouseLove says
Oh man, I’m not sure if they still sell those 5 x 5″ shadow boxes (I think that’s how big ours are) but I hope if they don’t that they bring them back soon! As for taller skinny frames, I’d check Target or Michael’s if you don’t see them at Ikea. Good luck!
xo
s