We’re back to share phase three of our sunroom mini makeover (see phase one here and phase two here). And this week’s update is all about a punchy turquoise stencil that we added. It took a bit of trial and error (like most of our learn-as-we-go projects) but we’re here to share the goods and the breakdown when it came to our method.
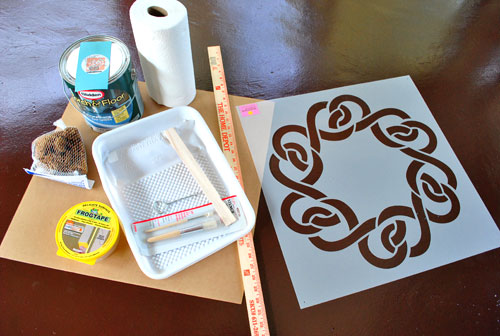
First we gathered our materials. We had a lot of painting supplies on hand so all we had to do was pick up some floor paint (Martha Stewart’s Lagoon color matched to Glidden’s oil-based porch and floor paint) along with a sea sponge and this amazing Ciel Stencil from Sunny (a local paint guru that we’ve loved ever since checking out her store and seeing her amazing stencils in this house and this house that we crashed a while back). The cost of the stencil, the paint, and the sponge came to $57 and we already owned the rest of our supplies.
After gathering our tools we measured the room to mark off where our stencils would go. Obviously this will be different for everyone (depending on the size of your room and your stencil) but we just figured out how many rows of stencils we could fit on each wall (seven on the long one and five on the shorter one) and used tape to delineate where the edge of each stencil could be placed to keep them within those rows (with about 8″ between each one on each side, since that’s how the math worked out). The lesson here is that this step is everything. As they say in home improvement, measure twice, cut stencil once. You NEVER want to get halfway done with your floor only to realize the layout won’t fit, is wonky, etc. So definitely do whatever it takes to visualize the plan before painting (like placing pieces of paper around the room to ensure that the arrangement will look balanced and even) before cracking open that can of floor paint.
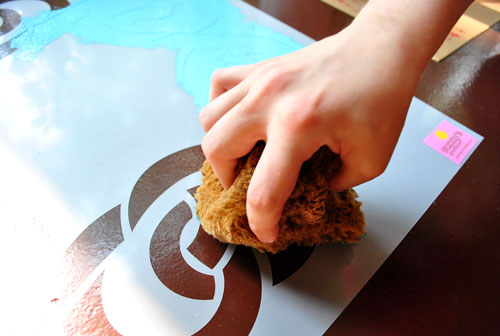
Then it was time to stencil. We used delicate surface Frog Tape to hold down each side of the stencil just to keep things in place. Then using light up and down movements with the sponge, we carefully dabbed on some paint (being sure not to go diagonally with the sponge for fear of getting under the edges of the stencil).
After we covered 100% of the brown floor paint that was showing through, it was time to peel back our stencil to reveal…
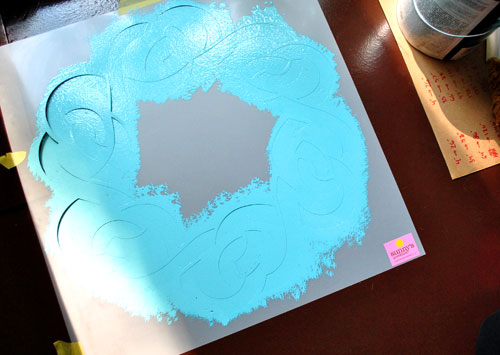
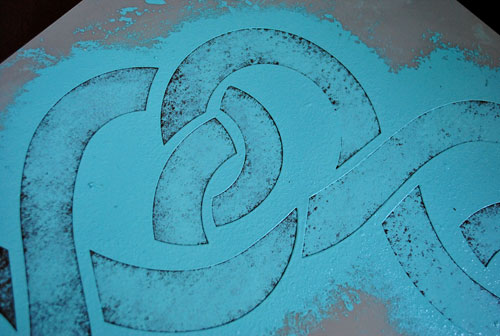
… a nasty and horrible result. Ack! The problem was clear- we had applied way too much paint and it had bled everywhere for a less than clean and pristine result.
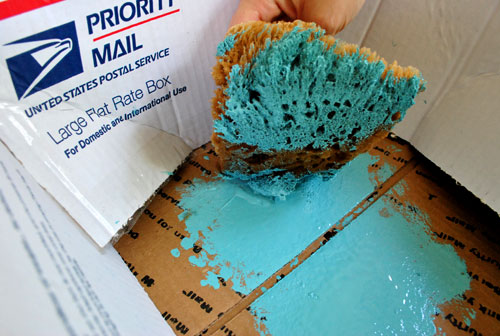
Thank goodness we had created that first stencil in a won’t-be-seen-spot thanks to furniture that will be placed there once the floor is dry. Needless to say we quickly revised our method from there on out and prayed to the paint gods that we would get a better result after our second attempt (and we’d definitely recommend testing your stenciling skills on cardboard or poster board before moving on to the floor). On our second attempt we only applied about 80-90% coverage (so the brown paint still peeked through) and we also decided we needed to dab the sponge on something before taking it straight from the paint tray full of blue paint to the stencil on the floor…
So John grabbed a cardboard box from the garage for me and I used it to dab off the excess paint for a much less gloppy application.
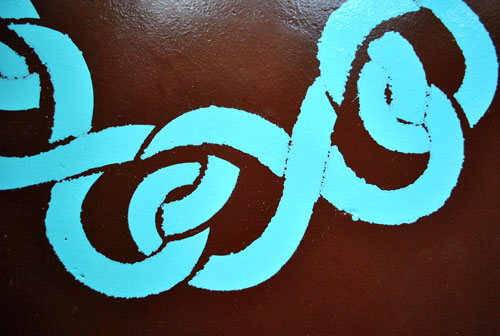
And the result this time (whew) was perfecto! Picture us beaming with pride as we peeled back that stencil. The interesting thing is that we thought it would look less than crisp since we didn’t have 100% paint coverage (remember we aimed for 80-90% instead) but it looked super clean and perfect once the stencil was removed. Victory!
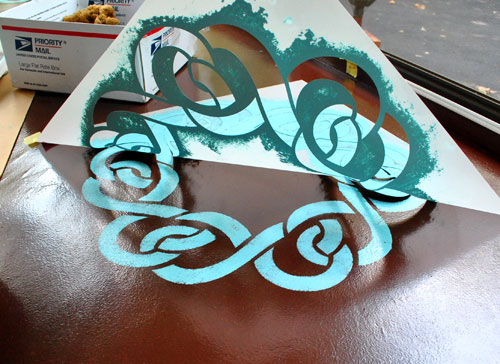
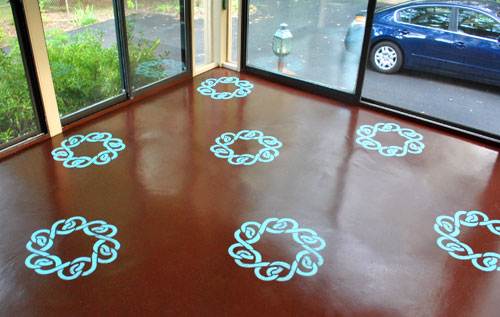
Here I am smiling because we figured out that less paint = more crispness. Which meant that stenciling got a lot less stressful from there on out. Oh and you’ll notice that I’m in a corner. We actually stenciled the four corners of the room first because we figured that way we’d have four stencils in different areas of the room to use to orient ourselves, so that’s another little tip that we picked up along the way.

And after completing those four corners I just painted my way around the room, sliding my cardboard box and my piece of cardboard with the paint tray on it around the room with me.

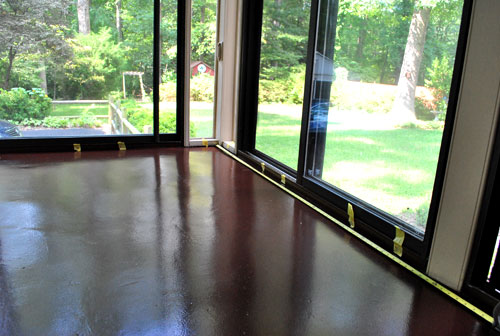
And here’s the final result:
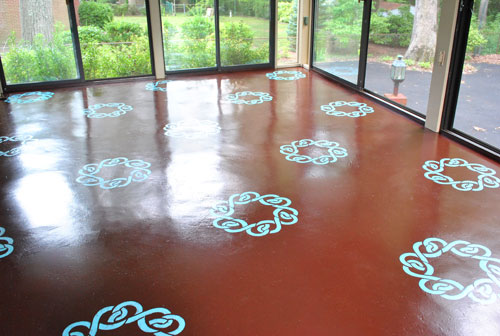
Sorry for all the glare, that’s one shiiiiiny floor.
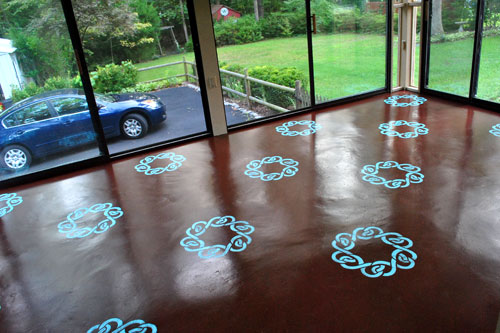
We really love that a $57 project could add such interest and texture to the room (especially since the turquoise stencil plays off of the lighter teal ceiling in the space). It’s akin to buying a super pricey area rug to spice up your room but we spent a fraction of that cost for an interesting and fun result. In short: we’re in love with our rich chocolate and link-chic patterned floor.
And we figured we’d share a few quick tips for anyone else who may attempt this project in the near future:
- Be sure to use paint that’s specifically formulated for porches and floors for extra durability (we went with oil-based stuff because that offers maximum protection and also works with the oil-based chocolate color that we previously applied – applying water based paint over oil-based paint would have made for a cracked and peeling result).
- You don’t need a lot of paint for a stenciling project (we could have gotten by with less than a quart but they only sold it by the gallon at our store).
- Measure out your layout a few times to be absolutely sure it’ll look balanced and even before beginning- and it helps to paint those corner stencils first and work around the room from there so you have a few different points of reference.
- Tape your stencil on all sides with 2″ of delicate surface tape, just to hold it in place.
- If you get any paint on the underside of your stencil (which only happened to us on our failed first attempt) wipe it off before placing the stencil on the floor again.
- Use a gentle up/down application with a sponge that you dab a few times on cardboard to remove the excess and aim for 80-90% coverage instead of 100% saturation (which we found led to bleeding and blobs).
- Give painted floors a ton of drying time before walking on them or moving furniture back in (we’re giving ours 7 full days since it’s humid, so stay tuned for the reveal pics next week once we can move things back in!).
- Cleaning up oil-paint on errant body parts is easy thanks to mineral spirits (update: many readers mentioned that a cooking oil, like vegetable oil, can also be used to remove oil-based paint in a more natural way).
So there you have it- our stenciling project from soup to nuts. Hope it helps anyone who is gearing up to add some interest to their floors sometime soon. What do you guys think? Anyone else tempted to try it?
Pssst- Wanna see how we painted our chocolate sunroom floor to begin with? Click here for all the deets.

Leave a Reply