Q: I would like to know your guys’ thought process BEFORE you start a big project (like your kitchen, living room, bathroom, a nursery, etc). Could you delve into how you ‘read’ a BEFORE and how to consider function along with style? Where/what do you research? How do you decide which projects to do when? What makes a project top priority while others take the backseat for a while? How do you determine your budget? How do you live with the mess while a project is going on? Basically, how do you mentally and physically get from BEFORE to AFTER? Lots of questions, sorry. On a lighter note, how do you unwind and NOT think about every single thing that you want to improve all the time? Sometimes I feel CRAZY making my mental home improvement list! Thanks for all the inspiration and hard work. – Dana
A: Good question! It’s actually one of the most often asked queries that we get- but unfortunately the answer isn’t really that cut and dry. There’s very little method to our madness as we sometimes tackle hard projects because we’re particularly inspired while other times we blow them off to do something easier while we wait for more motivation (and less sore muscles) to arrive. As for research, that really depends what we’re tackling. The first time we switched out light fixtures we did some pretty extensive googling and turned off the power to the entire house in the interest of not killing ourselves. But when we were searching for the perfect curtains to flank the window between our bedroom built-ins the research was a lot less involved… we just picked up a bunch of curtains at Bed Bath & Beyond and tried them all and returned every pair except the ones that made the cut.

When it comes to determining our budget, that’s always the easy part. We’re cheap. And if we can’t afford something we don’t get it. This might sound harsh but we often think that it’s this very fact that causes us to get creative and come up with more affordable solutions (like hanging two blinds next to each other to mimic the look of one long expensive one in our living room). And as for how we live in chaos and prioritize our projects, we did learn pretty early on into our big home makeover that it helped to focus on completing one task entirely before moving on to another one whenever we could.
his method helps us feel more accomplished and focused instead of being all over the place and living in an environment where every room looks like a war zone. Sure we painted a bunch of rooms over the course of a few weeks (leaving them all in disarray) but we quickly learned that was no way to live, so when it came to remodeling the kitchen or adding the bedroom built-ins, we focused only on those tasks with 100% of our brainpower and manpower, and then happily checked them off our list and moved on to making a mess in the next room.
But enough general jibber-jbber. We thought it might help to visually share one room’s specific journey from before to after- so you can really take a peek inside our home-improvement-crazy minds (and watch the process unfold firsthand). Fasten your seatbelts, this could get intense.
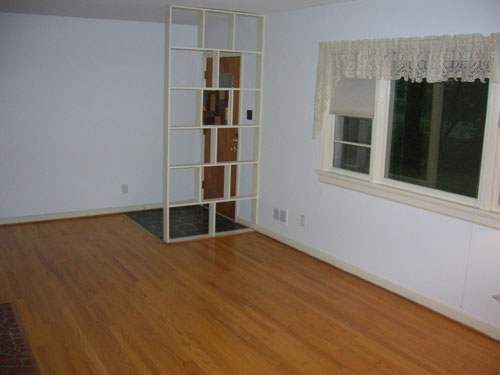
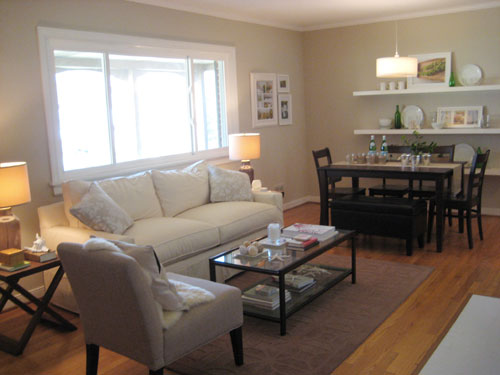
Let’s take our living room (seen above in its raw “before” form). When we first moved in we had no idea we would ever turn it into a living and dining room and convert our small formal dining room into a more-functional-for-us third bedroom. That came waay later after living with our home for a while and learning what we truly wanted before doing anything rash. So we started off with the obvious things that were a lot less intimidating. First we got rid of that dated wooden divider near the front door (I actually took a hammer to it and had dragged it all the way out into the garage by the time John got home from work). A bit of spackle and sanding had the wall where the divider had been affixed looking as good as new. And then it was time to remove the dated old curtains (leaving only the basic honeycomb blinds) for a cleaner and more updated look that would tide us over until we could later snag some curtains and blinds down the road.
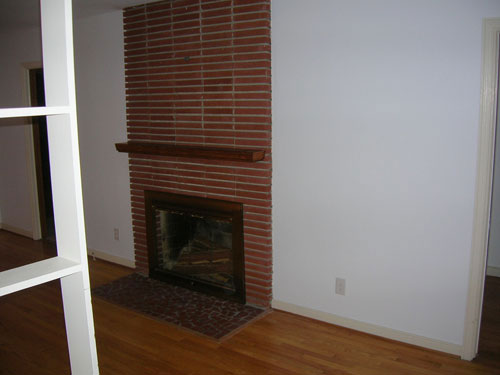
Then we moved on to slapping some paint on the walls. Our first color choice was anything but flawless (we were going for a soft celadon and ended up with a too-bright pastel green tone instead), but just getting some color on the walls and painting the pinky-beige trim and baseboards a crisp white tone made the whole room feel a lot fresher and we knew we could easily repaint it once we developed a better sense of the colors that we gravitated towards (which was as easy as finding some inspiration photos and quickly discovering we like warm creams, sandy tans, and blue-gray tones). And we can’t forget about tackling the dark fireplace that sucked a ton of light out of the room with some fresh white paint.
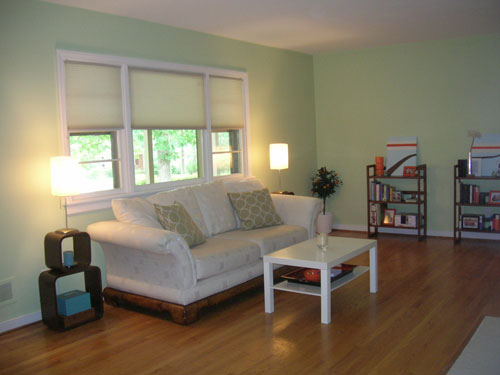
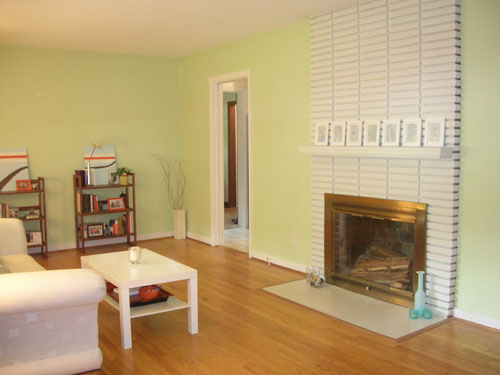
We know, we know. We were SORELY lacking in the furniture department (moving from NYC in a minivan meant we had virtually no furniture to our name so we had to make due with hand-me-downs and cheap Craigslist finds until we could save our pennies and add the items that we liked). So in the meantime we slowly upgraded from our cheap-o Ikea coffee table to a cheap-o thrift store find (that we still covet today) and switched out the small wooden bookshelves for inexpensive floating shelves from Ikea for more of a built-in feeling. We also were gifted two slipper chairs from Target that were on our wedding registry (hooray for free much-needed furniture) and switched out the too-small frames on the mantel for one large dark hand-me-down mirror that we painted white.

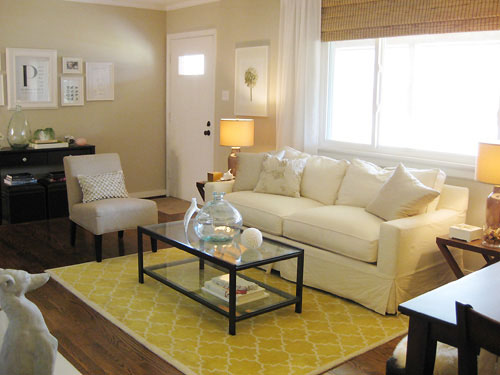
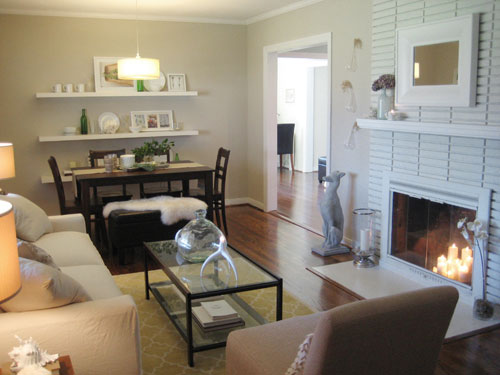
Soon enough we found ourselves repainting those green walls a soft sandy tan tone (Glidden’s Sand White) and then we were popping a pendant light above the table and extending the doorway that led into the kitchen to create a bona fide dining space. Our windows were still bare but we were able to snag an affordable wool rug to define the seating area and two side tables from Target with matching Nate Berkus for Linens N Things lamps (also from our wedding registry). We also finally found a sofa that we loved (and could afford!) so we sprung for it (and saved $400 more than we did when we got our Pottery Barn one in the den). Then I secretly arranged for a handyman to install crown molding around the room (as a gift to my very-sore-from-other-projects hubby), which really added a more polished feeling to the whole space.
And that brings us to the final after pictures. You can see that we hung our favorite bamboo blinds & white curtains to finish off the picture window and add height and softness to the whole space. Also in the softness department, we tossed a $19 Ikea sheepskin on the bench in the dining area to break up all those dark tones and add inviting ambiance. We also got a killer deal on the yellow moorish tile rug from Pottery Barn (it was a floor model) which brought a lot of life and interest into the entire room. It just feels happier now, right?
Oh and we had the existing wood flooring that runs all the way into the bedrooms stained deeper to match the new hardwood in the kitchen and adjoining den so all of those rooms finally feel truly open and seamless.
So that’s the sort of progression we’re talking about when we say that we live with things for a while, save our pennies, take things one do-able project at a time, and inch towards the finish line. As for the nursery project for John’s sister, we knew we needed to:
- Settle on bedding for the crib and create a coordinating but not matchy-matchy crib skirt for concealed storage (we actually found the crib sheet first and it served as our color palette inspiration for the whole room, so it was definitely our starting point)
- Paint the room (with our crib-sheet-established color palette in mind, we worked with Emily to settle on a color that would fit in with the rest of her house and still felt perfect for a little boy’s room)
- Meet certain must-have requirements like a place for the baby to sleep, a chair for nursing, somewhere to change the baby, and a piece for storing toys (Emily already had a thrift store chair, a hand-me-down crib and an armoire that we would be bringing in so we just needed something that could function as a changing table so we selected an affordable piece that worked with the existing items we would be bringing in for a cohesive feeling)
- Add some modern fun and whimsy to really make it come alive (hence the vertical striping idea)
- Make it a lot lighter and brighter since it’s a windowless space (so we brought in mirrors to bounce around light, and added more task lighting to keep things ambient and inviting)
- Add some finishing touches that are functional and easy on the eyes (we didn’t have specific objects in mind but knew we’d need some hooks, baskets, art, and sheles so we just played it by ear as we shopped and kept our color scheme- and the overall function of the space- in mind).
And of course we remembered to have lots of pickle & ice-cream breaks with Emily to keep things fun and to keep from burning out. We basically spent about a day per week for around 5 weeks piecing together the new nursery (which left us with enough time away from it to stay motivated and really think things through). And we’ll be revealing more project and ultimately the “after pics” pretty soon, so stick around for that.
If you ever feel like you’re moving too fast on something (which can make for a less than functional or practical end product) it’s always smart to take a big step back and impose a much-needed break. Go see a movie, go out to dinner, take the dog for a walk- do whatever it takes to give yourself a mental and physical break. It’s sort of what we did when we felt like our wedding was getting out of hand (too expensive and not the intimate event that we pictured). We took a step back, regrouped, and planned the day we always imagined. Sometimes you just need a time-out to see what you really want and slowly figure out how to get there.
If we hadn’t taken our time with our house, we’re certain we never would have come up with using bamboo blinds instead of pricey cabinet doors in our laundry nook or bringing in Ikea wardrobes to create curtained closets that flank our bed. Even things like widening doorways and adding the dining area to the living room weren’t ideas that came overnight at all- so although every bone in your body may want to be done done done, it’s always nice to live with things for a bit and slowly evolve your home so it’s customized and perfect for the way you live when the decorating dust does finally clear. We hope it helps! Happy renovating…

Laura says
Great post guys! Nice to see great rooms don’t just materialize magically but take time to piece together.
East End says
Wow, great transformation! Glad you got rid of the green paint. I still love that crazy divider at the entrance though……
Laura@JourneyChic says
It’s so nice to see that your house didn’t look perfect after one try. Sometimes it’s hard to read shelter mags and blogs by creative folks like you guys because I’m left thinking “When will my house ever look like that??” I bought too many things that I now regret in an effort to just “get it done” and feel crappy that it doesn’t look quite right. So you’ve given me hope, and made me feel less crappy. :)
Jenny says
We just bought our first house on Saturday! We can’t wait to move in and make it our own. It’s an older home that will need some work. Thank you so much for the great post that really puts all of the bazillion projects into perspective. You guys are a great inspiration and we look forward to your posts to keep us motivated through our work-in-progess!
Jen Z. says
Great post! Great ideas too. For me I need to sit back down with my list and check things off or delete things we changed our mind on or add things. But in the end I feel better that I took the time to sit down and rethink things. We have owned our house for 2 years and I’m sort of glad everything isn’t done, because I have changed my mind on some things. Gotta love DIY. We wouldn’t have it any other way. ;-) I love this blog guys!
Emily says
I live in Richmond, and stumbled upon your blog when reading a magazine one day. I just love all the attention and love you have put into your house and love you ideas, and the fact that you share all the details here.
I can’t wait for my faince’ and I to buy our first place.
Jenny @ Words On Wendhurst says
That was really neat to see the process of how your living room came to be. A room’s evolution is definitely a slow process. I think we have talked about our future kitchen remodel 1,000 times, and we are finally getting close to a beautiful, unique room that won’t blow the budget.
On another note, that old room divider in your living room makes me laugh every time. We had something like that in our living room, only ours had mirrors on it!
Jenny
Words On Wendhurst
Abby says
So nice to see the in-between. We’re in the in-between now in a lot of areas. We got it “livable” so the 70’s didn’t make us cringe everytime we came home, but now we’re on to making it more our style and fine tuning it. I’m also happy to see that others don’t always get it right the first try.
Kathy says
I love how you mentioned going from one room to the next. My fiance and I just purchased our first home, and I was all about painting everywhere first! But I’ve decided that’s just craziness on our part. We’ll work the one room at a time angle and see how it goes. Thanks so much for your inpiration! I love you site!
David W says
I love this post. Where to start and how to start are always my big sticking points. Thanks for your continued great work S & J.
Mrslimestone says
Good suggestions. I can never seem to finish one project before I start the next but Im disjointed like that. Its not very effcient :)
Christin says
Thanks so much for sharing the evolution of your living room. It’s encouraging to read how much time it takes for a room to really become what you have envisioned and that it really doesn’t happen over night! I also want to commend you for living within your means. I think it’s FANTASTIC advise to plan, and scrimp and save for each project. Kudos to you! That’s how my husband and I live and really think it’s the best. It’s not instant gratification – but I truly believe it’s worth it in the end. :) Keep up the great posts!
Jill@nokoikonomia says
That was a great post!! I loved seeing the evolution of your rooms and how they weren’t so perfect looking all at once. Thanks! And keep showing us some of the things that didn’t work out at first.
Megan says
Great post! It’s interesting (and refreshing) to learn about the process behind one of your makeovers. When designing a room, what are your thoughts on rugs (5×8 and larger)? I have been eyeing a Pottery Barn one that would look awesome in our front room, but the price makes me squirm. Do you think rugs are important investment pieces, or do you think they should be bought more affordably? And do you prefer a neutral timeless look in your rugs, or something more distinctive? (Btw, I think I spotted your yellow rug on sale at Pottery Barn a couple weeks ago – love it!)
Meg says
Great post!
What paint color/brand is the green you originally painted the room?
YoungHouseLove says
Meg- We don’t remember the original paint color but it’s very similar to Benjamin Moore’s Sweet Caroline.
Megan- Here’s a post all about rugs: https://www.younghouselove.com/rug-rules-101/
As for spending or splurging on rugs, it really just depends on your available budget and what you find. We have found great rugs on sale but have also paid full price for rugs that we love when we can afford them. Hope it helps!
xo,
s
Emily says
Wow, thank you for this post. I really needed it! I tend to get ahead of myself and want things done NOW. Which drives my husband crazy. I’ve been dreaming about remodeling the kitchen, but the bathroom still isn’t done and we really don’t have the money to start a big project like that, so thank you for the reality check. I’ll just have to make small changes for now!
Laurie says
Did you do anything to the fireplace interior between the last and fourth from last pics, or just throw in the candles? It looks better but maybe it is just the light and reflections?
I need to do something about mine, I thought about painting it black with the high heat resistant (grill) paint, and getting an iron back but then thought maybe just a more modern screen…
any insights would be appreciated.
YoungHouseLove says
Hey Laurie,
We gave the inside of the fireplace a good scrub and threw the candles in there, but high heat spray paint is another easy way to freshen up the inside of your firebox. Hope it helps!
xo,
s
Kevin M says
Great walk-through of the process. We just moved a few weeks ago and are going through the same thing the email writer is experiencing….lots of projects on the to-do list and not enough time to do them. We’ve at least narrowed them down to short vs. long-term, but it is still daunting.
One thing we’re having issues with is flooring. We have hardwood in the foyer and dining room, linoleum in the hall past the foyer, kitchen and bathroom, and carpet in the living room (just off the foyer). We want continuity but can’t decide between hardwood throughout or a mix of hardwood in the living & dining rooms and tile everywhere else. So we’re waiting until inspiration (or a good deal) strikes us.
Lindsey says
I happen to not be patient, and I always want to do everything, right now. BUT I also appreciate the time and effort of waiting and seeing how you like certain things, and slowly figuring out what other pieces to incorporate. Money is always a big driving factor, and I am taking the decorating of our new loft one bit at a time. Or at least trying to.
Lindsey says
Hi! I just wanted to say…really good post! I think I needed to hear it! It’s so easy to get a surge of inspiration and want to get it all done yesterday, but that can just set you back further when you realize you luv something else better or when you don’t have the money to start with! Taking it slow and evolving your home a step at a time is reality! I always get caught in this feeling like I have to apologize for my house not looking perfectly decorated. And I don’t need to! No one else cares and I’m not on any deadlines! Thanks for keeping it real!
Rachel says
New to your blog. You have a beautiful home. I love the color on the walls. Thanks for the tutorial!
jbhat says
This really was a great post. I am currently dissatisfied with the state of things in my living room and in my dining room…but have lots of ideas that are just going to take time to implelement due to budget constraints. It’s comforting to know that I am not the only one living with a room that is “in progress”…but it’s also frustrating to not be able to immediately show off/ enjoy what’s in my mind.
Tish says
Great post! I would love to get a design tip about how to style a room if you want to use a zebra print rug? You see them in magazines all the time, but how do I know if it will look good in my living room?
YoungHouseLove says
To use a zebra print rug in a room you have to let it be the star. Bring in clean-lined pieces in more subdued colors without much contrast so you don’t have other loud pieces and patterns that compete with your gorgeous zebra rug! Oh and seek out inspiration images with a zebra rugs in them. That’s always a huge help! Good luck…
xo,
s
julie says
What a great post… so helpful to remember that working on your home is an ongoing process that takes time! I enjoyed seeing the steps of your living room transformation- especially the change in paint. We recently painted our L-shaped living/dining room with Freshaire paint and the color choices are limited. We ended up with a yellowy green color and although it’s an improvement –I’m not sure about it. Not loving the color has me stuck on how to proceed with other rooms in our home. So, thanks for the reminder that it takes time. You have a beautiful home and I love your paint choices!
Magchunk says
This is a great post. Such a relief to see that your beautiful living room once was sparse and mismatched as mine was when I first moved in. I’m moving this fall and this was a good reminder to not get ahead of myself (haven’t even found a rental yet and am already redecorating!)
Maggie
Melanie says
I’m so glad you revisited this transformation. Those blinds you have are EXACTLY what I need. I’ve never seen them so light either. Most people seem to have the dark blinds. Every single window in our house is huge like that and we’ve never replaced the ugly aluminum blinds that are up because I’m too cheap to buy custom ones. Thank you for showing that again!
Its also nice for people to see that changes in a home don’t happen overnight!
Dana Miller says
Thanks J & S for addressing my slew of questions. I know they aren’t the pictures you are most proud of, but the transition pics you post are VERY helpful to us newbies. All great designers will tell you that a home is collected/decorated ‘over time’. You did a wonderful job portraying that in this post. I’ve said it several times and I’ll say it probably a bazillion more… Your DIYing, financial responsibility and eye for design are truly inspirational to me. When taking on any project now, I seriously think to myself “WWJSD?” (What would John & Sherry do?) Yeah, laugh, but it gets me focused every time!!!!!
Jacci says
I *loved* this post, guys! Loved it! :) I think it would be great to know the dates for each of those living room photos, too, just to give us an idea of your timeline. It look so fabulous now. You’ve really done such a beautiful job of making your house a home :)
XO,
Jacci
grace says
This is completely off topic but I have been reading for a while now and yet to comment but have this burning question. What do you do when you have made a bigger ticket item purchase that a year later you do not like? I bought a chocolate brown couch (corona sofa from macy’s, a ‘petrie’ knock off of Crate and Barrels) and now I do not like it. Main reason is the dark chocolate color. But, so as to not get lost in the details – my question is – what to do when your style/ home evolves and you realize something you spent considerable bank on no longer fits with your vision? Do you try to make it work or try to sell it and recoup your costs?
Thanks!
-grace
YoungHouseLove says
Hey Grace,
Hmm, that’s a toughie! I think for a gorgeous chocolate brown sofa I would design the room around that, especially if I saved up for it and had no hope of replacing it in the near future. I think the reason you might not like it is because it looks extra dark and high-contrast in your space (which is probably light and soft by comparison). But by embracing the rich color and tossing some warm throw pillows down to accent it (maybe some yummy apricot or tangerine colored ones) and painting the walls a rich and delicious caramel or mocha color, all of a sudden the sofa won’t stand out like a big dark heavy piece and will feel more integrated and yummy in your warm and rich room that complements it. Of course using a glass coffee table and maybe even some round honey-toned side tables will soften things up with curves and lighter colors that will work with your existing sofa without making the entire room a big dark black hole. Hope it helps!
xo,
s
grace says
Yes that is so very helpful! Thank you! I tend to like the exact palette you have described as your preference: creams, beiges and cool blue-greys. But I think I can work with this idea you have gifted me with to make it work. Thank you for your rapid response, and if I do paint I’ll share pictures!
Thanks again!
-grace
r8chel says
I got a kick out of the part near the end where you doled out advice to people who feel like they’re moving too fast. I seem to have the opposite problem. Maybe sometime you could offer a few words of wisdom to those of us who are on the super-slow track! I’m very gradually making progress on getting my house fixed up, but I have such a hard time making decisions about what I want… and I can’t seem to find things in the stores that I actually like… and when I finally do, I remember that I hate to spend money!
Any tips or suggestions for those of us who are moving too SLOWLY?! :)
YoungHouseLove says
Hmm, good question. My advice to you is this: get moving! You just need to build up some momentum, so even if you have to force yourself to paint just one wall, once you get going you’ll probably end up doing the whole room and maybe even the trim. Perhaps you can reward yourself like you would if you met any other goal (with a trip to the movies, a slice of cheesecake, or even a new pair of shoes?). That would definitely get me going! Hope it helps.
xo,
s
Lisa says
I have a question about your wall art. I am trying to integrate some inexpensive modern touches and pops of unexpected color into my master bedroom , and I really loved the look of the green “on the cheap” framed wall art in your 3rd bedroom. My bedroom walls are a dark sage green and my bedding is mostly green with a brown stripe along the edge. I found an idea in a magazine where the designer had integrated orange with a orange throw on green bedding and it looked fabulous. I’d like to borrow your idea of using magazine clips or fabrics in a 3-opening black frame to bring that color into the room and have purchased some swatches from a fabric store using orange,cream and green in the patterns. Do you recommend using 3 different patterns, or maybe bring in some brown solid with a stripe in one or should I perhaps repeat one of the swatches twice since it may be overly busy with all pattern? I could really use some guidance on that.
Thanks for your inspiring and fun site, it has given me excitement and confidence to get moving, take some design risks and make my own casa more beautiful and inviting.
YoungHouseLove says
It’s really your call! The different layered orange fabrics sound lovely so we say go for it!
xo,
s
Colleen in MA says
What a great question and a wonderful answer. Thank you for sharing the evolution of your living room. As a graphic designer I am creating all the time, but it’s not possible to hit command+Z to undo a wall color! But your post makes me less fearful to try something new in our home.
A while ago you did a makeover for my stepson’s room and this may be the kick in the butt to get in there and finalize those changes! I do owe you the after pics!!
Lisa says
Hi Sherry:
So sorry to bother you again. In my email I did forget to ask you about your monogram framed art that you have in your bedroom and living room.( I know, I am obsessed with wall decor!) I know at one time you sold it in your shop. Do you plan to offer that again? It is so clever.
Thanks
Lisa
YoungHouseLove says
Everything in our shop is limited edition so we’re sorry to say that the monograms are no longer available. Stay tuned for some fresh new stuff soon, though!
xo,
s
Susie says
My, how your living room has evolved! I love it in its current state!
Megan says
Where is the blue bedspread in the picture from? So cute.
YoungHouseLove says
It’s from West Elm but they don’t sell it anymore. Maybe check eBay? Good luck!
xo,
s
Jackie says
Hey youngsters,
I found your website a few weeks ago when I was painting stripes in my dining room, felt a moment of uncertainty, and stumbled upon your site seeing the stripes in your bathroom. I have wanted to write for weeks but didn’t know how to take the plunge! Anyway, my husband and I are about the same age as you guys. We married in July 08 and moved into my dream home on Long Island, NY in Aug 08. I have been moving room by room also but started with our family room. I painted it almost the same green color as you guys..slept on it…woke up and could not believe I picked such an intrusive color. I also finally painted it a shade of tan.
I am writing to say how inspiring and great your site is! My friends think I am crazy and maybe even obsessive about home design but I really just have YOUNG HOUSE LOVE for our home! Your room designs have inspired so many of my new projects! My house has what I call a “Beach Sophisticate” feel and your asthetic is so pleasing to me!
Thank you for sharing your passion and for feeding mine!
<3, Jackie
rebecca says
Hey youngsters,
I only just found your site a few weeks ago and let me say -I’m totally addicted! I’ve been on for the past 2 hours reading different posts that I’ve missed out on. My husband thinks I’m crazy!
I absolutely adore your entry-way table and your TV media stand from Target. I know this is probably pushing it, but do you happen to remember which models they are? Also, its hard to tell but are these pieces dark brown or black? I have a similar color scheme in my living room (light and bright) and I’m not sure whether to go with brown or black wood.
Much thanks! ~R.
YoungHouseLove says
Hey Rebecca,
So glad you’re digging through the archives! As for those tables, they’re both dark brown (a rich chocolate tone) and the TV stand is still sold under the name Manhattan or Hudson. As for the console, we’re not sure about the name, but we’re confident there’s something extremely similar if not identical on target.com so I would just look for clean lines and a deep wood finish. Hope it helps! Happy hunting…
xo,
s
rebecca says
PS. Yes, its 1:30 in the morning and I’m sitting here reading about how to hang curtains!
Lindsay says
Love this post! You guys should do more “evolutionary” posts like this one for some of the other rooms in your house. You’ve done such a great job of it on this one! Fantastic! Keep up the great work!
Laura says
This is a great post–thanks so much for showing us all of the stages! It’s reassuring that you didn’t just get it perfect with one shot.
Here’s a detail question for you: do you use the same trim color (for baseboards/crown moldings/doors) in all your rooms, or do you vary it according to wall color? We used the same color (Benjamin Moore white dove) for continuity, but sometimes I think I’d like a creamier color/less starkly white in our dining room. We have a small house and I don’t know how I’d do the transitions in doorways/archways. What do you think?
YoungHouseLove says
Trim is definitely something you can change from room to room to complement your palette. We have the same Benjamin Moore’s Decorators White on all of our trim throughout the house, but if a certain wall color called for something creamier we wouldn’t think twice about changing it to complement that room. Hope it helps!
xo,
s
troy says
just discovered your blog recently and am enjoying reading through it. i had to comment on the PB moorish tile rug … it totally finishes off that room beautifully … like the icing on the cake! i have the same rug in orange in my sunroom. it was one of those things that when i first saw it, i knew i had to have it. but i waited patiently for it to go on clearance, and was even able to get the store manager to match an even lower online price. so … you have excellent taste in rugs (excellent taste, period!) and i totally appreciate your approach to creating beautiful spaces with limited budget. it’s amazing what you can accomplish with a little determination (i stalked PB for months waiting for that rug to go on clearance!!) and patience. keep up the good work!
YoungHouseLove says
Ooh we love it in orange too. Congrats on your clearance rug score! Ours was a floor sample on sale so we were happy to give it a good home!
xo,
s
Amy says
I’m getting to know your blog (should be doing work) and your decorating style and am super encouraged to start tackling some of the projects my new/old house is screaming for. You mentioned that changing the trim color is easy….what about wood trim that is dark, dark, dark? Our house was built in 1910 in New England…think small rooms, lots of wood and low ceilings. I can’t decide whether or not to paint all this trim or to keep it and maintain the character of the house. How tough is it to paint trim, and what wall colors actually complement dark trim?
YoungHouseLove says
Hey Amy,
You just have to follow your heart on this one! We were lazy and didn’t want to paint the dark trim in many of our rooms but slowly we realized we were trying to decorate around something we didn’t like instead of just changing it (which ended up being cheaper and easier than trying to make something we didn’t like look good!). Here’s a post about our secret weapon for painting trim: a short handled high quality angled brush. To paint dark trim it usually takes about two coats, but the first one takes much longer since glossing over things a second time is usually pretty quick. Hope it helps!
xo,
s
Kiri says
Hi Sherry and John
I’ve recently become a convert to your site and have been on it everyday since I found it a week ago. You guys are inspirational and motivational! And if you don’t already have one, you now have a big fan in New Zealand. I geuss renovating and redecorating on a budget is an international interest, thanks so much for an awesome blog! My husband and I are persepctive homeowners (currently waiting on the green light from our mortgage broker) its scary right?! We’re buying my family home from my Mum and it needs alot of work but we are keen and happy to have your guys awesome advice to rely on. Thanks Y.H.L.
Kiri
YoungHouseLove says
Thanks so much for the sweet note Kiri! So happy you found us. And good luck with your future house adventures!
xo,
Sherry
Beverley says
Hi! So this may be a weird question, but I just bought one of those sheepskins from IKEA and I brought it home. It looks great but the SMELL….oh the smell!!! It stinks!!! Did you have the same problem and if so, any suggestions about how to remedy it?
Thanks!!
Bev
YoungHouseLove says
Hey Bev,
Eeks! It sounds like you got a bad batch or something. Ours have been odorless from the time we took them home. I would definitely try exchanging them since the smell is so bothersome. Hope it helps!
xo,
s
Amanda says
Hi! I recently found your site and have really enjoyed reading about your adventures! My husband and I bought our home several years ago and have slowly been making updates, which has been a fun process. Anyway, I couldn’t help but laugh when I read that you had removed the divider in your living room. We have one that is almost identical in our LR, but have opted to keep it. It’s good to know what things would look like if we did decide to remove it one day!
MaryGene says
This was an awesome post. My husband and I currently live in an apartment and are hoping to find a house in the next few years that we can transform just like y’all have!! Reading your blog has inspired and empowered us. This post was quite encouraging that “it can be done”!
Sarah W says
Thanks so much for posting this! I have been loving your site for a while now, but wondered about the process. Did they know exactly what they wanted and just go out and get it (furniture to art to knic nacks)? but what young couple has that kind of money?? etc. So I LOVED seeing that that is not the case and the transformation and mis colour and evolving that took place here! Thanks for being real! :) Love your site!
Katrina C. says
Phew!!! That couch..no words for it. I’d love to have a PB Basic also! Is it easy to clean? I have a microfiber one now and it’s super easy to clean…but my true love is the PB one..
YoungHouseLove says
Hey Katrina,
Yup, both of our slipcovered couches are super easy to keep clean (even though they’re relatively light in color). Here’s an old post all about why we love our Rowe sofa a lot more than our PB one: https://www.younghouselove.com/happy-happy-joy-joy/
Hope it helps!
xo,
s
Erin says
I am utterly in AWE of your creative geniusness!! I just stumbled on your site today for the first time and well it’s a done deal.. I am hooked! I live in Seoul, Korea with my husband in a rented 3 bedroom apt. After 2 years of marriage I’m FINALLY getting around to decorating our home. I am a complete noob and on top of that on a very tight budget so I’m opting for some serious DIY as well as creative solutions to a lot of renting restrictions!
Long story short… your site is awesome! Thanks for all the hard work you’ve put into it.. I’m learning so much!
PS. I LOVE that you and hubby have taken on the project of decorating your home together. you guys are ridiculously cute : )