Last year John’s younger sister Carrie moved to Philly for work and found herself living in a cute high-rise apartment in need of a bit of cheap sprucing. So in under $200 we skipped through Ikea, got art and accessories to transform her space, and made over her apartment in an afternoon (here’s that story). Well, a year later she’s been transferred back to Northern Virginia (closer to the fam- hurrah!) but has found herself once again in a plain jane room in need of some serious spiffing. So we took on the help-Carrie-makeover-her-room-on-the-cheap challenge again in this doozie of a sunroom turned bedroom:
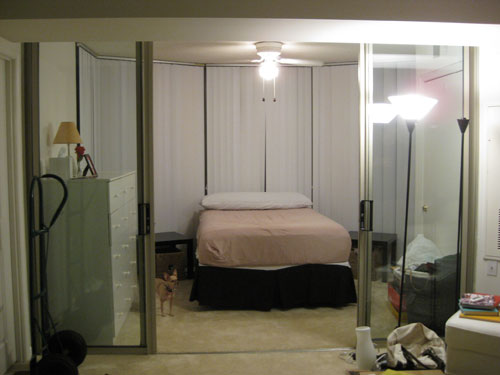
Yes, the room is almost entirely surrounded by glass- from the sliding doors that make her bedroom reminiscent of a fishbowl (let’s watch Carrie sleep… creepy) to the five- yes five!- floor to ceiling windows that create the irregularly shaped five-sided back wall. But we weren’t scared. Ok, well maybe a little. But thanks to our trusty $200 budget and another trip to Ikea, we had high hopes for this space. So off we went to our favorite Swedish furniture store for curtains, more curtains, a few accessories and some furniture to adapt with some cheap Home Depot supplies that we picked up on the way. Four hours later, the room looked like this:
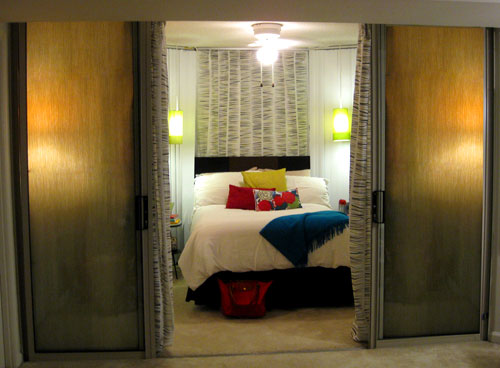
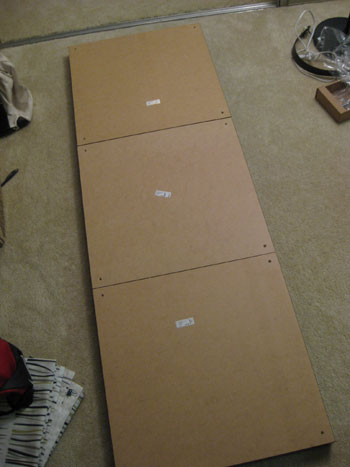
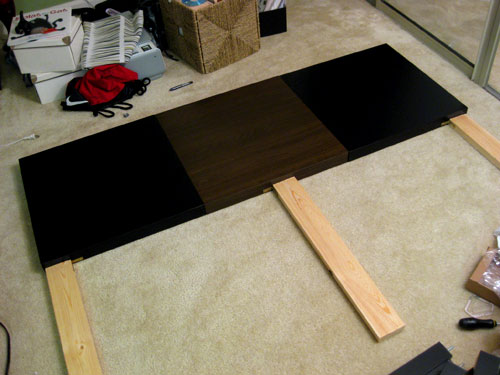
Cay you believe that’s the same space? Here’s how it all went down. First and foremost we wanted to work with what Carrie already had to keep her precious pennies in her pocket. So as you can see from last year’s apartment makeover, she already had two black Lack side tables, some colorful pillows, and those textured striped curtains to work with. The only issue is that the black tables were formerly sofa side tables, and were wayyy too low for her bed (see before photo) so we brainstormed an alternate plan to use them to create something else that we needed in the space to save money and keep them from going to waste. Can you find them in the after picture above?
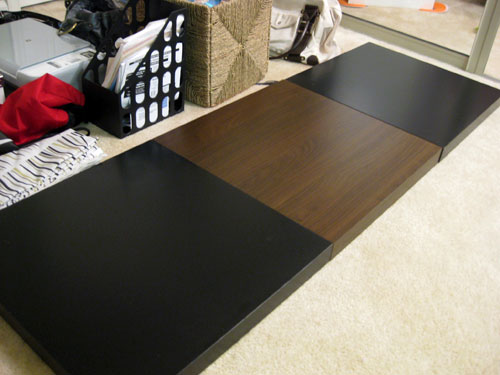
If you were wiley enough to guess that the black Lack tables from Ikea became the headboard, feel free to reward yourself with a celebratory donut. Yup, we were driving to Ikea with our new catalog in hand when I wondered aloud how wide those tables were. Turns out that three of them are almost the exact width of her bed, so we snagged one more (in a rich wood tone for interest) and did the happy dance at the “new lower price” of $7.99.
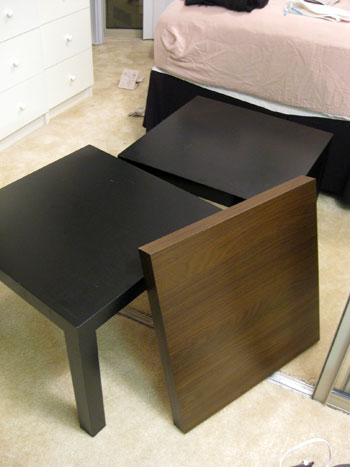
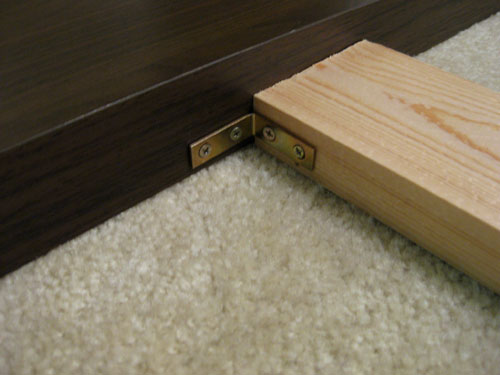
Then all we needed were a few dollars worth of metal brackets from Home Depot and a long 2 x 4 (which we had cut at HD into three 26″ pieces). The assembly process was simple. Step 1: unscrew the legs and turn all the tabletops upside-down and line them up with the brown square in the middle:
Step 2: Use strong metal brackets to connect each tabletop to the one next to it in at least two places (tip: don’t get decorative hardware- be sure it’s heavy duty enough to do the job). Oh and drilling a 55″ 1 x 3 across the back of your headboard will add even more durability and reinforcement so that’s extra credit (not shown below).
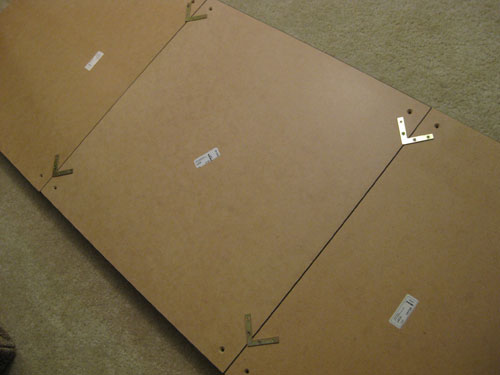
Step 3: Flip everything over to admire your handiwork (seriously guys, anyone can do this- we didn’t even use a power drill to assemble ours, I just used a regular old manual screwdriver and some elbow grease).
Step 4: Use three (or six for even more reinforcement) right angled L-brackets to connect the headboard legs (our three 26″ 2 x 4 pieces that we had pre-cut at Home Depot) to the newly-joined squares that make up the headboard:
And voila- a DIY headboard that we created for under $20 using a few things that Carrie already had laying around:
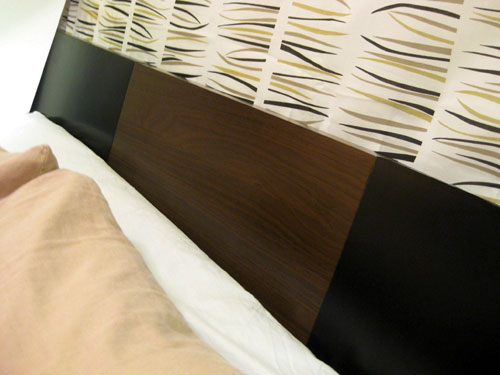
The headboard was actually more for function than form since the glass walls where the head of Carrie’s bed was resting come together to create an irregular angle that was causing Carrie’s pillows to get wedged between the bed and the window (and she kept waking up with her face in those vertical blinds). But thanks to the new made-it-ourselves solution, that pillow problem is a thing of the past.
But on to the biggest decorating road block we have ever encountered to date (truly- we were stumped for hours). We all agreed that Carrie needed some soft billowy curtains in front of those less-than-lovely vertical blinds (which she could not remove- no ifs, ands or buts) so we snagged a bunch of panels and rods and even a wire pulley system at Ikea in the hopes of turning a wall of vertical blinds into a soft and inviting cocoon of a bedroom. The unforeseen issues? We knew that we couldn’t hang the curtains from the “back wall” since it’s literally made up of five floor to ceiling glass windows (or use the track of the vertical blinds to hang the curtains since it wouldn’t accommodate any modifications of the sort) BUT we never anticipated that we couldn’t hang our curtains from the ceiling! Nope, we failed to anticipate that the ceiling would be a rock solid concrete-esque material that was literally impervious to screws, nails, and even our heavy-duty power drill. It could possibly have been made out of diamonds, it was that impenetrable.
So there went our wall of curtains idea. Right out those floor to ceiling windows. We did realize that we could “hang” one striped curtain panel behind the bed across the vertical blinds (we physically clipped it to the top of each blind to hold it up) creating the soft stripey fabric panel above the headboard. But once the curtain was clipped (with little Ikea curtain-hanging clips, btw) the blinds were no longer able to be opened or closed. So because Carrie doesn’t mind losing the ability to see out of the window behind her bed she was fine with us clipping the curtain to the vertical blinds… but for the rest of the windows in the room, we had to leave the verticals as-is to allow her to open and slide them on a daily basis (and again, the management would not let us remove the verticals- and they would see from the outside of the building if we had gone that route).
Long story short: Carrie has since called her building’s superintendent and asked two other renters how to hang curtains in the sunroom and no one has found a way! We’re still brainstorming though, so you can bet that if we think of something we’ll be there in a flash adding soft white curtain panels in front of those verticals to frame out the textured striped ones above the bed. Someday…
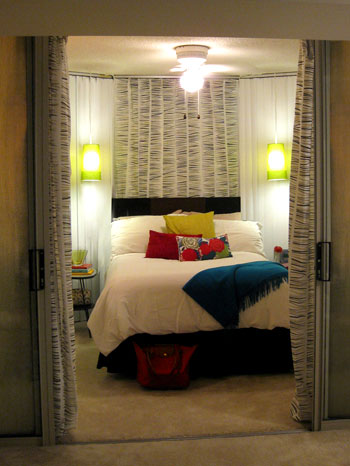
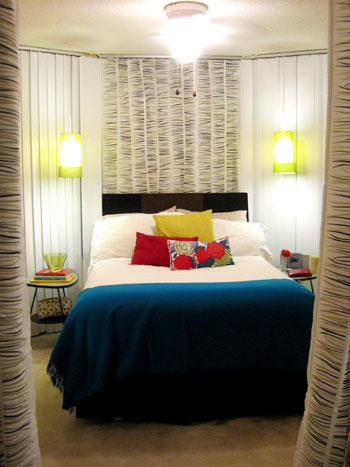
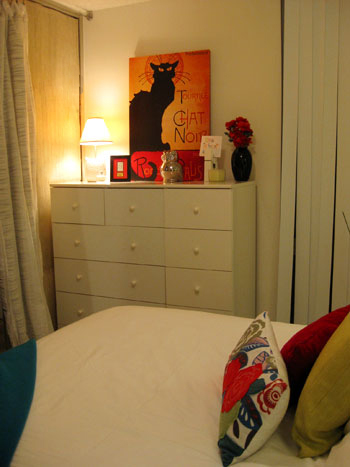
You’ll also notice that we brought in new side tables (conveniently shaped like rounded triangles, so they slip right into the triangular shaped space on each side of the bed). And at just $29 each we were psyched about our glass-topped Ikea finds. We also snagged some hanging lamps, which we knew would make the space. When you’re dealing with a small room, anything you can do to create drama and get things off of the few surfaces that you have for display/storage is always a plus. So don’t forget about plug in pendants or even sconces! At $12.99 each, these lights were totally within our budget. Huzzah. But how could we hang them from those bullet-proof ceilings? After approximately ten minutes of woe-is-me whining, we ran to CVS with our fingers crossed and returned with heavy-duty 3M wall hooks that we stuck to the ceiling to swag our little green shades. Success! Then we just plugged them in and we were in business.
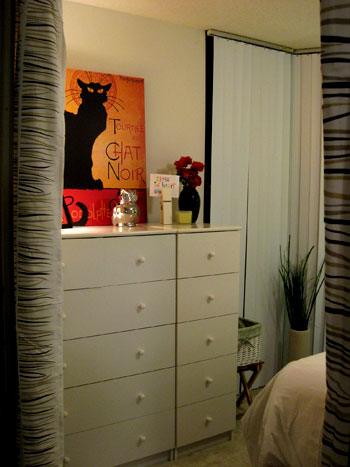
We also used Carrie’s existing items (the pillows from her old apartment, her fun blue throw, the colorful books on her side table) to decorate her little jewel box of a room. And we snagged one more pillow (the goldy-green one) from Ikea for just $7.99. We love how it ties the green shades and the green stripes in the curtains into the red and blue pillows and accessories that we integrated. We also grabbed her existing red canvas art and leaned it against the wall behind her childhood dressers (snagged from home for free) for another fun pop of color that every no-painting-the-walls rental needs:
But what about the sliders that lead into the room? You know, the ones that give Carrie’s roommates a Truman Show-esque perspective? Well, we originally thought about hanging curtains but thought that something a bit flatter and less billowy for at least part of the 10′ expanse of glass might make Carrie feel less like she’s sleeping in a curtain warehouse. So we trolled Ikea for some interesting textures that we hoped to place over the glass from the inside for privacy and interest. Wrapping paper? Nope, too thin. Wallpaper? Didn’t see any. Grasscloth window panels? Jackpot. It was just like purchasing a huge roll of grasscloth wallpaper for only $15 a roll (we used two of them to get ‘er done) and we simply cut them to size and used clear heavy-duty packing tape to seam them together for a clean look. We LOVED the outcome- and it was so easy. Here’s the play by play as demonstrated by my other half:
Step 1: Measure the glass and cut the grasscloth panel to fit either horizontally or vertically (we went horizontal because our sliders were a bit too wide to do vertical):
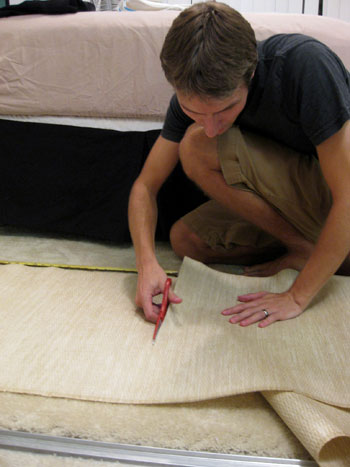
Step 2: Use clear packaging tape to very smoothly tape the exterior edges of each panel to the metal glass door surround. Go slow and steady for the cleanest effect possible.
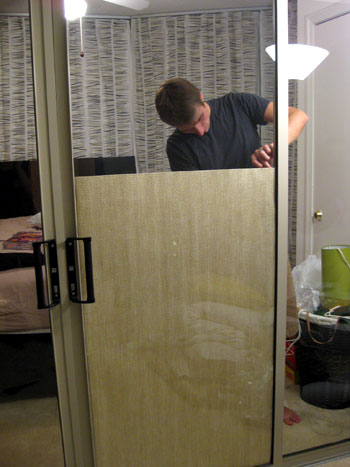
That’s it. And after a good amount of measuring, taping, stepping back to admire, repeat- you’ll have an awesome privacy screen built right into your sliding doors! Of course heavy duty clear tape is the key (this isn’t a job for scotch tape!) and hanging the grasscloth curtain panels the way they were intended to be used (from the ceiling or wall- both of which weren’t options for us) would also yield something fabulous and textured for your space- so you definitely don’t have to DIY everything if you’d rather stick to hanging the panels as they’re meant to be hung. Oh and we thought of another way to adhere the grasscloth if the tape method is too sticky (literally) for you (or if your house gets humid and warm, in which case we wonder if the tape will last for the long haul). Very strong magnets placed on either side of the glass would definitely hold the paper in place- and look pretty darn cool to boot.
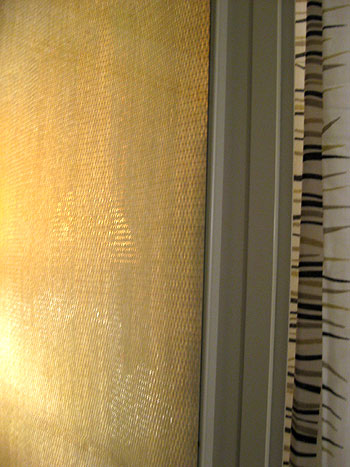
Oh and you’ll notice above that we did actually add two breezy curtain panels after hanging the grasscloth for a layered effect. They felt light enough not to be too invasive (plus since we couldn’t hang the wall of curtains behind the bed, we knew the room could handle a bit more softness in other places). And thankfully there were walls perpendicular to the glass sliders (unlike behind the bed) so we could hang a curtain wire from those two walls to secure them. We loved how the textured panels on the glass and the billowy striped curtains worked together in the space. Tip: curtains slide extra effortlessly on wire, so it’s always good for a doorway- and Ikea sells a great kit called the Dignitet.
So that’s the story of an angular glass sunroom, a trip to Ikea, a $200 budget, and a ceiling that could probably deflect Superman. Oh but we can’t just mention the budget without doing a little play-by-play of how we spent our allotted cash, so here’s the breakdown for all you curious home improvement enthusiasts (items not on list below were existing last-apartment remnants, which really helped us stretch our dough):
- Striped curtain panels throughout room: $30 (for two sets of 2)
- Curtain clips (for panel over bed) & curtain wire (to hang sliding door curtains): $20
- Hanging lamp shades and lighting kits on either side of the bed: $26 total (such a deal!)
- 3M hooks to hang lights from impervious-to-everything ceiling: $6
- Third lack table to complete headboard project: $8
- Wood and brackets from Home Depot to create headboard: $12
- Goldy-green pillow on bed: $8
- Glass topped side tables: $30 each
- Grasscloth curtain panels turned into slider door wallpaper: $30 (for two rolls)
- GRAND TOTAL: $200 (and not a penny to spare)
Don’t you guys love those green hanging pendants? They have to be one of our favorite details in the room. And although it’s still a small space (9 x 11′ to be exact)- it feels so cozy and inviting. Hooray for Ikea and apartment makeovers! So what about you guys? Anyone itching to snag some of the goodies that we reached for while we shopped til we dropped? Any soon-to be-head-board-making individuals out there who are ready for the Lack table challenge that we detailed above? Anyone else with wall to wall glass and impenetrable ceilings who have curtain woes of their own? Let’s commiserate.

Leave a Reply