Whether you’re interested in painting a chair, a table, or any other wooden piece of furniture, the steps are pretty much the same.
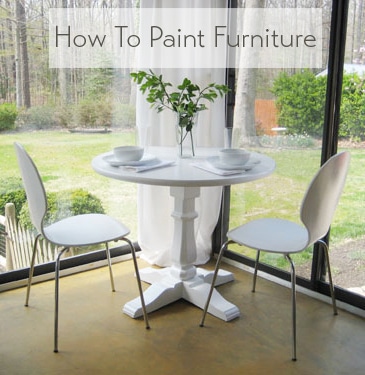
Take this table that we built and subsequently painted along with the accompanying white chairs (which used to be a golden blond wood tone).

Sprucing things up with a fresh coat of white paint took them from thrift store (where we got the table base) to Pottery Barn (which sells a similar version of it for 500 beans) in just a few hours.

But enough jibber-jabber. On with the how-to deets:
Step 1- Evaluate the surface of the piece that you’d like to paint. If it’s a sleek glossy surface (like varnished or sealed wood) you’ll want to gently sand the entire piece with 100 grit sandpaper). If it’s more of a dry chalky texture (like unfinished wood or flat paint) you can forgo the sandpaper and skip right to step two.
Step 2- Break out the oil-based primer to ensure that the paint sticks and no stains come through and ruin your finish (we’ve also used Zinsser Smart Prime with great success, which is a low-VOC stain-blocking primer that’s not oil-based – so it’s less stinky). Give the entire piece a good once over with a small foam roller or a paint brush. This coat of primer doesn’t have to be perfectly even in tone (it’ll probably look thinner in some areas since that’s how primer rolls) but as long as the entire piece is well covered – and it’s not too gloppy and thick – it’s ready for step three once it dries.
Step 3- Use a fresh small foam roller or paint brush to apply two thin and even coats of latex paint (a semi-gloss finish is usually best since it’s nice a wipe-able and durable choice). Many people mistakenly think that latex paint isn’t supposed to be applied over oil-based primer, but the real painting no-no is applying latex paint over oil-based paint, which is a guaranteed bubble-fest and should be avoided at all costs. And a word about small foam rollers vs. brushes: according to experts, all rollers – especially if used too quickly- may rile up the paint and lead to bubbles while paint brushes are the most bubble free application method known to man (although you might have brush stroke issues if the paint isn’t applied thinly enough or given ample drying time between coats).
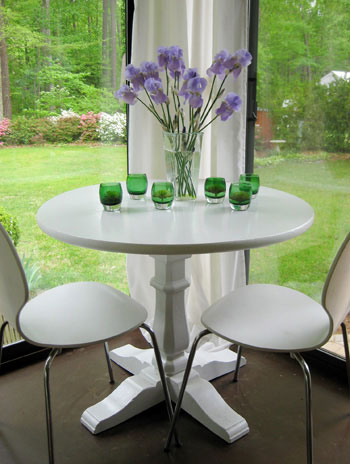
We painted the table above with a paint brush, not a roller. But we have also used small foam rollers with great success, so those are actually our recommended choice for beginners since they cut down on brush strokes or drippy finishes and seem to be the most error proof. No matter what you use, be sure to wait until the first coat of paint is thoroughly dry before applying a second coat (each coat should be applied super lightly and evenly – aim for the thickness of an eggshell or a piece of paper). This thin application is the key to avoiding brush strokes or roller marks for a smooth, gorgeous finish. Repeat after me: three or even four super thin coats are far better than one or two thick and drippy ones!
Step 4- This step is optional, so think of it as extra credit. Brushing on two thin and even coats of water-based poly for wipe-able protection that really goes the extra mile (and provides a glossy oh-so-luxe sheen) can’t hurt if you pick the right stuff. The only two brands that we’ve ever used with unmatched success are these two, so they’re our strong recommendation (other types can yellow or crack over time):
- Minwax Water-Based Polycrylic Protective Finish in “Clear Gloss” (found at any home improvement center)
- Safecoat Acrylacq (which is a low-VOC, non-toxic alternative sold at eco boutiques or online at places like greendepot.com)
We went the extra mile and applied poly to our white table above for a bit of added protection, and we even thinly polyed the chairs since they need to be just as easy to wipe down due to their proximity to food whenever we dine in the sunroom. Thin is definitely the operative word, and again you’ll want to be sure to let the first coat thoroughly dry before going in for the second. Any time you go over semi-wet paint or poly to smooth things out you’ll get terrible drag marks, so work from one side to the other and never go back over things until they’re completely dry.
Step 5- Wait at least a full 72 hours to place objects on your newly painted piece to avoid dents or divots in your finish. If you really want to be on the safe side, we’d recommend waiting five full days. Sometimes factors like humidity and primer/paint/poly thickness can keep things from fully curing up, and you don’t want to get indents from using your newly painted piece too quickly. Waiting this long might take some willpower because you’re dying to sit on/eat on/enjoy your brand new piece, but it’s worth the wait. Promise.
Easy, right? Ok, those were a lot of words, so it might sound complicated. But just take things one step at a time. And remember to breathe. You can totally do it. There’s really no reason to live with wood furniture that’s not exactly the tone or the shade that you’d like. So from painting an old side table a handsome glossy black to giving a scratched up wooden chair a cheerful red tone, it’s definitely a project that you can confidently tackle in an afternoon. Go forth and paint something!
*Oh and it bears noting that if your furniture item is anything other than solid wood or veneered wood (like laminate, melamine, etc) you should visit your local hardware store and ask the paint pro there what they recommend for that surface. There are some great oil-based primers and enamel paints out there (which are changing all the time) so it might be possible to get a great result. The key is really roughing up the surface so it’s less glossy and then priming and painting with the best stuff they have (usually oil or enamel based).Good luck!
Psst- In the market for a quick cabinet painting tutorial? Look no further.
Psssst- Wondering how to paint a brick fireplace? Wonder no more.
Pssssssst- Itching to paint wood paneling? Try this.

Leave a Reply