And now for the juicy wedding week DIY decor that you’ve all been waiting for.
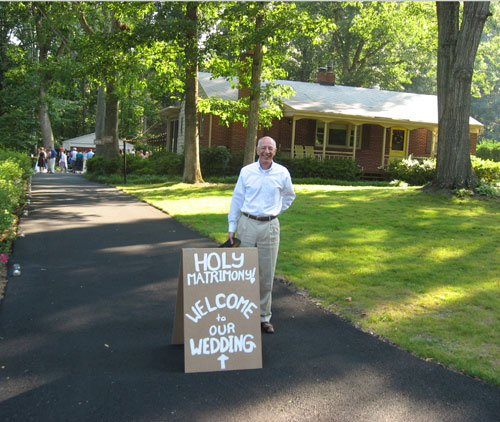
From the moment people arrived, we wanted to make sure they felt comfortable and warmly welcomed. So we created a handy dandy little wooden welcome sign with a hand painted message for our guests. And thanks to the sandwich-board construction (two pieces of wood secured with simple hinges at the top), we were also able to paint a cute departure message which said “Thanks for sharing our special day, please grab a glowstick to light your way to the car” along with a galvanized bucket of white glow sticks to help people navigate our semi-dark street safely. And we made the sign and purchased the glow sticks in bulk for under $30 total. Cha-ching. Here’s John’s dad playing greeter next to our “masterpiece”.
We wanted a celebration that felt festive and fun without sacrificing an ounce of style, so we were sure to set the tables with care. And while we probably saved well over a few thousand dollars with our DIY approach, we literally did every last thing ourselves (and spent months and months getting stuff together). In fact, other than renting the tables and chairs from a local vendor, there was nothing conventional about our reception’s set up. The tablecloths and runners were actually just white muslin and textured yellow fabric that we purchased from a local fabric store and the glassware was largely purchased at Ikea. We quickly realized that strategically buying these items was actually cheaper than renting them and we were able to create a more custom look without worrying about fees for staining, ripping, or breaking anything. Even the silverware was purchased from Sam’s Club. Afterwards we donated a lot of the servingware to charity, which felt really good (and was a write off to boot).
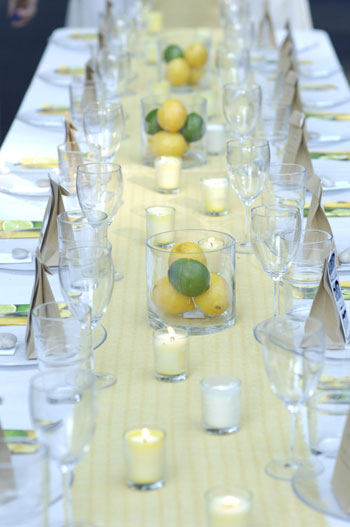
By choosing fruit over flowers (straight from the grocery store that morning) and going with centerpieces we could easily assemble ourselves (we’re talking ten minutes of arranging, tops), we saved hundreds while keeping things fresh and chic. The glass cylinders for the fruit centerpieces were from Michaels for $3.99 a pop and we also snagged about 200 glass votives thanks to Craigslist- where a former bride sold them all for $30 after barely using ’em herself. We even found festive lemon & lime paper napkins at Target and the punchy citrus print perfectly echoed our lemon and lime centerpieces (note: we may have over-purchased these, as we’re still using them to this day).
And now for the answer to the “what’s in those brown bags” question that many of you have been asking. Our garden themed favors were simple brown mini paper bags (thanks, Target) which held a single gladiolis bulb for our guests’ garden with easy planting instructions written on the back of each bag. Clipped to the front of the bag was another photostrip (tying in our save-the-date and the actual photobooth that we rented for the event) with John’s face covered in lipstick kisses while we held signs that read: Plant one… on us! *smooooch*
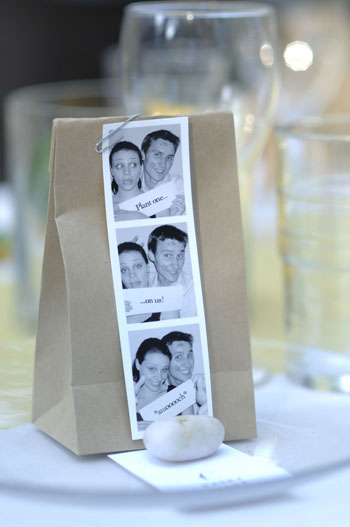
We also created place cards for each guest by hand stamping their first initial on a small square of cardstock, hand lettering their full name underneath and securing each card with a river rock (thanks again, Target). Many guests kept their cards (and even their rocks) which helped to remind us that sometimes simple can be just as elegant and beautiful as fancy calligraphy and ribbons.
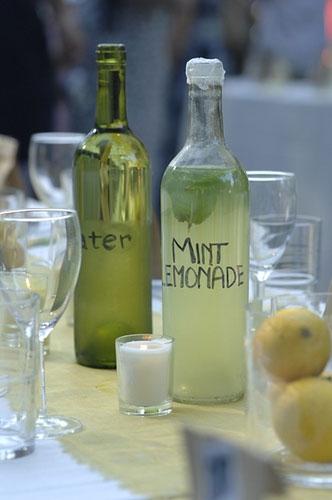
Another special table detail was our bevy of charming beverage containers. Instead of big plastic pitchers, we wanted the chic look of glass so we asked a local wine retailer to save old bottles for us (leftover from their weekly wine tastings and totally f-r-e-e). Once at home we made sure they were squeaky clean and hand labeled ’em with a sharpie (which never rubbed off or faded in case you’re wondering). We used all the green bottles to hold water, brown bottles for sweet tea and clear ones for homemade mint lemonade (fresh mint + lemonade= yum). Of course we also had many bottles of red and white wine on hand along with some of those cute vintage glass bottles of coca-cola. We really think making the effort to avoid cans and plastic kept things über classy and picture perfect.
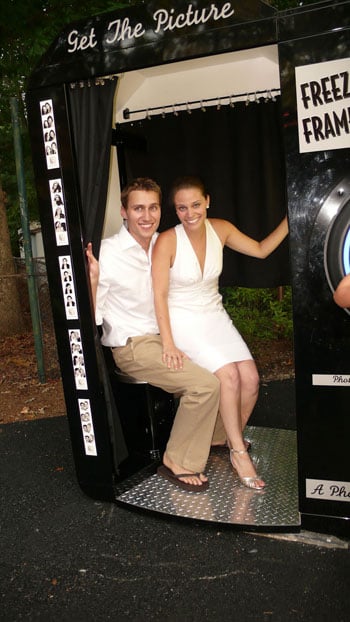
And as for how the idea to rent a photobooth came about, here’s the scoop. We were trying to think about something fun that we could introduce for some serious entertainment value (cotton candy machine? fireworks? sno-cone maker?) when we came up with the photobooth idea (spurred by our tradition of documenting many relationship milestones with a photobooth strip). For months we tried to hunt down something local (and then something not-so-local) to no avail, but about three months before the big day a lovely local lady named Lisa-Ann launched a photobooth rental business, and we were one of her first customers. At $1200 for the day (which included unlimited photostrips and an on site attendant to keep the booth running) it was certainly a splurge, but it really was the perfect touch. And the hysterical strips of our friends and family having fun in the booth are one of our favorite keepsakes (which we’ve collected in a leather-bound album while framing a few of our favorites around the house).
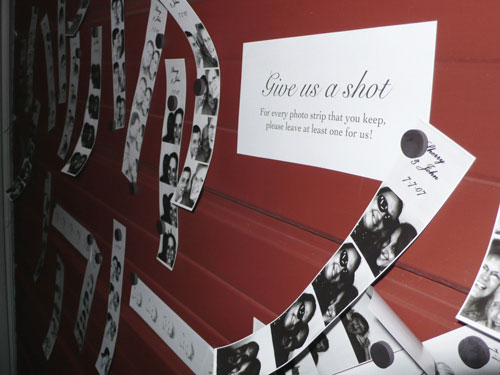
To encourage people to leave a few of their photostrips for us (and display them for other guests to peruse throughout the night) we transformed our big red metal garage door into the ultimate oversized magnetboard. All it took was a buncha inexpensive magnets and a sweet little reminder to save some photostrips for us. And lo and behold it worked… we ended up with even more photostrips than guests.
But one of our very favorite photostrips was the last one taken late in the evening after all of our guests had left. We ducked into the booth right before they hauled it away (John wasn’t even wearing his wedding pants anymore and had changed into shorts to start cleaning up). We just love how this strip perfectly captures the joy of the day and the undeniably euphoric feeling of…

… we can’t believe we actually pulled it off!!!
*Drop in on our Wedding Album tab below the header to check out all the details of our big day from start to finish!

Jennifer says
this is ridiculously cute/inspirational/beautiful. I’m sending the link to everyone I know!
Tatyana says
You guys should also be in the wedding planning industry! This is all SO amazing and inspirational.
One question: the cool lemon/lime napkins – are they paper or fabric? I’m guessing paper but wasn’t sure.
ALICE says
You guys did a fabulous job on your wedding! I love it. Thanks for sharing. :)
freckles chick says
I smell another magazine article of your own featuring your charming wedding in the near future =)
So lovely!!
maya says
just perfect! and great ideas for a backyard party of any sort too. maybe get a polaroid (quick, before it’s gone!) for the shots since i’d be cheaper than the photobooth.
what a happy day you guys had!
Sara says
So many super cute ideas!! I love the photobooth.
underwood-dc says
you guys make me sick you’re so perfect!! :-)
This is just beautiful. Building beautiful memories is what makes this so sweet. Thanks for sharing.
Jennifer says
Congratulations. A beautiful time! I thought about doing those fruit bowl centerpeices for mine… but location/place etc meant they were more expensive than flowers. They sure are gorgeous!
Katie says
Wow. I love the simple wedding – mine was way too ridiculous.
Question – what is it that is on top of the lemonade bottle? Is that wax paper? I’m assuming to keep it fresh and bug-free…do tell.
thanks and keep the wedding week rollin.
Emily says
I love the lemon and lime centerpieces. My wedding is a week and a half away and your backyard affair is looking so appealing!
YoungHouseLove says
Hey peeps,
Glad you’re enjoying every last DIY detail! Stay tuned for tomorrow’s post for even more creative and cost-effective ideas.
Now to answer Tatyana’s question as to whether the napkins were paper or cloth: we actually went with paper after they worked so seamlessly with our citrus theme (and were so super affordable). We did initially worry that they might cheapen the tablescape (unlike formal cloth napkins) but the thing that tipped the scales in their favor was the realization that basic cloth napkins wouldn’t add the punchy, fun graphic detail and pattern that the citrus printed paper napkins could. So we went for it- and don’t feel an ounce of regret. It still looked stylish and chic and totally worked with our less formal approach to gettin’ hitched.
As for Katie’s query about the “cover” on the lemonade bottle, it was actually my handsome hubby’s last minute idea to safeguard the bottles against bugs (although all the candles kept the event virtually bug free). We just happened to have some Glad Press’n Seal Wrap laying around (that plastic wrap-ish stuff that’s super clingy and sticks to itself). It totally did the trick, and although we didn’t have the bug issues that we feared we might, it eased our fears and was subtle enough to blend right in with the rest of the decor.
Thanks again for all the wedding week enthusiasm. Stay tuned for more juicy details in T minus 17 hours…
xoxo,
Sherry
stacie says
wow! who took the amazing pictures…. you should give him a shout out!
not that i know him or anything, cause i dont….. but hes really good
and i dont know his wife either…. but i bet shes hot.
S
Katie says
Haha!! That’s hilarious! I’m sure by now your husband is a well known photographer. His pictures really were amazing!
Crazy Daisy says
I just stumbled across your blog and am in love! Your “about” section then just sealed the deal :-) I will be a forever reader. Now, I need to get back to reading about the rest of your wedding and house renovations!
Joni says
Soooooo sweet, I confess I just teared up a bit!
I got married last year and while some of the event was DIY-ed, you two certainly take the cake in that department. I’ll send some photos of our invites – I went crazy with my Gocco screen printing.
Anna See says
I hate to break it to my husband, but these gorgeous pics and great ideas make me want to get married again!
Rhoda says
You 2 have got to be the most creative couple I’ve ever seen. I’ve enjoyed seeing your wedding adventures & all the things you did on a budget. It looked spectacular & so perfect for an outdoor wedding. I love all the little touches you came up with. Congrats on your 1 year!
Emily says
Your decor is so fun and still sophisticated. It looks like a relaxed and wonderful day to remember, which is the key to any great wedding!
Thanks for sharing!
tixhoartoors says
Thanks for the post